


本文首发于微信公众号「后厂技术官」
前言
上一篇我们讲到了自定义View,接着我们来讲讲常用的自定义组合控件,自定义组合控件就是多个控件组合起来成为一个新的控件,主要用来解决多次重复的使用同一类型的布局。比如我们应用的顶部的标题栏,还有弹出的固定样式的dialog,这些都是常用的,所以把他们所需要的控件组合起来重新定义成一个新的控件。
1.组合控件的xml布局
我们现在就自定义一个顶部的标题栏,当然实现标题栏有很多的方法,我们来看看自定义组合控件如何去实现。首先我们先定义我们组合控件的布局(view_customtitle.xml):
android:id="@+id/layout_titlebar_rootlayout"
android:layout_width="fill_parent"
android:layout_height="45dp"
>
android:id="@+id/iv_titlebar_left"
android:layout_width="wrap_content"
android:layout_height="fill_parent"
android:layout_alignParentLeft="true"
android:layout_centerInParent="true"
android:paddingLeft="15dp"
android:paddingRight="15dp"
android:src="@drawable/ico_return"
/>
android:id="@+id/tv_titlebar_title"
android:layout_width="wrap_content"
android:layout_height="wrap_content"
android:layout_centerInParent="true"
android:maxEms="11"
android:singleLine="true"
android:ellipsize="end"
android:textStyle="bold"/>
android:id="@+id/iv_titlebar_right"
android:layout_width="wrap_content"
android:layout_height="fill_parent"
android:layout_alignParentRight="true"
android:layout_centerInParent="true"
android:src="@drawable/title_right"
android:gravity="center"
android:padding="15dp"
/>
很简单的布局,左右边各一个图标,中间是标题文字。
2.组合控件的Java代码
接下来我们写java代码,因为我们的组合控件整体布局是RelativeLayout,所以我们的组合控件要继承RelativeLayout:
public class TitleBar extends RelativeLayout{
private ImageView iv_titlebar_left;
private ImageView iv_titlebar_right;
private TextView tv_titlebar_title;
private RelativeLayout layout_titlebar_rootlayout;
private int mColor= Color.BLUE;
private int mTextColor= Color.WHITE;
public TitleBar(Context context){
super(context);
initView(context);
}
public TitleBar(Context context, AttributeSet attrs){
super(context, attrs);
initView(context);
}
public TitleBar(Context context, AttributeSet attrs, int defStyleAttr){
super(context, attrs, defStyleAttr);
initView(context);
}
public void initView(Context context){
LayoutInflater.from(context).inflate(R.layout.view_customtitle, this, true);
iv_titlebar_left= (ImageView) findViewById(R.id.iv_titlebar_left);
iv_titlebar_right= (ImageView) findViewById(R.id.iv_titlebar_right);
tv_titlebar_title= (TextView) findViewById(R.id.tv_titlebar_title);
layout_titlebar_rootlayout= (RelativeLayout) findViewById(R.id.layout_titlebar_rootlayout);
//设置背景颜色
layout_titlebar_rootlayout.setBackgroundColor(mColor);
//设置标题文字颜色
tv_titlebar_title.setTextColor(mTextColor);
}
public void setTitle(String titlename){
if(!TextUtils.isEmpty(titlename)) {
tv_titlebar_title.setText(titlename);
}
}
public void setLeftListener(OnClickListener onClickListener){
iv_titlebar_left.setOnClickListener(onClickListener);
}
public void setRightListener(OnClickListener onClickListener){
iv_titlebar_right.setOnClickListener(onClickListener);
}
}
重写了三个构造方法并在构造方法中加载布局文件,对外提供了三个方法,分别用来设置标题的名字,和左右按钮的点击事件。
3.自定义属性
在上一篇文章Android View体系(九)自定义View我们讲到的自定义属性,同样的我们在values目录下创建 attrs.xml:
我们定义了三个属性,分别用来设置顶部标题栏的背景颜色、标题文字颜色和标题文字。为了引入自定义属性我们需要在TitleBar的构造函数中解析自定义属性的值:
public TitleBar(Context context, AttributeSet attrs){
super(context, attrs);
TypedArray mTypedArray=context.obtainStyledAttributes(attrs,R.styleable.TitleBar);
mColor=mTypedArray.getColor(R.styleable.TitleBar_title_bg,Color.BLUE);
mTextColor=mTypedArray.getColor(R.styleable.TitleBar_title_text_color, Color.WHITE);
titlename=mTypedArray.getString(R.styleable.TitleBar_title_text);
//获取资源后要及时回收
mTypedArray.recycle();
initView(context);
}
贴上修改后TitleBar的完整的代码:
import android.content.Context;
import android.content.res.TypedArray;
import android.graphics.Color;
import android.text.TextUtils;
import android.util.AttributeSet;
import android.view.LayoutInflater;
import android.widget.ImageView;
import android.widget.RelativeLayout;
import android.widget.TextView;
public class TitleBar extends RelativeLayout{
private ImageView iv_titlebar_left;
private ImageView iv_titlebar_right;
private TextView tv_titlebar_title;
private RelativeLayout layout_titlebar_rootlayout;
private int mColor = Color.BLUE;
private int mTextColor = Color.WHITE;
private String titlename;
public TitleBar(Context context){
super(context);
initView(context);
}
public TitleBar(Context context, AttributeSet attrs){
super(context, attrs);
initTypedArray(context, attrs);
initView(context);
}
public TitleBar(Context context, AttributeSet attrs, int defStyleAttr){
super(context, attrs, defStyleAttr);
initTypedArray(context, attrs);
initView(context);
}
private void initTypedArray(Context context, AttributeSet attrs){
TypedArray mTypedArray = context.obtainStyledAttributes(attrs, R.styleable.TitleBar);
mColor = mTypedArray.getColor(R.styleable.TitleBar_title_bg, Color.BLUE);
mTextColor = mTypedArray.getColor(R.styleable.TitleBar_title_text_color, Color.WHITE);
titlename = mTypedArray.getString(R.styleable.TitleBar_title_text);
//获取资源后要及时回收
mTypedArray.recycle();
}
private void initView(Context context){
LayoutInflater.from(context).inflate(R.layout.view_customtitle, this, true);
iv_titlebar_left = (ImageView) findViewById(R.id.iv_titlebar_left);
iv_titlebar_right = (ImageView) findViewById(R.id.iv_titlebar_right);
tv_titlebar_title = (TextView) findViewById(R.id.tv_titlebar_title);
layout_titlebar_rootlayout = (RelativeLayout) findViewById(R.id.layout_titlebar_rootlayout);
//设置背景颜色
layout_titlebar_rootlayout.setBackgroundColor(mColor);
//设置标题文字颜色
tv_titlebar_title.setTextColor(mTextColor);
setTitle(titlename);
}
public void setTitle(String titlename){
if (!TextUtils.isEmpty(titlename)) {
tv_titlebar_title.setText(titlename);
}
}
public void setLeftListener(OnClickListener onClickListener){
iv_titlebar_left.setOnClickListener(onClickListener);
}
public void setRightListener(OnClickListener onClickListener){
iv_titlebar_right.setOnClickListener(onClickListener);
}
}
4.xml中引用组合控件
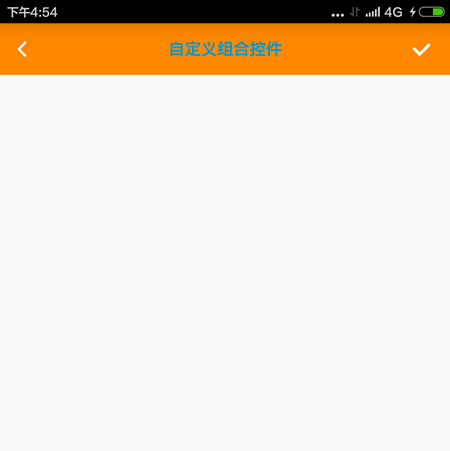
接下来在我们引用组合控件的布局,使用自定义属性需要添加schemas: xmlns:app=”http://schemas.android.com/apk/res-auto”,其中app是 我们自定义的名字,当然我们也可以取其他的名字:
android:layout_width="match_parent"
android:layout_height="match_parent"
android:orientation="vertical">
xmlns:app="http://schemas.android.com/apk/res-auto"
android:id="@+id/title"
android:layout_width="match_parent"
android:layout_height="45dp"
app:title_text="自定义组合控件"
app:title_bg="@android:color/holo_orange_dark"
app:title_text_color="@android:color/holo_blue_dark">
4.调用组合控件
在主界面调用我们自定义的TitleBar,并设置了左右两遍按钮的点击事件:
import android.app.Activity;
import android.os.Bundle;
import android.view.View;
import android.widget.Toast;
public class MainActivity extends Activity{
private TitleBar mTitleBar;
@Override
protected void onCreate(Bundle savedInstanceState){
super.onCreate(savedInstanceState);
setContentView(R.layout.activity_main);
mTitleBar= (TitleBar) this.findViewById(R.id.title);
// mTitleBar.setTitle("自定义组合控件");
mTitleBar.setLeftListener(new View.OnClickListener() {
@Override
public void onClick(View v){
Toast.makeText(MainActivity.this, "点击左键", Toast.LENGTH_SHORT).show();
}
});
mTitleBar.setRightListener(new View.OnClickListener() {
@Override
public void onClick(View v){
Toast.makeText(MainActivity.this, "点击右键", Toast.LENGTH_SHORT).show();
}
});
}
}
运行程序查看效果:


 2万+
2万+


 被折叠的 条评论
为什么被折叠?
被折叠的 条评论
为什么被折叠?
 到【灌水乐园】发言


