


龙芯开发板移植开源GUI(周立功的AWTK )
admin • 2020 年 02 月 19 日
1.获取源码
以下三者并列放在同一个目录。
git clone https://github.com/zlgopen/awtk.git
git clone https://github.com/zlgopen/awtk-examples.git
git clone https://github.com/zlgopen/awtk-linux-fb.git
cd awtk-linux-fb
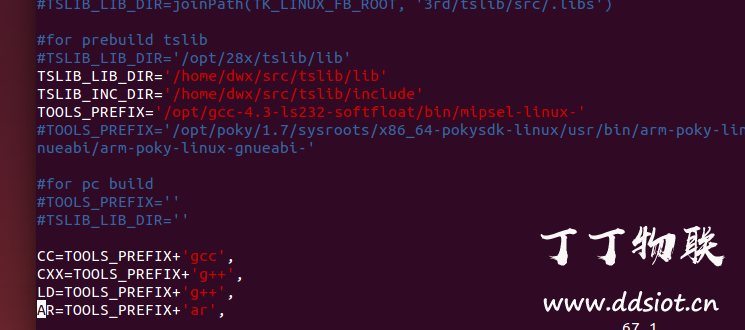
2.编辑 awtk_config.py 设置工具链的路径
TSLIB_LIB_DIR='/opt/28x/tslib/lib'
TSLIB_INC_DIR='/opt/28x/tslib/include'
TOOLS_PREFIX='/opt/28x/gcc-4.4.4-glibc-2.11.1-multilib-1.0/arm-fsl-linux-gnueabi/bin/arm-linux-'
这里需要修改tslib文件的路径,我的tslib是用buildroot工具生成的,所以,在buildroot的以下路径output/build/tslib-1.1, 重新生成一下tslib的安装库文件,我生成的tslib是在 /home/dwx/src/tslib这个路径下面,修改为以下内容:
TSLIB_LIB_DIR='/home/dwx/src/tslib/lib'
TSLIB_INC_DIR='/home/dwx/src/tslib/include'
TOOLS_PREFIX='/opt/gcc-4.3-ls232-softfloat/bin/mipsel-linux-'
3.编辑 awtk-port/main_loop_linux.c 修改输入设备的文件名
#define FB_DEVICE_FILENAME "/dev/fb0"
#define TS_DEVICE_FILENAME "/dev/input/event0"
#define KB_DEVICE_FILENAME "/dev/input/event1"
说明:在龙芯开发板里面,ts文件和kb文件句柄是反的,需要改过来,改为以下内容:
#define FB_DEVICE_FILENAME "/dev/fb0"
#define TS_DEVICE_FILENAME "/dev/input/event1"
#define KB_DEVICE_FILENAME "/dev/input/event0"
4.编译(请先安装scons)
生成内置 demoui 例子,生成结果在 build/bin 文件夹下的 demoui 文件
scons
也可以指定生成其他 Demo,生成结果在 build/bin 文件夹下的 demo 文件
scons APP=../awtk-examples/HelloWorld-Demo
5.生成发布包
对于内置的 demoui 例子
sudo sh ./release.sh
对于其他 Demo,需要加入资源文件夹参数,指向应用程序 assets 的父目录
sh ./release.sh ../awtk-examples/HelloWorld-Demo/res demo
sh ./release.sh ../awtk-examples/Chart-Demo/res_800_480 demo
6.运行
把 release.tar.gz 上传到开发板,并解压,然后运行:
./release/bin/demoui
./release/bin/demo


 300
300


 被折叠的 条评论
为什么被折叠?
被折叠的 条评论
为什么被折叠?
 到【灌水乐园】发言


