


首先要安装KVM虚拟化环境,参考下面的一篇博客进行安装:
一、部署webvirtmgr
参考官网:https://github.com/retspen/webvirtmgr/wiki/Install-WebVirtMgr
1、安装依赖包
# yum install git python-pip libvirt-python libxml2-python python-websockify supervisor nginx -y
已安装:
  nginx.x86_64 1:1.12.2-3.el7  python-websockify.noarch 0:0.6.0-2.el7  python2-pip.noarch 0:8.1.2-8.el7  supervisor.noarch 0:3.1.4-1.el7

作为依赖被安装:
  nginx-all-modules.noarch 1:1.12.2-3.el7                         nginx-filesystem.noarch 1:1.12.2-3.el7
  nginx-mod-http-geoip.x86_64 1:1.12.2-3.el7                      nginx-mod-http-image-filter.x86_64 1:1.12.2-3.el7
  nginx-mod-http-perl.x86_64 1:1.12.2-3.el7                       nginx-mod-http-xslt-filter.x86_64 1:1.12.2-3.el7
  nginx-mod-mail.x86_64 1:1.12.2-3.el7                            nginx-mod-stream.x86_64 1:1.12.2-3.el7
  python-meld3.x86_64 0:0.6.10-1.el7

更新完毕:
  git.x86_64 0:1.8.3.1-20.el7

作为依赖被升级:
  perl-Git.noarch 0:1.8.3.1-20.el7

完毕!
2、从git-hub中下载相关的webvirtmgr代码
# cd /usr/local/src/
# git clone git://github.com/retspen/webvirtmgr.git
[root@localhost ~]# cd /usr/local/src/
[root@localhost src]#
[root@localhost src]# ls
[root@localhost src]#
[root@localhost src]# git clone git://github.com/retspen/webvirtmgr.git
Cloning into 'webvirtmgr'...
remote: Enumerating objects: 5614, done.
remote: Total 5614 (delta 0), reused 0 (delta 0), pack-reused 5614
Receiving objects: 100% (5614/5614), 2.98 MiB | 37.00 KiB/s, done.
Resolving deltas: 100% (3602/3602), done.
[root@localhost src]#
[root@localhost src]# ls
webvirtmgr
[root@localhost src]#
3、安装webvirtmgr
# cd webvirtmgr/
# pip install -r requirements.txt
[root@localhost src]# cd webvirtmgr/
[root@localhost webvirtmgr]#
[root@localhost webvirtmgr]# ls
conf     deploy                images      locale       networks          secrets    setup.py   Vagrantfile
console  dev-requirements.txt  instance    manage.py    README.rst        serverlog  storages   vrtManager
create   hostdetail            interfaces  MANIFEST.in  requirements.txt  servers    templates  webvirtmgr
[root@localhost webvirtmgr]#
[root@localhost webvirtmgr]# pip install -r requirements.txt
Collecting django==1.5.5 (from -r requirements.txt (line 1))
  Downloading https://files.pythonhosted.org/packages/38/49/93511c5d3367b6b21fc2995a0e53399721afc15e4cd6eb57be879ae13ad4/Django-1.5.5.tar.gz (8.1MB)
    100% |████████████████████████████████| 8.1MB 19kB/s
Collecting gunicorn==19.5.0 (from -r requirements.txt (line 2))
  Downloading https://files.pythonhosted.org/packages/f9/4e/f4076a1a57fc1e75edc0828db365cfa9005f9f6b4a51b489ae39a91eb4be/gunicorn-19.5.0-py2.py3-none-any.whl (113kB)
    100% |████████████████████████████████| 122kB 38kB/s
Collecting lockfile>=0.9 (from -r requirements.txt (line 5))
  Downloading https://files.pythonhosted.org/packages/c8/22/9460e311f340cb62d26a38c419b1381b8593b0bb6b5d1f056938b086d362/lockfile-0.12.2-py2.py3-none-any.whl
Installing collected packages: django, gunicorn, lockfile
  Running setup.py install for django ... done
Successfully installed django-1.5.5 gunicorn-19.5.0 lockfile-0.12.2
You are using pip version 8.1.2, however version 19.1.1 is available.
You should consider upgrading via the 'pip install --upgrade pip' command.
[root@localhost webvirtmgr]#
注意:如果上面的命令执行中报错了,超时之类的,请更换有效的DNS比如阿里的DNS1:233.5.5.5或233.6.6.6
4、检查sqlite3(备注:自带不需要安装,导入模块检查一下)
[root@localhost webvirtmgr]# python
Python 2.7.5 (default, Nov 20 2015, 02:00:19)
[GCC 4.8.5 20150623 (Red Hat 4.8.5-4)] on linux2
Type "help", "copyright", "credits" or "license" for more information.
>>>
>>> import sqlite3
>>>
>>> exit()
[root@localhost webvirtmgr]#
5、初始化账号
# ./manage.py syncdb
[root@localhost webvirtmgr]# ./manage.py syncdb
WARNING:root:No local_settings file found.
Creating tables ...
Creating table auth_permission
Creating table auth_group_permissions
Creating table auth_group
Creating table auth_user_groups
Creating table auth_user_user_permissions
Creating table auth_user
Creating table django_content_type
Creating table django_session
Creating table django_site
Creating table servers_compute
Creating table instance_instance
Creating table create_flavor

You just installed Django's auth system, which means you don't have any superusers defined.
Would you like to create one now? (yes/no): yes
Username (leave blank to use 'root'): admin
Email address: 1512005532@qq.com
Password:
Password (again):
Superuser created successfully.
Installing custom SQL ...
Installing indexes ...
Installed 6 object(s) from 1 fixture(s)
[root@localhost webvirtmgr]#
6、拷贝web到相关目录
# mkdir -pv /var/www
# cp -r /usr/local/src/webvirtmgr /var/www/webvirtmgr
[root@localhost webvirtmgr]# mkdir -pv /var/www
mkdir: created directory ‘/var/www’
[root@localhost webvirtmgr]#
[root@localhost webvirtmgr]# cp -r /usr/local/src/webvirtmgr /var/www/webvirtmgr
[root@localhost webvirtmgr]#
7、编辑nginx配置文件
# cd /etc/nginx/
[root@localhost webvirtmgr]# cd /etc/nginx/
[root@localhost nginx]#
[root@localhost nginx]# ls
conf.d                  koi-utf             scgi_params
default.d               koi-win             scgi_params.default
fastcgi.conf            mime.types          uwsgi_params
fastcgi.conf.default    mime.types.default  uwsgi_params.default
fastcgi_params          nginx.conf          win-utf
fastcgi_params.default  nginx.conf.default
[root@localhost nginx]# ls /tmp/
ks-script-OhK0w4  yum.log
[root@localhost nginx]# mv nginx.conf /tmp
[root@localhost nginx]#
[root@localhost nginx]# cp nginx.conf.default nginx.conf
[root@localhost nginx]#
# vi nginx.conf
添加这行代码: include /etc/nginx/conf.d/*.conf;
[root@localhost nginx]# cat nginx.conf

#user  nobody;
worker_processes  1;

#error_log  logs/error.log;
#error_log  logs/error.log  notice;
#error_log  logs/error.log  info;

#pid        logs/nginx.pid;


events {
    worker_connections  1024;
}


http {
    include       mime.types;
    default_type  application/octet-stream;
    include /etc/nginx/conf.d/*.conf;

    #log_format  main  '$remote_addr - $remote_user [$time_local] "$request" '
    #                  '$status $body_bytes_sent "$http_referer" '
    #                  '"$http_user_agent" "$http_x_forwarded_for"';

    #access_log  logs/access.log  main;

    sendfile        on;
    #tcp_nopush     on;

    #keepalive_timeout  0;
    keepalive_timeout  65;

    #gzip  on;

    server {
        listen       80;
        server_name  localhost;

        #charset koi8-r;

        #access_log  logs/host.access.log  main;

        location / {
            root   html;
            index  index.html index.htm;
        }

        #error_page  404              /404.html;

        # redirect server error pages to the static page /50x.html
        #
        error_page   500 502 503 504  /50x.html;
        location = /50x.html {
            root   html;
        }

        # proxy the PHP scripts to Apache listening on 127.0.0.1:80
        #
        #location ~ \.php$ {
        #    proxy_pass   http://127.0.0.1;
        #}

        # pass the PHP scripts to FastCGI server listening on 127.0.0.1:9000
        #
        #location ~ \.php$ {
        #    root           html;
        #    fastcgi_pass   127.0.0.1:9000;
        #    fastcgi_index  index.php;
        #    fastcgi_param  SCRIPT_FILENAME  /scripts$fastcgi_script_name;
        #    include        fastcgi_params;
        #}

        # deny access to .htaccess files, if Apache's document root
        # concurs with nginx's one
        #
        #location ~ /\.ht {
        #    deny  all;
        #}
    }


    # another virtual host using mix of IP-, name-, and port-based configuration
    #
    #server {
    #    listen       8000;
    #    listen       somename:8080;
    #    server_name  somename  alias  another.alias;

    #    location / {
    #        root   html;
    #        index  index.html index.htm;
    #    }
    #}


    # HTTPS server
    #
    #server {
    #    listen       443 ssl;
    #    server_name  localhost;

    #    ssl_certificate      cert.pem;
    #    ssl_certificate_key  cert.key;

    #    ssl_session_cache    shared:SSL:1m;
    #    ssl_session_timeout  5m;

    #    ssl_ciphers  HIGH:!aNULL:!MD5;
    #    ssl_prefer_server_ciphers  on;

    #    location / {
    #        root   html;
    #        index  index.html index.htm;
    #    }
    #}

}
8、添加 /etc/nginx/conf.d/webvirtmgr.conf 配置文件
# vi /etc/nginx/conf.d/webvirtmgr.conf
server {
listen 80 default_server;

server_name $hostname;
#access_log /var/log/nginx/webvirtmgr_access_log;

location /static/ {
root /var/www/webvirtmgr/webvirtmgr; # or /srv instead of /var
expires max;
}

location / {
proxy_pass http://127.0.0.1:8000;
proxy_set_header X-Real-IP $remote_addr;
proxy_set_header X-Forwarded-for $proxy_add_x_forwarded_for;
proxy_set_header Host $host:$server_port;
proxy_set_header X-Forwarded-Proto $remote_addr;
proxy_connect_timeout 600;
proxy_read_timeout 600;
proxy_send_timeout 600;
client_max_body_size 1024M; # Set higher depending on your needs
}
}
9、授权
# chown -R nginx:nginx /var/www/webvirtmgr
10、启动nginx服务
# systemctl start nginx
# netstat -tunlp | grep 80
[root@localhost ~]# netstat -tunlp | grep 80
tcp        0      0 0.0.0.0:80              0.0.0.0:*               LISTEN      5088/nginx: master
tcp        0      0 127.0.0.1:8000          0.0.0.0:*               LISTEN      5165/python2
tcp        0      0 0.0.0.0:6080            0.0.0.0:*               LISTEN      5163/python2
11、设置 supervisor (如果iptables防火墙开启的话,就必须要开通80、8000、6080端口访问)
# vi /etc/supervisord.conf
在文件末尾添加,注意将默认的python改为python2,因为上面只有用这个版本执行才不报错!
[program:webvirtmgr]
command=/usr/bin/python2 /var/www/webvirtmgr/manage.py run_gunicorn -c /var/www/webvirtmgr/conf/gunicorn.conf.py                     //启动8000端口
directory=/var/www/webvirtmgr
autostart=true
autorestart=true
logfile=/var/log/supervisor/webvirtmgr.log
log_stderr=true
user=nginx

[program:webvirtmgr-console]
command=/usr/bin/python2 /var/www/webvirtmgr/console/webvirtmgr-console                               //启动6080端口(这是控制台vnc端口)
directory=/var/www/webvirtmgr
autostart=true
autorestart=true
stdout_logfile=/var/log/supervisor/webvirtmgr-console.log
redirect_stderr=true
user=nginx
检查
# vi /var/www/webvirtmgr/conf/gunicorn.conf.py
确保下面bind绑定的是本机的8000端口,这个在nginx配置中定义了,被代理的端口
bind = '127.0.0.1:8000'
12、设置开机自启动
# systemctl enable supervisord.service
# systemctl enable nginx
[root@localhost ~]# systemctl enable supervisord.service
Created symlink from /etc/systemd/system/multi-user.target.wants/supervisord.service to /usr/lib/systemd/system/supervisord.service.
[root@localhost ~]#
[root@localhost ~]# systemctl enable nginx
Created symlink from /etc/systemd/system/multi-user.target.wants/nginx.service to /usr/lib/systemd/system/nginx.service.
[root@localhost ~]#
启动服务
# systemctl start supervisord
[root@localhost ~]# systemctl start supervisord
[root@localhost ~]# systemctl status supervisord
● supervisord.service - Process Monitoring and Control Daemon
   Loaded: loaded (/usr/lib/systemd/system/supervisord.service; enabled; vendor preset: disabled)
   Active: active (running) since 一 2019-06-17 13:38:19 CST; 2s ago
  Process: 10893 ExecStart=/usr/bin/supervisord -c /etc/supervisord.conf (code=exited, status=0/SUCCESS)
 Main PID: 10896 (supervisord)
    Tasks: 13
   CGroup: /system.slice/supervisord.service
           ├─10896 /usr/bin/python /usr/bin/supervisord -c /etc/supervisord.conf
           ├─10898 /usr/bin/python2 /var/www/webvirtmgr/console/webvirtmgr-console
           ├─10899 /usr/bin/python2 /var/www/webvirtmgr/manage.py run_gunicorn -c /var/www/webvirtmgr/conf/gunicorn.conf.py
           ├─10905 /usr/bin/python2 /var/www/webvirtmgr/manage.py run_gunicorn -c /var/www/webvirtmgr/conf/gunicorn.conf.py
           ├─10906 /usr/bin/python2 /var/www/webvirtmgr/manage.py run_gunicorn -c /var/www/webvirtmgr/conf/gunicorn.conf.py
           ├─10907 /usr/bin/python2 /var/www/webvirtmgr/manage.py run_gunicorn -c /var/www/webvirtmgr/conf/gunicorn.conf.py
           ├─10908 /usr/bin/python2 /var/www/webvirtmgr/manage.py run_gunicorn -c /var/www/webvirtmgr/conf/gunicorn.conf.py
           ├─10909 /usr/bin/python2 /var/www/webvirtmgr/manage.py run_gunicorn -c /var/www/webvirtmgr/conf/gunicorn.conf.py
           ├─10910 /usr/bin/python2 /var/www/webvirtmgr/manage.py run_gunicorn -c /var/www/webvirtmgr/conf/gunicorn.conf.py
           ├─10911 /usr/bin/python2 /var/www/webvirtmgr/manage.py run_gunicorn -c /var/www/webvirtmgr/conf/gunicorn.conf.py
           ├─10912 /usr/bin/python2 /var/www/webvirtmgr/manage.py run_gunicorn -c /var/www/webvirtmgr/conf/gunicorn.conf.py
           └─10913 /usr/bin/python2 /var/www/webvirtmgr/manage.py run_gunicorn -c /var/www/webvirtmgr/conf/gunicorn.conf.py

6月 17 13:38:19 localhost.localdomain systemd[1]: Starting Process Monitoring and Control Daemon...
6月 17 13:38:19 localhost.localdomain systemd[1]: Started Process Monitoring and Control Daemon.
查看端口
6080和8000已经启动
[root@localhost ~]# netstat -tunlp | grep 6080
tcp        0      0 0.0.0.0:6080            0.0.0.0:*               LISTEN      12033/python2
[root@localhost ~]#
[root@localhost ~]# netstat -tunlp | grep 8000
tcp        0      0 127.0.0.1:8000          0.0.0.0:*               LISTEN      12034/python2
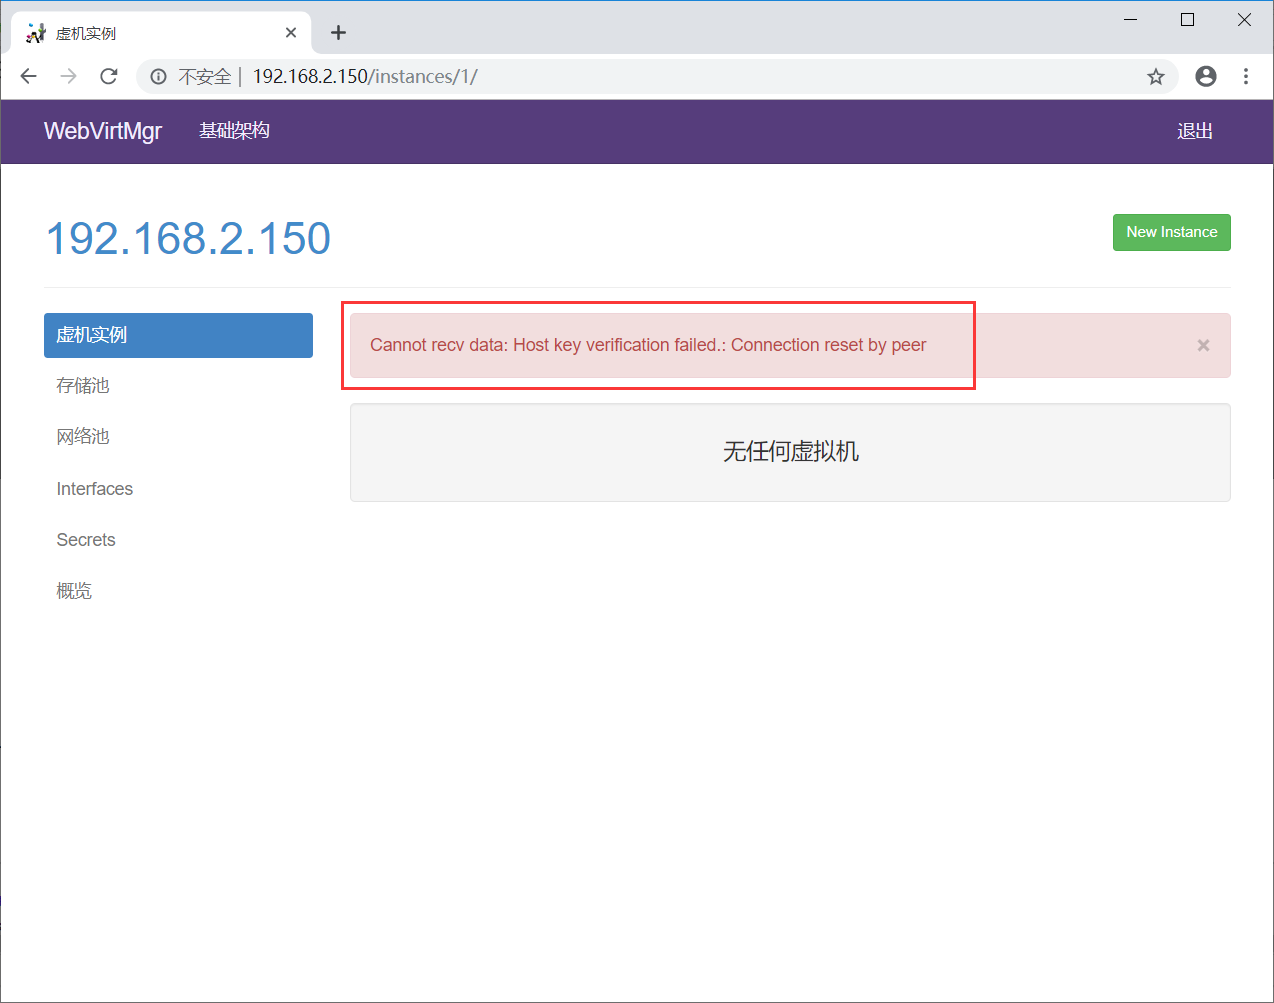
13、浏览器访问:http://192.168.2.150/servers/

配置连接
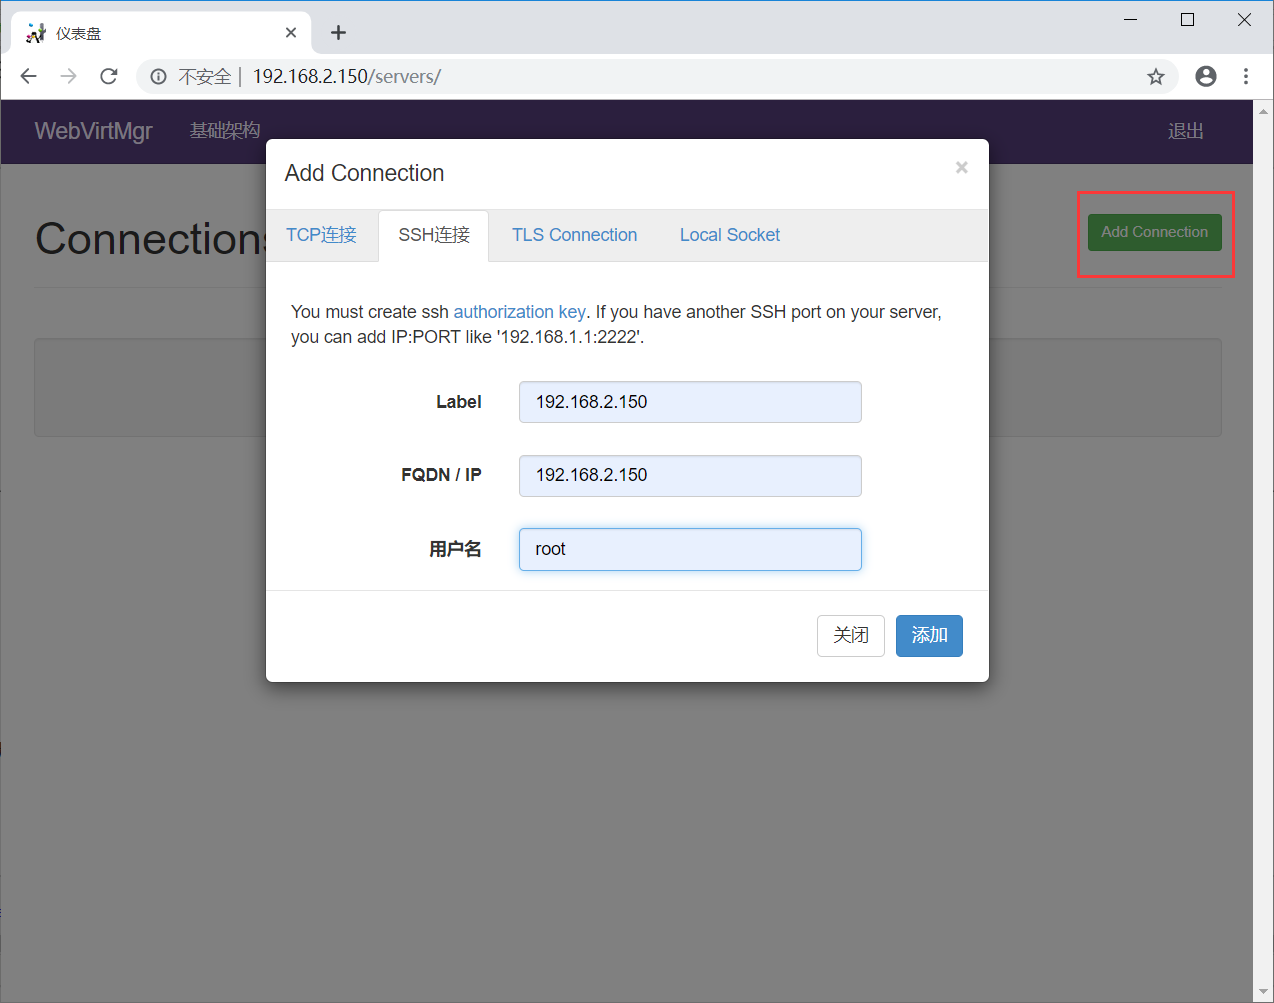
报错:无法接收数据:主机密钥验证失败。:连接被对等方重置
14、设置ssh
在webvirtmgr服务器(服务端)上(这里kvm和WebVirtMgr部署在同一台机器上)创建nginx用户家目录(默认nginx服务安装时是没有nginx家目录的),生成nginx的公私钥
# cd /home/
# mkdir nginx
# chown nginx.nginx nginx/
# chmod 700 -R nginx/
# su - nginx -s /bin/bash
$ ssh-keygen
一路回车
[root@localhost ~]# cd /home/
[root@localhost home]# mkdir nginx
[root@localhost home]# chown nginx.nginx nginx/
[root@localhost home]# chmod 700 -R nginx/
[root@localhost home]# su - nginx -s /bin/bash
-bash-4.2$ ssh-keygen
Generating public/private rsa key pair.
Enter file in which to save the key (/var/lib/nginx/.ssh/id_rsa):
Enter passphrase (empty for no passphrase):
Enter same passphrase again:
Your identification has been saved in /var/lib/nginx/.ssh/id_rsa.
Your public key has been saved in /var/lib/nginx/.ssh/id_rsa.pub.
The key fingerprint is:
de:3d:01:69:15:7f:c3:cc:92:3f:6d:40:10:9d:36:42 nginx@localhost.localdomain
The key's randomart image is:
+--[ RSA 2048]----+
|           .E=.. |
|           o.oX  |
|          +  =o*.|
|         . .  ooo|
|        S   .  oo|
|       . . . . ..|
|        . . o    |
|             .   |
|                 |
+-----------------+
-bash-4.2$
根据DSA算法生成私钥和公钥【默认建立在当前用户的家目录】
id_dsa -->私钥(钥匙)
id_dsa.pub -->公钥(锁)
$ touch ~/.ssh/config && echo -e "StrictHostKeyChecking=no\nUserKnownHostsFile=/dev/null" >> ~/.ssh/config
$ chmod 0600 ~/.ssh/config
-bash-4.2$ touch ~/.ssh/config && echo -e "StrictHostKeyChecking=no\nUserKnownHostsFile=/dev/null" >> ~/.ssh/config
-bash-4.2$ chmod 0600 ~/.ssh/config
在webvirtmgr服务器(服务端)上(这里kvm和WebVirtMgr部署在同一台机器上),将nginx用户的ssh-key上传到kvm服务器上(这里kvm和WebVirtMgr部署在同一台机器上)
$ ssh-copy-id root@192.168.2.150
-bash-4.2$ ssh-copy-id root@192.168.2.150
/bin/ssh-copy-id: INFO: attempting to log in with the new key(s), to filter out any that are already installed
/bin/ssh-copy-id: INFO: 1 key(s) remain to be installed -- if you are prompted now it is to install the new keys
Warning: Permanently added '192.168.2.150' (ECDSA) to the list of known hosts.
root@192.168.2.150's password:

Number of key(s) added: 1

Now try logging into the machine, with:   "ssh 'root@192.168.2.150'"
and check to make sure that only the key(s) you wanted were added.

-bash-4.2$
在kvm(客服端)服务器上(这里kvm和WebVirtMgr部署在同一台机器上)配置 libvirt ssh授权
# vi /etc/polkit-1/localauthority/50-local.d/50-libvirt-remote-access.pkla
新文件写入一下内容
Identity=unix-user:root         #注意这里采用的是root用户
Action=org.libvirt.unix.manage
ResultAny=yes
ResultInactive=yes
ResultActive=yes
授权
# chown -R root.root /etc/polkit-1/localauthority/50-local.d/50-libvirt-remote-access.pkla
15、重启 libvirtd 服务
# systemctl restart libvirtd
# systemctl status libvirtd
[root@localhost ~]# systemctl status libvirtd
● libvirtd.service - Virtualization daemon
   Loaded: loaded (/usr/lib/systemd/system/libvirtd.service; enabled; vendor preset: enabled)
   Active: active (running) since 一 2019-06-17 14:11:26 CST; 24min ago
     Docs: man:libvirtd(8)
           https://libvirt.org
 Main PID: 8023 (libvirtd)
    Tasks: 19 (limit: 32768)
   CGroup: /system.slice/libvirtd.service
           ├─5281 /usr/sbin/dnsmasq --conf-file=/var/lib/libvirt/dnsmasq/default.conf --leasefile-ro --dhcp-script=/usr/libexec/libvir...
           ├─5282 /usr/sbin/dnsmasq --conf-file=/var/lib/libvirt/dnsmasq/default.conf --leasefile-ro --dhcp-script=/usr/libexec/libvir...
           └─8023 /usr/sbin/libvirtd

6月 17 14:11:26 localhost.localdomain systemd[1]: Starting Virtualization daemon...
6月 17 14:11:26 localhost.localdomain systemd[1]: Started Virtualization daemon.
6月 17 14:11:27 localhost.localdomain dnsmasq[5281]: read /etc/hosts - 2 addresses
6月 17 14:11:27 localhost.localdomain dnsmasq[5281]: read /var/lib/libvirt/dnsmasq/default.addnhosts - 0 addresses
6月 17 14:11:27 localhost.localdomain dnsmasq-dhcp[5281]: read /var/lib/libvirt/dnsmasq/default.hostsfile
这样上面报错的问题就迎仍而解了!
然后重新ssh方式连接就ok了,就不会有上面那个报错了~

上面介绍的是WebVirtMgr和KVM部署在一台机器上,下面再记录下添加其他KVM宿主机(比如192.168.2.151)的方法
手动创建下面文件并配置SSH连接(如果采用tcp方式连接,其实这一步就不用配置了)
# vi /etc/polkit-1/localauthority/50-local.d/50-libvirt-remote-access.pkla
[root@kvm02 ~]# cat /etc/polkit-1/localauthority/50-local.d/50-libvirt-remote-access.pkla
[Remote libvirt SSH access]
Identity=unix-user:root
Action=org.libvirt.unix.manage
ResultAny=yes
ResultInactive=yes
ResultActive=yes
授权
# chown -R root.root /etc/polkit-1/localauthority/50-local.d/50-libvirt-remote-access.pkla
[root@kvm02 ~]# chown -R root.root /etc/polkit-1/localauthority/50-local.d/50-libvirt-remote-access.pkla
在WebVirtMgr部署机(上面的192.168.2.150)上执行:
# ssh-copy-id 192.168.2.151
# ssh 192.168.2.151 -L localhost:8000:localhost:8000 -L localhost:6080:localhost:60
[root@localhost ~]# ssh-copy-id 192.168.2.151
The authenticity of host '192.168.2.151 (192.168.2.151)' can't be established.
ECDSA key fingerprint is 27:21:e9:3a:3b:21:d4:be:22:4d:f2:72:62:db:08:39.
Are you sure you want to continue connecting (yes/no)? yes
/usr/bin/ssh-copy-id: INFO: attempting to log in with the new key(s), to filter out any that are already installed
/usr/bin/ssh-copy-id: INFO: 1 key(s) remain to be installed -- if you are prompted now it is to install the new keys
root@192.168.2.151's password:

Number of key(s) added: 1

Now try logging into the machine, with:   "ssh '192.168.2.151'"
and check to make sure that only the key(s) you wanted were added.

[root@localhost ~]# ssh 192.168.2.151 -L localhost:8000:localhost:8000 -L localhost:6080:localhost:60
bind: Address already in use
bind: Address already in use
Last login: Sun Jun 16 12:30:11 2019 from 192.168.2.17
[root@localhost ~]#
测试nginx用户ssh连接
# su - nginx -s /bin/bash
$ ssh root@192.168.2.151
[root@localhost ~]# su - nginx -s /bin/bash
上一次登录:一 6月 17 13:56:37 CST 2019pts/0 上
-bash-4.2$ ssh root@192.168.2.151
Warning: Permanently added '192.168.2.151' (ECDSA) to the list of known hosts.
root@192.168.2.151's password:
Last login: Sun Jun 16 13:40:45 2019 from 192.168.2.150
[root@kvm02 ~]# exit
登出
Connection to 192.168.2.151 closed.
-bash-4.2$
参考文献:
https://www.centos.bz/2018/07/centos7-2-kvm虚拟化管理平台webvirtmgr部署/
散尽浮华
https://www.cnblogs.com/kevingrace/p/5737724.html
centos7.2 kvm虚拟化管理平台WebVirtMgr部署
https://www.cnblogs.com/nulige/p/9236191.html
网络桥接
https://www.cnblogs.com/liutao97/p/6882599.html


 1万+
1万+


 被折叠的 条评论
为什么被折叠?
被折叠的 条评论
为什么被折叠?
 到【灌水乐园】发言


