


近日学习Easyui,发现非常好用,界面很美观。将学习的心得在此写下,这篇博客写SSh结合Easyui实现Datagrid的分页显示,其他的例如添加、修改、删除、批量删除等功能将在后面的博客一一写来。
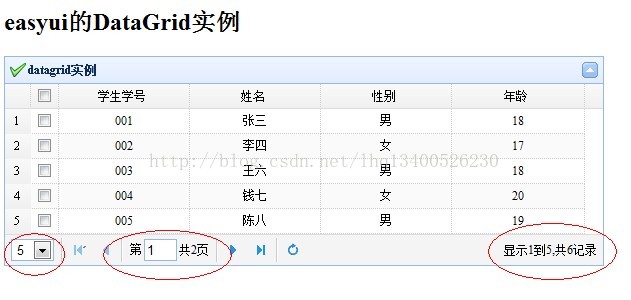
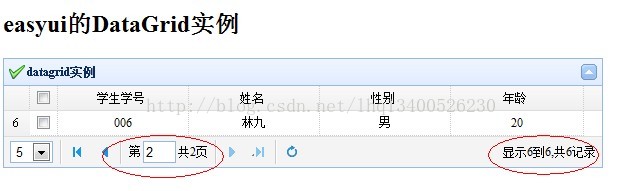
首先看一下要实现的效果:当每页显示5行数据:
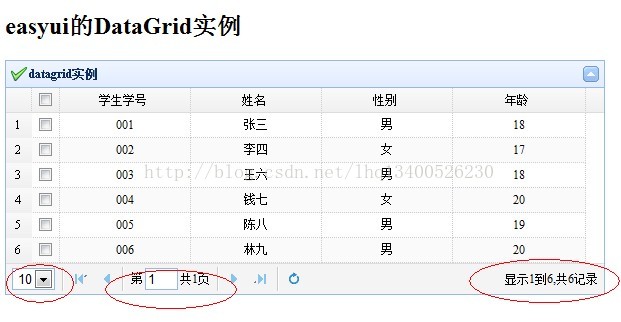
当每页显示10行数据,效果如下:
具体步骤:
1、下载Easyui,并搭建环境。可参照博客http://blog.csdn.net/lhq13400526230/article/details/9148299
2、搭建SSH工程,整个工程的目录结构如图所示:

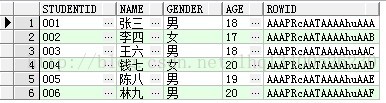
3、在Oracle数据库中创建表Student。并且输入下面6行数据,因为添加操作还没有实现,所以先在数据库表中添加数据。默认设定的值是每行5个数据,所以请至少输入6行数据,便于分页的测试。
4、web.xml的配置
<?xml version="1.0" encoding="UTF-8"?>
<web-app version="2.5" xmlns="http://java.sun.com/xml/ns/javaee"
    xmlns:xsi="http://www.w3.org/2001/XMLSchema-instance"
    xsi:schemaLocation="http://java.sun.com/xml/ns/javaee
    http://java.sun.com/xml/ns/javaee/web-app_2_5.xsd">

    <!-- Sttuts2过滤器 -->
    <filter>
        <filter-name>struts2</filter-name>
        <filter-class>org.apache.struts2.dispatcher.ng.filter.StrutsPrepareAndExecuteFilter</filter-class>
    </filter>
    <filter-mapping>
        <filter-name>struts2</filter-name>
        <url-pattern>/*</url-pattern>
    </filter-mapping>

    <!-- 监听器Spring -->
    <listener>
        <listener-class>org.springframework.web.context.ContextLoaderListener</listener-class>
    </listener>

    <!-- 定位applicationContext.xml的物理位置 -->
    <context-param>
        <param-name>contextConfigLocation</param-name>
        <param-value>classpath:applicationContext.xml</param-value>
    </context-param>

</web-app>
5、applicationContext.xml的配置
<?xml version="1.0" encoding="UTF-8"?>
<beans xmlns="http://www.springframework.org/schema/beans"
    xmlns:xsi="http://www.w3.org/2001/XMLSchema-instance" xmlns:context="http://www.springframework.org/schema/context"
    xmlns:aop="http://www.springframework.org/schema/aop" xmlns:tx="http://www.springframework.org/schema/tx"
    xsi:schemaLocation="http://www.springframework.org/schema/beans
           http://www.springframework.org/schema/beans/spring-beans-2.5.xsd
           http://www.springframework.org/schema/context
           http://www.springframework.org/schema/context/spring-context-2.5.xsd
           http://www.springframework.org/schema/aop http://www.springframework.org/schema/aop/spring-aop-2.5.xsd
           http://www.springframework.org/schema/tx http://www.springframework.org/schema/tx/spring-tx-2.5.xsd">


<import resource="applicationContext_bean.xml"/>
<import resource="applicationContext_db.xml"/>
</beans>
6、在com.model中创建模型类Student.java
package com.model;

public class Student {
    String studentid;// 主键
    String name;// 姓名
    String gender;// 性别
    String age;// 年龄

    public String getStudentid() {
        return studentid;
    }

    public void setStudentid(String studentid) {
        this.studentid = studentid;
    }

    public String getName() {
        return name;
    }

    public void setName(String name) {
        this.name = name;
    }

    public String getGender() {
        return gender;
    }

    public void setGender(String gender) {
        this.gender = gender;
    }

    public String getAge() {
        return age;
    }

    public void setAge(String age) {
        this.age = age;
    }

}
7、根据Student.java生成对应的映射文件Student.hbm.xml
<?xml version="1.0"?>
<!DOCTYPE hibernate-mapping PUBLIC "-//Hibernate/Hibernate Mapping DTD 3.0//EN"
"http://hibernate.sourceforge.net/hibernate-mapping-3.0.dtd">
<!-- Generated 2013-6-23 23:31:47 by Hibernate Tools 3.4.0.CR1 -->
<hibernate-mapping>
    <class name="com.model.Student" table="STUDENT">
        <id name="studentid" type="java.lang.String">
            <column name="STUDENTID" />
            <generator class="assigned" />
        </id>
        <property name="name" type="java.lang.String">
            <column name="NAME" />
        </property>
        <property name="gender" type="java.lang.String">
            <column name="GENDER" />
        </property>
        <property name="age" type="java.lang.String">
            <column name="AGE" />
        </property>
    </class>
</hibernate-mapping>
8、编写接口StudentService.java
package com.service;

import java.util.List;

public interface StudentService {
     public List getStudentList(String page,String rows) throws Exception;//根据第几页获取,每页几行获取数据
     public int getStudentTotal() throws Exception;//统计一共有多少数据
}
9、编写接口的实现类StudentServiceImpl.java
package com.serviceImpl;

import java.util.List;

import org.hibernate.SessionFactory;

import com.service.StudentService;

public class StudentServiceImpl implements StudentService {
    private SessionFactory sessionFactory;

    // 根据第几页获取,每页几行获取数据
    public List getStudentList(String page, String rows) {

        //当为缺省值的时候进行赋值
        int currentpage = Integer.parseInt((page == null || page == "0") ? "1": page);//第几页
        int pagesize = Integer.parseInt((rows == null || rows == "0") ? "10": rows);//每页多少行

        List list = this.sessionFactory.getCurrentSession().createQuery("from Student")
                       .setFirstResult((currentpage - 1) * pagesize).setMaxResults(pagesize).list();

        return list;
    }

    // 统计一共有多少数据
    public int getStudentTotal() throws Exception {
        return this.sessionFactory.getCurrentSession().find("from Student").size();
    }

    public SessionFactory getSessionFactory() {
        return sessionFactory;
    }

    public void setSessionFactory(SessionFactory sessionFactory) {
        this.sessionFactory = sessionFactory;
    }


}
10、配置连接数据库的配置文件applicationContext_db.xml
<?xml version="1.0" encoding="UTF-8"?>
<beans xmlns="http://www.springframework.org/schema/beans"
    xmlns:xsi="http://www.w3.org/2001/XMLSchema-instance" xmlns:context="http://www.springframework.org/schema/context"
    xmlns:aop="http://www.springframework.org/schema/aop" xmlns:tx="http://www.springframework.org/schema/tx"
    xsi:schemaLocation="http://www.springframework.org/schema/beans
           http://www.springframework.org/schema/beans/spring-beans-2.5.xsd
           http://www.springframework.org/schema/context
           http://www.springframework.org/schema/context/spring-context-2.5.xsd
           http://www.springframework.org/schema/aop http://www.springframework.org/schema/aop/spring-aop-2.5.xsd
           http://www.springframework.org/schema/tx http://www.springframework.org/schema/tx/spring-tx-2.5.xsd">


    <!-- 用Bean定义数据源 -->
    <bean id="dataSource" class="com.mchange.v2.c3p0.ComboPooledDataSource"
        destroy-method="close">
        <!-- 定义数据库驱动 -->
        <property name="driverClass">
            <value>oracle.jdbc.driver.OracleDriver</value>
        </property>
        <!-- 定义数据库URL -->
        <property name="jdbcUrl">
            <value>jdbc:oracle:thin:@localhost:1521:orcl</value>
        </property>
        <!-- 定义数据库的用户名 -->
        <property name="user">
            <value>lhq</value>
        </property>
        <!-- 定义数据库的密码 -->
        <property name="password">
            <value>lhq</value>
        </property>
        <property name="minPoolSize">
            <value>1</value>
        </property>
        <property name="maxPoolSize">
            <value>40</value>
        </property>
        <property name="maxIdleTime">
            <value>1800</value>
        </property>
        <property name="acquireIncrement">
            <value>2</value>
        </property>
        <property name="maxStatements">
            <value>0</value>
        </property>
        <property name="initialPoolSize">
            <value>2</value>
        </property>
        <property name="idleConnectionTestPeriod">
            <value>1800</value>
        </property>
        <property name="acquireRetryAttempts">
            <value>30</value>
        </property>
        <property name="breakAfterAcquireFailure">
            <value>true</value>
        </property>
        <property name="testConnectionOnCheckout">
            <value>false</value>
        </property>

    </bean>

    <!--定义Hibernate的SessionFactory -->
    <bean id="sessionFactory"
        class="org.springframework.orm.hibernate3.LocalSessionFactoryBean">
        <!-- 定义SessionFactory必须注入dataSource -->
        <property name="dataSource">
            <ref bean="dataSource" />
        </property>
        <!-- 定义Hibernate的SessionFactory属性 -->
        <property name="hibernateProperties">
            <props>
                <prop key="hibernate.dialect">
                    org.hibernate.dialect.Oracle10gDialect
                </prop>
            </props>
        </property>

        <!-- 定义POJO的映射文件 -->
        <property name="mappingResources">
            <list>
                <value>com/model/Student.hbm.xml</value>
            </list>
        </property>
    </bean>

    <!-- 配置事务拦截器 -->
    <bean id="transactionManager"
        class="org.springframework.orm.hibernate3.HibernateTransactionManager">
        <property name="sessionFactory" ref="sessionFactory" />
    </bean>

    <tx:advice id="txAdvice" transaction-manager="transactionManager">
        <tx:attributes>
            <tx:method name="save*" propagation="REQUIRED" /><!-- 只有一save、delete、update开头的方法才能执行增删改操作 -->
            <tx:method name="delete*" propagation="REQUIRED" />
            <tx:method name="update*" propagation="REQUIRED" />
            <tx:method name="*" propagation="SUPPORTS" read-only="true" /><!-- 其他方法为只读方法 -->
        </tx:attributes>
    </tx:advice>

    <aop:config>
        <aop:pointcut id="interceptorPointCuts"  expression="execution(* com.serviceImpl..*.*(..))" />  <!-- 对应实现类接口的包的位置 -->
        <aop:advisor advice-ref="txAdvice" pointcut-ref="interceptorPointCuts" />
    </aop:config>

</beans>
11、在控制层编写StudentAction.java类型
package com.action;

import java.util.List;

import javax.servlet.http.HttpServletRequest;
import javax.servlet.http.HttpServletResponse;

import net.sf.json.JSONObject;

import org.apache.log4j.Logger;
import org.apache.struts2.ServletActionContext;

import com.service.StudentService;

public class StudentAction {
    static Logger log = Logger.getLogger(StudentAction.class);
    private JSONObject jsonObj;
    private String rows;// 每页显示的记录数
    private String page;// 当前第几页
    private StudentService student_services;//String依赖注入

    //查询出所有学生信息
    public String getAllStudent() throws Exception {
        log.info("查询出所有学生信息");

        List list = student_services.getStudentList(page, rows);
        this.toBeJson(list,student_services.getStudentTotal());

        return null;
    }

    //转化为Json格式
       public void toBeJson(List list,int total) throws Exception{
            HttpServletResponse response = ServletActionContext.getResponse();
            HttpServletRequest request = ServletActionContext.getRequest();

            JSONObject jobj = new JSONObject();//new一个JSON
            jobj.accumulate("total",total );//total代表一共有多少数据
            jobj.accumulate("rows", list);//row是代表显示的页的数据

            response.setCharacterEncoding("utf-8");//指定为utf-8
            response.getWriter().write(jobj.toString());//转化为JSOn格式

            log.info(jobj.toString());
       }


    public StudentService getStudent_services() {
        return student_services;
    }

    public void setStudent_services(StudentService student_services) {
        this.student_services = student_services;
    }

    public void setJsonObj(JSONObject jsonObj) {
        this.jsonObj = jsonObj;
    }

    public void setRows(String rows) {
        this.rows = rows;
    }

    public void setPage(String page) {
        this.page = page;
    }


}
12、编写Spring的依赖注入applicationContext_bean.xml配置文件
<?xml version="1.0" encoding="UTF-8"?>
<beans xmlns="http://www.springframework.org/schema/beans"
    xmlns:xsi="http://www.w3.org/2001/XMLSchema-instance" xmlns:context="http://www.springframework.org/schema/context"
    xmlns:aop="http://www.springframework.org/schema/aop" xmlns:tx="http://www.springframework.org/schema/tx"
    xsi:schemaLocation="http://www.springframework.org/schema/beans
           http://www.springframework.org/schema/beans/spring-beans-2.5.xsd
           http://www.springframework.org/schema/context
           http://www.springframework.org/schema/context/spring-context-2.5.xsd
           http://www.springframework.org/schema/aop http://www.springframework.org/schema/aop/spring-aop-2.5.xsd
           http://www.springframework.org/schema/tx http://www.springframework.org/schema/tx/spring-tx-2.5.xsd">

    <!-- 业务层Service -->
    <bean id="student_service" class="com.serviceImpl.StudentServiceImpl">
        <property name="sessionFactory">
             <ref bean="sessionFactory"></ref>
        </property>
    </bean>

    <!-- 控制层Action -->
    <bean id="student_action" class="com.action.StudentAction">
        <property name="student_services">
             <ref bean="student_service" />
        </property>
    </bean>

</beans>
13、编写struts.xml配置文件
<?xml version="1.0" encoding="UTF-8"?>
<!DOCTYPE struts PUBLIC
"-//Apache Software Foundation//DTD Struts Configuration 2.0//EN"
"http://struts.apache.org/dtds/struts-2.0.dtd">
<struts>
    <package name="Easyui" extends="json-default">
        <!-- 学生信息 -->
        <action name="getAllStudentAction" class="student_action" method="getAllStudent">
            <result type="json"> </result>
        </action>
    </package>
</struts>
14、编写JSP----index.jsp
<%@ page language="java" pageEncoding="utf-8" isELIgnored="false"%>
<%
    String path = request.getContextPath();
%>
<%@ taglib prefix="s" uri="/struts-tags"%>
<!DOCTYPE html PUBLIC "-//W3C//DTD HTML 4.01 Transitional//EN" "http://www.w3.org/TR/html4/loose.dtd">
<html>
<head>
<meta http-equiv="Content-Type" content="text/html; charset=utf-8">
<title>数字框</title>
<!-- 引入Jquery -->
<script type="text/javascript"   src="<%=path%>/js/easyui/jquery-1.8.0.min.js" charset="utf-8"></script>
<!-- 引入Jquery_easyui -->
<script type="text/javascript"   src="<%=path%>/js/easyui/jquery.easyui.min.js" charset="utf-8"></script>
<!-- 引入easyUi国际化--中文 -->
<script type="text/javascript"   src="<%=path%>/js/easyui/locale/easyui-lang-zh_CN.js" charset="utf-8"></script>
<!-- 引入easyUi默认的CSS格式--蓝色 -->
<link rel="stylesheet" type="text/css"   href="<%=path%>/js/easyui/themes/default/easyui.css" />
<!-- 引入easyUi小图标 -->
<link rel="stylesheet" type="text/css"   href="<%=path%>/js/easyui/themes/icon.css" />

<script type="text/javascript">
    $(function() {
        $('#mydatagrid').datagrid({
            title : 'datagrid实例',
            iconCls : 'icon-ok',
            width : 600,
            pageSize : 5,//默认选择的分页是每页5行数据
            pageList : [ 5, 10, 15, 20 ],//可以选择的分页集合
            nowrap : true,//设置为true,当数据长度超出列宽时将会自动截取
            striped : true,//设置为true将交替显示行背景。
            collapsible : true,//显示可折叠按钮
            toolbar:"#tb",//在添加 增添、删除、修改操作的按钮要用到这个
            url:'getAllStudentAction.action',//url调用Action方法
            loadMsg : '数据装载中......',
            singleSelect:true,//为true时只能选择单行
            fitColumns:true,//允许表格自动缩放,以适应父容器
            //sortName : 'xh',//当数据表格初始化时以哪一列来排序
            //sortOrder : 'desc',//定义排序顺序,可以是'asc'或者'desc'(正序或者倒序)。
            remoteSort : false,
             frozenColumns : [ [ {
                field : 'ck',
                checkbox : true
            } ] ],
            pagination : true,//分页
            rownumbers : true//行数
        });

    });

</script>

</head>
<body>
    <h2>
        <b>easyui的DataGrid实例</b>
    </h2>

    <table id="mydatagrid">
       <thead>
            <tr>
                <th data-options="field:'studentid',width:100,align:'center'">学生学号</th>
                <th data-options="field:'name',width:100,align:'center'">姓名</th>
                <th data-options="field:'gender',width:100,align:'center'">性别</th>
                <th data-options="field:'age',width:100,align:'center'">年龄</th>
            </tr>
        </thead>
    </table>

</body>
</html>
15、启动程序,输入http://localhost:8080/easyui/index.jsp进行测试
来自:http://blog.csdn.net/lhq13400526230/article/details/9158111
参考文章:http://www.open-open.com/lib/view/open1380637261182.html


 125
125


 被折叠的 条评论
为什么被折叠?
被折叠的 条评论
为什么被折叠?
 到【灌水乐园】发言


