


-------------------siwuxie095
整合 Spring 框架和 Hibernate 框架
1、导入相关 jar 包(共 28 个)
(1)导入 Spring 的核心 jar 包和日志相关的 jar 包(6 个)
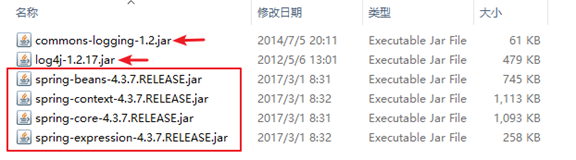
Commons Logging 下载链接:
http://commons.apache.org/proper/commons-logging/download_logging.cgi
LOG4J 下载链接:
https://www.apache.org/dist/logging/log4j/
(2)导入 Spring 的 AOP 开发的 jar 包(4 个)
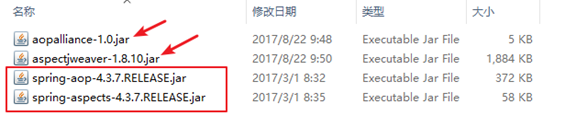
AOP Alliance 下载链接:
http://mvnrepository.com/artifact/aopalliance/aopalliance
AspectJ Weaver 下载链接:
http://mvnrepository.com/artifact/org.aspectj/aspectjweaver
(3)导入 Spring 的 JDBC 开发的 jar 包(2 个)

(4)导入 Spring 整合 Web 项目的 jar 包(1 个)

(5)导入 Hibernate 的基本 jar 包(10 个)
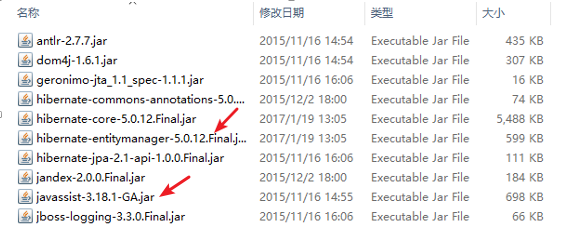
其中:
1)hibernate-entitymanager 和其它包不在同一个文件夹下
2)在 Struts2 和 Hibernate 中,都有 javassist,会产生冲突,
选择高版本,删除低版本即可
(3)导入 Hibernate 日志相关的包(2 个)

SLF4J 下载链接:https://www.slf4j.org/dist/,其中包含 slf4j-api
和 slf4j-log4j
其实,Hibernate 日志相关的包还包含 log4j,因为在 Spring 中已经
有了,所以这里就不再添加
(4)导入 MySQL 的 JDBC 驱动的 jar 包(1 个)

mysql-connector-java 下载链接:
https://dev.mysql.com/downloads/connector/j/
(5)导入 Spring 整合 Hibernate 的 jar 包(1 个)

「也可用来整合其它 ORM 框架」
(6)导入 C3P0 的 jar 包(1 个)
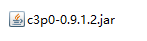
C3P0 下载链接:
http://mvnrepository.com/artifact/c3p0/c3p0
注意:如果使用的是 0.9.1 版本,只需要一个 jar 包即可,如果使用
的是 0.9.2 版本,还需要导入一个辅助包 mchange-commons-java
Mchange Commons Java 下载链接:
http://mvnrepository.com/artifact/com.mchange/mchange-commons-java
2、测试
(1)编写一个实体类
User.java:
package com.siwuxie095.entity;
public class User {
private Integer uid; private String username; private String address;
public Integer getUid() { return uid; } public void setUid(Integer uid) { this.uid = uid; }
public String getUsername() { return username; } public void setUsername(String username) { this.username = username; }
public String getAddress() { return address; } public void setAddress(String address) { this.address = address; }
@Override public String toString() { return "User [uid=" + uid + ", username=" + username + ", address=" + address + "]"; }
} |
(2)在 Hibernate 映射配置文件中进行配置
User.hbm.xml:
<?xml version="1.0" encoding="UTF-8"?> <!DOCTYPE hibernate-mapping PUBLIC "-//Hibernate/Hibernate Mapping DTD 3.0//EN" "http://www.hibernate.org/dtd/hibernate-mapping-3.0.dtd">
<hibernate-mapping>
<class name="com.siwuxie095.entity.User" table="t_user">
<id name="uid" column="uid"> <generator class="native"></generator> </id>
<property name="username" column="username"></property> <property name="address" column="address"></property>
</class> </hibernate-mapping> |
(3)在 Hibernate 核心配置文件中进行配置
hibernate.cfg.xml:
<?xml version="1.0" encoding="UTF-8"?> <!DOCTYPE hibernate-configuration PUBLIC "-//Hibernate/Hibernate Configuration DTD 3.0//EN" "http://www.hibernate.org/dtd/hibernate-configuration-3.0.dtd"> <hibernate-configuration> <session-factory>
<property name="hibernate.show_sql">true</property> <property name="hibernate.format_sql">true</property> <!-- 注意:只有配置 hibernate.hbm2ddl.auto 为 update,才能自动创建表 --> <property name="hibernate.hbm2ddl.auto">update</property> <property name="hibernate.dialect">org.hibernate.dialect.MySQLDialect</property> <!-- 原来的配置: <property name="hibernate.current_session_context_class">thread</property>
在 SSH 框架整合中会报错,要么将这个配置删了,要么改成如下配置
参考链接:http://blog.csdn.net/maoyuanming0806/article/details/61417995 --> <property name="hibernate.current_session_context_class"> org.springframework.orm.hibernate5.SpringSessionContext </property>
<mapping resource="com/siwuxie095/entity/User.hbm.xml"/>
</session-factory> </hibernate-configuration> |
(4)在 Spring 核心配置文件中进行配置
applicationContext.xml:
<?xml version="1.0" encoding="UTF-8"?> <beans xmlns="http://www.springframework.org/schema/beans" xmlns:xsi="http://www.w3.org/2001/XMLSchema-instance" xmlns:aop="http://www.springframework.org/schema/aop" xmlns:context="http://www.springframework.org/schema/context" xmlns:tx="http://www.springframework.org/schema/tx" xsi:schemaLocation=" http://www.springframework.org/schema/beans http://www.springframework.org/schema/beans/spring-beans.xsd http://www.springframework.org/schema/aop http://www.springframework.org/schema/aop/spring-aop.xsd http://www.springframework.org/schema/context http://www.springframework.org/schema/context/spring-context.xsd http://www.springframework.org/schema/tx http://www.springframework.org/schema/tx/spring-tx.xsd">
<!-- 配置 C3P0 连接池 --> <bean id="dataSource" class="com.mchange.v2.c3p0.ComboPooledDataSource"> <property name="driverClass" value="com.mysql.jdbc.Driver"/> <!-- jdbc:mysql:///test_db 是 jdbc:mysql://localhost:3306/test_db 的简写 --> <property name="jdbcUrl" value="jdbc:mysql:///test_db"/> <property name="user" value="root"/> <property name="password" value="8888"/> </bean>
<!-- SessionFactory 对象的创建交给 Spring 进行管理 --> <bean id="sessionFactory" class="org.springframework.orm.hibernate5.LocalSessionFactoryBean"> <!-- 因为在 Hibernate 核心配置文件中,没有数据库配置, 而是在 Spring 的核心配置文件中进行配置,所以需要 注入 dataSource
LocalSessionFactoryBean 中有相关属性,所以可以 注入 --> <property name="dataSource" ref="dataSource"></property> <!-- 指定 Hibernate 核心配置文件的位置 --> <property name="configLocations" value="classpath:hibernate.cfg.xml"></property> </bean>
</beans> |
(5)在部署描述文件中进行配置
web.xml:
<?xml version="1.0" encoding="UTF-8"?> <web-app xmlns:xsi="http://www.w3.org/2001/XMLSchema-instance" xmlns="http://xmlns.jcp.org/xml/ns/javaee" xsi:schemaLocation="http://xmlns.jcp.org/xml/ns/javaee http://xmlns.jcp.org/xml/ns/javaee/web-app_3_1.xsd" version="3.1"> <welcome-file-list> <welcome-file>index.jsp</welcome-file> </welcome-file-list>
<!-- 配置 Spring 的监听器 ContextLoaderListener --> <listener> <listener-class>org.springframework.web.context.ContextLoaderListener</listener-class> </listener>
<!-- 配置 Spring 核心配置文件的位置(路径) --> <context-param> <param-name>contextConfigLocation</param-name> <param-value>classpath:applicationContext.xml</param-value> </context-param>
</web-app> |
(6)启动 Tomcat 服务器,发现 MySQL 数据库中自动创建了表 t_user
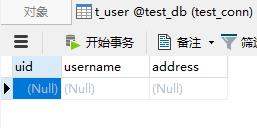
前提:
在 Hibernate 核心配置文件中配置了 hibernate.hbm2ddl.auto 为 update
【made by siwuxie095】


 411
411


 被折叠的 条评论
为什么被折叠?
被折叠的 条评论
为什么被折叠?
 到【灌水乐园】发言


