


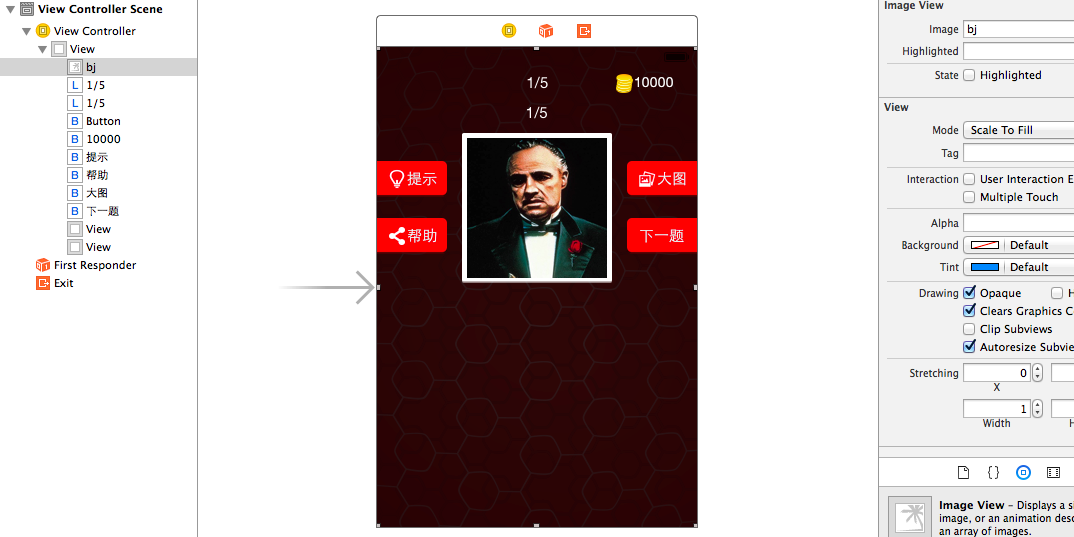
案例效果:

(1)导入所需的素材,然后用storyboard把上半截位置和大小相对固定的东西布局起来。当然,这些控件也要定义成对应地IBOutlet和IBAction方便兴许使用它们。
注意:本案例在3.5inch设备上显示最佳,所以须要设置一下。
(2)首先实现点击“下一题”的功能
- (IBAction)nextQuestion {
    //1、序号添加
    self.index++;
    //2、依据序号拿到相应的模型(对象)
    NSQuestion *question=self.questions[self.index];
    //3、设置文本以及图像
    self.noLabel.text=[NSString stringWithFormat:@"%d/%d",self.index+1,self.questions.count];
    self.titleLabel.text=question.title;
    [self.iconBtn setImage:[UIImage imageNamed:question.icon] forState:UIControlStateNormal];
    //4、推断button是否失效
    self.nextQuestionBtn.enabled=self.index!=(self.questions.count-1);
    //5、加入正确答案
    [self addAnswerBtn:question];
    //6、加入option选项
    [self addOptionBtn:question];
}
当然,在viewLoad中要让视图显示第一个页面,须要例如以下:
- (void)viewDidLoad {
    self.index=-1;
    [self nextQuestion];
    [super viewDidLoad];
}
然后一个个实现nextQuestion方法中提到的那些方法。
(3)定义一个数据模型类,就是将字典转化成模型
在NSQuestion.h中:
#import <Foundation/Foundation.h>

@interface NSQuestion : NSObject
@property(nonatomic,copy) NSString *answer;
@property(nonatomic,copy) NSString *title;
@property(nonatomic,copy) NSString *icon;
@property(nonatomic,strong) NSArray *options;

-(instancetype)initWithDic:(NSDictionary *)dict;
+(instancetype)questionWithDic:(NSDictionary *)dict;
@end
在NSQuestion.m中:
#import "NSQuestion.h"

@implementation NSQuestion

-(instancetype)initWithDic:(NSDictionary *)dict{
    if ([super init]) {
        self.answer=dict[@"answer"];
        self.title=dict[@"title"];
        self.icon=dict[@"icon"];
        self.options=dict[@"options"];
    }
    return self;
}

+(instancetype)questionWithDic:(NSDictionary *)dict{
    return [[self alloc]initWithDic:dict];
}

@end
在ViewController.m中转化成模型:
#import "ViewController.h"
#import "NSQuestion.h"

@interface ViewController ()
@property(nonatomic,strong) NSArray *questions;
@end

@implementation ViewController

-(NSArray *)questions{
    if (_questions==nil) {
        NSArray *arr1=[NSArray arrayWithContentsOfFile:[[NSBundle mainBundle]pathForResource:@"questions.plist" ofType:nil]];
        NSMutableArray *questionArray=[[NSMutableArray alloc]init];
        for (NSDictionary *dic1 in arr1) {
            NSQuestion *question=[[NSQuestion alloc]initWithDic:dic1];
            [questionArray addObject:question];
        }
        _questions=questionArray;
    }
    return _questions;
}
(4)addAnswerBtn方法
-(void)addAnswerBtn:(NSQuestion *)question{
    //5、加入正确答案
    //先删除上一题的answer
    //让数组中的全部对象都运行相同地方法。用以下这一句取代以下的for循环
    [self.answerView.subviews makeObjectsPerformSelector:@selector(removeFromSuperview)];
//    for (UIView *subViews in self.answerView.subviews) {
//        [subViews removeFromSuperview];
//    }
    //然后再加入新的answer,依据答案的长度来加入
    int length=question.answer.length;
    for (int i=0; i<length; i++) {
        UIButton *answerBtn=[[UIButton alloc]init];
        [answerBtn setTitleColor:[UIColor blackColor] forState:UIControlStateNormal];//设置文字颜色,否则默认白色于背景相同
        [answerBtn setBackgroundImage:[UIImage imageNamed:@"btn_answer"] forState:UIControlStateNormal];
        [answerBtn setBackgroundImage:[UIImage imageNamed:@"btn_answer_highlighted"] forState:UIControlStateHighlighted];
        CGFloat answerMargin=10;
        CGFloat answerW=35;
        CGFloat answerH=35;
        CGFloat answerX=(self.view.frame.size.width-length*answerW-(length-1)*answerMargin)/2+i*(answerW+answerMargin);
        answerBtn.frame=CGRectMake(answerX, 0, answerW, answerH);
        [self.answerView addSubview:answerBtn];

        //监听点击事件
        [answerBtn addTarget:self action:@selector(answerClick:) forControlEvents:UIControlEventTouchUpInside];
    }
}
这个点击事件的方法:
-(void)answerClick:(UIButton *)answerBtn{
    //让答案button文字相应的button显示出来,用for遍历
    //获取button文字用currentTitle
//    NSString *answerTitle=[answerBtn titleForState:UIControlStateNormal];
    for (UIButton *optionBtn in self.optionView.subviews) {
//        NSString *optionTitle=[optionBtn titleForState:UIControlStateNormal];
        //推断哪个optionbutton再显示出来。并且这个button本身是隐藏的,由于option里可能有同样的文字
        if ([answerBtn.currentTitle isEqualToString:optionBtn.currentTitle] && optionBtn.hidden==YES) {
            optionBtn.hidden=NO;
            break;
        }
    }
    //点击的button文字消失,由于这个文字上面须要用到比較,所以比較晚,再把文字去除
    [answerBtn setTitle:nil forState:UIControlStateNormal];

    //点击随意一个button。相当于去除文字,那么答案就不是正确答案,文字颜色回复黑色
    for (UIButton *answerBtn in self.answerView.subviews) {
        [answerBtn setTitleColor:[UIColor blackColor] forState:UIControlStateNormal];
    }
}
(4)addOptionBtn方法
-(void)addOptionBtn:(NSQuestion *)question{
    //6、加入option选项
    //也是先删除再加入,相同用一句取代for循环
    [self.optionView.subviews makeObjectsPerformSelector:@selector(removeFromSuperview)];
//    for (UIView *subViews in self.optionView.subviews) {
//        [subViews removeFromSuperview];
//    }
    int count=question.options.count;
    int totalColumn=7;
    for (int i=0; i<count; i++) {
        UIButton *optionBtn=[[UIButton alloc]init];
        [optionBtn setBackgroundImage:[UIImage imageNamed:@"btn_option"] forState:UIControlStateNormal];
        [optionBtn setBackgroundImage:[UIImage imageNamed:@"btn_option_highlighted"] forState:UIControlStateHighlighted];
        CGFloat optionMargin=10;
        CGFloat optionW=35;
        CGFloat optionH=35;
        int row=i/7;
        int col=i%7;
        CGFloat optionX=(self.view.frame.size.width-totalColumn*optionW-(totalColumn-1)*optionMargin)/2+col*(optionW+optionMargin);
        CGFloat optionY=row*(optionH+optionMargin);
        optionBtn.frame=CGRectMake(optionX, optionY, optionW, optionH);
        [optionBtn setTitle:question.options[i] forState:UIControlStateNormal];
        [optionBtn setTitleColor:[UIColor blackColor] forState:UIControlStateNormal];
        [self.optionView addSubview:optionBtn];

        //button点击
        [optionBtn addTarget:self action:@selector(optionClick:) forControlEvents:UIControlEventTouchUpInside];
    }
}
这个监听事件方法:
-(void)optionClick:(UIButton *)optionBtn{
    //1、被点击的button消失
    optionBtn.hidden=YES;//不能删除,由于还要显示,所以用隐藏
    //2、显示文字到正确答案上去(第一个没有文字的answerbutton)
    //这里设置完,无法查看效果,是由于answer的文字默认是白色,于背景同样
    for (UIButton *answerBtn in self.answerView.subviews) {
        //推断是否有文字
//        NSString *answerTitle=[answerBtn titleForState:UIControlStateNormal];
        if (answerBtn.currentTitle.length==0) {
            [answerBtn setTitle:[optionBtn titleForState:UIControlStateNormal] forState:UIControlStateNormal];
            break;//找到后就通知for的遍历
        }
    }
    //每点击一个optionbutton就推断这个答案是否已经填满,并推断是否正确
    BOOL full=YES;
    NSMutableString *tempAnswerTitle=[NSMutableString string];
    for (UIButton *answerBtn in self.answerView.subviews){
//        NSString *answerTitle=[answerBtn titleForState:UIControlStateNormal];
        if (answerBtn.currentTitle.length==0) {//说明答案没有满
            full=NO;
        }
        //拼接文字
        if (answerBtn.currentTitle) {
            [tempAnswerTitle appendString:answerBtn.currentTitle];
        }
    }
    //假设答案满了,则推断是否正确
    if (full) {
        NSQuestion *question=self.questions[self.index];
        if ([tempAnswerTitle isEqualToString:question.answer]) {
            for (UIButton *answerBtn in self.answerView.subviews) {
                [answerBtn setTitleColor:[UIColor blueColor] forState:UIControlStateNormal];
            }
            //推断正确后
            //先拿到当前分,再加分
            [self addScore:100];
//            int score=[self.scoreBtn titleForState:UIControlStateNormal].intValue;
//            score+=100;
//            [self.scoreBtn setTitle:[NSString stringWithFormat:@"%d",score] forState:UIControlStateNormal];
            //延迟运行:跳到下一题
            //直接用[self nextQuestion];会马上跳转
            [self performSelector:@selector(nextQuestion) withObject:nil afterDelay:0.5];
        }else{
            for (UIButton *answerBtn in self.answerView.subviews) {
                [answerBtn setTitleColor:[UIColor redColor] forState:UIControlStateNormal];
            }
        }
    }
}
这里面用到一个addScore计算分数的方法:
-(void)addScore:(int)dealtScore{
    int score=[self.scoreBtn titleForState:UIControlStateNormal].intValue;
    score+=dealtScore;
    [self.scoreBtn setTitle:[NSString stringWithFormat:@"%d",score] forState:UIControlStateNormal];
}
(5)对应的,点击“提示”产生的效果,是清空answer。给第一个字,并扣分
- (IBAction)tip {
    //1、先清空answer。也就是点击answer的button。就相当于清空
    for (UIButton *answerBtn in self.answerView.subviews) {
        [self answerClick:answerBtn];
    }
    //2、取出正确答案
    NSQuestion *question=self.questions[self.index];
    //3、取出正确答案的第一个字符
    NSString *firstAnswer=[question.answer substringToIndex:1];
    //4、推断并从option中取出
    for (UIButton *optionBtn in self.optionView.subviews) {
        if ([optionBtn.currentTitle isEqualToString:firstAnswer]) {
            [self optionClick:optionBtn];
            break;
        }
    }
    //5、扣分
    [self addScore:-500];
//    int score=[self.scoreBtn titleForState:UIControlStateNormal].intValue;
//    score-=500;
//    [self.scoreBtn setTitle:[NSString stringWithFormat:@"%d",score] forState:UIControlStateNormal];
}
(6)点击“大图”的效果。加入一个阴影,调整图像顺序。并让图片和阴影等动画变动
- (IBAction)bigImg {

    //1、加入一个半透明阴影
    UIButton *cover=[[UIButton alloc]init];
    cover.frame=self.view.bounds;
    cover.backgroundColor=[UIColor blackColor];
    cover.alpha=0;
    [cover addTarget:self action:@selector(smallImg) forControlEvents:UIControlEventTouchUpInside];
    self.cover=cover;
    [self.view addSubview:cover];

    //2、调整阴影和图像顺序
    [self.view bringSubviewToFront:self.iconBtn];

    //相同。用block改造以下的代码
    [UIView animateWithDuration:0.5 animations:^{
        cover.alpha=0.7;//阴影逐步出现
        //3、改变图像大小frame
        CGFloat iconW=self.view.frame.size.width;
        CGFloat iconH=iconW;
        CGFloat iconY=(self.view.frame.size.height-iconH)/2;
        self.iconBtn.frame=CGRectMake(0, iconY, iconW, iconH);
    }];

//    [UIView beginAnimations:nil context:nil];
//    cover.alpha=0.7;//阴影逐步出现
//    //3、改变图像大小frame
//    CGFloat iconW=self.view.frame.size.width;
//    CGFloat iconH=iconW;
//    CGFloat iconY=(self.view.frame.size.height-iconH)/2;
//    self.iconBtn.frame=CGRectMake(0, iconY, iconW, iconH);
//    [UIView commitAnimations];
}
上述代码中得阴影cover有一个事件,就是点击后图片恢复小图,而且阴影消失等等。例如以下:
-(void)smallImg{
    //用block动画改造以下代码以及removeCover方法
    [UIView animateWithDuration:0.5 animations:^{
        self.cover.alpha=0;//先让阴影逐渐消失,然后删除
        self.iconBtn.frame=CGRectMake(85, 86, 150, 150);
    } completion:^(BOOL finished) {
        [self.cover removeFromSuperview];
        self.cover=nil;//便于推断阴影是否还存在
    }];

//    //1、删除阴影
//
//    //2、图像位置恢复frame
//    [UIView beginAnimations:nil context:nil];
//    //动画结束后,调用self的removeCover方法删除阴影,这样删除阴影才会有个延迟,阴影逐渐消失的动画才干正常
//    [UIView setAnimationDelegate:self];
//    [UIView setAnimationDidStopSelector:@selector(removeCover)];
//    self.cover.alpha=0;//先让阴影逐渐消失,然后删除
//    self.iconBtn.frame=CGRectMake(85, 86, 150, 150);//也能够在变大之前记录原有位置
//    [UIView commitAnimations];
}

//-(void)removeCover{
//    [self.cover removeFromSuperview];
//    self.cover=nil;//便于推断阴影是否还存在
//}
(7)而点击图片本身,也会有放大缩小的事件:
- (IBAction)iconClick {
    if (self.cover==nil) {
        [self bigImg];
    }else{
        [self smallImg];
    }
}
(8)用到的知识点
——获取button当前文字用.currentTitle属性。
——实现动画特效,除了[UIView beginAnimations:]这套组合外,推荐使用[UIView animateWithDuration: animations:^{ } completion:^(BOOL finished) { }];假设动画完毕后没有须要运行的代码。那么最后面的completion能够去除。
——调整子视图上下叠加顺序能够用bringSubviewToFront之类的方法。
——注意,button的文字默认是白色,假设背景也是白色,那么须要格外注意。
——假设图片的frame属性设置没有生效,即没有变大缩小移动等特效。那么通常是Auto Layout没有关闭。
——button有一个默认属性:按下时颜色变暗,假设不须要,则取消勾选“Highlighted Adjusts Image”。
——截取某字符串的前某几个字符则用substringToIndex。数字是N,则是0~n-1这几个字符。
——实现透明度,是属性alpha。
——一般要删除某个控件,则须要这个控件自身调用removeFromSuperview方法。
但假设要删除某个视图里面的非常多子视图,除了用for循环让子视图一个个自己自删,还能够用例如以下方法:makeObjectsPerformSelector。
    [self.answerView.subviews makeObjectsPerformSelector:@selector(removeFromSuperview)];
//    for (UIView *subViews in self.answerView.subviews) {
//        [subViews removeFromSuperview];
// }——注意代码顺序。比方用button上得文字和其它button上的文字相比較,然后在删除这个button,这是正确顺序,而不能先删除,否则后面无法获取到这个button上得文字。
——推断button有没有文字:推断button文字的长度是否等于0。
——可变字符串的加入用appendString方法。
——延迟运行某个动作能够用performSelector:@selector() withObject:nil afterDelay:这种方法。
假设是[self perform...]那么就是延迟运行self的selector里的方法。
——把一个字符串转换成整型,能够直接在这个字符串后面添加.intValue属性。
(9)怎样加入icon图标(iPhone的、AppStore以及spotlight的,当然兴许还有ipad的等等)
直接按要求定义好图片大小和命名规范。然后拖到Image.xcassets的AppIcon里就可以。
(10)怎样加入启动页面?
直接在LaunchScreen.xib里面设置。这个和玩storyboard一样样的。
我们此处设置的大小是3.5inch的。所以设置好设备尺寸后。把原先的删除掉,直接弄一个imageView。在上面加入个图片就可以。


 124
124


 被折叠的 条评论
为什么被折叠?
被折叠的 条评论
为什么被折叠?
 到【灌水乐园】发言


