


模块,用一砣代码实现了某个功能的代码集合。
类似于函数式编程和面向过程编程,函数式编程则完成一个功能,其他代码用来调用即可,提供了代码的重用性和代码间的耦合。
而对于一个复杂的功能来,可能需要多个函数才能完成(函数又可以在不同的.py文件中),n个 .py 文件组成的代码集合就称为模块。
如:os 是系统相关的模块;file是文件操作相关的模块
模块分为三种:
自定义模块
内置模块
开源模块
自定义模块
1、定义模块
情景一:

情景二:

情景三:

2、导入模块
Python之所以应用越来越广泛,在一定程度上也依赖于其为程序员提供了大量的模块以供使用,如果想要使用模块,则需要导入。导入模块有一下几种方法:
|
1
2
3
4
|
import
module
from
module.xx.xx
import
xx
from
module.xx.xx
import
xx as rename
from
module.xx.xx
import
*
|
导入模块其实就是告诉Python解释器去解释那个py文件
- 导入一个py文件,解释器解释该py文件
- 导入一个包,解释器解释该包下的 __init__.py 文件
那么问题来了,导入模块时是根据那个路径作为基准来进行的呢?即:sys.path
print sys.path
如果sys.path路径列表没有你想要的路径,可以通过 sys.path.append('路径') 添加。
通过os模块可以获取各种目录,例如:


1 import sys
2 import os
3
4 pre_path = os.path.abspath('../')
5 sys.path.append(pre_path)
开源模块
一、下载安装
下载安装有两种方式:
yum
pip
apt-get
...
下载源码
解压源码
进入目录
编译源码    python setup.py build
安装源码    python setup.py install
注:在使用源码安装时,需要使用到gcc编译和python开发环境,所以,需要先执行:
|
1
2
3
4
|
yum install gcc
yum install python
-
devel
或
apt
-
get python
-
dev
|
安装成功后,模块会自动安装到 sys.path 中的某个目录中,如:
|
1
|
/
usr
/
lib
/
python2.
7
/
site
-
packages
/
|
二、导入模块
同自定义模块中导入的方式
三、模块 paramiko
paramiko是一个用于做远程控制的模块,使用该模块可以对远程服务器进行命令或文件操作,值得一说的是,fabric和ansible内部的远程管理就是使用的paramiko来现实。
1、下载安装
|
1
2
3
4
5
6
7
8
9
10
11
12
13
14
15
16
17
18
19
|
# pycrypto,由于 paramiko 模块内部依赖pycrypto,所以先下载安装pycrypto
# 下载安装 pycrypto
wget http:
/
/
files.cnblogs.com
/
files
/
wupeiqi
/
pycrypto
-
2.6
.
1.tar
.gz
tar
-
xvf pycrypto
-
2.6
.
1.tar
.gz
cd pycrypto
-
2.6
.
1
python setup.py build
python setup.py install
# 进入python环境,导入Crypto检查是否安装成功
# 下载安装 paramiko
wget http:
/
/
files.cnblogs.com
/
files
/
wupeiqi
/
paramiko
-
1.10
.
1.tar
.gz
tar
-
xvf paramiko
-
1.10
.
1.tar
.gz
cd paramiko
-
1.10
.
1
python setup.py build
python setup.py install
# 进入python环境,导入paramiko检查是否安装成功
|
2、使用模块
 1 #!/usr/bin/env python
 2 #coding:utf-8
 3
 4 import paramiko
 5
 6 ssh = paramiko.SSHClient()
 7 ssh.set_missing_host_key_policy(paramiko.AutoAddPolicy())
 8 ssh.connect('192.168.1.108', 22, 'alex', '123')
 9 stdin, stdout, stderr = ssh.exec_command('df')
10 print stdout.read()
11 ssh.close();
执行命令-
通过秘钥连接服务器
 1 import os,sys
 2 import paramiko
 3
 4 t = paramiko.Transport(('182.92.219.86',22))
 5 t.connect(username='wupeiqi',password='123')
 6 sftp = paramiko.SFTPClient.from_transport(t)
 7 sftp.put('/tmp/test.py','/tmp/test.py')
 8 t.close()
 9
10
11 import os,sys
12 import paramiko
13
14 t = paramiko.Transport(('182.92.219.86',22))
15 t.connect(username='wupeiqi',password='123')
16 sftp = paramiko.SFTPClient.from_transport(t)
17 sftp.get('/tmp/test.py','/tmp/test2.py')
18 t.close()
 1 import paramiko
 2
 3 pravie_key_path = '/home/auto/.ssh/id_rsa'
 4 key = paramiko.RSAKey.from_private_key_file(pravie_key_path)
 5
 6 t = paramiko.Transport(('182.92.219.86',22))
 7 t.connect(username='wupeiqi',pkey=key)
 8
 9 sftp = paramiko.SFTPClient.from_transport(t)
10 sftp.put('/tmp/test3.py','/tmp/test3.py')
11
12 t.close()
13
14 import paramiko
15
16 pravie_key_path = '/home/auto/.ssh/id_rsa'
17 key = paramiko.RSAKey.from_private_key_file(pravie_key_path)
18
19 t = paramiko.Transport(('182.92.219.86',22))
20 t.connect(username='wupeiqi',pkey=key)
21
22 sftp = paramiko.SFTPClient.from_transport(t)
23 sftp.get('/tmp/test3.py','/tmp/test4.py')
24
25 t.close()
内置模块
一、os
用于提供系统级别的操作
 1 os.getcwd() 获取当前工作目录,即当前python脚本工作的目录路径
 2 os.chdir("dirname")  改变当前脚本工作目录;相当于shell下cd
 3 os.curdir  返回当前目录: ('.')
 4 os.pardir  获取当前目录的父目录字符串名:('..')
 5 os.makedirs('dirname1/dirname2')    可生成多层递归目录
 6 os.removedirs('dirname1')    若目录为空,则删除,并递归到上一级目录,如若也为空,则删除,依此类推
 7 os.mkdir('dirname')    生成单级目录;相当于shell中mkdir dirname
 8 os.rmdir('dirname')    删除单级空目录,若目录不为空则无法删除,报错;相当于shell中rmdir dirname
 9 os.listdir('dirname')    列出指定目录下的所有文件和子目录,包括隐藏文件,并以列表方式打印
10 os.remove()  删除一个文件
11 os.rename("oldname","newname")  重命名文件/目录
12 os.stat('path/filename')  获取文件/目录信息
13 os.sep    输出操作系统特定的路径分隔符,win下为"\\",Linux下为"/"
14 os.linesep    输出当前平台使用的行终止符,win下为"\t\n",Linux下为"\n"
15 os.pathsep    输出用于分割文件路径的字符串
16 os.name    输出字符串指示当前使用平台。win->'nt'; Linux->'posix'
17 os.system("bash command")  运行shell命令,直接显示
18 os.environ  获取系统环境变量
19 os.path.abspath(path)  返回path规范化的绝对路径
20 os.path.split(path)  将path分割成目录和文件名二元组返回
21 os.path.dirname(path)  返回path的目录。其实就是os.path.split(path)的第一个元素
22 os.path.basename(path)  返回path最后的文件名。如何path以/或\结尾,那么就会返回空值。即os.path.split(path)的第二个元素
23 os.path.exists(path)  如果path存在,返回True;如果path不存在,返回False
24 os.path.isabs(path)  如果path是绝对路径,返回True
25 os.path.isfile(path)  如果path是一个存在的文件,返回True。否则返回False
26 os.path.isdir(path)  如果path是一个存在的目录,则返回True。否则返回False
27 os.path.join(path1[, path2[, ...]])  将多个路径组合后返回,第一个绝对路径之前的参数将被忽略
28 os.path.getatime(path)  返回path所指向的文件或者目录的最后存取时间
29 os.path.getmtime(path)  返回path所指向的文件或者目录的最后修改时间
二、sys
用于提供对解释器相关的操作
1 sys.argv           命令行参数List,第一个元素是程序本身路径
2 sys.exit(n)        退出程序,正常退出时exit(0)
3 sys.version        获取Python解释程序的版本信息
4 sys.maxint         最大的Int值
5 sys.path           返回模块的搜索路径,初始化时使用PYTHONPATH环境变量的值
6 sys.platform       返回操作系统平台名称
7 sys.stdout.write('please:')
8 val = sys.stdin.readline()[:-1]
三、hashlib
用于加密相关的操作,代替了md5模块和sha模块,主要提供 SHA1, SHA224, SHA256, SHA384, SHA512 ,MD5 算法
 1 import hashlib
 2
 3 # ######## md5 ########
 4
 5 hash = hashlib.md5()
 6 hash.update('admin')
 7 print hash.hexdigest()
 8
 9 # ######## sha1 ########
10
11 hash = hashlib.sha1()
12 hash.update('admin')
13 print hash.hexdigest()
14
15 # ######## sha256 ########
16
17 hash = hashlib.sha256()
18 hash.update('admin')
19 print hash.hexdigest()
20
21
22 # ######## sha384 ########
23
24 hash = hashlib.sha384()
25 hash.update('admin')
26 print hash.hexdigest()
27
28 # ######## sha512 ########
29
30 hash = hashlib.sha512()
31 hash.update('admin')
32 print hash.hexdigest()
以上加密算法虽然依然非常厉害,但时候存在缺陷,即:通过撞库可以反解。所以,有必要对加密算法中添加自定义key再来做加密。
|
1
2
3
4
5
6
7
|
import
hashlib
# ######## md5 ########
hash
=
hashlib.md5(
'898oaFs09f'
)
hash
.update(
'admin'
)
print
hash
.hexdigest()
|
还不够吊?python 还有一个 hmac 模块,它内部对我们创建 key 和 内容 再进行处理然后再加密
|
1
2
3
4
|
import
hmac
h
=
hmac.new(
'wueiqi'
)
h.update(
'hellowo'
)
print
h.hexdigest()
|
不能再牛逼了!!!
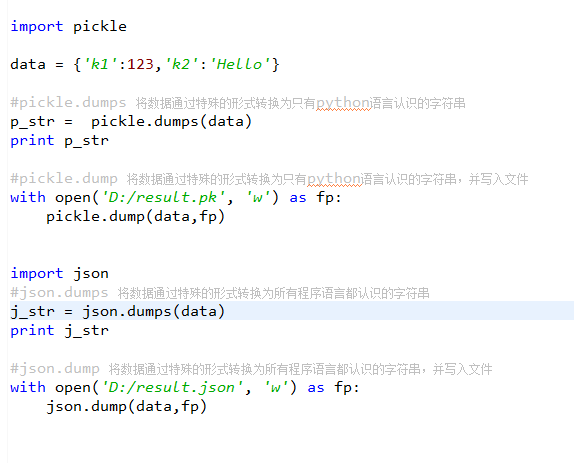
四、json 和 pickle
用于序列化的两个模块
- json,用于字符串 和 python数据类型间进行转换
- pickle,用于python特有的类型 和 python的数据类型间进行转换
Json模块提供了四个功能:dumps、dump、loads、load
pickle模块提供了四个功能:dumps、dump、loads、load
五、执行系统命令
可以执行shell命令的相关模块和函数有:
- os.system
- os.spawn*
- os.popen* --废弃
- popen2.* --废弃
- commands.* --废弃,3.x中被移除
1 import commands
2
3 result = commands.getoutput('cmd')
4 result = commands.getstatus('cmd')
5 result = commands.getstatusoutput('cmd'
以上执行shell命令的相关的模块和函数的功能均在 subprocess 模块中实现,并提供了更丰富的功能。
call
执行命令,返回状态码
|
1
2
|
ret
=
subprocess.call([
"ls"
,
"-l"
], shell
=
False
)
ret
=
subprocess.call(
"ls -l"
, shell
=
True
)
|
shell = True ,允许 shell 命令是字符串形式
check_call
执行命令,如果执行状态码是 0 ,则返回0,否则抛异常
|
1
2
|
subprocess.check_call([
"ls"
,
"-l"
])
subprocess.check_call(
"exit 1"
, shell
=
True
)
|
check_output
执行命令,如果状态码是 0 ,则返回执行结果,否则抛异常
|
1
2
|
subprocess.check_output([
"echo"
,
"Hello World!"
])
subprocess.check_output(
"exit 1"
, shell
=
True
)
|
subprocess.Popen(...)
用于执行复杂的系统命令
参数:
args:shell命令,可以是字符串或者序列类型(如:list,元组)
bufsize:指定缓冲。0 无缓冲,1 行缓冲,其他 缓冲区大小,负值 系统缓冲
stdin, stdout, stderr:分别表示程序的标准输入、输出、错误句柄
preexec_fn:只在Unix平台下有效,用于指定一个可执行对象(callable object),它将在子进程运行之前被调用
close_sfs:在windows平台下,如果close_fds被设置为True,则新创建的子进程将不会继承父进程的输入、输出、错误管道。
所以不能将close_fds设置为True同时重定向子进程的标准输入、输出与错误(stdin, stdout, stderr)。
shell:同上
cwd:用于设置子进程的当前目录
env:用于指定子进程的环境变量。如果env = None,子进程的环境变量将从父进程中继承。
universal_newlines:不同系统的换行符不同,True -> 同意使用 \n
startupinfo与createionflags只在windows下有效
将被传递给底层的CreateProcess()函数,用于设置子进程的一些属性,如:主窗口的外观,进程的优先级等等
1 import subprocess
2 #默认为shell=False 前一个参数需求为列表
3 ret1 = subprocess.Popen(["mkdir","t1"])
4 #当指定shell=True 前一个参数需求为字符串
5 ret2 = subprocess.Popen("mkdir t2", shell=True)
终端输入的命令分为两种:

输入即可得到输出,如:ifconfig
输入进行某环境,依赖再输入,如:python
1 import subprocess 2 3 obj = subprocess.Popen("mkdir t3", shell=True, cwd='/home/dev',)
 1 import subprocess
 2
 3 obj = subprocess.Popen(["python"], stdin=subprocess.PIPE, stdout=subprocess.PIPE, stderr=subprocess.PIPE)
 4 obj.stdin.write('print 1 \n ')
 5 obj.stdin.write('print 2 \n ')
 6 obj.stdin.write('print 3 \n ')
 7 obj.stdin.write('print 4 \n ')
 8 obj.stdin.close()
 9
10 cmd_out = obj.stdout.read()
11 obj.stdout.close()
12 cmd_error = obj.stderr.read()
13 obj.stderr.close()
14
15 print cmd_out
16 print cmd_error
1 import subprocess
2
3 #stdin=subprocess.PIPE 处理管道命令,控制文件的关闭
4 obj = subprocess.Popen(["python"], stdin=subprocess.PIPE, stdout=subprocess.PIPE, stderr=subprocess.PIPE)
5 out_error_list = obj.communicate('print "hello"')
6 print out_error_list
六、shutil
高级的 文件、文件夹、压缩包 处理模块
shutil.copyfileobj(fsrc, fdst[, length])
将文件内容拷贝到另一个文件中,可以部分内容
1 def copyfileobj(fsrc, fdst, length=16*1024):
2     """copy data from file-like object fsrc to file-like object fdst"""
3     while 1:
4         buf = fsrc.read(length)
5         if not buf:
6             break
7         fdst.write(buf)
shutil.copyfile(src, dst)
 1 def copyfile(src, dst):
 2     """Copy data from src to dst"""
 3     if _samefile(src, dst):
 4         raise Error("`%s` and `%s` are the same file" % (src, dst))
 5
 6     for fn in [src, dst]:
 7         try:
 8             st = os.stat(fn)
 9         except OSError:
10             # File most likely does not exist
11             pass
12         else:
13             # XXX What about other special files? (sockets, devices...)
14             if stat.S_ISFIFO(st.st_mode):
15                 raise SpecialFileError("`%s` is a named pipe" % fn)
16
17     with open(src, 'rb') as fsrc:
18         with open(dst, 'wb') as fdst:
19             copyfileobj(fsrc, fdst)
shutil.copymode(src, dst)
1 def copymode(src, dst):
2     """Copy mode bits from src to dst"""
3     if hasattr(os, 'chmod'):
4         st = os.stat(src)
5         mode = stat.S_IMODE(st.st_mode)
6         os.chmod(dst, mode)
shutil.copystat(src, dst)
拷贝状态的信息,包括:mode bits, atime, mtime, flags
 1 def copystat(src, dst):
 2     """Copy all stat info (mode bits, atime, mtime, flags) from src to dst"""
 3     st = os.stat(src)
 4     mode = stat.S_IMODE(st.st_mode)
 5     if hasattr(os, 'utime'):
 6         os.utime(dst, (st.st_atime, st.st_mtime))
 7     if hasattr(os, 'chmod'):
 8         os.chmod(dst, mode)
 9     if hasattr(os, 'chflags') and hasattr(st, 'st_flags'):
10         try:
11             os.chflags(dst, st.st_flags)
12         except OSError, why:
13             for err in 'EOPNOTSUPP', 'ENOTSUP':
14                 if hasattr(errno, err) and why.errno == getattr(errno, err):
15                     break
16             else:
17                 raise
shutil.copy(src, dst)
拷贝文件和权限
 1 def copy(src, dst):
 2     """Copy data and mode bits ("cp src dst").
 3
 4     The destination may be a directory.
 5
 6     """
 7     if os.path.isdir(dst):
 8         dst = os.path.join(dst, os.path.basename(src))
 9     copyfile(src, dst)
10     copymode(src, dst
shutil.ignore_patterns(*patterns)
shutil.copytree(src, dst, symlinks=False, ignore=None)
递归的去拷贝文件
例如:copytree(source, destination, ignore=ignore_patterns('*.pyc', 'tmp*'))
 1 def ignore_patterns(*patterns):
 2     """Function that can be used as copytree() ignore parameter.
 3
 4     Patterns is a sequence of glob-style patterns
 5     that are used to exclude files"""
 6     def _ignore_patterns(path, names):
 7         ignored_names = []
 8         for pattern in patterns:
 9             ignored_names.extend(fnmatch.filter(names, pattern))
10         return set(ignored_names)
11     return _ignore_patterns
12
13 def copytree(src, dst, symlinks=False, ignore=None):
14     """Recursively copy a directory tree using copy2().
15
16     The destination directory must not already exist.
17     If exception(s) occur, an Error is raised with a list of reasons.
18
19     If the optional symlinks flag is true, symbolic links in the
20     source tree result in symbolic links in the destination tree; if
21     it is false, the contents of the files pointed to by symbolic
22     links are copied.
23
24     The optional ignore argument is a callable. If given, it
25     is called with the `src` parameter, which is the directory
26     being visited by copytree(), and `names` which is the list of
27     `src` contents, as returned by os.listdir():
28
29         callable(src, names) -> ignored_names
30
31     Since copytree() is called recursively, the callable will be
32     called once for each directory that is copied. It returns a
33     list of names relative to the `src` directory that should
34     not be copied.
35
36     XXX Consider this example code rather than the ultimate tool.
37
38     """
39     names = os.listdir(src)
40     if ignore is not None:
41         ignored_names = ignore(src, names)
42     else:
43         ignored_names = set()
44
45     os.makedirs(dst)
46     errors = []
47     for name in names:
48         if name in ignored_names:
49             continue
50         srcname = os.path.join(src, name)
51         dstname = os.path.join(dst, name)
52         try:
53             if symlinks and os.path.islink(srcname):
54                 linkto = os.readlink(srcname)
55                 os.symlink(linkto, dstname)
56             elif os.path.isdir(srcname):
57                 copytree(srcname, dstname, symlinks, ignore)
58             else:
59                 # Will raise a SpecialFileError for unsupported file types
60                 copy2(srcname, dstname)
61         # catch the Error from the recursive copytree so that we can
62         # continue with other files
63         except Error, err:
64             errors.extend(err.args[0])
65         except EnvironmentError, why:
66             errors.append((srcname, dstname, str(why)))
67     try:
68         copystat(src, dst)
69     except OSError, why:
70         if WindowsError is not None and isinstance(why, WindowsError):
71             # Copying file access times may fail on Windows
72             pass
73         else:
74             errors.append((src, dst, str(why)))
75     if errors:
76         raise Error, errors
shutil.rmtree(path[, ignore_errors[, onerror]])
递归的去删除文件
 1 def rmtree(path, ignore_errors=False, οnerrοr=None):
 2     """Recursively delete a directory tree.
 3
 4     If ignore_errors is set, errors are ignored; otherwise, if onerror
 5     is set, it is called to handle the error with arguments (func,
 6     path, exc_info) where func is os.listdir, os.remove, or os.rmdir;
 7     path is the argument to that function that caused it to fail; and
 8     exc_info is a tuple returned by sys.exc_info().  If ignore_errors
 9     is false and onerror is None, an exception is raised.
10
11     """
12     if ignore_errors:
13         def onerror(*args):
14             pass
15     elif onerror is None:
16         def onerror(*args):
17             raise
18     try:
19         if os.path.islink(path):
20             # symlinks to directories are forbidden, see bug #1669
21             raise OSError("Cannot call rmtree on a symbolic link")
22     except OSError:
23         onerror(os.path.islink, path, sys.exc_info())
24         # can't continue even if onerror hook returns
25         return
26     names = []
27     try:
28         names = os.listdir(path)
29     except os.error, err:
30         onerror(os.listdir, path, sys.exc_info())
31     for name in names:
32         fullname = os.path.join(path, name)
33         try:
34             mode = os.lstat(fullname).st_mode
35         except os.error:
36             mode = 0
37         if stat.S_ISDIR(mode):
38             rmtree(fullname, ignore_errors, onerror)
39         else:
40             try:
41                 os.remove(fullname)
42             except os.error, err:
43                 onerror(os.remove, fullname, sys.exc_info())
44     try:
45         os.rmdir(path)
46     except os.error:
47         onerror(os.rmdir, path, sys.exc_info()
shutil.move(src, dst)
递归的去移动文件
 1 def move(src, dst):
 2     """Recursively move a file or directory to another location. This is
 3     similar to the Unix "mv" command.
 4
 5     If the destination is a directory or a symlink to a directory, the source
 6     is moved inside the directory. The destination path must not already
 7     exist.
 8
 9     If the destination already exists but is not a directory, it may be
10     overwritten depending on os.rename() semantics.
11
12     If the destination is on our current filesystem, then rename() is used.
13     Otherwise, src is copied to the destination and then removed.
14     A lot more could be done here...  A look at a mv.c shows a lot of
15     the issues this implementation glosses over.
16
17     """
18     real_dst = dst
19     if os.path.isdir(dst):
20         if _samefile(src, dst):
21             # We might be on a case insensitive filesystem,
22             # perform the rename anyway.
23             os.rename(src, dst)
24             return
25
26         real_dst = os.path.join(dst, _basename(src))
27         if os.path.exists(real_dst):
28             raise Error, "Destination path '%s' already exists" % real_dst
29     try:
30         os.rename(src, real_dst)
31     except OSError:
32         if os.path.isdir(src):
33             if _destinsrc(src, dst):
34                 raise Error, "Cannot move a directory '%s' into itself '%s'." % (src, dst)
35             copytree(src, real_dst, symlinks=True)
36             rmtree(src)
37         else:
38             copy2(src, real_dst)
39             os.unlink(src)
shutil.make_archive(base_name, format,...)
创建压缩包并返回文件路径,例如:zip、tar
- base_name: 压缩包的文件名,也可以是压缩包的路径。只是文件名时,则保存至当前目录,否则保存至指定路径,
如:www =>保存至当前路径
如:/Users/wupeiqi/www =>保存至/Users/wupeiqi/ - format: 压缩包种类,“zip”, “tar”, “bztar”,“gztar”
- root_dir: 要压缩的文件夹路径(默认当前目录)
- owner: 用户,默认当前用户
- group: 组,默认当前组
- logger: 用于记录日志,通常是logging.Logger对象
|
1
2
3
4
5
6
7
8
9
|
#将 /Users/wupeiqi/Downloads/test 下的文件打包放置当前程序目录
import
shutil
ret
=
shutil.make_archive(
"wwwwwwwwww"
,
'gztar'
, root_dir
=
'/Users/wupeiqi/Downloads/test'
)
#将 /Users/wupeiqi/Downloads/test 下的文件打包放置 /Users/wupeiqi/目录
import
shutil
ret
=
shutil.make_archive(
"/Users/wupeiqi/wwwwwwwwww"
,
'gztar'
, root_dir
=
'/Users/wupeiqi/Downloads/test'
)
|
shutil 对压缩包的处理是调用 ZipFile 和 TarFile 两个模块来进行的,详细:
 1 import zipfile
 2
 3 # 压缩
 4 z = zipfile.ZipFile('laxi.zip', 'w')
 5 z.write('a.log')
 6 z.write('data.data')
 7 z.close()
 8
 9 # 解压
10 z = zipfile.ZipFile('laxi.zip', 'r')
11 z.extractall()
12 z.close()
 1 import tarfile
 2
 3 # 压缩
 4 tar = tarfile.open('your.tar','w')
 5 tar.add('/Users/wupeiqi/PycharmProjects/bbs2.zip', arcname='bbs2.zip')
 6 tar.add('/Users/wupeiqi/PycharmProjects/cmdb.zip', arcname='cmdb.zip')
 7 tar.close()
 8
 9 # 解压
10 tar = tarfile.open('your.tar','r')
11 tar.extractall()  # 可设置解压地址
12 tar.close()
七、ConfigParser
用于对特定的配置进行操作,当前模块的名称在 python 3.x 版本中变更为 configparser。
|
1
2
3
4
5
6
7
8
9
|
# 注释1
; 注释
2
[section1]
k1
=
v1
k2:v2
[section2]
k1
=
v1
|
|
1
2
3
4
5
6
7
8
9
10
11
12
13
14
15
16
17
18
19
20
21
22
23
24
25
26
27
28
29
30
31
|
import
ConfigParser
config
=
ConfigParser.ConfigParser()
config.read(
'i.cfg'
)
# ########## 读 ##########
#secs = config.sections()
#print secs
#options = config.options('group2')
#print options
#item_list = config.items('group2')
#print item_list
#val = config.get('group1','key')
#val = config.getint('group1','key')
# ########## 改写 ##########
#sec = config.remove_section('group1')
#config.write(open('i.cfg', "w"))
#sec = config.has_section('wupeiqi')
#sec = config.add_section('wupeiqi')
#config.write(open('i.cfg', "w"))
#config.set('group2','k1',11111)
#config.write(open('i.cfg', "w"))
#config.remove_option('group2','age')
#config.write(open('i.cfg', "w"))
|
八、logging
用于便捷记录日志且线程安全的模块
|
1
2
3
4
5
6
7
8
9
10
11
12
13
14
|
import
logging
logging.basicConfig(filename
=
'log.log'
,
format
=
'%(asctime)s - %(name)s - %(levelname)s -%(module)s: %(message)s'
,
datefmt
=
'%Y-%m-%d %H:%M:%S %p'
,
level
=
10
)
logging.debug(
'debug'
)
logging.info(
'info'
)
logging.warning(
'warning'
)
logging.error(
'error'
)
logging.critical(
'critical'
)
logging.log(
10
,
'log'
)
|
对于等级:
|
1
2
3
4
5
6
7
8
|
CRITICAL
=
50
FATAL
=
CRITICAL
ERROR
=
40
WARNING
=
30
WARN
=
WARNING
INFO
=
20
DEBUG
=
10
NOTSET
=
0
|
只有大于当前日志等级的操作才会被记录。
对于格式,有如下属性可是配置:

九、time
时间相关的操作,时间有三种表示方式:
- 时间戳 1970年1月1日之后的秒,即:time.time()
- 格式化的字符串 2014-11-11 11:11, 即:time.strftime('%Y-%m-%d')
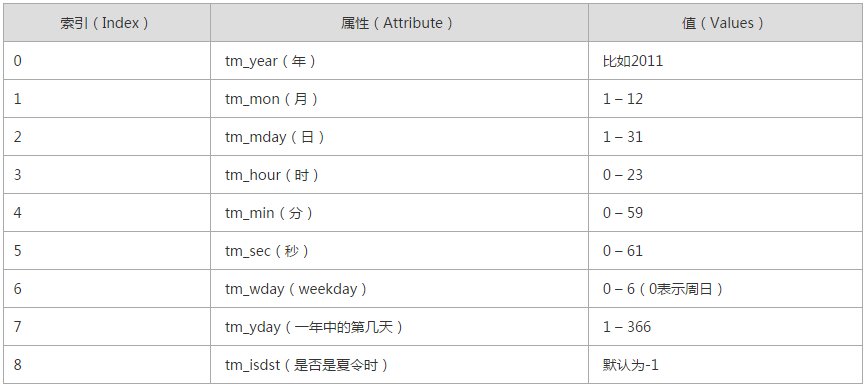
- 结构化时间 元组包含了:年、日、星期等... time.struct_time 即:time.localtime()
|
1
2
3
4
5
6
7
8
9
10
11
12
13
14
15
16
17
18
19
20
21
22
23
24
25
|
print
time.time()
print
time.mktime(time.localtime())
print
time.gmtime()
#可加时间戳参数
print
time.localtime()
#可加时间戳参数
print
time.strptime(
'2014-11-11'
,
'%Y-%m-%d'
)
print
time.strftime(
'%Y-%m-%d'
)
#默认当前时间
print
time.strftime(
'%Y-%m-%d'
,time.localtime())
#默认当前时间
print
time.asctime()
print
time.asctime(time.localtime())
print
time.ctime(time.time())
import
datetime
'''
datetime.date:表示日期的类。常用的属性有year, month, day
datetime.time:表示时间的类。常用的属性有hour, minute, second, microsecond
datetime.datetime:表示日期时间
datetime.timedelta:表示时间间隔,即两个时间点之间的长度
timedelta([days[, seconds[, microseconds[, milliseconds[, minutes[, hours[, weeks]]]]]]])
strftime("%Y-%m-%d")
'''
import
datetime
print
datetime.datetime.now()
print
datetime.datetime.now()
-
datetime.timedelta(days
=
5
)
|

十、re
re模块用于对python的正则表达式的操作。
字符:
. 匹配除换行符以外的任意字符
\w 匹配字母或数字或下划线或汉字
\s 匹配任意的空白符
\d 匹配数字
\b 匹配单词的开始或结束
^ 匹配字符串的开始
$ 匹配字符串的结束
次数:
* 重复零次或更多次
+ 重复一次或更多次
? 重复零次或一次
{n} 重复n次
{n,} 重复n次或更多次
{n,m} 重复n到m次
IP:
^(25[0-5]|2[0-4]\d|[0-1]?\d?\d)(\.(25[0-5]|2[0-4]\d|[0-1]?\d?\d)){3}$
手机号:
^1[3|4|5|8][0-9]\d{8}$
1、match(pattern, string, flags=0)
从起始位置开始根据模型去字符串中匹配指定内容,匹配单个
- 正则表达式
- 要匹配的字符串
- 标志位,用于控制正则表达式的匹配方式
import re

obj = re.match('\d+', '123uuasf')
if obj:
    print obj.group()
# flags
I = IGNORECASE = sre_compile.SRE_FLAG_IGNORECASE # ignore case
L = LOCALE = sre_compile.SRE_FLAG_LOCALE # assume current 8-bit locale
U = UNICODE = sre_compile.SRE_FLAG_UNICODE # assume unicode locale
M = MULTILINE = sre_compile.SRE_FLAG_MULTILINE # make anchors look for newline
S = DOTALL = sre_compile.SRE_FLAG_DOTALL # make dot match newline
X = VERBOSE = sre_compile.SRE_FLAG_VERBOSE # ignore whitespace and comments
2、search(pattern, string, flags=0)
根据模型去字符串中匹配指定内容,匹配单个
import re

obj = re.search('\d+', 'u123uu888asf')
if obj:
    print obj.group()
3、group和groups

a = "123abc456"
print re.search("([0-9]*)([a-z]*)([0-9]*)", a).group()

print re.search("([0-9]*)([a-z]*)([0-9]*)", a).group(0)
print re.search("([0-9]*)([a-z]*)([0-9]*)", a).group(1)
print re.search("([0-9]*)([a-z]*)([0-9]*)", a).group(2)

print re.search("([0-9]*)([a-z]*)([0-9]*)", a).groups()
4、findall(pattern, string, flags=0)
上述两中方式均用于匹配单值,即:只能匹配字符串中的一个,如果想要匹配到字符串中所有符合条件的元素,则需要使用 findall。
import re

obj = re.findall('\d+', 'fa123uu888asf')
print obj
5、sub(pattern, repl, string, count=0, flags=0)
用于替换匹配的字符串
content = "123abc456"
new_content = re.sub('\d+', 'sb', content)
# new_content = re.sub('\d+', 'sb', content, 1)
print new_content
相比于str.replace功能更加强大
6、split(pattern, string, maxsplit=0, flags=0)
根据指定匹配进行分组
content = "'1 - 2 * ((60-30+1*(9-2*5/3+7/3*99/4*2998+10*568/14))-(-4*3)/(16-3*2) )'"
new_content = re.split('\*', content)
# new_content = re.split('\*', content, 1)
print new_content
content = "'1 - 2 * ((60-30+1*(9-2*5/3+7/3*99/4*2998+10*568/14))-(-4*3)/(16-3*2) )'"
new_content = re.split('[\+\-\*\/]+', content)
# new_content = re.split('\*', content, 1)
print new_content
inpp = '1-2*((60-30 +(-40-5)*(9-2*5/3 + 7 /3*99/4*2998 +10 * 568/14 )) - (-4*3)/ (16-3*2))'
inpp = re.sub('\s*','',inpp)
new_content = re.split('\(([\+\-\*\/]?\d+[\+\-\*\/]?\d+){1}\)', inpp, 1)
print new_content
相比于str.split更加强大
实例:计算器源码
十一、random
随机数
|
1
2
3
4
|
mport random
print
random.random()
print
random.randint(
1
,
2
)
print
random.randrange(
1
,
10
)
|
随机验证码实例:
|
1
2
3
4
5
6
7
8
9
10
|
import
random
checkcode
=
''
for
i
in
range
(
4
):
current
=
random.randrange(
0
,
4
)
if
current !
=
i:
temp
=
chr
(random.randint(
65
,
90
))
else
:
temp
=
random.randint(
0
,
9
)
checkcode
+
=
str
(temp)
print
checkcode
|


 3630
3630


 被折叠的 条评论
为什么被折叠?
被折叠的 条评论
为什么被折叠?
 到【灌水乐园】发言


