


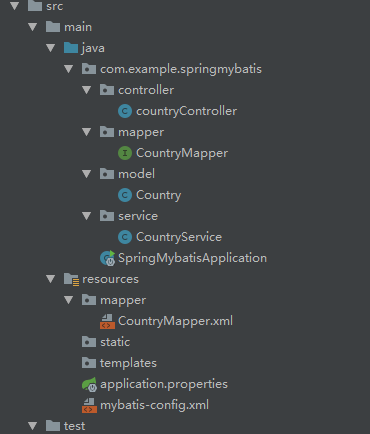
示例的各个文件如下:
在pom里加了mybatis的依赖后,在application.properties加上:
spring.datasource.url=jdbc:mysql://127.0.0.1:3306/test
spring.datasource.username=**
spring.datasource.password=**

mybatis.mapperLocations=classpath*:mapper/*Mapper.xml
mybatis.typeAliasesPackage=com.example.springmybatis.model
mybatis.config-location=classpath:mybatis-config.xml
mybatis-config.xml可以配置的选项如下:


<?xml version="1.0" encoding="UTF-8" ?>
<!DOCTYPE configuration PUBLIC "-//mybatis.org//DTD Config 3.0//EN" "http://mybatis.org/dtd/mybatis-3-config.dtd">
<configuration>
    <!-- 参数设置 -->
    <settings>
        <!-- 这个配置使全局的映射器启用或禁用缓存 -->
        <setting name="cacheEnabled" value="true" />
        <!-- 全局启用或禁用延迟加载。当禁用时,所有关联对象都会即时加载 -->
        <setting name="lazyLoadingEnabled" value="true" />
        <!-- 当启用时,有延迟加载属性的对象在被调用时将会完全加载任意属性。否则,每种属性将会按需要加载 -->
        <setting name="aggressiveLazyLoading" value="true" />
        <!-- 允许或不允许多种结果集从一个单独的语句中返回(需要适合的驱动) -->
        <setting name="multipleResultSetsEnabled" value="true" />
        <!-- 使用列标签代替列名。不同的驱动在这方便表现不同。参考驱动文档或充分测试两种方法来决定所使用的驱动 -->
        <setting name="useColumnLabel" value="true" />
        <!-- 允许JDBC支持生成的键。需要适合的驱动。如果设置为true则这个设置强制生成的键被使用,尽管一些驱动拒绝兼容但仍然有效(比如Derby) -->
        <setting name="useGeneratedKeys" value="true" />
        <!-- 指定MyBatis如何自动映射列到字段/属性。PARTIAL只会自动映射简单,没有嵌套的结果。FULL会自动映射任意复杂的结果(嵌套的或其他情况) -->
        <setting name="autoMappingBehavior" value="PARTIAL" />
        <!--当检测出未知列(或未知属性)时,如何处理,默认情况下没有任何提示,这在测试的时候很不方便,不容易找到错误。
        NONE : 不做任何处理 (默认值)
        WARNING : 警告日志形式的详细信息
        FAILING : 映射失败,抛出异常和详细信息
        -->
        <setting name="autoMappingUnknownColumnBehavior" value="WARNING"/>
        <!-- 配置默认的执行器。SIMPLE执行器没有什么特别之处。REUSE执行器重用预处理语句。BATCH执行器重用语句和批量更新 -->
        <setting name="defaultExecutorType" value="SIMPLE" />
        <!-- 设置超时时间,它决定驱动等待一个数据库响应的时间 -->
        <setting name="defaultStatementTimeout" value="25000" />
        <!--设置查询返回值数量,可以被查询数值覆盖  -->
        <setting name="defaultFetchSize" value="100"/>
        <!-- 允许在嵌套语句中使用分页-->
        <setting name="safeRowBoundsEnabled" value="false"/>
        <!--是否开启自动驼峰命名规则(camel case)映射,即从经典数据库列名 A_COLUMN 到经典 Java 属性名 aColumn 的类似映射。-->
        <setting name="mapUnderscoreToCamelCase" value="false"/>
        <!--MyBatis 利用本地缓存机制(Local Cache)防止循环引用(circular references)和加速重复嵌套查询。 默认值为 SESSION,这种情况下会缓存一个会话中执行的所有查询。 若设置值为 STATEMENT,本地会话仅用在语句执行上,对相同 SqlSession 的不同调用将不会共享数据。-->
        <setting name="localCacheScope" value="SESSION"/>
        <!-- 当没有为参数提供特定的 JDBC 类型时,为空值指定 JDBC 类型。 某些驱动需要指定列的 JDBC 类型,多数情况直接用一般类型即可,比如 NULL、VARCHAR OTHER。-->
        <setting name="jdbcTypeForNull" value="OTHER"/>
        <!-- 指定哪个对象的方法触发一次延迟加载。-->
        <setting name="lazyLoadTriggerMethods" value="equals,clone,hashCode,toString"/>
    </settings>

    <!-- 别名定义 -->
    <typeAliases>
        <typeAlias alias="pageAccessURL" type="com.lgm.mybatis.model.PageAccessURL" />
    </typeAliases>

    <!--自定义类型处理器 -->
    <typeHandlers>
    <!-- <typeHandler handler="com.xhm.util.BooleanTypeHandlder" /> -->
        <!--扫描整个包下的自定义类型处理器-->
        <package name="com.xhm.util"/>
    </typeHandlers>

    <!--plugins插件之 分页拦截器  -->
    <plugins>
        <plugin interceptor="com.xhm.util.PageInterceptor"></plugin>
    </plugins>

    <!--配置environment环境-->
    <environments default="development">
        <!-- 环境配置1,每个SqlSessionFactory对应一个环境 -->
        <environment id="development1">
            <!-- 事务配置 type= JDBC、MANAGED 1.JDBC:这个配置直接简单使用了JDBC的提交和回滚设置。它依赖于从数据源得到的连接来管理事务范围。
            2.MANAGED:这个配置几乎没做什么。它从来不提交或回滚一个连接。而它会让容器来管理事务的整个生命周期(比如Spring或JEE应用服务器的上下文)。 默认情况下它会关闭连接。然而一些容器并不希望这样,因此如果你需要从连接中停止它,将closeConnection属性设置为false -->
            <transactionManager type="JDBC" />
            <!-- <transactionManager type="MANAGED">
            <property name="closeConnection" value="false"/>
            </transactionManager> -->
                <!-- 数据源类型:type = UNPOOLED、POOLED、JNDI 1.UNPOOLED:这个数据源的实现是每次被请求时简单打开和关闭连接。它有一点慢,这是对简单应用程序的一个很好的选择,因为它不需要及时的可用连接。
                不同的数据库对这个的表现也是不一样的,所以对某些数据库来说配置数据源并不重要,这个配置也是闲置的 2.POOLED:这是JDBC连接对象的数据源连接池的实现,用来避免创建新的连接实例时必要的初始连接和认证时间。
                这是一种当前Web应用程序用来快速响应请求很流行的方法。 3.JNDI:这个数据源的实现是为了使用如Spring或应用服务器这类的容器,容器可以集中或在外部配置数据源,然后放置一个JNDI上下文的引用 -->
            <dataSource type="UNPOOLED">
                <property name="driver" value="com.mysql.jdbc.Driver" />
                <property name="url" value="jdbc:mysql://localhost:3306/xhm" />
                <property name="username" value="root" />
                <property name="password" value="root" />
                <!-- 默认连接事务隔离级别 <property name="defaultTransactionIsolationLevel" value=""
                /> -->
            </dataSource>
        </environment>

        <!-- 环境配置2 -->
        <environment id="development2">
            <transactionManager type="JDBC" />
            <dataSource type="POOLED">
                <property name="driver" value="com.mysql.jdbc.Driver" />
                <property name="url" value="jdbc:mysql://localhost:3306/xhm" />
                <property name="username" value="root" />
                <property name="password" value="root" />
                <!-- 在任意时间存在的活动(也就是正在使用)连接的数量 -->
                <property name="poolMaximumActiveConnections" value="10" />
                <!-- 任意时间存在的空闲连接数 -->
                <property name="poolMaximumIdleConnections" value="5" />
                <!-- 在被强制返回之前,池中连接被检查的时间 -->
                <property name="poolMaximumCheckoutTime" value="20000" />
                <!-- 这是给连接池一个打印日志状态机会的低层次设置,还有重新尝试获得连接,这些情况下往往需要很长时间(为了避免连接池没有配置时静默失败) -->
                <property name="poolTimeToWait" value="20000" />
                <!-- 发送到数据的侦测查询,用来验证连接是否正常工作,并且准备接受请求。 -->
                <property name="poolPingQuery" value="NO PING QUERY SET" />
                <!-- 这是开启或禁用侦测查询。如果开启,你必须用一个合法的SQL语句(最好是很快速的)设置poolPingQuery属性 -->
                <property name="poolPingEnabled" value="false" />
                <!-- 这是用来配置poolPingQuery多次时间被用一次。这可以被设置匹配标准的数据库连接超时时间,来避免不必要的侦测 -->
                <property name="poolPingConnectionsNotUsedFor" value="0" />
            </dataSource>
        </environment>

        <!-- 环境配置3 -->
        <environment id="development3">
            <transactionManager type="JDBC" />
            <dataSource type="JNDI">
                <property name="data_source" value="java:comp/env/jndi/mybatis" />
                <property name="env.encoding" value="UTF8" />
                <!-- <property name="initial_context" value=""/> <property name="env.encoding"
                    value="UTF8"/> -->
            </dataSource>
        </environment>
    </environments>

    <!-- 映射文件,mapper的配置文件 -->
    <mappers>
        <!--直接映射到相应的mapper文件-->
        <mapper resource="com/xhm/mapper/UserMapper.xml"/>
        <!--扫描包路径下所有xxMapper.xml文件-->
        <package name="com.xhm.mapper"/>
    </mappers>
</configuration>
在项目中,一般不需要特殊配置,主要是开启驼峰命名。我使用的一般配置是:
<?xml version="1.0" encoding="UTF-8"?>
<!DOCTYPE configuration
        PUBLIC "-//mybatis.org//DTD Config 3.0//EN"
        "http://mybatis.org/dtd/mybatis-3-config.dtd">
<configuration>

    <settings>
        <!-- Globally enables or disables any caches configured in any mapper under this configuration -->
        <setting name="cacheEnabled" value="true"/>
        <!-- Sets the number of seconds the driver will wait for a response from the database -->
        <setting name="defaultStatementTimeout" value="3000"/>
        <!-- Enables automatic mapping from classic database column names A_COLUMN to camel case classic Java property names aColumn -->
        <setting name="mapUnderscoreToCamelCase" value="true"/>
        <!-- Allows JDBC support for generated keys. A compatible driver is required.
        This setting forces generated keys to be used if set to true,
         as some drivers deny compatibility but still work -->
        <setting name="useGeneratedKeys" value="true"/>
    </settings>

    <!-- Continue going here -->

</configuration>
在resource文件夹新建CountryMapper.xml,用xml配置sql。内容如下:
<?xml version="1.0" encoding="UTF-8" ?>
<!DOCTYPE mapper PUBLIC "-//mybatis.org//DTD Mapper 3.0//EN"
        "http://mybatis.org/dtd/mybatis-3-mapper.dtd" >
<mapper namespace="com.example.springmybatis.mapper.CountryMapper">
    <select id="selectAll" resultType="Country">
        select id,countryname,countrycode from country
    </select>
</mapper>
controller中使用
新建mapper包,创建CountryMapper接口文件,内容如下:
package com.example.springmybatis.mapper;

import com.example.springmybatis.model.Country;
import org.apache.ibatis.annotations.Mapper;

import java.util.List;

@Mapper
public interface CountryMapper {
    List<Country> selectAll();
}
同时新建controller和service包和类,如下:
controoller:
package com.example.springmybatis.controller;

import com.alibaba.fastjson.JSON;
import com.example.springmybatis.service.CountryService;
import org.springframework.beans.factory.annotation.Autowired;
import org.springframework.web.bind.annotation.RequestMapping;
import org.springframework.web.bind.annotation.RestController;

@RestController
public class countryController {

    @Autowired
    private CountryService countryService;

    @RequestMapping("/selectAll")
    public String selectAll(){
        return JSON.toJSONString(countryService.selectAll());
    }
}
service:
package com.example.springmybatis.service;

import com.example.springmybatis.mapper.CountryMapper;
import com.example.springmybatis.model.Country;
import org.springframework.beans.factory.annotation.Autowired;
import org.springframework.stereotype.Service;

import java.util.List;

@Service
public class CountryService {

    @Autowired
    private CountryMapper countryMapper;

    public List<Country> selectAll(){
        return countryMapper.selectAll();
    }
}
model就省略了,只有id,countryName,countryCode三个属性。


 3020
3020


 被折叠的 条评论
为什么被折叠?
被折叠的 条评论
为什么被折叠?
 到【灌水乐园】发言


