


Spring中的Bean
1、Bean的配置:
a)、Bean的本质就是Java中的类,而Spring中的Bean其实就是对实体类的引用,来生产Java类对象,从而实现生产和管理Bean 。
b)、Spring容器支持两种格式的配置文件:Properties文件和XML文件。在实际开发中,最常使用的是XML文件格式的配置方式,这种配置方式是通过XML文件来注册并管理Bean之间的依赖关系。
c)、XML配置文件的根元素是<beans>,<beans>中包含了多个<bean>子元素,每一个<bean>子元素定义了一个Bean,并描述了该Bean如何被装配到Spring容器中。
d)、关于<beans>元素的常用属性如下表所示:
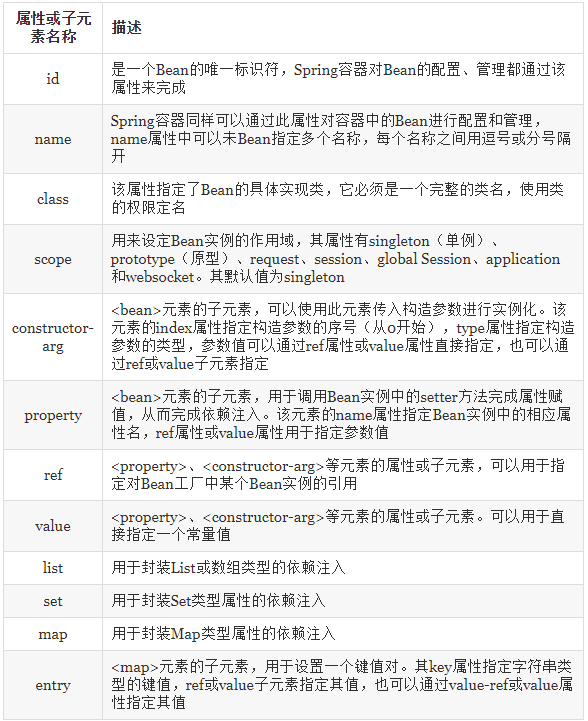
e)、如果在Bean中未指定id和name,则Spring会将class值当作id使用。
2、Bean的实例化
实例化Bean有三种方式,分别为构造器实例化、静态工厂方式实例化和实例工厂方式实例化(其中最常用的是构造器实例化)。
1)、构造器实例化:指Spring容器通过Bean对应的类中默认的构造函数来实例化Bean。
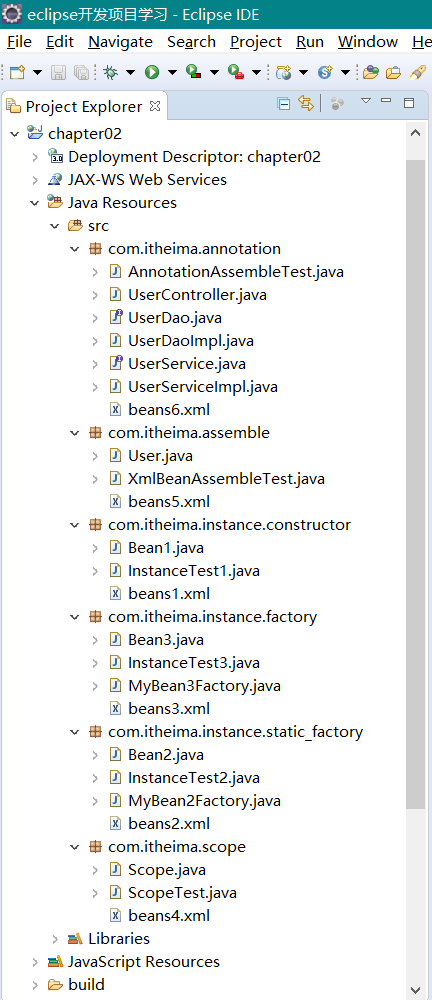
src->com.itheima.instance.constructor
①Bean1.java
1 package com.itheima.instance.constructor;
2
3 public class Bean1 { // 实例化Bean1的对象时调用其无参构造方法
4
5 }
②beans1.xml
1 <?xml version="1.0" encoding="UTF-8"?>
2 <beans xmlns="http://www.springframework.org/schema/beans"
3    xmlns:xsi="http://www.w3.org/2001/XMLSchema-instance"
4 xsi:schemaLocation="http://www.springframework.org/schema/beans
5                       http://www.springframework.org/schema/beans/spring-beans-4.3.xsd">
6    <bean id="bean1" class="com.itheima.instance.constructor.Bean1" />
7 </beans>
③测试类:InstanceTest1.java
 1 package com.itheima.instance.constructor;
 2
 3 import org.springframework.context.ApplicationContext;
 4 import org.springframework.context.support.ClassPathXmlApplicationContext;
 5
 6 //构造器实例化Bean
 7 public class InstanceTest1 {
 8     public static void main(String[] args) {
 9         // 1、定义配置文件路径
10         String xmlPath = "com/itheima/instance/constructor/beans1.xml";
11         // 2、ApplicationContext在加载配置文件时,对Bean进行实例化(Spring容器会通过id为bean1ID的实现类Bean1中默认的无参构造方法对Bean进行实例化)
12         ApplicationContext applicationContext = new ClassPathXmlApplicationContext(xmlPath);
13         // 3、通过容器获取Bean1的实例
14         Bean1 bean = (Bean1) applicationContext.getBean("bean1ID");
15         System.out.println(bean);
16     }
17 }
④运行结果:

2)、静态工厂:要求自己创建一个静态工厂的方法来创建Bean的实例。
src->com.itheima.instance.static_factory
①Bean2.java
1 package com.itheima.instance.static_factory;
2
3 public class Bean2 {
4     //无需添加任何方法
5 }
②MyBean2Factory.java
1 package com.itheima.instance.static_factory;
2
3 public class MyBean2Factory { // 创建工厂类MyBean2Factory
4     // 使用自己的工厂创建Bean2实例(使用静态方法创建Bean2实例)
5     public static Bean2 createBean() {
6         return new Bean2();
7     }
8 }
③beans2.xml
 1 <?xml version="1.0" encoding="UTF-8"?>
 2 <beans xmlns="http://www.springframework.org/schema/beans"
 3    xmlns:xsi="http://www.w3.org/2001/XMLSchema-instance"
 4 xsi:schemaLocation="http://www.springframework.org/schema/beans
 5                       http://www.springframework.org/schema/beans/spring-beans-4.3.xsd">
 6
 7      <bean id="bean2ID" class="com.itheima.instance.static_factory.MyBean2Factory"
 8     factory-method="createBean" />
 9     <!-- 由于使用的是静态工厂方法,所以需要通过class属性指定其对应的工厂实现类为MyBean2Factory
10         factory-method属性来告诉Spring容器,需要createBean这个工厂方法
11     -->
12 </beans>
④测试类:InstanceTest2.java
 1 package com.itheima.instance.static_factory;
 2
 3 import org.springframework.context.ApplicationContext;
 4 import org.springframework.context.support.ClassPathXmlApplicationContext;
 5
 6 // 静态工厂实例化Bean
 7 public class InstanceTest2 {
 8     public static void main(String[] args) {
 9         String xmlPath = "com/itheima/instance/static_factory/beans2.xml";
10         ApplicationContext applicationContext = new ClassPathXmlApplicationContext(xmlPath);
11         System.out.println(applicationContext.getBean("bean2ID"));
12     }
13 }
⑤运行结果:

3)、实例工厂:采用直接创建Bean实例的方式,在配置文件中,通过factory-bean属性配置一个实例工厂,然后使用factory-method属性确定使用工厂中的哪个方法。
src->com.itheima.instance.factory
①Bean3.java
1 package com.itheima.instance.factory;
2
3 public class Bean3 {
4     //无需添加任何方法
5 }
②MyBean3Factory.java
 1 package com.itheima.instance.factory;
 2
 3 public class MyBean3Factory { // 创建工厂类MyBean3Factory
 4     public MyBean3Factory() { // 默认使用无参构造方法输出语句
 5         System.out.println("bean3工厂实例化中");
 6     }
 7     // 创建Bean3实例的方法
 8     public Bean3 createBean() {
 9         return new Bean3();
10     }
11 }
③beans3.xml
 1 <?xml version="1.0" encoding="UTF-8"?>
 2 <beans xmlns="http://www.springframework.org/schema/beans"
 3    xmlns:xsi="http://www.w3.org/2001/XMLSchema-instance"
 4 xsi:schemaLocation="http://www.springframework.org/schema/beans
 5                       http://www.springframework.org/schema/beans/spring-beans-4.3.xsd">
 6     <!-- 配置工厂 -->
 7       <bean id="myBean3FactoryID" class="com.itheima.instance.factory.MyBean3Factory" />
 8      <!-- 使用factory-bean属性指向配置的实例工厂 (myBean3FactoryID),该属性值就是工厂Bean的id。
 9          使用factory-method属性确定使用工厂中的哪个方法 (createBean)
10      -->
11      <bean id="bean3ID" factory-bean="myBean3FactoryID" factory-method="createBean" />
12 </beans>
④测试类:InstanceTest3.java
 1 package com.itheima.instance.factory;
 2
 3 import org.springframework.context.ApplicationContext;
 4 import org.springframework.context.support.ClassPathXmlApplicationContext;
 5
 6 public class InstanceTest3 {
 7     public static void main(String[] args) {
 8         String xmlPath = "com/itheima/instance/factory/beans3.xml";
 9         ApplicationContext applicationContext = new ClassPathXmlApplicationContext(xmlPath);
10         System.out.println(applicationContext.getBean("bean3ID"));
11     }
12 }
⑤运行结果:

3、Bean的作用域:
1)、作用域的种类
Spring 4.3中为Bean的实例定义了7种作用域,如下表所示:
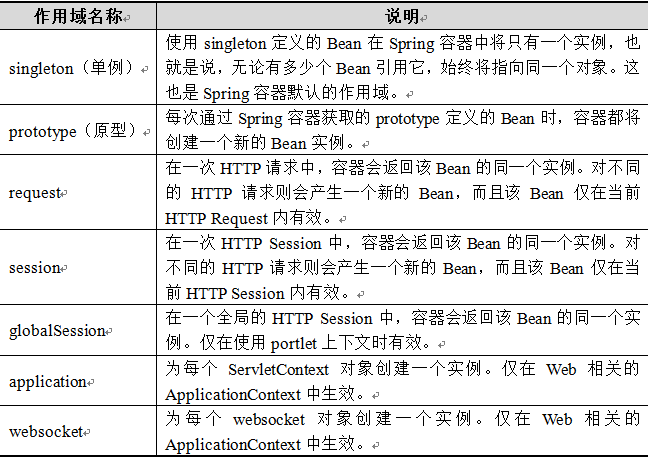
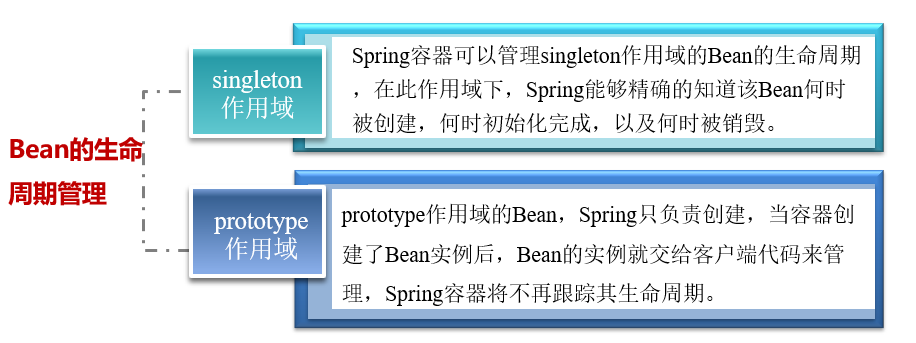
在上表7种作用域中,singleton和prototype是最常用的两种作用域。
2)、singleton作用域
a)、singleton是Spring容器默认的作用域,当Bean的作用域为singleton时,Spring容器就只会存在一个共享的Bean实例。singleton作用域对于无会话状态的Bean(如Dao 组件、Service组件)来说,是最理想的选择。
b)、在Spring配置文件中,可以使用<bean>元素的scope属性,将Bean的作用域定义成singleton。例如:
<bean id="scope" class="com.itheima.scope.Scope" scope="singleton"/>
c)、src->com.itheima.scope
①Scope.java
1 package com.itheima.scope;
2
3 public class Scope {
4     //无需写任何方法
5 }
②beans4.xml
1 <?xml version="1.0" encoding="UTF-8"?>
2 <beans xmlns="http://www.springframework.org/schema/beans"
3    xmlns:xsi="http://www.w3.org/2001/XMLSchema-instance"
4 xsi:schemaLocation="http://www.springframework.org/schema/beans
5                       http://www.springframework.org/schema/beans/spring-beans-4.3.xsd">
6     <bean id="scopeID" class="com.itheima.scope.Scope" scope="singleton"/>
7 </beans>
③测试类:ScopeTest.java
 1 package com.itheima.scope;
 2
 3 import org.springframework.context.ApplicationContext;
 4 import org.springframework.context.support.ClassPathXmlApplicationContext;
 5
 6 public class ScopeTest {
 7     public static void main(String[] args) {
 8         String xmlPath = "com/itheima/scope/beans4.xml";
 9         ApplicationContext applicationContext = new ClassPathXmlApplicationContext(xmlPath);
10         // 输出获得实例
11         System.out.println(applicationContext.getBean("scopeID"));
12         System.out.println(applicationContext.getBean("scopeID"));
13         // 两次输出结果相同,这说明Spring容器只创建了一个Scope类的实例
14     }
15 }
④运行结果:

3)、prototype作用域
a)、对需要保持会话状态的Bean(如Struts 2的Action类)应该使用prototype作用域。在使用prototype作用域时,Spring容器会为每个对该Bean的请求都创建一个新的实例。
b)、在Spring配置文件中,同样使用<bean>元素的scope属性,将Bean的作用域定义成prototype 。例如:
<bean id="scope" class="com.itheima.scope.Scope" scope=" prototype "/>
c)、src->com.itheima.scope
①beans4.xml
1 <?xml version="1.0" encoding="UTF-8"?>
2 <beans xmlns="http://www.springframework.org/schema/beans"
3    xmlns:xsi="http://www.w3.org/2001/XMLSchema-instance"
4 xsi:schemaLocation="http://www.springframework.org/schema/beans
5                       http://www.springframework.org/schema/beans/spring-beans-4.3.xsd">
6     <!--<bean id="scopeID" class="com.itheima.scope.Scope" scope="singleton"/> -->
7       <bean id="scopeID" class="com.itheima.scope.Scope" scope="prototype"/>
8       <!-- 在singleton作用域下,只创建一个Bean实例,而在prototype作用域下,每次创建不同的Bean实例 -->
9 </beans>
②运行结果:

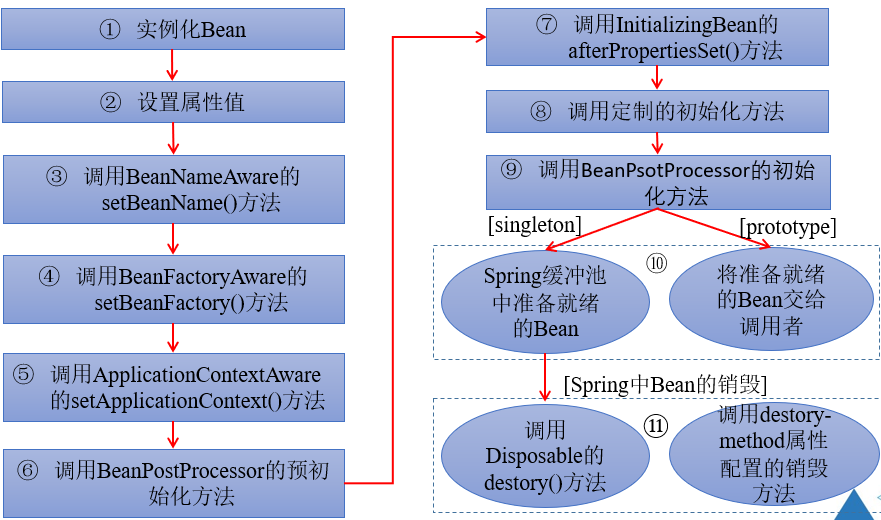
4、Bean的生命周期
1)、Spring容器可以管理Bean部分作用域的生命周期。
2)、Spring容器中Bean的生命周期流程如下图所示:
5、Bean的装配方式
Bean的装配可以理解为依赖关系注入,Bean的装配方式即Bean依赖注入的方式。Spring容器支持多种形式的Bean的装配方式,如基于XML的装配、基于注解(Annotation)的装配和自动装配(其中最常用的是基于注解的装配)。
1)、基于XML的装配
a)、2种方式:设值注入(Setter Injection)和构造注入(Constructor Injection)。
b)、设值注入要求一个bean必须满足2点要求:Bean类必须有一个默认的无参构造方法、Bean类必须为需要注入的属性提供对应的setter方法。
c)、使用设值注入时,在Spring配置文件中,需要使用<bean>元素的子元素<property>来为每个属性注入值;
d)、构造注入要求Bean类必须提供有参构造方法,配置文件中,需要使用<bean>元素的子元素<constructor-arg>来定义构造方法的参数,可以使用value属性(或子元素)来设置该参数的值。
src->com.itheima.assemble
①User.java
 1 package com.itheima.assemble;
 2 import java.util.List;
 3
 4 import javax.swing.plaf.basic.BasicInternalFrameTitlePane.SystemMenuBar;
 5
 6 public class User {
 7     private String username;
 8     private Integer password;
 9     private List<String> list;
10     /*
11      * 1、使用构造注入
12      * 1.1、提供带所有参数的有参构造方法
13      */
14     public User (String username, Integer passward, List<String> list) { // 有参构造方法
15         super(); // 调用父类的无参构造方法,可以不写
16         this.username = username;
17         this.password = passward;
18         this.list = list;
19     }
20
21     /*
22      * 2、使用设值注入
23      * 2.1、提供默认无参构造方法
24      * 2.2、为所有属性提供setter方法
25      */
26     public User() { // 无参构造方法
27         super(); // 调用父类Object的无参构造方法,可以不写
28     }
29     public void setUsername(String username) {
30         this.username = username;
31     }
32     public void setPassword(Integer password) {
33         this.password = password;
34     }
35     public void setList(List<String> list) {
36         this.list = list;
37     }
38
39     @Override
40     public String toString() { // 重写父类的Object的toString方法
41         return "User [username=" + username + ", password=" + password + ", list=" + list + "]";
42     }
43 }
②beans5.xml
 1 <?xml version="1.0" encoding="UTF-8"?>
 2 <beans xmlns="http://www.springframework.org/schema/beans"
 3    xmlns:xsi="http://www.w3.org/2001/XMLSchema-instance"
 4 xsi:schemaLocation="http://www.springframework.org/schema/beans
 5                       http://www.springframework.org/schema/beans/spring-beans-4.3.xsd">
 6     <!-- 1、使用构造注入方式装配User实例 -->
 7       <bean id = "user1ID" class = "com.itheima.assemble.User">
 8       <!--
 9         <constructor-arg> 元素用于定义构造方法的参数,
10         其index表示其索引(从0开始),value属性用于设置注入的值,
11           其子元素<list>来为User类中对应的list集合属性注入值。
12       -->
13       <constructor-arg index = "0" value = "tom" />
14       <constructor-arg index = "1" value = "123456" />
15       <constructor-arg index = "2" >
16              <list>
17                  <value>"constructorvalue1"</value>
18                  <value>"constructorvalue2"</value>
19           </list>
20       </constructor-arg>
21       </bean>
22
23       <!-- 使用设值注入方式装配User实例 -->
24     <bean id = "user2ID" class = "com.itheima.assemble.User">
25     <!--
26           <property>元素用于调用Bean实例中的setter方法完成属性的赋值,从而完成依赖注入,
27           而其子元素<list>同样是为User类中对应的list集合属性注入值。
28     -->
29         <property name="username" value = "张三"></property>
30           <property name="password" value = "654321"></property>
31           <!-- 注入list集合 -->
32           <property name="list">
33                <list>
34                    <value>"setlistvalue1"</value>
35                    <value>"setlistvalue2"</value>
36                   </list>
37           </property>
38       </bean>
39 </beans>
③测试类:XmlBeanAssembleTest.java
 1 package com.itheima.assemble;
 2
 3 import org.springframework.context.ApplicationContext;
 4 import org.springframework.context.support.ClassPathXmlApplicationContext;
 5
 6 public class XmlBeanAssembleTest {
 7     public static void main(String[] args) {
 8         String xmlPath = "com/itheima/assemble/beans5.xml";
 9         ApplicationContext applicationContext = new ClassPathXmlApplicationContext(xmlPath);
10         System.out.println(applicationContext.getBean("user1ID"));
11         System.out.println(applicationContext.getBean("user2ID"));
12     }
13 }
④运行结果:

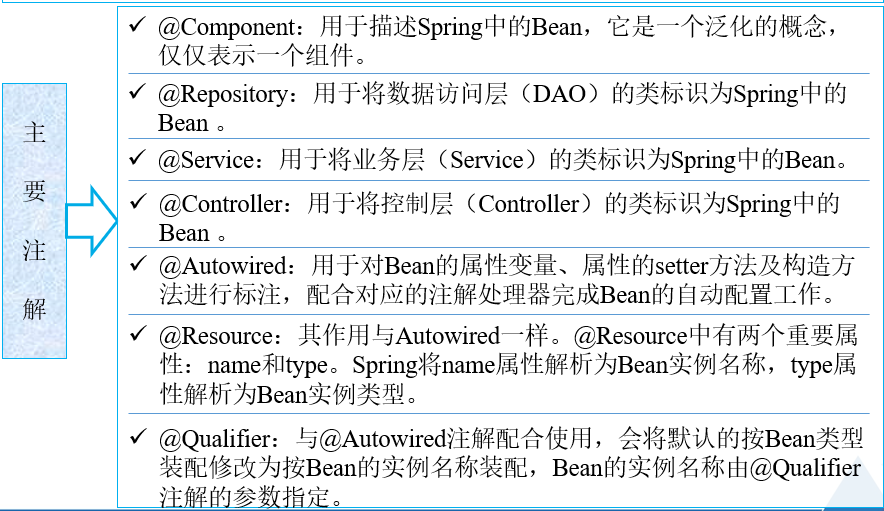
2)、基于Annotation的装配
a)、基于XML的装配可能会导致XML配置文件过于臃肿,给后续的维护和升级带来一定的困难。为此,Spring提供了对Annotation(注解)技术的全面支持。
b)、src->com.itheima.annotation
①UserDao.java
1 package com.itheima.annotation;
2
3 public interface UserDao {
4     public void save();
5 }
②UserDaoImpl.java
 1 package com.itheima.annotation;
 2 import org.springframework.stereotype.Repository;
 3
 4 @Repository("userDaoID")
 5 // @Repository注解将UserDaoImpl(数据访问层DAO层)的类标识为Spring中的Bean,其写法相当于配置文件中
 6 // <bean id = "userDaoID" class = "com.itheima.annotation.UserDaoImpl" />的编写
 7 public class UserDaoImpl implements UserDao{
 8     public void save() {
 9         System.out.println("userdaoID...save...");
10     }
11 }
③UserService.java
1 package com.itheima.annotation;
2
3 public interface UserService {
4     public void save();
5 }
④UserServiceImpl.java
 1 package com.itheima.annotation;
 2
 3 import javax.annotation.Resource;
 4 import org.springframework.stereotype.Service;
 5
 6 @Service("userServiceID")
 7 // @Service注解将(业务层的)UserServiceImpl类标识为Spring中的Bean,相当于配置文件中
 8 // <bean id = "userServiceID" class = "com.itheima.annotation.UserServiceImpl" />的编写
 9
10 public class UserServiceImpl implements UserService{
11     @Resource(name = "userDaoID")
12     /*
13      * @Resource注解标注在UserDao的Bean的实例上,相当于配置文件中
14      * <property name = "userDao" ref = "userDaoID" />的编写
15      * @Resource默认按照Bean实例名称进行装配,2个属性:name属性解析为Bean实例名称;type属性解析为Bean实例类型
16      * 如果都不指定,匹配过程为实例名称->实例类型,若都不匹配,则抛出NoSuchBeanDefinitionException异常
17     */
18     private UserDao userDao;
19
20     public void save() {
21         // 调用成员对象userDao中的save方法
22         this.userDao.save();
23         System.out.println("userServiceID...save...");
24     }
25 }
⑤UserController.java
 1 package com.itheima.annotation;
 2
 3 import javax.annotation.Resource;
 4 import org.springframework.stereotype.Controller;
 5
 6 @Controller("userControllerID")
 7 //@Controller注解标注了UserController类,这相当于配置文件中
 8 //<bean id = "userControllerID" class = "com.itheima.annotation.UserController" />的编写
 9
10 public class UserController {
11     @Resource(name = "userServiceID")
12     // @Resource注解标注在UserService的Bean的实例上,相当于配置文件中
13     // <property name = "userService" ref = "userServiceID" />的编写
14     private UserService userService;
15
16     public void save() {
17         this.userService.save();
18         System.out.println("userControllerID...save...");
19     }
20 }
⑥beans6.xml
 1 <?xml version="1.0" encoding="UTF-8"?>
 2 <beans xmlns="http://www.springframework.org/schema/beans"
 3    xmlns:xsi="http://www.w3.org/2001/XMLSchema-instance"
 4 xmlns:context="http://www.springframework.org/schema/context"
 5 xsi:schemaLocation="http://www.springframework.org/schema/beans
 6                     http://www.springframework.org/schema/beans/spring-beans-4.3.xsd
 7                     http://www.springframework.org/schema/context
 8                     http://www.springframework.org/schema/context/spring-context-4.3.xsd">
 9      <!-- 以上补充context的约束信息,使用 context 命名空间 ,
10          通过配置<context:annotation-config />来开启注解处理器 -->
11      <!--分别定义3个Bean实例,这里不再需要配置子元素<property>完成setter方法依赖注入  -->
12
13          <context:annotation-config />
14          <bean id="userDaoID" class="com.itheima.annotation.UserDaoImpl" />
15          <bean id="userServiceID" class="com.itheima.annotation.UserServiceImpl" />
16          <bean id="userControllerID" class="com.itheima.annotation.UserController" />
17 </beans>
⑦AnnotationAssembleTest.java
 1 package com.itheima.annotation;
 2
 3 import org.springframework.context.ApplicationContext;
 4 import org.springframework.context.support.ClassPathXmlApplicationContext;
 5
 6 //基于Annotation(注解)的装配
 7 public class AnnotationAssembleTest {
 8     public static void main(String[] args) {
 9         String xmlPath = "com/itheima/annotation/beans6.xml";
10         ApplicationContext applicationContext = new ClassPathXmlApplicationContext(xmlPath);
11         // 获取UserController的Bean实例userControllerID
12         UserController userController = (UserController) applicationContext.getBean("userControllerID");
13         userController.save();
14     }
15 }
⑧运行结果:

c)、除了可以像示例中通过<bean>元素来配置Bean外,还可以通过包扫描的形式来配置一个包下的所有Bean:
<context:component-scan base-package="Bean所在的包路径" />
d)、将beans6.xml文件中的13~16行代码替换成下面这个,运行效果一样。
<!-- Spring注解提供了另外一种高效的注解配置方式,(对包路径下的所有Bean文件进行扫描) -->
    <!--使用 context 命名空间 ,通知Spring扫描指定包下所有Bean类,进行注解解析 -->
        <context:component-scan base-package="com.itheima.annotation" />
3)、自动装配
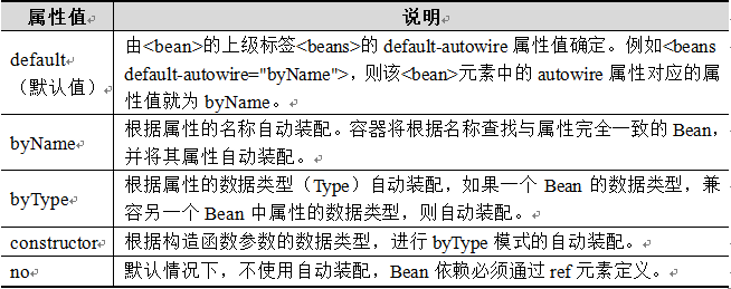
a)、所谓自动装配就是将一个Bean自动的注入到到其他Bean的Property中(也就是类成员变量赋值)。 Spring的<bean>元素中包含一个autowire属性,我们可以通过设置autowire的属性值来自动装配Bean。
b)、autowire属性有5个值,其值及说明下表所示:
c)、修改UserServiceImple.java和UserController.java,分别增加类属性的setter方法;修改Spring配置文件,使用autowire属性配置Bean;其他文件不用修改。
①UserServiceImple.java
 1 package com.itheima.annotation;
 2
 3 import javax.annotation.Resource;
 4 import org.springframework.stereotype.Service;
 5
 6 @Service("userServiceID")
 7 // @Service注解将(业务层的)UserServiceImpl类标识为Spring中的Bean,相当于配置文件中
 8 // <bean id = "userServiceID" class = "com.itheima.annotation.UserServiceImpl" />的编写
 9
10 public class UserServiceImpl implements UserService{
11     @Resource(name = "userDaoID")
12     /*
13      * @Resource注解标注在UserDao的Bean的实例上,相当于配置文件中
14      * <property name = "userDao" ref = "userDaoID" />的编写
15      * @Resource默认按照Bean实例名称进行装配,2个属性:name属性解析为Bean实例名称;type属性解析为Bean实例类型
16      * 如果都不指定,匹配过程为实例名称->实例类型,若都不匹配,则抛出NoSuchBeanDefinitionException异常
17     */
18     private UserDao userDao;
19
20     // 添加类属性UserDao的setter方法
21     public void setUserDao(UserDao userDao) {
22         this.userDao = userDao;
23     }
24
25     public void save() {
26         // 调用成员对象userDao中的save方法
27         this.userDao.save();
28         System.out.println("userServiceID...save...");
29     }
30 }
②UserController.java
 1 package com.itheima.annotation;
 2
 3 import javax.annotation.Resource;
 4 import org.springframework.stereotype.Controller;
 5
 6 @Controller("userControllerID")
 7 //@Controller注解标注了UserController类,这相当于配置文件中
 8 //<bean id = "userControllerID" class = "com.itheima.annotation.UserController" />的编写
 9
10 public class UserController {
11     @Resource(name = "userServiceID")
12     // @Resource注解标注在UserService的Bean的实例上,相当于配置文件中
13     // <property name = "userService" ref = "userServiceID" />的编写
14     private UserService userService;
15
16     // 添加类属性UserService的setter方法
17     public void setUserService(UserService userService) {
18         this.userService = userService;
19     }
20
21     public void save() {
22         this.userService.save();
23         System.out.println("userControllerID...save...");
24     }
25 }
③beans6.xml
 1 <?xml version="1.0" encoding="UTF-8"?>
 2 <beans xmlns="http://www.springframework.org/schema/beans"
 3    xmlns:xsi="http://www.w3.org/2001/XMLSchema-instance"
 4 xmlns:context="http://www.springframework.org/schema/context"
 5 xsi:schemaLocation="http://www.springframework.org/schema/beans
 6                     http://www.springframework.org/schema/beans/spring-beans-4.3.xsd
 7                     http://www.springframework.org/schema/context
 8                     http://www.springframework.org/schema/context/spring-context-4.3.xsd">
 9
10     <!-- 使用bean元素的autowire属性完成自动装配,所谓自动装配,就是将一个Bean自动地注入到其他Bean的Property中 -->
11
12     <!-- 注意:这里的id(除了最后一个)名称应对应setter方法中的参数(实例化对象),即设置了autowire之后,
13         Spring会自动寻找userService Bean中的属性,并将属性名称与配置文件中定义的Bean做匹配,
14         否则会报java.lang.NullPointerException异常。
15      -->
16     <bean id="userDao" class="com.itheima.annotation.UserDaoImpl" />
17     <bean id="userService" class="com.itheima.annotation.UserServiceImpl" autowire="byName" />
18     <bean id="userControllerID" class="com.itheima.annotation.UserController" autowire="byName"/>
19
20 </beans>
④运行结果:


 99
99


 被折叠的 条评论
为什么被折叠?
被折叠的 条评论
为什么被折叠?
 到【灌水乐园】发言


