


出处:https://doc.sitecore.com/developers/90/platform-administration-and-architecture/en/configure-azure-search.html#UUID-6db2d23d-88f1-df71-5144-82fd14c811d3_id__Create_a_Search
创建搜索服务
-
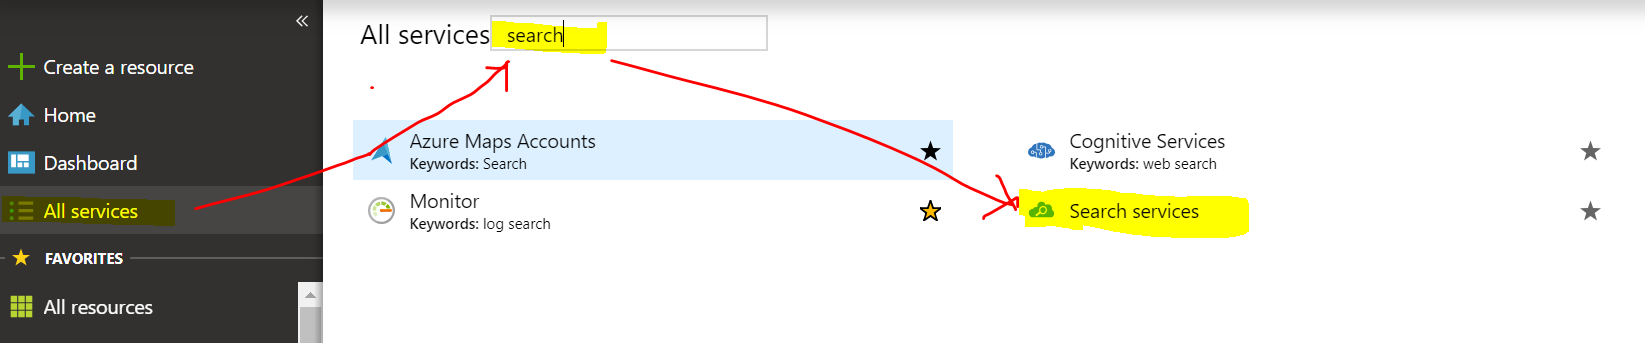
登陆 the Azure portal, "All service" --> 输入 “search” -->选择“Search Services”
-
在 “Search services”页面, 点击“Add”

-
在“New Search Service”页面:
-
输入服务名称
- 选择subscription
-
选择合适的resource group, location, and pricing tier
Note
Sitecore 需要 15 search indexes, 所以至少需要选择S Standard pricing tier. (译者:选择Basic也可,如果没有自定义的index正好够 )

-
-
点 Create.
-
在创建好的Search Service中点Keys,可以找到Primary/Secondary admin key,稍后会在connection string中用到
更新Connection String
在 connection string 配置文件(通常在App_Config文件夹中)找到"cloud.search"(译者:如果没有,新建一个),应该包含如下信息:
-
serviceUrl– Search Service API的HTTPS URL (比如: https://dk-test.search.windows.net). -
apiVersion– follows a date format, for example, 2015-02-28 (译者:目前是2017-11-11,可以在Search Service的“Search Explorer”中的“Set API version”找到). -
apiKey– 上一步中提到的admin key,可以在Search Service的“Keys”中找到
Note
Sitecore 8.2-Update 3 以及之后的版本默认使用 API version 2015-02-28-Preview.
Connection string 格式:
<add name="cloud.search" connectionString="serviceUrl=<url>;apiVersion=<apiVersion>;apiKey=<apiKey>" />
Sitecore 支持 geo-replicated Search Service:
-
-
建立两个或多个 Search service.
-
在connection strings 使用 | 作为分割符. 例如在一个geo-replicated scenario中使用两个search services:searchservice1 和searchservice2, 在connection string需要做以下配置:
<add name="cloud.search"
connectionString="serviceUrl=https://searchservice1.search.windows.net;apiVersion=2015-02-28;apiKey=AdminKey1|serviceUrl=https://searchservice2.search.windows.net;apiVersion=2015-02-28;apiKey=AdminKey2" />
-
Best practice:每个index使用专用的search service. :
-
-
connection string 新建一条,比如
cloud.search.analytics. -
在index配置中使用新建的connect string值:
-

|
指定Azure作为搜索引擎
Sitecore默认Solr作为搜索引擎,如果要使用Azure Search Service,需要如下更改(译者:以下步骤翻译自https://doc.sitecore.com/developers/90/platform-administration-and-architecture/en/configure-a-search-and-indexing-provider.html):
在 web.config 文件, 找到 <AppSettings> "search:define" setting,设置为Azure:
<AppSettings> <add key="search:define" value="Azure"/> </AppSettings>
重建所有index
-
使用admin登陆Sitecore (http:// {your_instance}/sitecore/login)
-
"Control Panel" --> "Indexing manager".
-
选择所有 indexes,点击 Rebuild.
Note
重建index消耗一定时间,可能需要 15 minutes 甚至更长
重建index之后,在Azure Search Service中可以看到:

Map the Azure field types
Azure Search使用 Entity Data Model (EDM) field types.
Mapping between .Net and Sitecore:
sitecore\contentsearch\indexConfigurations\defaultCloudIndexConfiguration\CloudTypeMapper\Sitecore.ContentSearch.Azure.DefaultIndexConfiguration.config file.
Note
对所有自定义的field需要定义map element:
<map type="<Field type>" cloudType="<Edm type from list of supported types>" />
Map fields
Best Practice: listing all fields under the index configuration section
-
sitecore\contentSearch\configuration\indexes\index\configuration\fieldMap
| Attribute | Description |
|---|---|
|
| The name of the field, as defined for Lucene and Solr. |
|
| The field name as defined for Cloud. It can only contain letters, numbers, and underscores. NoteThe first character must be a letter. |
|
| Use the boost attribute to give one field more importance than another. |
|
| You must configure this attribute for |
|
| The |


 906
906


 被折叠的 条评论
为什么被折叠?
被折叠的 条评论
为什么被折叠?
 到【灌水乐园】发言


