


Introduction
This tutorial could well be the simplest windows program you could ever write. All you need to understand this tutorial is the basics of windows messaging. This tutorial is about the CButton class, and how to get a simple button working.
This tutorial simply takes input for two numbers and depending on what button you click, does the math. ie. if you enter 1 and 2, then click on 'Plus' the answer will be 3. Pretty basic.
To create this program first we need to get the framework laid out. Now 99.9% of the time, you will be using buttons via a dialog box so that is where we will start. Open up the AppWizard and create a new project titled ButtonDemo. Just create a basic dialog box without any document / view architecture.

Then click on the ResourceVew tab in the 'Workspace' window. Proceed to edit the dialog box IDD_BUTTONDEMO_DLG. It will already contain the Buttons 'Ok' and 'Cancel'. Delete the 'TODO :' message and the 'Cancel' button so we can get to work.
Just drag n' drop the buttons needed, in this example 'Plus' and 'Minus'. Then select and right click to edit their properties. The MFC keeps track of these buttons by their unique ID, a macro located in the "Resource.h" file. For code clarity, change the name of the ID to ID_BUTTON_ADD and modify the caption of the button.

Next, let's add the Edit boxes to house the values to be added or subtracted, do this in a very similar manner to the way you added the buttons. Just drag and drop them in and then modify their ID. We will need an Edit box for the left and right side of the equation as well as one to house the answer. Just for clarity to the end user, check the 'disable' property of the last Edit box. Since we won't directly be able to specify the answer. We will also add a Static control for the equals sign. Just drop one in and then change the caption.
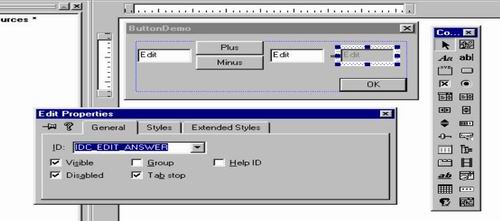
Now that our buttons and are in place we need to wire them into our application. We do this via the class wizard. (Control + W) Click on the Member Variables tab and proceed to add the variables m_nX, m_nY, and m_nAnswer. All integers; these will hold the values inputted from the Edit controls.

Then click on the Message Maps tab. And add a new function for the object ID ID_BUTTON_ADD and ID_BUTTON_SUBTRACT message BN_CLICK. This create a function is called whenever that button is clicked once. Denoted by OnButtonAdd and OnButtonSubtract.

Now that we have created our buttons this is all the code we need to write to get this program working. It is fairly self explanatory: what we did was create two functions to be called whenever the respective buttons were pressed. The UpdateData (BOOL) functions are used to manage the data in the Edit boxes of the dialog. UpdataData (TRUE), 'updates' the member variables linked to the Edit boxes to whatever is the current value. UpdataData (FALSE), updates the Edit box to whatever our variable is.
void CButtonDemoDlg::OnButtonAdd()
{
UpdateData (TRUE);
m_nAnswer = m_nX + m_nY;
UpdateData (FALSE);
}
void CButtonDemoDlg::OnButtonSubtract()
{
UpdateData (TRUE);
m_nAnswer = m_nX - m_nY;
UpdateData (FALSE);
}
That is it! All we need to do to implement a simple button.
License
This article has no explicit license attached to it but may contain usage terms in the article text or the download files themselves. If in doubt please contact the author via the discussion board below.


 2464
2464


 被折叠的 条评论
为什么被折叠?
被折叠的 条评论
为什么被折叠?
 到【灌水乐园】发言


