


druid是阿里巴巴开源的数据库连接池,提供了优秀的对数据库操作的监控功能,本文要讲解一下springboot项目怎么集成druid。
本文在基于jpa的项目下开发,首先在pom文件中额外加入druid依赖,pom文件如下:
xsi:schemaLocation="http://maven.apache.org/POM/4.0.0 http://maven.apache.org/xsd/maven-4.0.0.xsd">
4.0.0
com.dalaoyang
springboot_druid
0.0.1-SNAPSHOT
jar
springboot_druid
springboot_druid
org.springframework.boot
spring-boot-starter-parent
1.5.12.RELEASE
UTF-8
UTF-8
1.8
org.springframework.boot
spring-boot-starter-data-jpa
org.springframework.boot
spring-boot-starter-web
org.springframework.boot
spring-boot-devtools
runtime
mysql
mysql-connector-java
runtime
org.springframework.boot
spring-boot-starter-test
test
com.alibaba
druid
1.0.28
org.springframework.boot
spring-boot-maven-plugin
application.properties上半段和整合jpa一点没变,下面加入了一些druid的配置,如果对druid的配置有什么不理解的,可以去网上查一下。(这篇文章我觉得写的很好,传送门)
#端口号
server.port=8888
##validate 加载hibernate时,验证创建数据库表结构
##create 每次加载hibernate,重新创建数据库表结构,这就是导致数据库表数据丢失的原因。
##create-drop 加载hibernate时创建,退出是删除表结构
##update 加载hibernate自动更新数据库结构
##validate 启动时验证表的结构,不会创建表
##none 启动时不做任何操作
spring.jpa.hibernate.ddl-auto=create
##控制台打印sql
spring.jpa.show-sql=true
##数据库配置
##数据库地址
spring.datasource.url=jdbc:mysql://localhost:3306/test?characterEncoding=utf8&useSSL=false
##数据库用户名
spring.datasource.username=root
##数据库密码
spring.datasource.password=root
##数据库驱动
spring.datasource.driver-class-name=com.mysql.jdbc.Driver
#这里是不同的
#使用druid的话 需要多配置一个属性spring.datasource.type
spring.datasource.type=com.alibaba.druid.pool.DruidDataSource
# 连接池的配置信息
# 初始化大小,最小,最大
spring.datasource.initialSize=5
spring.datasource.minIdle=5
spring.datasource.maxActive=20
# 配置获取连接等待超时的时间
spring.datasource.maxWait=60000
# 配置间隔多久才进行一次检测,检测需要关闭的空闲连接,单位是毫秒
spring.datasource.timeBetweenEvictionRunsMillis=60000
# 配置一个连接在池中最小生存的时间,单位是毫秒
spring.datasource.minEvictableIdleTimeMillis=300000
spring.datasource.validationQuery=SELECT 1 FROM DUAL
spring.datasource.testWhileIdle=true
spring.datasource.testOnBorrow=false
spring.datasource.testOnReturn=false
# 打开PSCache,并且指定每个连接上PSCache的大小
spring.datasource.poolPreparedStatements=true
spring.datasource.maxPoolPreparedStatementPerConnectionSize=20
# 配置监控统计拦截的filters,去掉后监控界面sql无法统计,'wall'用于防火墙
spring.datasource.filters=stat,wall,log4j
# 通过connectProperties属性来打开mergeSql功能;慢SQL记录
然后在项目中加入DruidConfig,简单讲解一下,这个配置文件主要是加载application.properties的配置,代码如下:
package com.dalaoyang.config;
import java.sql.SQLException;
import javax.sql.DataSource;
import org.apache.log4j.Logger;
import org.springframework.beans.factory.annotation.Value;
import org.springframework.context.annotation.Bean;
import org.springframework.context.annotation.Configuration;
import org.springframework.context.annotation.Primary;
import com.alibaba.druid.pool.DruidDataSource;
/**
* @author dalaoyang
* @Description
* @project springboot_learn
* @package com.dalaoyang.config
* @email yangyang@dalaoyang.cn
* @date 2018/4/12
*/
@Configuration
public class DruidConfig {
private Logger logger = Logger.getLogger(this.getClass());
@Value("${spring.datasource.url}")
private String dbUrl;
@Value("${spring.datasource.username}")
private String username;
@Value("${spring.datasource.password}")
private String password;
@Value("${spring.datasource.driver-class-name}")
private String driverClassName;
@Value("${spring.datasource.initialSize}")
private int initialSize;
@Value("${spring.datasource.minIdle}")
private int minIdle;
@Value("${spring.datasource.maxActive}")
private int maxActive;
@Value("${spring.datasource.maxWait}")
private int maxWait;
@Value("${spring.datasource.timeBetweenEvictionRunsMillis}")
private int timeBetweenEvictionRunsMillis;
@Value("${spring.datasource.minEvictableIdleTimeMillis}")
private int minEvictableIdleTimeMillis;
@Value("${spring.datasource.validationQuery}")
private String validationQuery;
@Value("${spring.datasource.testWhileIdle}")
private boolean testWhileIdle;
@Value("${spring.datasource.testOnBorrow}")
private boolean testOnBorrow;
@Value("${spring.datasource.testOnReturn}")
private boolean testOnReturn;
@Value("${spring.datasource.poolPreparedStatements}")
private boolean poolPreparedStatements;
@Value("${spring.datasource.maxPoolPreparedStatementPerConnectionSize}")
private int maxPoolPreparedStatementPerConnectionSize;
@Value("${spring.datasource.filters}")
private String filters;
@Value("{spring.datasource.connectionProperties}")
private String connectionProperties;
@Bean
@Primary //主数据源
public DataSource dataSource(){
DruidDataSource datasource = new DruidDataSource();
datasource.setUrl(this.dbUrl);
datasource.setUsername(username);
datasource.setPassword(password);
datasource.setDriverClassName(driverClassName);
//configuration
datasource.setInitialSize(initialSize);
datasource.setMinIdle(minIdle);
datasource.setMaxActive(maxActive);
datasource.setMaxWait(maxWait);
datasource.setTimeBetweenEvictionRunsMillis(timeBetweenEvictionRunsMillis);
datasource.setMinEvictableIdleTimeMillis(minEvictableIdleTimeMillis);
datasource.setValidationQuery(validationQuery);
datasource.setTestWhileIdle(testWhileIdle);
datasource.setTestOnBorrow(testOnBorrow);
datasource.setTestOnReturn(testOnReturn);
datasource.setPoolPreparedStatements(poolPreparedStatements);
datasource.setMaxPoolPreparedStatementPerConnectionSize(maxPoolPreparedStatementPerConnectionSize);
try {
datasource.setFilters(filters);
} catch (SQLException e) {
logger.error("druid configuration Exception", e);
}
datasource.setConnectionProperties(connectionProperties);
return datasource;
}
}
然后创建DruidFilter,代码如下:
package com.dalaoyang.filter;
import javax.servlet.annotation.WebFilter;
import javax.servlet.annotation.WebInitParam;
import com.alibaba.druid.support.http.WebStatFilter;
/**
* @author dalaoyang
* @Description
* @project springboot_learn
* @package com.dalaoyang.filter
* @email yangyang@dalaoyang.cn
* @date 2018/4/12
*/
@WebFilter(filterName="druidWebStatFilter",urlPatterns="/*",
initParams={
@WebInitParam(name="exclusions",value="*.js,*.gif,*.jpg,*.bmp,*.png,*.css,*.ico,/druid/*")//忽略资源
}
)
public class DruidFilter extends WebStatFilter {
}
新建DruidServlet,在类上面加注解@WebServlet,其中配置了登录druid监控页面的账号密码,白名单黑名单之类的配置,代码如下:
package com.dalaoyang.servlet;
import javax.servlet.annotation.WebInitParam;
import javax.servlet.annotation.WebServlet;
import com.alibaba.druid.support.http.StatViewServlet;
/**
* @author dalaoyang
* @Description
* @project springboot_learn
* @package com.dalaoyang.servlet
* @email yangyang@dalaoyang.cn
* @date 2018/4/12
*/
@WebServlet(urlPatterns="/druid/*",
initParams={
@WebInitParam(name="allow",value=""),// IP白名单(没有配置或者为空,则允许所有访问)
@WebInitParam(name="deny",value=""),// IP黑名单 (deny优先于allow)
@WebInitParam(name="loginUsername",value="admin"),// 登录druid管理页面用户名
@WebInitParam(name="loginPassword",value="admin")// 登录druid管理页面密码
})
public class DruidServlet extends StatViewServlet {
}
然后在启动类加入注解@ServletComponentScan,让项目扫描到servlet,代码如下:
package com.dalaoyang;
import org.springframework.boot.SpringApplication;
import org.springframework.boot.autoconfigure.SpringBootApplication;
import org.springframework.boot.web.servlet.ServletComponentScan;
@SpringBootApplication
// 启动类必须加入@ServletComponentScan注解,否则无法扫描到servlet
@ServletComponentScan
public class SpringbootDruidApplication {
public static void main(String[] args) {
SpringApplication.run(SpringbootDruidApplication.class, args);
}
}
剩余的就是和整合jpa一样的entity(实体类),repository(数据操作层),controller(测试使用的controller),直接展示代码。
City
package com.dalaoyang.entity;
import javax.persistence.*;
/**
* @author dalaoyang
* @Description
* @project springboot_learn
* @package com.dalaoyang.Entity
* @email 397600342@qq.com
* @date 2018/4/7
*/
@Entity
@Table(name="city")
public class City {
@Id
@GeneratedValue(strategy=GenerationType.AUTO)
private int cityId;
private String cityName;
private String cityIntroduce;
public City(int cityId, String cityName, String cityIntroduce) {
this.cityId = cityId;
this.cityName = cityName;
this.cityIntroduce = cityIntroduce;
}
public City(String cityName, String cityIntroduce) {
this.cityName = cityName;
this.cityIntroduce = cityIntroduce;
}
public City() {
}
public int getCityId() {
return cityId;
}
public void setCityId(int cityId) {
this.cityId = cityId;
}
public String getCityName() {
return cityName;
}
public void setCityName(String cityName) {
this.cityName = cityName;
}
public String getCityIntroduce() {
return cityIntroduce;
}
public void setCityIntroduce(String cityIntroduce) {
this.cityIntroduce = cityIntroduce;
}
}
CityRepository
package com.dalaoyang.repository;
import com.dalaoyang.entity.City;
import org.springframework.data.jpa.repository.JpaRepository;
/**
* @author dalaoyang
* @Description
* @project springboot_learn
* @package com.dalaoyang.Repository
* @email 397600342@qq.com
* @date 2018/4/7
*/
public interface CityRepository extends JpaRepository {
}
CityController
package com.dalaoyang.controller;
import com.dalaoyang.entity.City;
import com.dalaoyang.repository.CityRepository;
import org.springframework.beans.factory.annotation.Autowired;
import org.springframework.web.bind.annotation.GetMapping;
import org.springframework.web.bind.annotation.RestController;
/**
* @author dalaoyang
* @Description
* @project springboot_learn
* @package com.dalaoyang.controller
* @email 397600342@qq.com
* @date 2018/4/7
*/
@RestController
public class CityController {
@Autowired
private CityRepository cityRepository;
//http://localhost:8888/saveCity?cityName=北京&cityIntroduce=中国首都
@GetMapping(value = "saveCity")
public String saveCity(String cityName,String cityIntroduce){
City city = new City(cityName,cityIntroduce);
cityRepository.save(city);
return "success";
}
//http://localhost:8888/deleteCity?cityId=2
@GetMapping(value = "deleteCity")
public String deleteCity(int cityId){
cityRepository.delete(cityId);
return "success";
}
//http://localhost:8888/updateCity?cityId=3&cityName=沈阳&cityIntroduce=辽宁省省会
@GetMapping(value = "updateCity")
public String updateCity(int cityId,String cityName,String cityIntroduce){
City city = new City(cityId,cityName,cityIntroduce);
cityRepository.save(city);
return "success";
}
//http://localhost:8888/getCityById?cityId=3
@GetMapping(value = "getCityById")
public City getCityById(int cityId){
City city = cityRepository.findOne(cityId);
return city;
}
}
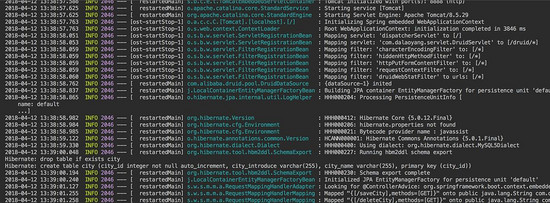
然后启动项目,可以看到控制台已经创建了city表。
然后访问http://localhost:8888/druid,可以看到如下图:
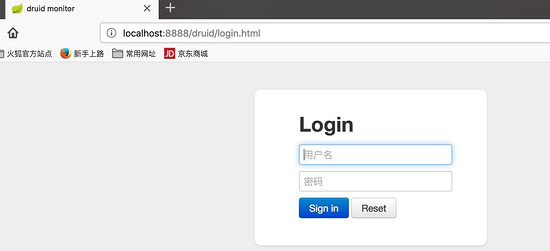
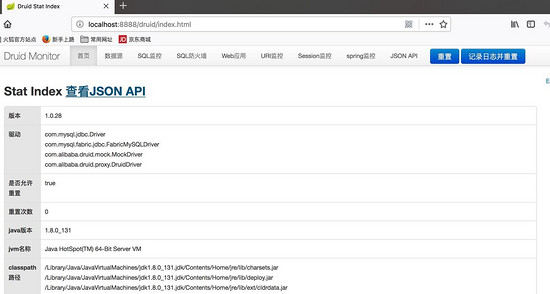
输入账号密码admin,admin,如下图
然后这时我们可以访问http://localhost:8888/saveCity?cityName=北京&cityIntroduce=中国首都
然后点击导航上面的SQL监控,如下图,
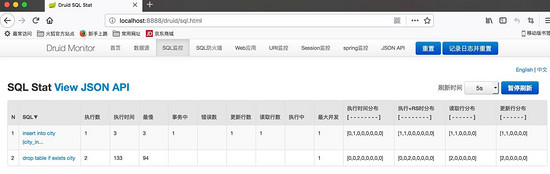
从上图可以看到启动项目创建表的sql已经刚刚执行的sql。到这里整合已经完成了。
以上就是本文的全部内容,希望对大家的学习有所帮助,也希望大家多多支持脚本之家。


 155
155


 被折叠的 条评论
为什么被折叠?
被折叠的 条评论
为什么被折叠?
 到【灌水乐园】发言


