


一、概述
本文基于spring-boot-starter-websocket简单的完成收发信息功能,使用注解形式进行实现。
二、相关配置
spring:2.0.2,jdk:1.8.202,maven:3.3.9
因为spring和maven有版本匹配的要求,请大家注意自己的版本是否匹配
三、项目结构
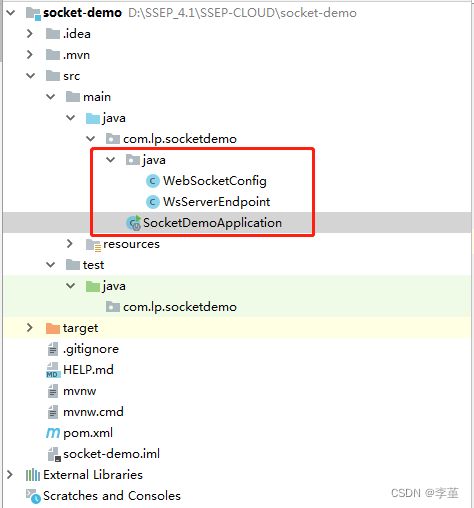
四、代码
1.启动类
SocketDemoApplication
package com.lp.socketdemo;

import org.springframework.boot.SpringApplication;
import org.springframework.boot.autoconfigure.SpringBootApplication;
import org.springframework.scheduling.annotation.EnableScheduling;

@EnableScheduling
@SpringBootApplication
public class SocketDemoApplication {

    public static void main(String[] args) {
        SpringApplication.run(SocketDemoApplication.class, args);
    }

}
2. 监听类
WsServerEndpoint
package com.lp.socketdemo.java;

import lombok.extern.slf4j.Slf4j;
import org.springframework.scheduling.annotation.Scheduled;
import org.springframework.stereotype.Component;

import javax.websocket.OnClose;
import javax.websocket.OnMessage;
import javax.websocket.OnOpen;
import javax.websocket.Session;
import javax.websocket.server.ServerEndpoint;
import java.io.IOException;
import java.util.Map;
import java.util.concurrent.ConcurrentHashMap;

/**
 * 监听websocket地址(myWs)
 */
@ServerEndpoint("/myWs")
@Component
public class WsServerEndpoint {

    static Map<String,Session> map = new ConcurrentHashMap<>();
    @OnOpen
    public void onOpen(Session session) {
        map.put(session.getId(),session);
        System.out.println("webSockte is open: " + session.getId());
        sendAll(session,"上线");
    }

    @OnMessage
    public String onMessage(String message) {
        System.out.println("收到一条信息:"+message);
        return "已收到你的消息:"+message;
    }

    @OnClose
    public void onClose(Session session) {
        System.out.println("webSockte is close:"+session.getId());
        sendAllEceptMe(session,"下线");
        map.remove(session.getId());

    }

    @Scheduled(fixedRate = 60000)
    public void sendMsg() {
        for (String key: map.keySet()) {
            try {
                map.get(key).getBasicRemote().sendText("心跳");
            } catch (IOException e) {
                e.printStackTrace();
            }
        }
    }

    public void sendAll(Session session,String msg) {
        for (String key: map.keySet()) {
            try {
                map.get(key).getBasicRemote().sendText(session.getId()+":"+msg);
            } catch (IOException e) {
                e.printStackTrace();
            }
        }
    }

    public void sendAllEceptMe(Session session,String msg) {
        for (String key: map.keySet()) {
            try {
                if(!session.getId().equals(key)) {
                    map.get(key).getBasicRemote().sendText(session.getId()+":"+msg);
                }
            } catch (IOException e) {
                e.printStackTrace();
            }
        }
    }
}
3.配置类
WebSocketConfig
package com.lp.socketdemo.java;

import org.springframework.context.annotation.Bean;
import org.springframework.context.annotation.Configuration;
import org.springframework.web.socket.server.standard.ServerEndpointExporter;

/**
 * 配置类,注入bean
 */
@Configuration
public class WebSocketConfig {

    @Bean
    public ServerEndpointExporter serverEndpointExporter() {
        return new ServerEndpointExporter();
    }
}
4.前段
websocketTest.html
<!DOCTYPE html>
<html>
<head>
  <meta http-equiv="Content-Type" content="text/html; charset=UTF-8">
  <title>websocket调试页面</title>
</head>
<script type="text/javascript" src="jquery.min.js"></script>
<body>
<div style="float: left; padding: 20px">
  <strong>location:</strong> <br />
  <input type="text" id="serverUrl" size="35" value="" /> <br />
  <button onclick="connect()">connect</button>
  <button onclick="wsclose()">disConnect</button>
  <br /> <strong>message:</strong> <br /> <input id="txtMsg" type="text" size="50" />
  <br />
  <button onclick="sendEvent()">发送</button>
</div>

<div style="float: left; margin-left: 20px; padding-left: 20px; width: 350px; border-left: solid 1px #cccccc;"> <strong>消息记录</strong>
  <div style="border: solid 1px #999999;border-top-color: #CCCCCC;border-left-color: #CCCCCC; padding: 5px;width: 100%;height: 172px;overflow-y: scroll;" id="echo-log"></div>
  <button onclick="clearLog()" style="position: relative; top: 3px;">清除消息</button>
</div>

</div>
</body>
<!-- 下面是h5原生websocket js写法 -->
<script type="text/javascript">
  let output ;
  let websocket;
  function connect(){ //初始化连接
    output = document.getElementById("echo-log")
    let inputNode = document.getElementById("serverUrl");
    let wsUri = inputNode.value;
    try{
		websocket = new WebSocket(wsUri);
    }catch(ex){
      console.log(ex)
      alert("对不起websocket连接异常")
    }

    connecting();
    window.addEventListener("load", connecting, false);
  }


  function connecting()
  {
    websocket.onopen = function(evt) { onOpen(evt) };
    websocket.onclose = function(evt) { onClose(evt) };
    websocket.onmessage = function(evt) { onMessage(evt) };
    websocket.onerror = function(evt) { onError(evt) };
  }

  function sendEvent(){
    let msg = document.getElementById("txtMsg").value
    doSend(msg);
  }

  //连接上事件
  function onOpen(evt)
  {
    writeToScreen("CONNECTED");
    doSend("WebSocket 已经连接成功!");
  }

  //关闭事件
  function onClose(evt)
  {
    writeToScreen("连接已经断开!");
  }

  //后端推送事件
  function onMessage(evt)
  {
    writeToScreen('<span style="color: blue;">服务器: ' + evt.data+'</span>');
  }

  function onError(evt)
  {
    writeToScreen('<span style="color: red;">异常信息:</span> ' + evt.data);
  }

  function doSend(message)
  {
    writeToScreen("客户端A: " + message);
    websocket.send(message);
  }

  //清除div的内容
  function clearLog(){
    output.innerHTML = "";
  }

  //浏览器主动断开连接
  function wsclose(){
    websocket.close();
  }

  function writeToScreen(message)
  {
    let pre = document.createElement("p");
    pre.innerHTML = message;
    output.appendChild(pre);
  }
</script>
</html>
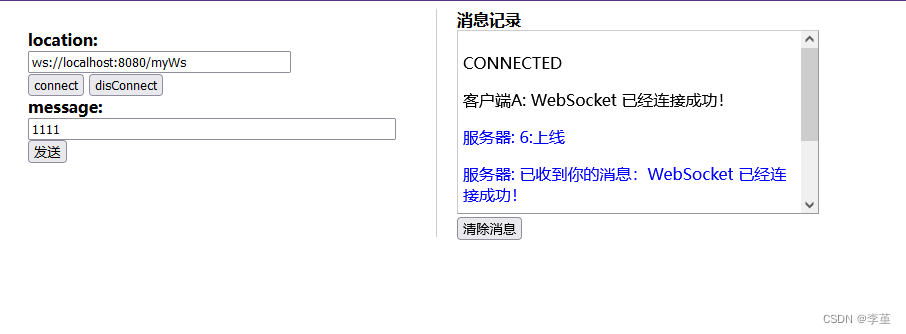
五、效果展示
六、引用
最全面的SpringMVC教程(六)——WebSocket_springmvc websocket_小新要变强的博客-CSDN博客


 3884
3884


 被折叠的 条评论
为什么被折叠?
被折叠的 条评论
为什么被折叠?
 到【灌水乐园】发言


