


用js实现简单放大镜效果,供大家参考,具体内容如下
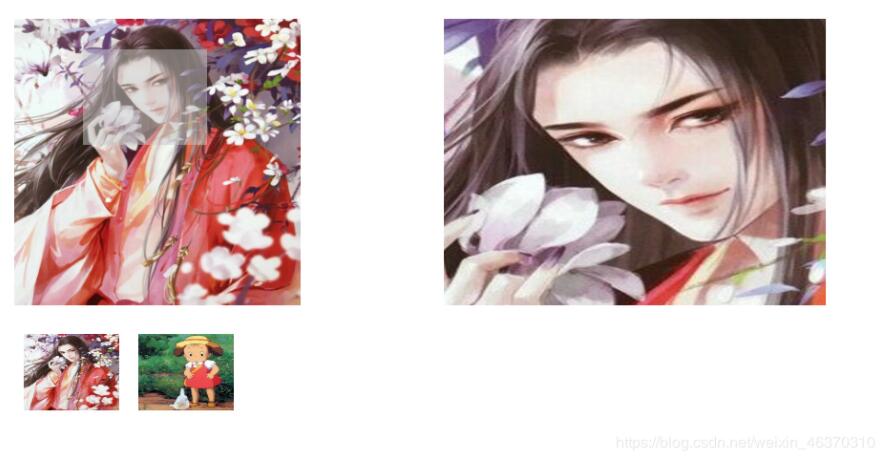
此处放大镜实现的效果就是当鼠标放置在图片上会有半透明遮罩,图片的一个区域就会被放大,然后展示在右边。当鼠标移动时右边的大图片也会局部移动。这里的放大并不是真正的放大,而是等比例移动。下面是实现的代码:
css样式代码如下:
.s_box{width:400px;height: 300px;position: absolute;left: 50px;top:100px;}
.s_box img{width: 400px;height: 300px;}
.s_box span{width: 130px;height: 100px;background: rgba(200,200,200,0.5);position: absolute;left:0;top:0;display: none;cursor:move;}
.b_box{width: 400px;height: 300px;overflow: hidden;position: absolute;left:500px;top:100px;display: none;}
.b_box img{width: 1200px;height: 900px;position: absolute;left:0;top:0;}
.list{margin: 0;padding: 0;list-style: none;position: absolute;left:50px;top:430px;}
.list li{float: left;margin: 0 10px;}
.list li img{width: 100px;height: 80px;}
html代码如下:


js主要代码如下:
// 分析:
// 1.选择元素
// 2.绑定事件
// 3.进入的时候显示元素
// 4.移动:遮罩层跟随鼠标移动的同时计算遮罩层的移动比例 、右侧大图,等比例移动
// 5.离开的时候隐藏元素
class Large{
constructor(){
this.sBox = document.querySelector(".s_box");
this.sImg = document.querySelector(".s_box img");
this.sSpan = document.querySelector(".s_box span");
this.bBox = document.querySelector(".b_box");
this.bImg = document.querySelector(".b_box img");
// 点击小图切换大图的按钮
this.li = document.querySelectorAll(".list li");
}
addEvent(){
var that = this;
this.sBox.onmouseover = function(){
that.over();
}
this.sBox.onmousemove = function(eve){
var e = eve || window.event;
that.move(e);
}
this.sBox.onmouseout = function(){
that.out();
}
// 切换图片按钮的点击事件:根据布局做出调整
for(var i=0;i
this.li[i].onclick = function(){
that.sImg.src = this.children[0].src;
that.bImg.src = this.children[0].src;
}
}
}
over(){
this.sSpan.style.display = "block";
this.bBox.style.display = "block";
}
move(e){
// 计算遮罩层跟随鼠标移动时的left和top
var l = e.pageX - this.sBox.offsetLeft - this.sSpan.offsetWidth/2;
var t = e.pageY - this.sBox.offsetTop - this.sSpan.offsetHeight/2;
// 边界限定
if(l<0) l=0;
if(t<0) t=0;
if(l > this.sBox.offsetWidth - this.sSpan.offsetWidth){
l = this.sBox.offsetWidth - this.sSpan.offsetWidth;
}
if(t > this.sBox.offsetHeight - this.sSpan.offsetHeight){
t = this.sBox.offsetHeight - this.sSpan.offsetHeight;
}
// 设置遮罩层的位置
this.sSpan.style.left = l + "px";
this.sSpan.style.top = t + "px";
// 根据遮罩层移动的距离计算比例
var x = l / (this.sBox.offsetWidth - this.sSpan.offsetWidth);
var y = t / (this.sBox.offsetHeight - this.sSpan.offsetHeight);
// 根据上一步得到的比例,计算右侧大图要移动的当前值
this.bImg.style.left = (this.bBox.offsetWidth - this.bImg.offsetWidth) * x + "px";
this.bImg.style.top = (this.bBox.offsetHeight - this.bImg.offsetHeight) * y + "px";
}
out(){
this.sSpan.style.display = "none";
this.bBox.style.display = "none";
}
}
// 启动
var l = new Large();
l.addEvent();
实现效果:
更多关于放大镜的精彩文章,请点击链接查看:《放大镜效果》
以上就是本文的全部内容,希望对大家的学习有所帮助,也希望大家多多支持脚本之家。


 557
557


 被折叠的 条评论
为什么被折叠?
被折叠的 条评论
为什么被折叠?
 到【灌水乐园】发言


