


操作系统环境:centos linux release 7.7.1908 (Core)

基础环境配置
关闭SeLinux及防火墙
sed -i "s/SELINUX=enforcing/SELINUX=disabled/" /etc/selinux/config
setenforce 0
systemctl stop firewalld //停止系统默认的防火墙
systemctl mask firewalld //屏蔽服务(让它不能启动)
yum remove -y firewalld //卸载系统自带的防火墙
安装运维基础工具
yum install -y chkconfig net-tools ntsysv mlocate lrzsz wget lsof setuptool
安装yum源
yum install -y epel-release
wget https://dev.MySQL.com/get/mysql80-community-release-el7-2.noarch.rpm
yum localinstall -y mysql80-community-release-el7-2.noarch.rpm
MySQL8.0安装
yum install -y bison-devel libaio-devel perl-Data-Dumper
yum install -y mysql-server
systemctl start mysqld //启动MySQL
systemctl enable mysqld.service //开机自启动
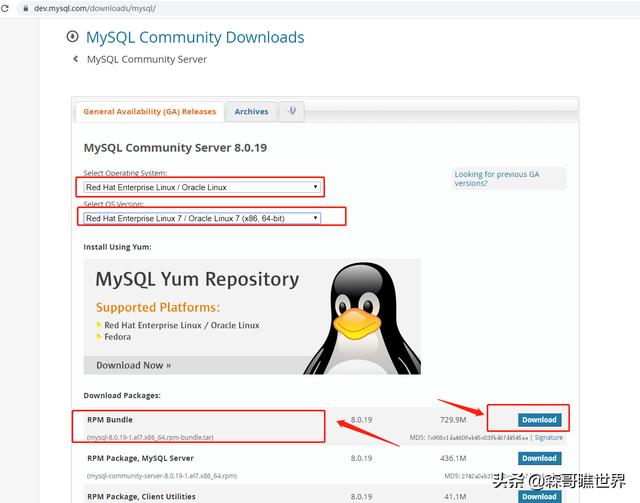
由于mysql的yum源是在国外,所以,在国内安装很慢,因此,森哥的做法,是直接下载rpm包回来手工安装 。如下操作:
wget https://dev.mysql.com/get/Downloads/MySQL-8.0/mysql-8.0.19-1.el7.x86_64.rpm-bundle.tar
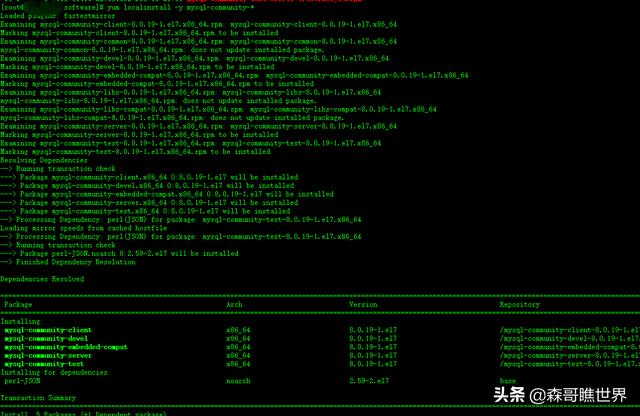
tar -xvf mysql-8.0.19-1.el7.x86_64.rpm-bundle.tar
yum localinstall -y mysql-community-* //使用localinstall会自己补足未安装的所需要组件
systemctl start mysqld //启动MySQL
systemctl enable mysqld.service //开机自启动
修改初始密码
grep 'temporary password' /var/log/mysqld.log //mysql5.7版本后,初始密码不再为空,默认随机生成,可通过该命令查询
mysql -u root -p //进入mysql,输入刚刚查到的密码
alter user 'root'@'localhost' identified with mysql_native_password by '三种或以上的八位字符'; //修改密码,并将密码插件更改为mysql_native_password
初始my.cnf配置的内容为:
cat /etc/my.cnf
# For advice on how to change settings please see
# http://dev.mysql.com/doc/refman/8.0/en/server-configuration-defaults.html
[mysqld]
#
# Remove leading # and set to the amount of RAM for the most important data
# cache in MySQL. Start at 70% of total RAM for dedicated server, else 10%.
# innodb_buffer_pool_size = 128M
#
# Remove the leading "# " to disable binary logging
# Binary logging captures changes between backups and is enabled by
# default. It's default setting is log_bin=binlog
# disable_log_bin
#
# Remove leading # to set options mainly useful for reporting servers.
# The server defaults are faster for transactions and fast SELECTs.
# Adjust sizes as needed, experiment to find the optimal values.
# join_buffer_size = 128M
# sort_buffer_size = 2M
# read_rnd_buffer_size = 2M
#
# Remove leading # to revert to previous value for default_authentication_plugin,
# this will increase compatibility with older clients. For background, see:
# https://dev.mysql.com/doc/refman/8.0/en/server-system-variables.html#sysvar_default_authentication_plugin
# default-authentication-plugin=mysql_native_password
datadir=/var/lib/mysql
socket=/var/lib/mysql/mysql.sock
log-error=/var/log/mysqld.log
pid-file=/var/run/mysqld/mysqld.pid
原则上,上面的这个配置,就可以正常使用了。但有时候为了一些业务场合的应用,就需要考虑对其进行修改,以达到符合实现业务的需求。
mkdir /var/log/mysqld
touch /var/log/mysqld/error.log
chown mysql.mysql /var/log/mysqld -R
# For advice on how to change settings please see
# http://dev.mysql.com/doc/refman/8.0/en/server-configuration-defaults.html
[mysqld]
#
# Remove leading # and set to the amount of RAM for the most important data
# cache in MySQL. Start at 70% of total RAM for dedicated server, else 10%.
# innodb_buffer_pool_size = 128M
#
# Remove the leading "# " to disable binary logging
# Binary logging captures changes between backups and is enabled by
# default. It's default setting is log_bin=binlog
# disable_log_bin
#
# Remove leading # to set options mainly useful for reporting servers.
# The server defaults are faster for transactions and fast SELECTs.
# Adjust sizes as needed, experiment to find the optimal values.
# join_buffer_size = 128M
# sort_buffer_size = 2M
# read_rnd_buffer_size = 2M
#
# Remove leading # to revert to previous value for default_authentication_plugin,
# this will increase compatibility with older clients. For background, see:
# https://dev.mysql.com/doc/refman/8.0/en/server-system-variables.html#sysvar_default_authentication_plugin
# default-authentication-plugin=mysql_native_password
# server-id = 1 //单MySQL服务下,可以省略不用
datadir=/var/lib/mysql //数据文件所在位置
socket=/var/lib/mysql/mysql.sock //sock文件所在位置
log_error = /var/log/mysqld/error.log //数据库错误日志文件
# skip_name_resolve = 1 //设置这个,说明只能通过IP连接,不用主机名,一般不建议使用
character-set-server=utf8mb4 //数据库默认字符集,可以支持表情符号等,utf8不支持表情符号。另外utf8mb4是mysql8.0起支持的。
collation-server = utf8mb4_general_ci //数据库字符集对应一些排序等规则,必须和character-set-server对应
transaction_isolation = READ-COMMITTED //事务隔离级别,默认为可重复读
init_connect='SET NAMES utf8mb4' //设置client连接mysql时的字符集,防止乱码
max_connections=500 //最大连接数
max_connect_errors = 1000 //最大错误连接数
explicit_defaults_for_timestamp = true //TIMESTAMP如果没有显示声明NOT NULL,允许NULL值
max_allowed_packet = 1024M //SQL数据包发送的大小,如果有BLOB对象建议修改成1G
# interactive_timeout = 1800 //MySQL默认的wait_timeout 值为8个小时, interactive_timeout参数需要同时配置才能生效
# wait_timeout = 1800
tmp_table_size = 134217728 //内部内存临时表的最大值,超过了这个值将写入磁盘,系统IO压力增大
max_heap_table_size = 134217728
# query_cache_size = 0 //禁用mysql的缓存查询结果集功能,可根据业务需求是否开启,通常为关闭
# query_cache_type = 0
# slow_query_log = 1 //慢查询sql日志设置
# slow_query_log_file = /var/log/mysqld/slow.log
# long_query_time = 8 //慢查询执行的秒数,必须达到此值可被记录
# log_queries_not_using_indexes = 1 //检查未使用到索引的sql
# log_throttle_queries_not_using_indexes = 5 //开启后,记录慢sql的频次、每分钟记录的条数
# min_examined_row_limit = 100 // 检索的行数必须达到此值才可被记为慢查询
# skip-log-bin //关闭binlog功能
binlog_expire_logs_seconds=604800 //binlog日志文件保存的过期时间,过期后自动删除
innodb_log_file_size=60M
innodb_buffer_pool_size=128M
[client]
default-character-set=utf8mb8
socket=/var/lib/mysql/mysql.sock
[mysqld_safe]
open-files-limit = 8192
log-error=/var/log/mysqld.log
socket=/var/lib/mysql/mysql.sock
pid-file=/var/run/mysqld/mysqld.pid
密码恢复
有时候,会将root密码给忘记了,就需要对MySQL进行密码恢复。
在/etc/my.cnf中,的[mysqld]内,加入如下内容:
skip-grant-table //改为安全模式,无法密码登陆
重启mysqld
systemctl restart mysqld
进入重置密码
mysql -u root -p //空密码,直接回车
use mysql;
update user set authentication_string='' where user='root'; //先清空密码
注释掉my.cnf中的skip-grant-table,再重启mysqld。然后就可以免密码进入,再修改密码。
mysql -u root -p //不用输入密码,直接进入
alter user 'root'@'localhost' identified with mysql_native_password by '三种或以上的八位字符'; //修改密码,并将密码插件更改为mysql_native_password
现在就恢复正常使用了。


 3670
3670


 被折叠的 条评论
为什么被折叠?
被折叠的 条评论
为什么被折叠?
 到【灌水乐园】发言


