


 本文介绍了SpringData对关系型数据库的访问,重点是JPA的使用。首先阐述了SpringData和JPA的关系,回顾了JPA的基本概念。接着通过一个入门示例展示了如何配置SpringData-JPA,包括搭建环境、配置Spring和整合Spring-Data-JPA。最后,探讨了编程查询的实现,解释了通过继承Repository接口进行数据操作的规则。

1. SpringData概述
1.1. SpringData是什么
SpringData是Spring提供对数据库访问的技术,其中包括关系型数据库、非关系型数据库(No-sql数据库)、以及map-reduce(大数据Hadoop)框架的访问。
在本文中,主要介绍SpringData对关系型数据库的访问。SpringData官方对关系型数据库的支持,可以通过JPA整合实现对数据库的操作。
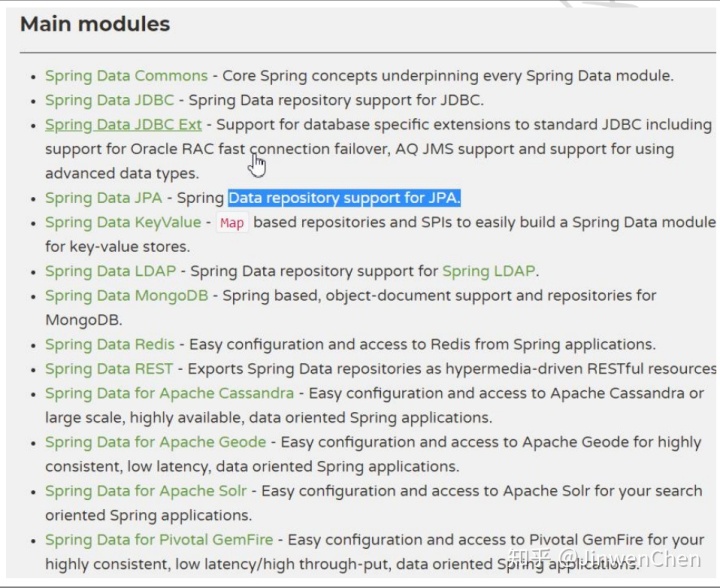
在本文以JPA为例来介绍SpringData,所以学习SpringData必须先学习JPA的相关知识。
PS:快速入门JPA可以参考:https://zhuanlan.zhihu.com/p/103919787
1.2. 回顾JPA
@Test
public void findAll(){
    //1获得操作对象
    EntityManager manager = JPAUtil.getEntityManager();
    //2.获得JPQL查询对象
    //HIbernateJPA兼容HQL。标准的JPQL是必须要使用select
    TypedQuery<Student> query = manager.createQuery("select s from Student s", Student.class);
    //返回多条查询的数据,getResultList
    //TypedQuery解决了HIbernate返回有警告的问题
    List<Student> students = query.getResultList();
    for (Student student : students) {
        System.out.println("学生名:"+student.getStuName());
    }
    manager.close();
}
--说明:
以上代码我们看到,我们执行JPQL需要:
[1] 先创建一个操作对象
[2] 获得查询对象Query实例对象
[3] 查询结束后,要关闭操作对象
[4] 关闭后再返还数据。
--问题:完成一次操作,需要写很多的操作代码。
相对于传统的JPA实现(hibernate-jpa、openJPA),如果使用Spring-Data-JPA完成以上代码,可以实现 DAO层零实现。SpringData对JPA的实现提供了一套良好的API支持,让我们更加快速的完成对数据库的操作。
2. 入门示例
2.1. 需求
通过Spring-Data-JPA实现查询学生表所有数据。
2.2. 配置步骤说明
Spring-Data-JPA是基于Spring的,所以配置思路是:先配置Spring框架,再整合SpringData-jpa。
第一步:导入包(使用Maven导入)。
第二步:配置Spring。
第三步:整合Spring-Data-JPA。
第四步:编写查询的实现代码。
2.3. 配置步骤
第一部分:搭建环境(创建项目导入包)
--前提:已经创建好了数据库。
数据库脚本:
/*
 Navicat Premium Data Transfer

 Source Server         : root
 Source Server Type    : MySQL
 Source Server Version : 50562
 Source Host           : localhost:3306
 Source Schema         : hibernate

 Target Server Type    : MySQL
 Target Server Version : 50562
 File Encoding         : 65001

 Date: 29/01/2020 17:18:05
*/

SET NAMES utf8mb4;
SET FOREIGN_KEY_CHECKS = 0;

-- ----------------------------
-- Table structure for tb_student
-- ----------------------------
DROP TABLE IF EXISTS `tb_student`;
CREATE TABLE `tb_student`  (
  `student_id` int(11) NOT NULL AUTO_INCREMENT,
  `student_name` varchar(50) CHARACTER SET utf8 COLLATE utf8_general_ci NULL DEFAULT NULL,
  `student_pwd` varchar(50) CHARACTER SET utf8 COLLATE utf8_general_ci NULL DEFAULT NULL,
  `student_status` int(2) NULL DEFAULT NULL,
  `create_date` date NULL DEFAULT NULL,
  PRIMARY KEY (`student_id`) USING BTREE
) ENGINE = InnoDB AUTO_INCREMENT = 7 CHARACTER SET = utf8 COLLATE = utf8_general_ci ROW_FORMAT = Compact;

SET FOREIGN_KEY_CHECKS = 1;
第一步:创建项目
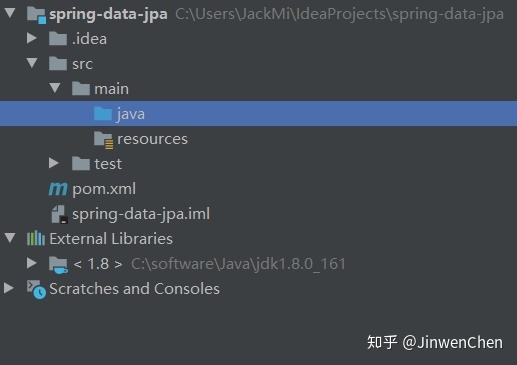
第二步:导入Pom依赖
导入JPA实现(hibernate-jpa)、spring-data-jpa、Junit4依赖。
<dependency>
    <groupId>org.springframework.data</groupId>
    <artifactId>spring-data-jpa</artifactId>
    <version>2.1.10.RELEASE</version>
</dependency>
<dependency>
    <groupId>org.hibernate</groupId>
    <artifactId>hibernate-entitymanager</artifactId>
    <version>5.4.10.Final</version>
</dependency>
<dependency>
    <groupId>junit</groupId>
    <artifactId>junit</artifactId>
    <version>4.12</version>
</dependency>
注意事项:spring-data-jpa默认依赖了所有spring核心包,因此导入spring-data-jpa即具备了Spring框架的环境。
第二部分:配置Spring
需求
编写一个简单的DAO类,输出一句话。
第一步:创建一个DAO类
@Repository
public class StudentDAO {
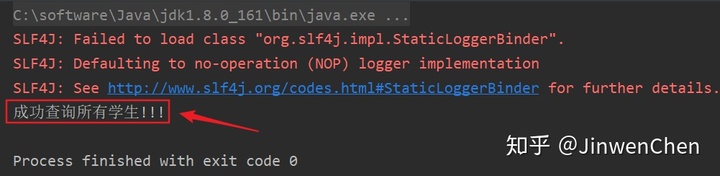
public void findAll() {
System.out.println("成功查询所有学生!!!");
}
}第二步:创建Spring配置文件
<?xml version="1.0" encoding="UTF-8"?>
<beans xmlns="http://www.springframework.org/schema/beans"
       xmlns:xsi="http://www.w3.org/2001/XMLSchema-instance"
       xmlns:context="http://www.springframework.org/schema/context"
       xsi:schemaLocation="http://www.springframework.org/schema/beans
       http://www.springframework.org/schema/beans/spring-beans.xsd http://www.springframework.org/schema/context https://www.springframework.org/schema/context/spring-context.xsd">

    <!-- 配置包扫描 -->
    <context:component-scan base-package="org.brick" />

</beans>
第三步:创建一个测试类
public class StudentDAOTest {

    @Test
    public void testFindAll() {
        ClassPathXmlApplicationContext context = new ClassPathXmlApplicationContext("application.xml");
        StudentDAO studentDAO = (StudentDAO) context.getBean("studentDAO");
        studentDAO.findAll();
    }
}
--测试成功
第三部分:整合Spring-Data-JPA
任何持久层框架和Spring整合,都是为了使用Spring容器里面的数据源。
--问题:为什么需要使用Spring容器的数据源?
因为只有使用Spring容器里面的数据源,才能使用Spring事物代理。既然Spring-Data-JPA框架也是一个持久层框架,那么也需要先配置数据源,再和Spring整合。
--整合思路为:
第一步:创建数据源。
第二步:获得JPA的实体管理工厂。
第三步:启动事物代理。
第四步:整合Spring-Data-JPA。 第一步:创建数据源
这里使用Druid数据源,因此导入Druid的依赖以及mysql驱动包依赖。
<dependency>
    <groupId>com.alibaba</groupId>
    <artifactId>druid</artifactId>
    <version>1.1.21</version>
</dependency>
<dependency>
    <groupId>mysql</groupId>
    <artifactId>mysql-connector-java</artifactId>
    <version>8.0.19</version>
</dependency>
--配置Druid数据源到spring容器
<!-- 配置Druid -->
<bean id="dataSource" class="com.alibaba.druid.pool.DruidDataSource" init-method="init" destroy-method="close">
    <property name="driverClassName" value="com.mysql.cj.jdbc.Driver" />
    <property name="url" value="jdbc:mysql://localhost:3306/hibernate?serverTimezone=UTC" />
    <property name="username" value="root" />
    <property name="password" value="root" />
</bean>
第二步:配置JPA实体管理工厂
因为需要使用Spring数据源,所以实体工厂要使用spring-orm来整合spring的实体管理工厂代理类,创建实体管理工厂。
<!-- 配置EntityManager -->
<bean id="entityManagerFactory" class="org.springframework.orm.jpa.LocalContainerEntityManagerFactoryBean">

    <!-- [1] 配置DataSource -->
    <property name="dataSource" ref="dataSource" />

    <!-- [2] 配置实体类所在分包 -->
    <property name="packagesToScan" value="org.brick.pojo" />

    <!--
        [3] 配置JPA适配器
        问题:为什么需要配置JPA适配器?
        答:JPA是一种标准,基于JPA这个标准有很多实现框架,因此我们需要通过JPA适配器指定使用的是哪一种JPA实现
            在这里,使用hibernate-JPA,即配置HibernateJpaVendorAdapter这个适配器
     -->
    <property name="jpaVendorAdapter">
        <bean class="org.springframework.orm.jpa.vendor.HibernateJpaVendorAdapter" />
    </property>

    <!-- [4] 配置JPA框架的属性 -->
    <property name="jpaProperties">
        <props>
            <!-- 指定数据库方言,可无需配置,框架运行会自动识别 -->
            <prop key="hibernate.dialect">org.hibernate.dialect.MySQL5InnoDBDialect</prop>
            <!-- 指定SQL语句是否显示 -->
            <prop key="hibernate.show_sql">true</prop>
            <!-- 指定SQL语句是否格式化 -->
            <prop key="hibernate.format_sql">true</prop>
            <!-- 指定hibernate的自动更新功能 -->
            <prop key="hibernate.hbm2ddl.auto">update</prop>
        </props>
    </property>
</bean>
第三步:整合Spring-Data-JPA
<!-- 整合Spring-data-jpa -->
<jpa:repositories base-package="org.brick.dao" entity-manager-factory-ref="entityManagerFactory" />
第四步:配置事物代理
<!-- 配置TransactionManager -->
<bean id="transactionManager" class="org.springframework.orm.jpa.JpaTransactionManager">
    <property name="entityManagerFactory" ref="entityManagerFactory" />
</bean>

<!-- 启动编程式事务 -->
<tx:annotation-driven transaction-manager="transactionManager" />
第四部分:编程查询的实现代码
第一步:创建pojo,映射实体类
@Entity
@Table(name = "tb_student")
public class Student implements Serializable {

    private static final Long serialVersionUID = 1L;

    @Id
    @GeneratedValue(strategy = GenerationType.IDENTITY)
    @Column(name = "student_id")
    private String student_id;

    @Column(name = "student_name")
    private String studentName;

    @Column(name = "student_pwd")
    private String studentPwd;

    @Column(name = "student_status")
    private String studentStatus;

    @Column(name = "create_date")
    private String createDate;

    // get、set方法
}
第二步:修改UserDAO类为JPA接口
注意:Spring-Data-JPA操作接口,必须通过继承Repository接口,才能获得该DAO接口的代理对象。
 /**
 * Repository<Student, Integer>中的Student表示的是实体类,Integer表示的是主键的类型
 */
public interface StudentDAO extends Repository<Student, Integer> {

    /**
     * 查询所有对象
     * @return
     */
    List<Student> findAll();
}
第三步:修改测试类,查看查询结果
--修改测试方法
@Test
public void testFindAll() {
    ClassPathXmlApplicationContext context = new ClassPathXmlApplicationContext("application.xml");
    StudentDAO studentDAO = (StudentDAO) context.getBean("studentDAO");
    try {
        List<Student> students = studentDAO.findAll();
        for (Student student : students) {
            System.out.println(student.getStudentName() + "--" + student.getStudentPwd());
        }
    } catch (Exception e) {
        e.printStackTrace();
    } finally {
        context.close();
    }
}
--测试成功
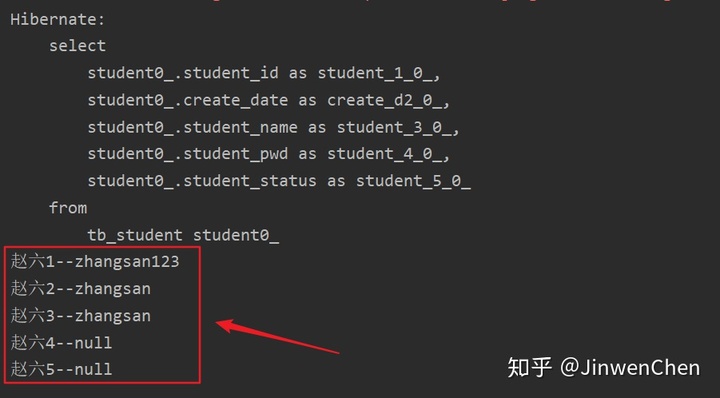
--问题:为什么我们定义的findAll方法能够查询到所有的数据呢?
Spring-Data-JPA定义了一套规则,通过规则来实现DAO操作功能。
--规则如下:
[1] 内置的查询方法,以 find、read、get开头。
[2] 内置的统计查询方法,以count开头。
[3] 如果查询所有的数据,使用All关键字。
[4] 如果条件查询,使用By关键字。
[5] 如果条件查询有多个条件,需要逻辑运算,使用And、Or关键字。
[6] 如果条件查询是模糊查询,使用Like关键字。
[7] 内置的删除方法,以delete开头。
[8] 内置的保存方法,以save开头。


 1890
1890

 被折叠的 条评论
为什么被折叠?
被折叠的 条评论
为什么被折叠?
 到【灌水乐园】发言


