


现在很多android的应用都采用底部导航栏的功能,这样可以使得用户在使用过程中随意切换不同的页面,现在我采用TabHost组件来自定义一个底部的导航栏的功能。
我们先看下该demo实例的框架图:
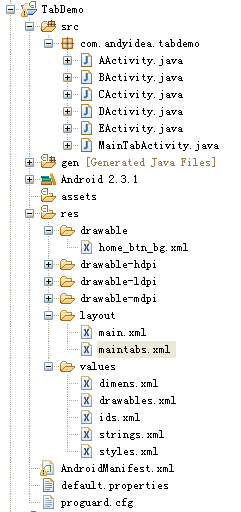
其中各个类的作用以及资源文件就不详细解释了,还有资源图片(在该Demo中借用了其它应用程序的资源图片)也不提供了,大家可以自行更换自己需要的资源图片。直接上各个布局文件或各个类的代码:
1、res/layout目录下的 maintabs.xml 源码:
xmlns:android="http://schemas.android.com/apk/res/android">
android:gravity="center_vertical" android:layout_gravity="bottom" android:orientation="horizontal" android:id="@id/main_radio" android:background="@drawable/maintab_toolbar_bg"
android:layout_width="fill_parent" android:layout_height="wrap_content">
2、res/drawable 下的 home_btn_bg.xml 源码:
xmlns:android="http://schemas.android.com/apk/res/android">
3、res/values 下的源码:dimens.xml源码:
10.0sp
5.0dip
2.0dip
30.0sp
100.0dip
48.0dip
20.0dip
19.0dip
10.0dip
20.0dip
10.0dip
35.0dip
74.0dip
70.0dip
13.299988dip
20.0dip
0.0dip
20.0sp
10.0dip
50.0dip
drawables.xml源码:
#fff4f4f4
#fffff4db
#ff000000
#00000000
@android:color/transparent
#99000000
#fff4f4f4
#ff272727
#ff333333
ids.xml源码:
false
false
false
false
false
false
strings.xml源码:
Hello World, MainTabActivity!
TabDemo
消息
首页
更多
时间
好友
styles.xml源码:
@dimen/bottom_tab_font_size
#ffffffff
marquee
center_horizontal
@drawable/home_btn_bg
@dimen/bottom_tab_padding_up
2.0dip
fill_parent
wrap_content
2.0dip
@null
true
@dimen/bottom_tab_padding_drawable
1.0
4、 src/com.andyidea.tabdemo包下面各个UI界面类源码:
MainTabActivity.java源码:
package com.andyidea.tabdemo;
import android.app.TabActivity;
import android.content.Intent;
import android.os.Bundle;
import android.view.Window;
import android.widget.CompoundButton;
import android.widget.RadioButton;
import android.widget.CompoundButton.OnCheckedChangeListener;
import android.widget.TabHost;
public class MainTabActivity extends TabActivity implements OnCheckedChangeListener{
private TabHost mTabHost;
private Intent mAIntent;
private Intent mBIntent;
private Intent mCIntent;
private Intent mDIntent;
private Intent mEIntent;
/** Called when the activity is first created. */
@Override
public void onCreate(Bundle savedInstanceState) {
super.onCreate(savedInstanceState);
requestWindowFeature(Window.FEATURE_NO_TITLE);
setContentView(R.layout.maintabs);
this.mAIntent = new Intent(this,AActivity.class);
this.mBIntent = new Intent(this,BActivity.class);
this.mCIntent = new Intent(this,CActivity.class);
this.mDIntent = new Intent(this,DActivity.class);
this.mEIntent = new Intent(this,EActivity.class);
((RadioButton) findViewById(R.id.radio_button0))
.setOnCheckedChangeListener(this);
((RadioButton) findViewById(R.id.radio_button1))
.setOnCheckedChangeListener(this);
((RadioButton) findViewById(R.id.radio_button2))
.setOnCheckedChangeListener(this);
((RadioButton) findViewById(R.id.radio_button3))
.setOnCheckedChangeListener(this);
((RadioButton) findViewById(R.id.radio_button4))
.setOnCheckedChangeListener(this);
setupIntent();
}
@Override
public void onCheckedChanged(CompoundButton buttonView, boolean isChecked) {
if(isChecked){
switch (buttonView.getId()) {
case R.id.radio_button0:
this.mTabHost.setCurrentTabByTag("A_TAB");
break;
case R.id.radio_button1:
this.mTabHost.setCurrentTabByTag("B_TAB");
break;
case R.id.radio_button2:
this.mTabHost.setCurrentTabByTag("C_TAB");
break;
case R.id.radio_button3:
this.mTabHost.setCurrentTabByTag("D_TAB");
break;
case R.id.radio_button4:
this.mTabHost.setCurrentTabByTag("MORE_TAB");
break;
}
}
}
private void setupIntent() {
this.mTabHost = getTabHost();
TabHost localTabHost = this.mTabHost;
localTabHost.addTab(buildTabSpec("A_TAB", R.string.main_home,
R.drawable.icon_1_n, this.mAIntent));
localTabHost.addTab(buildTabSpec("B_TAB", R.string.main_news,
R.drawable.icon_2_n, this.mBIntent));
localTabHost.addTab(buildTabSpec("C_TAB",
R.string.main_manage_date, R.drawable.icon_3_n,
this.mCIntent));
localTabHost.addTab(buildTabSpec("D_TAB", R.string.main_friends,
R.drawable.icon_4_n, this.mDIntent));
localTabHost.addTab(buildTabSpec("MORE_TAB", R.string.more,
R.drawable.icon_5_n, this.mEIntent));
}
private TabHost.TabSpec buildTabSpec(String tag, int resLabel, int resIcon,
final Intent content) {
return this.mTabHost.newTabSpec(tag).setIndicator(getString(resLabel),
getResources().getDrawable(resIcon)).setContent(content);
}
}
其中 AActivity.java 与 BActivity.java ,CActivity.java ,DActivity.java ,EActivity.java 中的源码都一样,只是用来表示不同的界面展示,故这里只列出 AActivity.java的源码:
package com.andyidea.tabdemo;
import android.app.Activity;
import android.os.Bundle;
import android.view.Gravity;
import android.widget.TextView;
public class AActivity extends Activity{
@Override
public void onCreate(Bundle savedInstanceState) {
super.onCreate(savedInstanceState);
TextView tv = new TextView(this);
tv.setText("This is A Activity!");
tv.setGravity(Gravity.CENTER);
setContentView(tv);
}
}
最后,大家别忘了在 AndroidManifest.xml 文件中注册各个 Activity 组件哦。好了,现在我们看下我们程序运行的效果图:
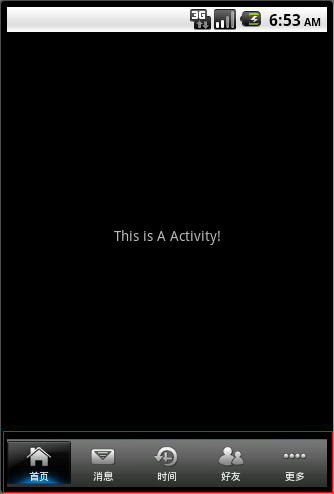
到此就实现了一个比较流行的底部导航栏的功能了,希望本文所述对大家学习Android软件编程有所帮助。


 692
692


 被折叠的 条评论
为什么被折叠?
被折叠的 条评论
为什么被折叠?
 到【灌水乐园】发言


