


# webhook工具
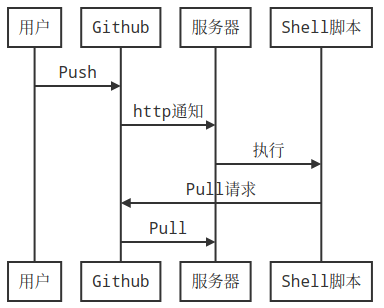
## webhook工作流程
## 安装
由于`webhook`是golang开发的, 所以要先安装`golang`
```
$ yum install -y golang
```
然后安装webhook
```
$ go get github.com/adnanh/webhook
```
查看`GOPATH`找到安装目录
```
$ go env
>>>
GOPATH=/root/go
>>>
```
所以安装目录就是`/root/go/bin/webhook`
## 生成ssh key
要获得`pull`权限, 需要把服务器的`ssh key`添加到(github, gitee, gitlab, gitea)上
```
$ ssh-keygen
一路回车
```
然后查看公钥
```
$ cat ~/.ssh/id_rsa.pub
ssh-rsa JHGGGKGYUUGH..........GYUFGUYFUGKJIFGUTFUU root@xxx
```
把她添加到github或者gitee等网站的公钥中, 就可以获得pull权限
## Shell脚本编写
```bash
#!/bin/bash
cd /www/wwwroot
if [ ! -d "webapp" ]; then
git clone [仓库地址]
fi
cd webapp
git pull origin master
```
这里我们拟保存在`/home/webhook/webapp.sh`
**记得添加执行权限, 和测试**
```
$ chmod +x webapp.sh
```
## hook配置和启动
**hooks.json**
```
[
{
"id": "woc",
"execute-command": "webapp.sh",
"command-working-directory": "/home/webhook"
}
]
```
- id 顾名思义, 可以自定义
- execute-command 执行脚本名称
- command-working-directory 脚本所在目录
支持多个
**启动**
```
$ /root/go/bin/webhook -hooks hooks.json -verbose
后台运行, 关闭终端也会运行
$ nohup /root/go/bin/webhook -hooks hooks.json -verbose > /dev/null 2>&1 &
```
然后你可以访问
```
http://yourdomain:9000/hooks/{id}
````
并添加在`github webhook中`
## 参考
- [https://zhuanlan.zhihu.com/p/136364880](https://zhuanlan.zhihu.com/p/136364880)


 868
868

 被折叠的 条评论
为什么被折叠?
被折叠的 条评论
为什么被折叠?
 到【灌水乐园】发言


