


各位亲爱的小伙伴们,你们好呀,我还是那个梦想当厨师的罗老师。有位不知名的粉丝跟我说:”听说springboot 搭配jpa进行数据操作比较火,你会不会?“,我一时间不知道怎么回答,答案当然是不会啦,我要是会的话,还写文章干嘛。我只是会用而已。
恰好2017年年底的时候,我也是努力自学了一波,现在已经能正常的使用spring boot + JPA了。好了废话不多说,开启斗图模式。
还是废话一下,为了防止以后有人问我mybatis怎么用,那我顺带一起讲一下。
JPA的使用
第一步:新建一个IDEA war工程,注意在选择的时候,不要选SQL选项,作为使用IDEA的老司机们,你们应该懂吧。不懂的话, 我就很头疼
第二步:引入jar包
此处需要引用两个,一个是mysql,一个是JPA
mysql mysql-connector-java 5.1.46 org.springframework.boot spring-boot-starter-data-jpa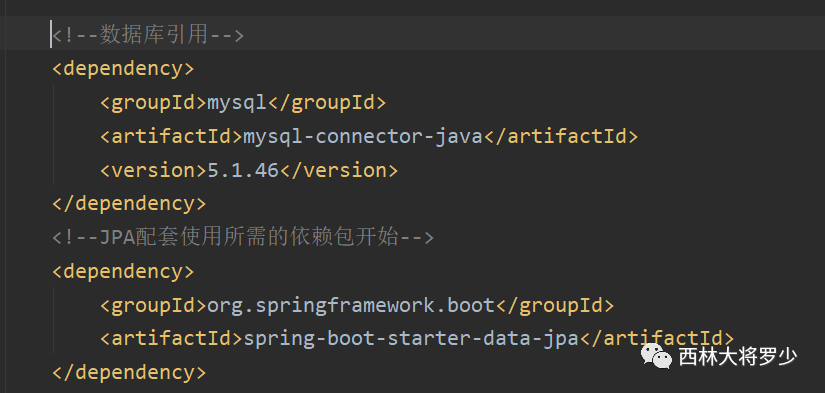
注意事项:mysql一定要选择版本,如果不选择版本很容易识别不到并且启动程序会报错哦
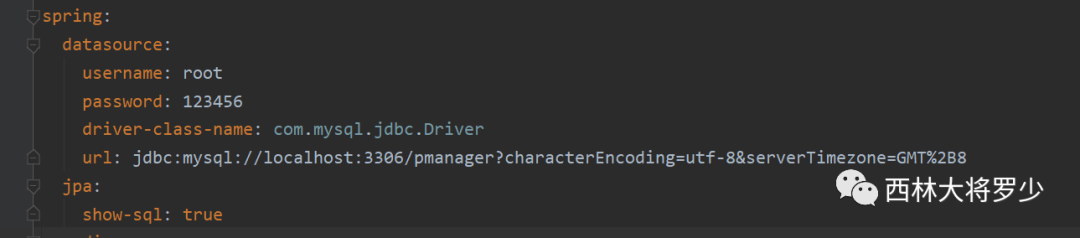
第三步:配置文件
spring:datasource:username: rootpassword: 123456driver-class-name: com.mysql.jdbc.Driver url: jdbc:mysql://localhost:3306/pmanager?characterEncoding=utf-8&serverTimezone=GMT%2B8jpa:show-sql: trueshow-sql设置为true。后续在执行sql时会打印出来。便于查看
第四步:定义接口方法
我的做法是封装SQL查询,使用到的有EntityManager、NativeQuery,具体看我代码
接口定义
package jp.db.jpa;import org.hibernate.query.NativeQuery;import java.util.Map;public interface IJPAImpl {/** *通过SQL命令执行查询 * @param sql * @return */ NativeQuery commonQuery(String sql); /** * 通过SQL命令执行查询,target获取接收值 * @param sql * @param target * @return */ NativeQuery commonQueryByClass(String sql, Class target); /** * 增删该查 * @param sql * @param param * @return */ int commonQueryByParam(String sql, Map, Object> param); /** * 通过SQL返回List集合 * @param sql * @param target * @param <T> * @return */ <T> T queryList(String sql, Class target); /** * 通过SQL 和参数返回List集合 * @param sql * @param target * @param param * @param <T> * @return */ <T> T queryListByParam(String sql, Class target, Map, Object> param); /** * SQL检索单条数据 * @param sql * @param target * @param param * @return */ Object queryByParam(String sql, Class target, Map, Object> param); /** * 检索单条数据 * @param sql * @param param * @return */ NativeQuery queryByParam(String sql, Map, Object> param);}接口方法
package jp.db.jpa.impl;import jp.db.jpa.IJPAImpl;import org.hibernate.Session;import org.hibernate.query.NativeQuery;import org.hibernate.query.internal.NativeQueryImpl;import org.hibernate.transform.Transformers;import org.springframework.stereotype.Repository;import javax.persistence.EntityManager;import javax.persistence.PersistenceContext;import java.util.Map;@Repositorypublic class JPAImpl implements IJPAImpl {@PersistenceContext    private EntityManager entityManager;    /**     * 获取session     * @return     */    private Session getHibernateSession() {
        Session session = entityManager.unwrap(Session.class);        return session;    }/**     *通过SQL命令执行查询     * @param sql     * @return     */    public NativeQuery commonQuery(String sql) {
        NativeQuery query = getHibernateSession().createNativeQuery(sql);        return query;    }/**     * 通过SQL命令执行查询,target获取接收值    * @param sql     * @param target     * @return     */    public NativeQuery commonQueryByClass(String sql, Class target) {
        NativeQuery query = getHibernateSession().createNativeQuery(sql);        query.unwrap(NativeQueryImpl.class).setResultTransformer(Transformers.aliasToBean(target));        return query;    }/**     * 通过SQL命令执行增删改查     * @param sql     * @param param     * @return     */    public int commonQueryByParam(String sql, Map, Object> param) {
        NativeQuery query = getHibernateSession().createNativeQuery(sql).setProperties(param);        int executeCnt = query.executeUpdate();        return executeCnt;    }/**     * 通过SQL返回List集合     * @param sql     * @param target     * @param <T>     * @return     */    public <T> T queryList(String sql, Class target) {
        NativeQuery query = getHibernateSession().createNativeQuery(sql);        query.unwrap(NativeQueryImpl.class).setResultTransformer(Transformers.aliasToBean(target));        return (T)query.getResultList();    }/**     * 通过SQL 和参数返回List集合     * @param sql     * @param target     * @param param     * @param <T>     * @return     */    public <T> T queryListByParam(String sql, Class target, Map, Object> param) {
        NativeQuery query = getHibernateSession().createNativeQuery(sql).setProperties(param);        query.unwrap(NativeQueryImpl.class).setResultTransformer(Transformers.aliasToBean(target));        return (T)query.getResultList();    }/**     * SQL检索单条数据     * @param sql     * @param target     * @param param     * @return     */    public Object queryByParam(String sql, Class target, Map, Object> param) {
        NativeQuery query = getHibernateSession().createNativeQuery(sql).setProperties(param);        query.unwrap(NativeQueryImpl.class).setResultTransformer(Transformers.aliasToBean(target));        return query.getSingleResult();    }@Override    public NativeQuery queryByParam(String sql, Map, Object> param) {
        NativeQuery query = getHibernateSession().createNativeQuery(sql).setProperties(param);        query.unwrap(NativeQueryImpl.class);        return query;    }
}以上两个java内容是我自行探索封装而成的,你可以借用,也可以网上探索更好的使用(如果你有更好用的话,告诉我,我也想学习下)
第五步:引用接口定义
引用方式和调用service方式一样
@AutowiredIJPAImpl jpaDao;使用此JPA这种数据处理的优缺点(个人观点)
优点:可以自定义SQL查询,可方便进行多表级联查询
缺点:自定义SQL编写比较多,容易出错,不能快速生成查询语句(和mybatis genneration生成工具相比)
我个人的话,两个都会用,遇到级联查询的话,我就用JPA,遇到普通的查询我就用mybatis
具体举个JPA调用例子:
@Overridepublic DirectorInfoEntity selectUserInfoById(String account) {
    DirectorInfoEntity model = null;    try {
        String sql = "";        sql += " select * from director_info where account = :account ";        Map, Object> param = new HashMap, Object>();        param.put("account"   , CommonUtils.objectToStr(account));        List modelList = jpaDao.queryListByParam(sql, DirectorInfoEntity.class, param);        if(modelList.size() > 0) {
             model = modelList.get(0);        }return model;    } catch (Exception e) {
        e.printStackTrace();    }return null;
}
package jp.entity;import lombok.Data;import java.util.Date;@Datapublic class DirectorInfoEntity {private String account; private String username; private String password; private Date createTime; private String author; private Integer level; private String updateAuthor;}解释一下:定义的方法中参数传入一般用map,参数返回值因为是泛型,可以自己自定义赋值
以上就是JAP调用的方式了,你看会了吗?赶紧代码贴起来尝试一下吧
接下来讲一下mybatis的使用
第一步:引入jar包
org.mybatis.generator mybatis-generator-core 1.3.7 org.mybatis.spring.boot mybatis-spring-boot-starter 1.3.2第二部:创建mybatis的xml文件以及model存放的目录
我们要设置的目录有三个,一个是dao、一个是mapper、一个是model
来解释下:dao就是定义sql查询语句方法
mapper是xml文件,是具体的查询语句以及返回值
model就是数据库字段的类型定义和返回值定义
创建好这三个目录之后,在application.yml文件中加入以下配置
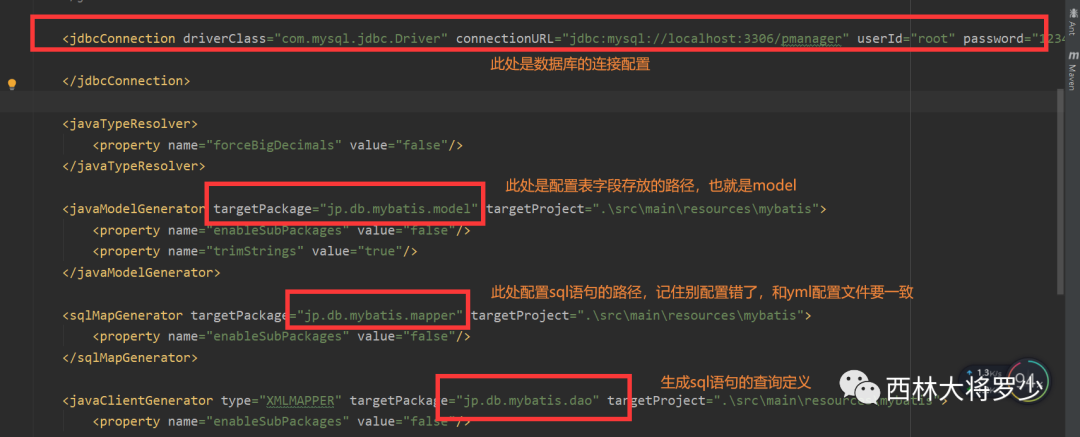
#用于mybatismybatis:mapper-locations: classpath:jp/db/mybatis/*/*.xmltype-aliases-package: jp.db.mybatis.modelmybatis: 是固定写法
mapper-locations:是扫码mybatis的xml
type-aliases-package:是字段类型定义的存放包目录
接下来是最关键的一步,在启动项上启动加上mybatis扫码
@MapperScan("jp.db.mybatis")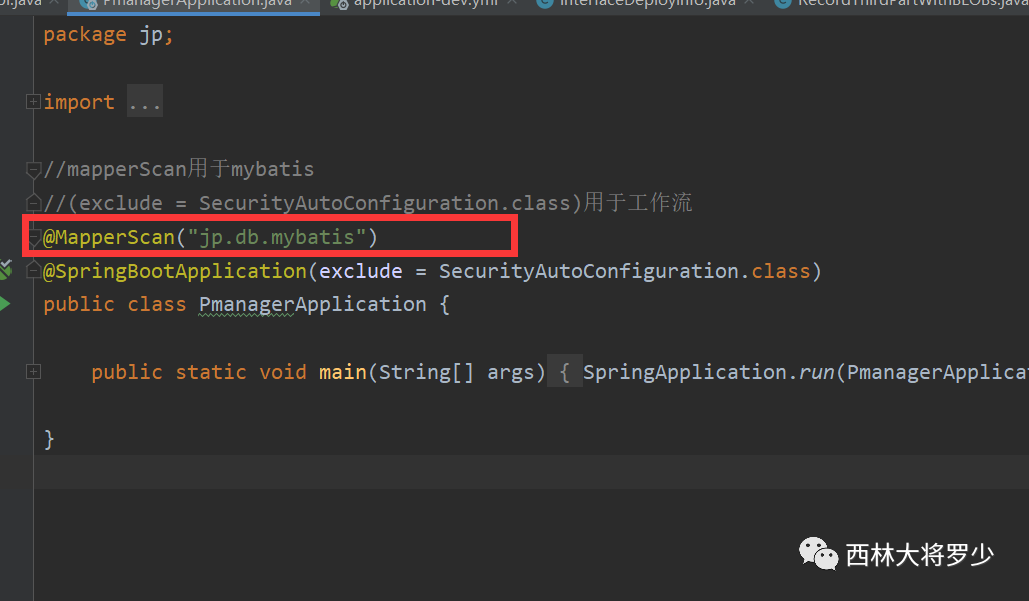
到了这个时候,你可能会问,我要自己写SQL文吗?
当然不必,有sql自动生成工具。mybatisGeneration,用法如下:
在resources目录下新建一个mybatis目录,在mybatis目录下写入generatorConfig.xml
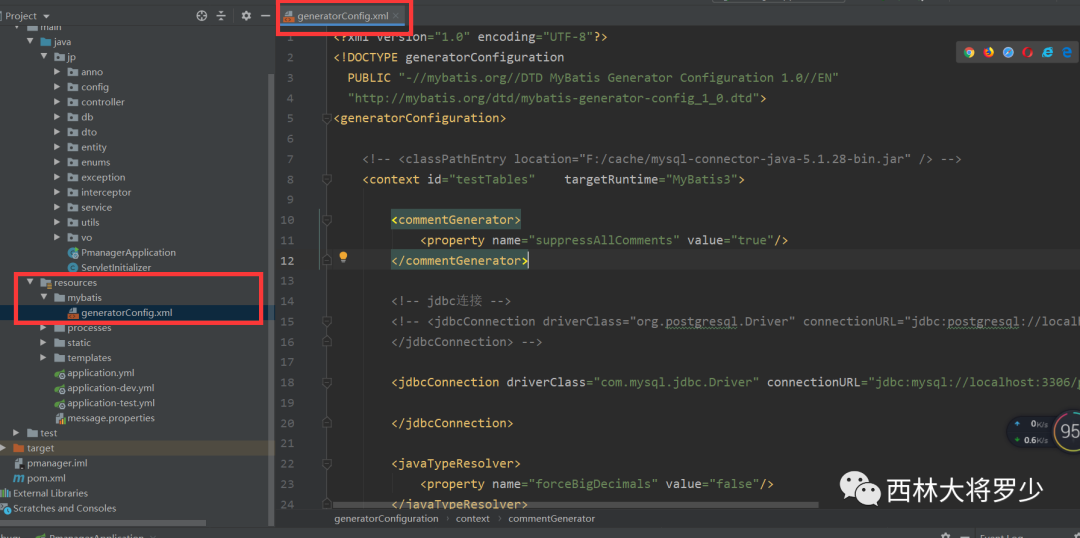
generatorConfig.xml文件内容如下:内部数据库连接以及地址按照自身项目进行修改
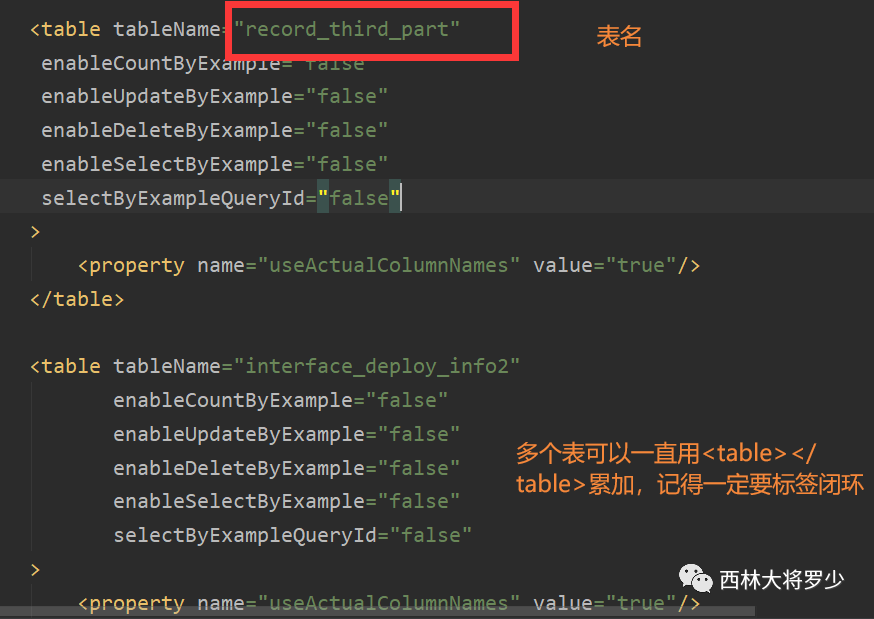
xml version="1.0" encoding="UTF-8"?>/span>generatorConfiguration PUBLIC "-//mybatis.org//DTD MyBatis Generator Configuration 1.0//EN" "http://mybatis.org/dtd/mybatis-generator-config_1_0.dtd"> id="testTables" targetRuntime="MyBatis3"> name="suppressAllComments" value="true"/> driverClass="com.mysql.jdbc.Driver" connectionURL="jdbc:mysql://localhost:3306/pmanager" userId="root" password="123456"> name="forceBigDecimals" value="false"/> targetPackage="jp.db.mybatis.model" targetProject=".\src\main\resources\mybatis"> name="enableSubPackages" value="false"/> name="trimStrings" value="true"/> targetPackage="jp.db.mybatis.mapper" targetProject=".\src\main\resources\mybatis"> name="enableSubPackages" value="false"/> type="XMLMAPPER" targetPackage="jp.db.mybatis.dao" targetProject=".\src\main\resources\mybatis"> name="enableSubPackages" value="false"/> tableName="record_third_part" enableCountByExample="false" enableUpdateByExample="false" enableDeleteByExample="false" enableSelectByExample="false" selectByExampleQueryId="false" > name="useActualColumnNames" value="true"/>
tableName="interface_deploy_info2" enableCountByExample="false" enableUpdateByExample="false" enableDeleteByExample="false" enableSelectByExample="false" selectByExampleQueryId="false" > name="useActualColumnNames" value="true"/>
tableName="interface_deploy_info4" enableCountByExample="false" enableUpdateByExample="false" enableDeleteByExample="false" enableSelectByExample="false" selectByExampleQueryId="false" > name="useActualColumnNames" value="true"/>
特别强调
name="trimStrings" value="true"/>
这句表示:model中的字段和库表字段完全一致,如果将他去除就可能出现自定大小写差别
接下来就是写代码去执行这个generatorConfig.xml了
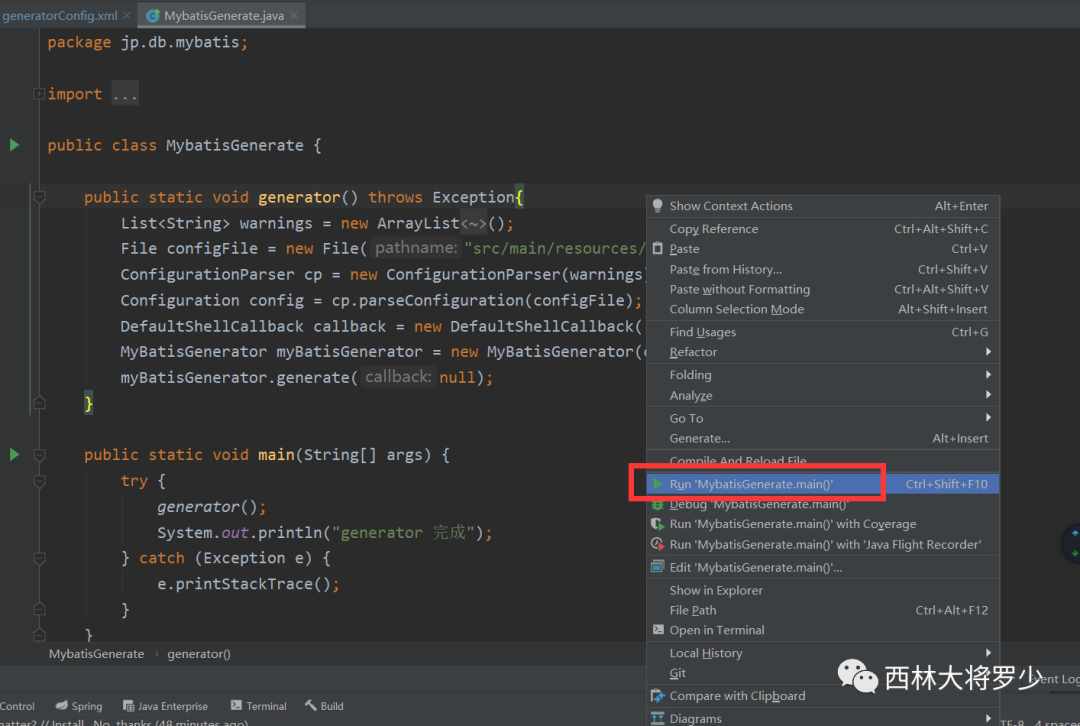
定义一个MybatisGenerate,去写入以下代码
package jp.db.mybatis;import org.mybatis.generator.api.MyBatisGenerator;import org.mybatis.generator.config.Configuration;import org.mybatis.generator.config.xml.ConfigurationParser;import org.mybatis.generator.internal.DefaultShellCallback;import java.io.File;import java.util.ArrayList;import java.util.List;public class MybatisGenerate {public static void generator() throws Exception{
        List warnings = new ArrayList();        File configFile = new File("src/main/resources/mybatis/generatorConfig.xml");        ConfigurationParser cp = new ConfigurationParser(warnings);        Configuration config = cp.parseConfiguration(configFile);        DefaultShellCallback callback = new DefaultShellCallback(true);        MyBatisGenerator myBatisGenerator = new MyBatisGenerator(config, callback, warnings);        myBatisGenerator.generate(null);    }public static void main(String[] args) {try {generator();            System.out.println("generator 完成");        } catch (Exception e) {
            e.printStackTrace();        }
    }
}
右键执行
执行完后查看以下mybatis目录
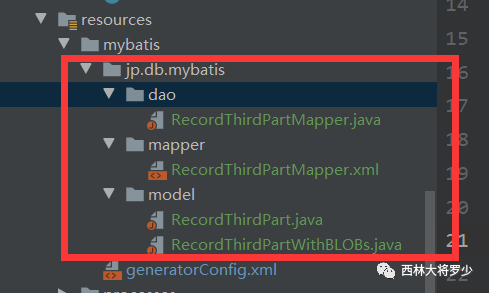
此时生成了三个文件夹,将这三个文件夹下的文件放到你实际定义的同名目录下吧。
(注意:mybatis Generation生成的查询语句只包含增删改查,如果要进行级联查询也要自己手动修改哦)
最后讲一下mybatis的使用。其实和JPA一样。
@ResourceRecordThirdPartMapper thirdPartMapper;举个例子:查看主键是否存在,存在就更新,不存在就添加
package jp.service.impl;import jp.db.mybatis.dao.RecordThirdPartMapper;import jp.db.mybatis.model.RecordThirdPart;import jp.db.mybatis.model.RecordThirdPartWithBLOBs;import jp.enums.MessageEnum;import jp.service.IRecordService;import jp.utils.*;import jp.vo.ResultVo;import org.springframework.beans.factory.annotation.Autowired;import org.springframework.stereotype.Service;import org.springframework.util.StringUtils;import javax.annotation.Resource;import javax.servlet.http.HttpServletRequest;import java.util.Date;import java.util.HashMap;import java.util.List;import java.util.Map;@Servicepublic class RecordServiceImpl implements IRecordService {@Resource    RecordThirdPartMapper thirdPartMapper;    @Override    public ResultVo addThirdPart(RecordThirdPartWithBLOBs thirdPartWithBLOBs, HttpServletRequest request) {int cnt = -1;        if(StringUtils.isEmpty(thirdPartWithBLOBs.getUuid())) {//开始追加            thirdPartWithBLOBs.setUuid(CommonUtils.getUuid());            Date nowTime = DateUtils.getCurrentTime();            thirdPartWithBLOBs.setCreateTime(nowTime);            thirdPartWithBLOBs.setUpdateTime(nowTime);            thirdPartWithBLOBs.setUpdateCount(0);            cnt = thirdPartMapper.insertSelective(thirdPartWithBLOBs);        } else {
            RecordThirdPart model = thirdPartMapper.selectByPrimaryKey(thirdPartWithBLOBs.getUuid());            if(model != null) {if(model.getUpdateCount() != thirdPartWithBLOBs.getUpdateCount()) {return ResultVoUtil.error(MessageEnum.W004);                }
                thirdPartWithBLOBs.setCreateTime(model.getCreateTime());                Date nowTime = DateUtils.getCurrentTime();                thirdPartWithBLOBs.setUpdateTime(nowTime);                thirdPartWithBLOBs.setUpdateCount(model.getUpdateCount() == null? 0 : model.getUpdateCount() + 1);            }
            cnt = thirdPartMapper.updateByPrimaryKeySelective(thirdPartWithBLOBs);        }if(cnt > 0) return ResultVoUtil.success();        return ResultVoUtil.error(MessageEnum.E007, null, "数据操作失败");
}
}
以上就是本次所有内容了,书写不易,小伙伴们,点个赞再走吧,动动发财的小手哈。


 1919
1919


 被折叠的 条评论
为什么被折叠?
被折叠的 条评论
为什么被折叠?
 到【灌水乐园】发言


