


#备注:默认读者已经安装好了docker环境
第一步:创建一个应用目录(后面使用该目录为工作目录,存放应用文件以及Dockerfile):
Python
mkdir /root/docker/lzwtestpython
cd /root/docker/lzwtestpython
1
2
mkdir/root/docker/lzwtestpython
cd/root/docker/lzwtestpython
第二步:为容器定义一个Dockerfile:
创建Dockerfile文件:
Python
vi Dockerfile
1
viDockerfile
输入Dockerfile文件内容:
Python
# Use an official Python runtime as a parent image
FROM python:2.7-slim
# Set the working directory to /app
WORKDIR /app
# Copy the current directory contents into the container at /app
COPY . /app
# Install any needed packages specified in requirements.txt
RUN pip install --trusted-host pypi.python.org -r requirements.txt
# Make port 80 available to the world outside this container
EXPOSE 80
# Define environment variable
ENV NAME World
# Run app.py when the container launches
CMD ["python", "app.py"]
1
2
3
4
5
6
7
8
9
10
11
12
13
14
15
16
17
18
19
20
# Use an official Python runtime as a parent image
FROMpython:2.7-slim
# Set the working directory to /app
WORKDIR/app
# Copy the current directory contents into the container at /app
COPY./app
# Install any needed packages specified in requirements.txt
RUNpipinstall--trusted-hostpypi.python.org-rrequirements.txt
# Make port 80 available to the world outside this container
EXPOSE80
# Define environment variable
ENVNAMEWorld
# Run app.py when the container launches
CMD["python","app.py"]
在文件内容中,我们可以看到,我们的python文件为app.py,下面我们需要去创建这个文件。一般来说,python项目中会包含一个 requirements.txt 文件,用于记录所有依赖包。
第三步:创建requirements.txt和app.py
创建requirements.txt文件:
Python
vi requirements.txt
1
virequirements.txt
输入requirements.txt文件内容:
Python
Flask
Redis
1
2
Flask
Redis
创建app.py文件:
Python
vi app.py
1
viapp.py
输入app.py文件内容:
Python
from flask import Flask
from redis import Redis, RedisError
import os
import socket
# Connect to Redis
redis = Redis(host="redis", db=0, socket_connect_timeout=2, socket_timeout=2)
app = Flask(__name__)
@app.route("/")
def hello():
try:
visits = redis.incr("counter")
except RedisError:
visits = "cannot connect to Redis, counter disabled"
html = "
Hello {name}!
" \"Hostname: {hostname}
" \
"Visits: {visits}"
return html.format(name=os.getenv("NAME", "world"), hostname=socket.gethostname(), visits=visits)
if __name__ == "__main__":
app.run(host='0.0.0.0', port=80)
1
2
3
4
5
6
7
8
9
10
11
12
13
14
15
16
17
18
19
20
21
22
23
24
fromflaskimportFlask
fromredisimportRedis,RedisError
importos
importsocket
# Connect to Redis
redis=Redis(host="redis",db=0,socket_connect_timeout=2,socket_timeout=2)
app=Flask(__name__)
@app.route("/")
defhello():
try:
visits=redis.incr("counter")
exceptRedisError:
visits="cannot connect to Redis, counter disabled"
html="
Hello {name}!
"\"Hostname: {hostname}
"\
"Visits: {visits}"
returnhtml.format(name=os.getenv("NAME","world"),hostname=socket.gethostname(),visits=visits)
if__name__=="__main__":
app.run(host='0.0.0.0',port=80)
到这里,我们可以发现,我们没有真正的在电脑上安装python,和requirements.txt里提到的flask或者redis。看起来,你并没有搭建好python+flask+redis的环境。但是,通过接下来的步骤,你即将拥有。
第四步:创建应用
检查工作文件夹下的三个文件是否都创建完成,三个文件如下:
Python
$ ls
Dockerfileapp.pyrequirements.txt
1
2
$ls
Dockerfileapp.pyrequirements.txt
现在开始运行创建Docker镜像命令,我们加上-t命令来命名,这里我们起一个很友好的名字friendlyhello(^_^)
Python
docker build -t friendlyhello .
1
dockerbuild-tfriendlyhello.
我们可以看一看执行的命令的回显:
Python
Sending build context to Docker daemon 4.608kB
Step 1/7 : FROM python:2.7-slim
2.7-slim: Pulling from library/python
802b00ed6f79: Pull complete
10b2d5f7ed73: Pull complete
1073a127cf89: Pull complete
90283f3dc1cd: Pull complete
Digest: sha256:0a43a6d7858af4a42427c792b682936d2cd34e183fb026627f53ddb556d4bf62
Status: Downloaded newer image for python:2.7-slim
---> c9cde4658340
Step 2/7 : WORKDIR /app
---> Running in 5b6e0800c538
Removing intermediate container 5b6e0800c538
---> 3ac183b809ce
Step 3/7 : COPY . /app
---> b05ac52c77de
Step 4/7 : RUN pip install --trusted-host pypi.python.org -r requirements.txt
---> Running in 58bd2a10311e
Collecting Flask (from -r requirements.txt (line 1))
Downloading https://files.pythonhosted.org/packages/7f/e7/08578774ed4536d3242b14dacb4696386634607af824ea997202cd0edb4b/Flask-1.0.2-py2.py3-none-any.whl (91kB)
Collecting Redis (from -r requirements.txt (line 2))
Downloading https://files.pythonhosted.org/packages/3b/f6/7a76333cf0b9251ecf49efff635015171843d9b977e4ffcf59f9c4428052/redis-2.10.6-py2.py3-none-any.whl (64kB)
Collecting itsdangerous>=0.24 (from Flask->-r requirements.txt (line 1))
Downloading https://files.pythonhosted.org/packages/dc/b4/a60bcdba945c00f6d608d8975131ab3f25b22f2bcfe1dab221165194b2d4/itsdangerous-0.24.tar.gz (46kB)
Collecting Jinja2>=2.10 (from Flask->-r requirements.txt (line 1))
Downloading https://files.pythonhosted.org/packages/7f/ff/ae64bacdfc95f27a016a7bed8e8686763ba4d277a78ca76f32659220a731/Jinja2-2.10-py2.py3-none-any.whl (126kB)
Collecting Werkzeug>=0.14 (from Flask->-r requirements.txt (line 1))
Downloading https://files.pythonhosted.org/packages/20/c4/12e3e56473e52375aa29c4764e70d1b8f3efa6682bef8d0aae04fe335243/Werkzeug-0.14.1-py2.py3-none-any.whl (322kB)
Collecting click>=5.1 (from Flask->-r requirements.txt (line 1))
Downloading https://files.pythonhosted.org/packages/fa/37/45185cb5abbc30d7257104c434fe0b07e5a195a6847506c074527aa599ec/Click-7.0-py2.py3-none-any.whl (81kB)
Collecting MarkupSafe>=0.23 (from Jinja2>=2.10->Flask->-r requirements.txt (line 1))
Downloading https://files.pythonhosted.org/packages/4d/de/32d741db316d8fdb7680822dd37001ef7a448255de9699ab4bfcbdf4172b/MarkupSafe-1.0.tar.gz
Building wheels for collected packages: itsdangerous, MarkupSafe
Running setup.py bdist_wheel for itsdangerous: started
Running setup.py bdist_wheel for itsdangerous: finished with status 'done'
Stored in directory: /root/.cache/pip/wheels/2c/4a/61/5599631c1554768c6290b08c02c72d7317910374ca602ff1e5
Running setup.py bdist_wheel for MarkupSafe: started
Running setup.py bdist_wheel for MarkupSafe: finished with status 'done'
Stored in directory: /root/.cache/pip/wheels/33/56/20/ebe49a5c612fffe1c5a632146b16596f9e64676768661e4e46
Successfully built itsdangerous MarkupSafe
Installing collected packages: itsdangerous, MarkupSafe, Jinja2, Werkzeug, click, Flask, Redis
Successfully installed Flask-1.0.2 Jinja2-2.10 MarkupSafe-1.0 Redis-2.10.6 Werkzeug-0.14.1 click-7.0 itsdangerous-0.24
Removing intermediate container 58bd2a10311e
---> 20b7d92b6075
Step 5/7 : EXPOSE 80
---> Running in 45f7bfcee8c8
Removing intermediate container 45f7bfcee8c8
---> 0c99f24bb0ca
Step 6/7 : ENV NAME World
---> Running in 4d192a73ee76
Removing intermediate container 4d192a73ee76
---> da526dcf3514
Step 7/7 : CMD ["python", "app.py"]
---> Running in 50226d88c2d5
Removing intermediate container 50226d88c2d5
---> bb0d475e1b3c
Successfully built bb0d475e1b3c
Successfully tagged friendlyhello:latest
1
2
3
4
5
6
7
8
9
10
11
12
13
14
15
16
17
18
19
20
21
22
23
24
25
26
27
28
29
30
31
32
33
34
35
36
37
38
39
40
41
42
43
44
45
46
47
48
49
50
51
52
53
54
55
56
57
58
SendingbuildcontexttoDockerdaemon4.608kB
Step1/7:FROMpython:2.7-slim
2.7-slim:Pullingfromlibrary/python
802b00ed6f79:Pullcomplete
10b2d5f7ed73:Pullcomplete
1073a127cf89:Pullcomplete
90283f3dc1cd:Pullcomplete
Digest:sha256:0a43a6d7858af4a42427c792b682936d2cd34e183fb026627f53ddb556d4bf62
Status:Downloadednewerimageforpython:2.7-slim
--->c9cde4658340
Step2/7:WORKDIR/app
--->Runningin5b6e0800c538
Removingintermediatecontainer5b6e0800c538
--->3ac183b809ce
Step3/7:COPY./app
--->b05ac52c77de
Step4/7:RUNpipinstall--trusted-hostpypi.python.org-rrequirements.txt
--->Runningin58bd2a10311e
CollectingFlask(from-rrequirements.txt(line1))
Downloadinghttps://files.pythonhosted.org/packages/7f/e7/08578774ed4536d3242b14dacb4696386634607af824ea997202cd0edb4b/Flask-1.0.2-py2.py3-none-any.whl(91kB)
CollectingRedis(from-rrequirements.txt(line2))
Downloadinghttps://files.pythonhosted.org/packages/3b/f6/7a76333cf0b9251ecf49efff635015171843d9b977e4ffcf59f9c4428052/redis-2.10.6-py2.py3-none-any.whl(64kB)
Collectingitsdangerous>=0.24(fromFlask->-rrequirements.txt(line1))
Downloadinghttps://files.pythonhosted.org/packages/dc/b4/a60bcdba945c00f6d608d8975131ab3f25b22f2bcfe1dab221165194b2d4/itsdangerous-0.24.tar.gz(46kB)
CollectingJinja2>=2.10(fromFlask->-rrequirements.txt(line1))
Downloadinghttps://files.pythonhosted.org/packages/7f/ff/ae64bacdfc95f27a016a7bed8e8686763ba4d277a78ca76f32659220a731/Jinja2-2.10-py2.py3-none-any.whl(126kB)
CollectingWerkzeug>=0.14(fromFlask->-rrequirements.txt(line1))
Downloadinghttps://files.pythonhosted.org/packages/20/c4/12e3e56473e52375aa29c4764e70d1b8f3efa6682bef8d0aae04fe335243/Werkzeug-0.14.1-py2.py3-none-any.whl(322kB)
Collectingclick>=5.1(fromFlask->-rrequirements.txt(line1))
Downloadinghttps://files.pythonhosted.org/packages/fa/37/45185cb5abbc30d7257104c434fe0b07e5a195a6847506c074527aa599ec/Click-7.0-py2.py3-none-any.whl(81kB)
CollectingMarkupSafe>=0.23(fromJinja2>=2.10->Flask->-rrequirements.txt(line1))
Downloadinghttps://files.pythonhosted.org/packages/4d/de/32d741db316d8fdb7680822dd37001ef7a448255de9699ab4bfcbdf4172b/MarkupSafe-1.0.tar.gz
Buildingwheelsforcollectedpackages:itsdangerous,MarkupSafe
Runningsetup.pybdist_wheelforitsdangerous:started
Runningsetup.pybdist_wheelforitsdangerous:finishedwithstatus'done'
Storedindirectory:/root/.cache/pip/wheels/2c/4a/61/5599631c1554768c6290b08c02c72d7317910374ca602ff1e5
Runningsetup.pybdist_wheelforMarkupSafe:started
Runningsetup.pybdist_wheelforMarkupSafe:finishedwithstatus'done'
Storedindirectory:/root/.cache/pip/wheels/33/56/20/ebe49a5c612fffe1c5a632146b16596f9e64676768661e4e46
SuccessfullybuiltitsdangerousMarkupSafe
Installingcollectedpackages:itsdangerous,MarkupSafe,Jinja2,Werkzeug,click,Flask,Redis
SuccessfullyinstalledFlask-1.0.2Jinja2-2.10MarkupSafe-1.0Redis-2.10.6Werkzeug-0.14.1click-7.0itsdangerous-0.24
Removingintermediatecontainer58bd2a10311e
--->20b7d92b6075
Step5/7:EXPOSE80
--->Runningin45f7bfcee8c8
Removingintermediatecontainer45f7bfcee8c8
--->0c99f24bb0ca
Step6/7:ENVNAMEWorld
--->Runningin4d192a73ee76
Removingintermediatecontainer4d192a73ee76
--->da526dcf3514
Step7/7:CMD["python","app.py"]
--->Runningin50226d88c2d5
Removingintermediatecontainer50226d88c2d5
--->bb0d475e1b3c
Successfullybuiltbb0d475e1b3c
Successfullytaggedfriendlyhello:latest
分析回显,我们可以看到执行的过程有7步:
Python
Step 1/7 : FROM python:2.7-slim
Step 2/7 : WORKDIR /app
Step 3/7 : COPY . /app
Step 4/7 : RUN pip install --trusted-host pypi.python.org -r requirements.txt
Step 5/7 : EXPOSE 80
Step 6/7 : ENV NAME World
Step 7/7 : CMD ["python", "app.py"]
1
2
3
4
5
6
7
8
9
10
11
12
13
Step1/7:FROMpython:2.7-slim
Step2/7:WORKDIR/app
Step3/7:COPY./app
Step4/7:RUNpipinstall--trusted-hostpypi.python.org-rrequirements.txt
Step5/7:EXPOSE80
Step6/7:ENVNAMEWorld
Step7/7:CMD["python","app.py"]
这7步,是在Dockerfile里指定的(所以Dockerfile最关键啊#_#)。
命令执行完后,我们可以输入如下命令来查看本机安装的docker 镜像
Python
$ docker image ls
REPOSITORY TAG IMAGE ID
friendlyhello latest 326387cea398第五步
1
2
3
4
$dockerimagels
REPOSITORYTAGIMAGEID
friendlyhellolatest326387cea398第五步
第五步:运行应用
运行应用,并且把你物理机(或者云服务器)的4000端口映射到我们容器的80端口,使用-p命令:
Python
docker run -p 4000:80 friendlyhello
1
dockerrun-p4000:80friendlyhello
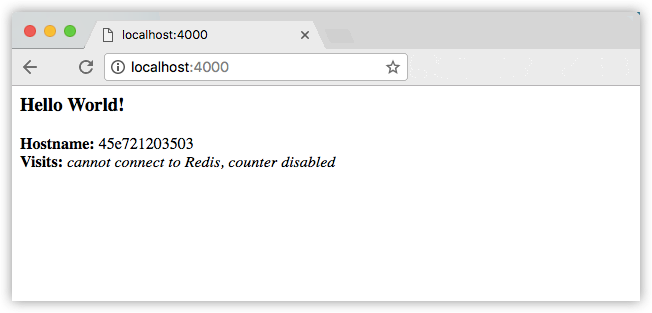
哈?你问为什么要这样做?因为你的app.py文件里指的是80端口,如果我们没有使用docker,直接是在自己电脑上运行该python程序,确实可以通过http://0.0.0.0:80进行访问。目前在我们的容器中,确实也是80端口启用了,但是要让我们的其他用户访问这台物理机地址的容器内的python应用,需要把物理机的端口4000与容器的80端口进行映射。现在,请用http://localhost:4000 来检查一下吧
如果你是布置在别的机器上而非本机的话,也可以用地址加端口号的方式来访问。例如http://192.168.99.100:4000/ 或者http://www.yinyubo.cn:4000/
没有浏览器的话,也可以通过curl命令工具来访问
Python
$ curl http://localhost:4000
Hello World!
Hostname: 8fc990912a14 Visits: cannot connect to Redis, counter disabled1
2
3
$curlhttp://localhost:4000
HelloWorld!
Hostname:8fc990912a14 Visits: cannotconnecttoRedis,counterdisabled如果你需要关闭docker应用的话,可以用如下方法:
Python
$ docker container ls
CONTAINER ID IMAGE COMMAND CREATED
1fa4ab2cf395 friendlyhello "python app.py" 28 seconds ago
1
2
3
$dockercontainerls
CONTAINERIDIMAGECOMMANDCREATED
1fa4ab2cf395friendlyhello"python app.py"28secondsago
先获得docker 容器的ID,然后用docker container stop 命令来关闭它,例如:
Python
docker container stop 1fa4ab2cf395
1
dockercontainerstop1fa4ab2cf395


 577
577


 被折叠的 条评论
为什么被折叠?
被折叠的 条评论
为什么被折叠?
 到【灌水乐园】发言


