


最近很忙所以一个多星期没有更新过我的博客了,Juniper SRX的所有试验(SRX100能搞定的)都已经做完了,最近正在做PPT!IRONPORT邮件防火墙也已经把高级特×××完毕了,只等最后录像!还有就是最近YESLAB接了一个《思蜀援川》项目,汶川的朋友都到我们这里来学习了!最后就是我还在学开车,本周四还要考交规,这简直是个郁闷的事情!
SRX防火墙因为条件所限没有完成的试验如下,希望有条件的高人联系我,让小弟做做实验!
1.高可用性(毕竟我只有一台防火墙)
2.IPS(授权问题)
3.透明墙(传中说只有高端才能够支持)
实验六:Dynamic Virtual Tunnel Interface(DVTI)技术
我们曾经在第四章第四个试验中,介绍过VTI技术,并且对SVTI的配置进行了详细的介绍。VTI技术一共分为两大部分SVTI和DVTI,SVTI运用于站点到站点×××,用于替代传统静态crypto map的配置,并且创建一个虚拟隧道接口,我们可以在这个虚拟隧道接口上对×××流量运用各种网络技术,例如:IOS防火墙,QoS,NAT,动态路由协议等等。DVTI技术与SVTI技术类似,只是DVTI技术运用于远程访问的Ez×××,Cisco官方对DVTI的特点作了如下的介绍。
1. 替代传统的Dynamic map配置。
2. 支持加密单播与组播。
3. 支持QoS,FW,NetFlow,ACL,NAT和VRF技术(注意不支持在DVTI接口上的动态路由协议)。
4. 支持RADIUS服务器推送基于用户和组的策略。
5. 克隆虚拟模板(virtual template)配置,动态创建虚拟访问接口(virtual access interfaces)。
了解了DVTI的基本特性后,我们先来了解一下DVTI的具体配置命令,然后再介绍一下我对这个技术的理解。
第一部分:实验目标
介绍Ez××× DVTI配置方式。
第二部分:实际接线状况
图9-29:Ez××× DVTI实验实际接线图

第三部分:实验拓扑
图9-30: Ez××× DVTI实验拓扑
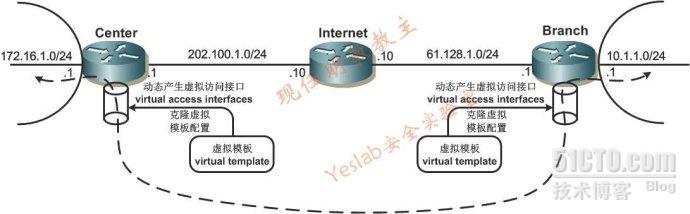
拓扑介绍:本次试验的主要目的是介绍Ez××× DVTI配置方式。Center模拟中心站点路由器,Branch模拟分支站点路由器。具体网段与地址如上图所示。采用DVTI技术之后,Ez×××一旦建立会在Ez×××服务器和客户端分别产生一个虚拟访问接口,这个接口的配置源自于对虚拟模板配置的克隆。Ez×××服务器和客户端通过这两个虚拟访问接口虚拟的连接在一起。我们可以在这个接口上配置IOS防火墙,QoS,NAT等等高级特性。
第四部分:基本网络配置
Center基本网络配置
| enable configure terminal ! hostname Center ! interface Loopback0 ip address 172.16.1.1 255.255.255.0 ! interface FastEthernet0/0 ip address 202.100.1.1 255.255.255.0 no shutdown ! ip route 0.0.0.0 0.0.0.0 202.100.1.10 ! end |
Internet基本网络配置
| enable configure terminal ! hostname Internet ! interface FastEthernet0/0 ip address 202.100.1.10 255.255.255.0 no shutdown ! interface FastEthernet1/0 ip address 61.128.1.10 255.255.255.0 no shutdown ! end |
Branch基本网络配置
| enable configure terminal ! hostname Branch ! interface Loopback0 ip address 10.1.1.1 255.255.255.0 ! interface FastEthernet1/0 ip address 61.128.1.1 255.255.255.0 no shutdown ! ip route 0.0.0.0 0.0.0.0 61.128.1.10 ! end |
第五部分:Ez××× DVTI配置
Center Ez××× DVTI服务器配置
| enable configure terminal ! aaa new-model ! aaa authentication login noacs line none aaa authentication login Ez×××-XAUTH local aaa authorization network Ez×××-MODE-CFG local ! username ipsecuser password 0 yeslabccies ! crypto isakmp policy 10 encr 3des hash md5 authentication pre-share group 2 ! crypto isakmp client configuration group ipsecgroup key yeslabccies pool Ez×××-Pool save-password crypto isakmp profile Ez×××-Profile match identity group ipsecgroup client authentication list Ez×××-XAUTH isakmp authorization list Ez×××-MODE-CFG client configuration address respond virtual-template 100 <在ISAKMP Profile下调用虚拟模板,关联ipsecgroup组的用户到这个虚拟模板100,我们可以在这个模板下配置访问控制列表,NAT地址转换或者QoS相关策略,这些策略自动会运用到这个组的用户。> ! crypto ipsec transform-set Ez×××-Trans esp-des esp-md5-hmac ! crypto ipsec profile IPSec-Profile set transform-set Ez×××-Trans set isakmp-profile Ez×××-Profile <在IPSec Profile下调用ISAKMP Profile,关联第一阶段策略和认证信息到第二阶段策略。> ! interface Virtual-Template100 type tunnel <配置时一定注意“type tunnel”关键字> ip unnumbered FastEthernet0/0 <注意一定要“unnumber”任何一个有IP地址的接口,“unnumber”没有配置IP地址的接口,或者随意手动配置一个IP地址都会造成Ez×××无法正常建立。> tunnel source FastEthernet0/0 <隧道的源一定是本地加密点地址。> tunnel mode ipsec ipv4 <“tunnel mode ipsec ipv4”这句话是VTI技术的关键> tunnel protection ipsec profile IPSec-Profile <在虚拟模板下调用IPSec Profile,这样所有动态产生的虚拟访问接口都会被这个IPSec Profile所保护> ! ip local pool Ez×××-Pool 123.1.1.100 123.1.1.200 ! line con 0 login authentication noacs line aux 0 login authentication noacs ! end |
Branch Ez××× DVTI客户端配置
| enable configure terminal ! crypto ipsec client ez*** Ez×××-Client connect auto group ipsecgroup key yeslabccies mode client peer 202.100.1.1 virtual-interface 56 <调用虚拟模板56,这个Ez×××建立以后产生的虚拟访问接口,会克隆虚拟模板56的配置而产生。> username ipsecuser password yeslabccies ! interface Loopback0 ip address 10.1.1.1 255.255.255.0 crypto ipsec client ez*** Ez×××-Client inside ! interface FastEthernet1/0 ip address 61.128.1.1 255.255.255.0 crypto ipsec client ez*** Ez×××-Client outside ! interface Virtual-Template56 type tunnel ip unnumbered Loopback0 <虚拟模板下只需要“ip unnumbered”命令即可,配置注意事项与Ez××× DVTI服务器端相同。> ! end |
第六部分:查看Ez××× DVTI状态
Center Ez××× DVTI状态
| Center#show crypto session Crypto session current status Interface: Virtual-Access2 <动态产生接口“Virtual-Access2”> Username: ipsecuser <Ez×××认证的用户为“ipsecuser”> Profile: Ez×××-Profile <使用的ISAKMP Profile为“Ez×××-Profile”> Group: ipsecgroup <IKE第一阶段认证的组为“ipsecgroup”> Assigned address: 123.1.1.101 <为客户推送的地址为“123.1.1.101”> Session status: UP-ACTIVE Peer: 61.128.1.1 port 500 IKE SA: local 202.100.1.1/500 remote 61.128.1.1/500 Active IPSEC FLOW: permit ip 0.0.0.0/0.0.0.0 0.0.0.0/0.0.0.0 <感兴趣流为进入这个虚拟隧道接口的所有流量> Active SAs: 2, origin: crypto map Center#show ip route Codes: C - connected, S - static, R - RIP, M - mobile, B - BGP D - EIGRP, EX - EIGRP external, O - OSPF, IA - OSPF inter area N1 - OSPF NSSA external type 1, N2 - OSPF NSSA external type 2 E1 - OSPF external type 1, E2 - OSPF external type 2 i - IS-IS, su - IS-IS summary, L1 - IS-IS level-1, L2 - IS-IS level-2 ia - IS-IS inter area, * - candidate default, U - per-user static route o - ODR, P - periodic downloaded static route Gateway of last resort is 202.100.1.10 to network 0.0.0.0 172.16.0.0/24 is subnetted, 1 subnets C 172.16.1.0 is directly connected, Loopback0 C 202.100.1.0/24 is directly connected, FastEthernet0/0 123.0.0.0/32 is subnetted, 1 subnets S 123.1.1.101 [1/0] via 0.0.0.0, Virtual-Access2 <通过“Virtual-Access2”去往地址池地址“123.1.1.101”> S* 0.0.0.0/0 [1/0] via 202.100.1.10 |
Branch Ez××× DVTI状态
| Branch#show crypto session Crypto session current status Interface: Virtual-Access2 <动态产生接口“Virtual-Access2”> Session status: UP-ACTIVE Peer: 202.100.1.1 port 500 IKE SA: local 61.128.1.1/500 remote 202.100.1.1/500 Active <两个加密点UDP/500之间的IKE安全关联> IPSEC FLOW: permit ip 0.0.0.0/0.0.0.0 0.0.0.0/0.0.0.0 <感兴趣流为进入这个虚拟隧道接口的所有流量> Active SAs: 2, origin: crypto map Branch#show crypto ipsec client ez*** Easy ××× Remote Phase: 6 Tunnel name : Ez×××-Client Inside interface list: Loopback0 Outside interface: Virtual-Access2 (bound to FastEthernet1/0) <这个Ez×××的外部接口为动态产生的虚拟访问接口“Virtual-Access2”> Current State: IPSEC_ACTIVE Last Event: MTU_CHANGED Address: 123.1.1.101 (applied on Loopback10000) Mask: 255.255.255.255 Save Password: Allowed Current Ez××× Peer: 202.100.1.1 Branch# show ip route Codes: C - connected, S - static, R - RIP, M - mobile, B - BGP D - EIGRP, EX - EIGRP external, O - OSPF, IA - OSPF inter area N1 - OSPF NSSA external type 1, N2 - OSPF NSSA external type 2 E1 - OSPF external type 1, E2 - OSPF external type 2 i - IS-IS, su - IS-IS summary, L1 - IS-IS level-1, L2 - IS-IS level-2 ia - IS-IS inter area, * - candidate default, U - per-user static route o - ODR, P - periodic downloaded static route Gateway of last resort is 61.128.1.10 to network 0.0.0.0 202.100.1.0/32 is subnetted, 1 subnets S 202.100.1.1 [1/0] via 61.128.1.10 10.0.0.0/24 is subnetted, 1 subnets C 10.1.1.0 is directly connected, Loopback0 123.0.0.0/32 is subnetted, 1 subnets C 123.1.1.101 is directly connected, Loopback10000 61.0.0.0/24 is subnetted, 1 subnets C 61.128.1.0 is directly connected, FastEthernet1/0 S* 0.0.0.0/0 [1/0] via 61.128.1.10 [1/0] via 0.0.0.0, Virtual-Access2 <默认没有启用分割隧道技术,所以产生了一条默认路由出口为动态产生的虚拟访问接口“Virtual-Access2”,如果启用了分割隧道技术,应该产生一条去往中心内部网络的静态路由,下一条依然为“Virtual-Access2”。> |
实验七:GRE Over Ez×××完美解决方案
我们已经学过了很多×××技术,但是没有任何一个技术能够运用在,客户和服务器双动态地址,有隧道接口并且能够运用动态路由协议,这种极端复杂而苛刻的场合。虽然非常苛刻但却非常容易出现,例如:我公司和我家都是使用ADSL动态获取地址,但是我却希望配置一个站点到站点的×××(使用Ez×××拨号的感觉绝对不如站点到站点×××使用起来爽),还希望有隧道并且能够运行动态路由协议。(能够跑通动态路由协议,绝对是一件心情为之一爽的事情)。我们现在就对以前学习的×××技术逐个进行分析,了解他们运用在这种场合存在哪些缺陷?传统的站点到站点技术就不讨论了,属于什么都不支持什么都没有。传统的GRE,GRE Over IPSec和DM×××技术不支持双动态地址。GET×××就不是一个互联网技术,所以也不是讨论范围。Ez×××虽然能够支持动态地址(可以使用peer配置中心×××网关的域名),但是不管是Ez×××的哪种配置方式,都不能支持在隧道上运行动态路由协议,虽然DVTI有动态产生的虚拟访问接口,但却不能在这个接口上运行动态路由协议。综上所述我们以前学习的×××技术都不能运用在这种复杂而苛刻的场合,现在我就为大家介绍一下现任明教教主自创的GRE Over Ez×××完美解决方案,能够在最复杂和苛刻的×××网络环境中运用。
图9-32: GRE Over Ez×××完美解决方案
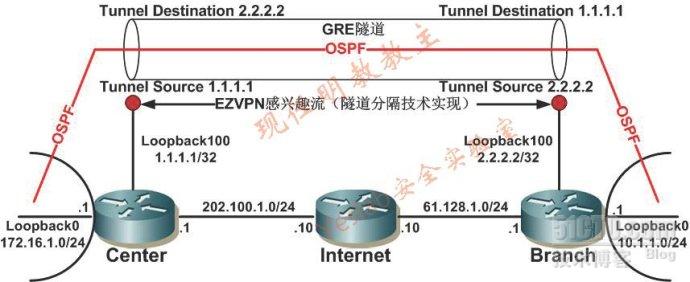
试验介绍:本次试验的主要目的是介绍GRE Over Ez×××完美解决方案,Center和Branch分别模拟中心和分支站点的×××网关路由器。由于基本网络环境和试验六完全相同,所以在本实验中省略了对设备基本网络配置的介绍。配置GRE Over Ez×××这个实验,我们首先需要在Center和Branch上创建两个环回口(Loopback100)。Center上环回口“loopback100”地址为1.1.1.1/32,Branch上环回口“loopback100”地址为2.2.2.2/32。配置完环回口后,就开始配置一个普通的Ez×××,唯一需要注意的就是Branch Ez×××的Inside接口为 “Loopback100”,这样保障了Ez×××感兴趣流在Branch端的通讯点地址为2.2.2.2/32。在Center上配置Ez×××服务器需要使用分割隧道技术,使用分割隧道技术把“1.1.1.1/32”这个网络推送给客户。通过在Ez×××服务器和客户端的努力我们让Ez×××的感兴趣流为中心站点的1.1.1.1/32到分支站点2.2.2.2/32之间的流量(注意:客户端使用网络扩展模式)。可能看到这里,很多人还没有看出门道,感觉我只是在做一个无聊的Ez×××演示实验。精彩的部分马上开始,紧接着要配置的就是GRE隧道,在Center上配置一个GRE隧道,隧道的源为“1.1.1.1”目的为“2.2.2.2”。正好相反在Branch上配置的GRE隧道,隧道的源为“2.2.2.2”目的为“1.1.1.1”。这个时候大家可以好好想想,是不是在Center和Branch之间这个GRE隧道的所有流量(1.1.1.1到2.2.2.2之间的GRE流量)都已经被预先配置Ez×××所加密了!实现了这个实验名字“GRE Over Ez×××”。在Center和Branch之间有了一个联通的虚拟隧道,后续的事情就变得比较简单了,只需要配置一个动态路由协议,把Center和Branch的身后网络,还有GRE隧道的网络加入到这个路由协议里,就大功告成了。
第一部分:配置换回口“Loopback100”
Center配置换回口“loopback100”
| Center(config)#interface loopback 100 Center(config-if)#ip address 1.1.1.1 255.255.255.255 |
Branch配置换回口“loopback100”
| Branch(config)#interface loopback 100 Branch(config-if)#ip address 2.2.2.2 255.255.255.255 |
第二部分:配置Ez×××
Center配置Ez×××服务器
| Center(config)#aaa new-model Center(config)#aaa authentication login noacs line none Center(config)#aaa authentication login Ez×××-XAUTH local Center(config)#aaa authorization network Ez×××-MODE-CFG local Center(config)#username ipsecuser password 0 yeslabccies Center(config)#crypto isakmp policy 10 Center(config-isakmp)# encr 3des Center(config-isakmp)# hash md5 Center(config-isakmp)# authentication pre-share Center(config-isakmp)# group 2 Center(config)#crypto isakmp client configuration group ipsecgroup Center(config-isakmp-group)# key yeslabccies Center(config-isakmp-group)# acl Split Center(config-isakmp-group)# save-password <注意配置分割隧道技术和保存密码。> Center(config)#crypto isakmp profile Ez×××-Profile Center(conf-isa-prof)# match identity group ipsecgroup Center(conf-isa-prof)# client authentication list Ez×××-XAUTH Center(conf-isa-prof)# isakmp authorization list Ez×××-MODE-CFG Center(conf-isa-prof)# client configuration address respond Center(config)# crypto ipsec transform-set IPSec-Trans esp-des esp-md5-hmac Center(config)#crypto dynamic-map Dynamic-Map 10 Center(config-crypto-map)# set transform-set IPSec-Trans Center(config-crypto-map)# set isakmp-profile Ez×××-Profile Center(config)# crypto map cry-map 1000 ipsec-isakmp dynamic Dynamic-Map Center(config)#interface FastEthernet0/0 Center(config-if)# ip address 202.100.1.1 255.255.255.0 Center(config-if)# crypto map cry-map Center(config)#ip access-list extended Split Center(config-ext-nacl)# permit ip host 1.1.1.1 any Center(config-cp)#line con 0 Center(config-line)# login authentication noacs Center(config-line)#line aux 0 Center(config-line)# login authentication noacs |
Branch配置Ez×××客户端
| Branch(config)#crypto ipsec client ez*** Ez×××-Client Branch(config-crypto-ez***)# connect auto <Ez×××的自动连接也是一个重要特点,不需要感兴趣流的触发,只需设备开机,或者获取互联网的连接即可发起×××连接> Branch(config-crypto-ez***)# group ipsecgroup key yeslabccies Branch(config-crypto-ez***)# mode network-extension <使用网络扩展模式,实现2.2.2.2 到 1.1.1.1的感兴趣流。> Branch(config-crypto-ez***)# peer 202.100.1.1 <Ez×××的最大特点就是不仅仅可以配置IP地址而且还可以配置域名,中心可以使用动态域名技术,客户端动态获取IP地址,并且通过Peer指定中心的动态域名实现中心和分支站点地址的双动态> Branch(config-crypto-ez***)# username ipsecuser password yeslabccies Branch(config-if)#interface Loopback100 Branch(config-if)# ip address 2.2.2.2 255.255.255.255 Branch(config-if)# crypto ipsec client ez*** Ez×××-Client inside <注意Ez×××的内部接口是“Loopback100”,本地通讯点。> Branch(config-if)#interface FastEthernet1/0 Branch(config-if)# ip address 61.128.1.1 255.255.255.0 Branch(config-if)# crypto ipsec client ez*** Ez×××-Client outside |
测试Ez×××
| Branch#show crypto session Crypto session current status Interface: FastEthernet1/0 Session status: UP-ACTIVE Peer: 202.100.1.1 port 500 IKE SA: local 61.128.1.1/500 remote 202.100.1.1/500 Active IPSEC FLOW: permit ip host 2.2.2.2 host 1.1.1.1 Active SAs: 2, origin: crypto map Branch#ping 1.1.1.1 source 2.2.2.2 repeat 100 Type escape sequence to abort. Sending 100, 100-byte ICMP Echos to 1.1.1.1, timeout is 2 seconds: Packet sent with a source address of 2.2.2.2 !!!!!!!!!!!!!!!!!!!!!!!!!!!!!!!!!!!!!!!!!!!!!!!!!!!!!!!!!!!!!!!!!!!!!! !!!!!!!!!!!!!!!!!!!!!!!!!!!!!! Success rate is 100 percent (100/100), round-trip min/avg/max = 136/259/600 ms Branch#show crypto engine connections active Crypto Engine Connections ID Interface Type Algorithm Encrypt Decrypt IP-Address 3 Fa1/0 IPsec DES+MD5 0 100 61.128.1.1 4 Fa1/0 IPsec DES+MD5 100 0 61.128.1.1 1003 Fa1/0 IKE MD5+3DES 0 0 61.128.1.1 |
第三部分:配置GRE隧道
Center配置GRE隧道
| Center(config)#interface tunnel 0 Center(config-if)#ip address 192.168.1.1 255.255.255.0 Center(config-if)#tunnel source 1.1.1.1 Center(config-if)#tunnel destination 2.2.2.2 |
Branch配置GRE隧道
| Branch(config)#interface tunnel 0 Branch(config-if)#ip address 192.168.1.2 255.255.255.0 Branch(config-if)#tunnel source 2.2.2.2 Branch(config-if)#tunnel destination 1.1.1.1 |
Branch测试GRE隧道
| Branch#ping 192.168.1.1 Type escape sequence to abort. Sending 5, 100-byte ICMP Echos to 192.168.1.1, timeout is 2 seconds: !!!!! Success rate is 100 percent (5/5), round-trip min/avg/max = 260/301/348 ms |
第三部分:动态路由协议
Center配置动态路由协议
| Center(config)#router ospf 1 Center(config-router)#network 192.168.1.0 0.0.0.255 area 0 Center(config-router)#network 172.16.1.0 0.0.0.255 area 0 |
Branch配置动态路由协议
| Branch(config)#router ospf 1 Branch(config-router)#network 192.168.1.0 0.0.0.255 area 0 Branch(config-router)#network 10.1.1.0 0.0.0.255 area 0 |
Branch测试动态路由协议
| Branch#show ip ospf neighbor Neighbor ID Pri State Dead Time Address Interface 172.16.1.1 0 FULL/ - 00:00:39 192.168.1.1 Tunnel0 Branch#show ip route ospf 172.16.0.0/32 is subnetted, 1 subnets O 172.16.1.1 [110/11112] via 192.168.1.1, 00:09:21, Tunnel0 Branch#ping 172.16.1.1 source 10.1.1.1 repeat 10 Type escape sequence to abort. Sending 10, 100-byte ICMP Echos to 172.16.1.1, timeout is 2 seconds: Packet sent with a source address of 10.1.1.1 !!!!!!!!!! Success rate is 100 percent (10/10), round-trip min/avg/max = 252/296/336 ms |
转载于:https://blog.51cto.com/xrmjjz/685640


 3765
3765


 被折叠的 条评论
为什么被折叠?
被折叠的 条评论
为什么被折叠?
 到【灌水乐园】发言


