


此篇博客目录:
1. linux系统目录结构
2. ls命令
3. 文件类型
4. alias命令
5. 相对路径和绝对路径
6. cd命令
7. mkdir and rmdir
8. rm命令
9. 环境变量PATH
10. cp命令
11. mv命令
12. 文档查看(cat more less head tail)
13. chmod命令
14. chown and chgrp 命令
15. umask命令
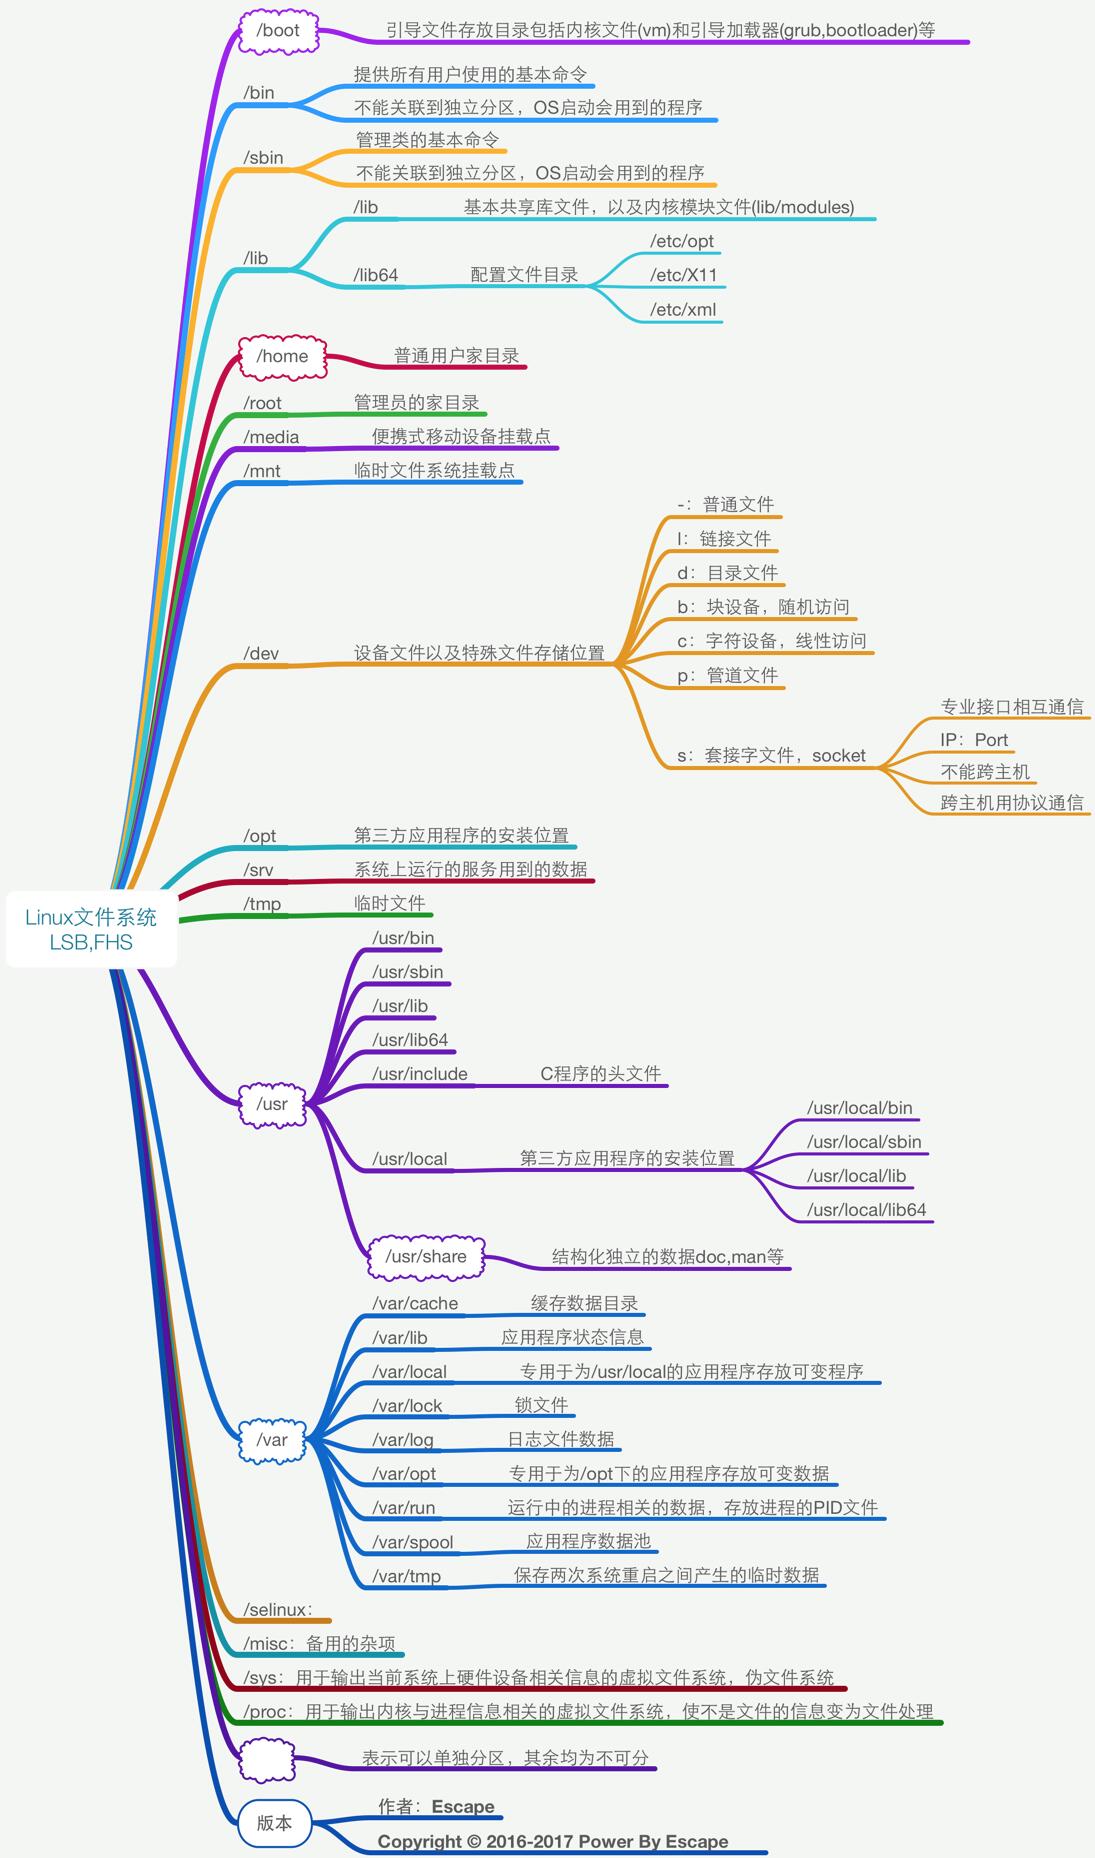
linux系统目录结构介绍:
使用 tree -L 1 / 命令查询整个根目录:
[root@ln /]# tree -L 1/
.
├── bin -> usr/bin 用来储存系统命令的文件目录
├── boot 系统启动相关文件目录
├── dev 设备文件目录
├── etc 系统配置文件目录
├── home 用户家目录
├── lib -> usr/lib 库文件目录
├── lib64 -> usr/lib64 库文件目录
├── media 媒介目录
├── mnt 临时挂载目录
├── opt 空目录
├── proc 系统启动进程目录 !
├── qq (这个是我自己创建的。。略过)
├── root 用户家目录
├── run 一些进程产生的临时文件
├── sbin -> usr/sbin 用来储存系统命令的文件目录
├── srv 空目录--存服务产生的一些文件
├── sys 存系统内核文件
├── tmp 系统的临时目录
├── usr 存储用户文件
└── var 存储系统日志
上图中有 -> 这个符号 后面跟了个目录。 这个意思代表是软链接的意思。后面会详解
系统目录文件夹图片:http://www.apelearn.com/study_v2/linux_dir_tree.jpg
LS 命令:
ls 显示该目录下的所有文件(但不包括隐藏文件)
[root@ln ~]# ls
1 1.txt 2.txt 3.txt 4.txt 666 anaconda-ks.cfg qq qw qwe
[root@ln ~]#
-a 显示该目录下的所有文件(包括隐藏文件)
[root@ln ~]# ls -a
. 1 2.txt 4.txt anaconda-ks.cfg .bash_logout .bashrc qq qwe .tcshrc
.. 1.txt 3.txt 666 .bash_history .bash_profile .cshrc qw .ssh .viminfo
[root@ln ~]#
-l 显示该目录下所有文件的详细信息
[root@ln ~]# ls -l
总用量 8
-rw-r--r--. 1 root root 0 5月 3 22:51 1
-rw-rw-r--. 1 root root 0 5月 10 07:16 1.txt
-rw-r--r--. 1 root root 0 5月 10 04:55 2.txt
-rw-r--r--. 1 root root 0 5月 10 07:17 3.txt
-rw-rw-r--. 1 root root 0 5月 10 07:20 4.txt
-rw-r--r--. 1 root root 28 5月 3 23:03 666
-rw-------. 1 root root 1368 5月 4 06:24 anaconda-ks.cfg
drwxrwxrwx. 3 root root 67 5月 10 05:04 qq
drwxrwxr-x. 2 root root 6 5月 10 05:05 qw
drwxrwxr-x. 2 root root 6 5月 10 07:19 qwe
[root@ln ~]#
-l 命令 等于 ll 命令
[root@ln ~]# ll
总用量 8
-rw-r--r--. 1 root root 0 5月 3 22:51 1
-rw-rw-r--. 1 root root 0 5月 10 07:16 1.txt
-rw-r--r--. 1 root root 0 5月 10 04:55 2.txt
-rw-r--r--. 1 root root 0 5月 10 07:17 3.txt
-rw-rw-r--. 1 root root 0 5月 10 07:20 4.txt
-rw-r--r--. 1 root root 28 5月 3 23:03 666
-rw-------. 1 root root 1368 5月 4 06:24 anaconda-ks.cfg
drwxrwxrwx. 3 root root 67 5月 10 05:04 qq
drwxrwxr-x. 2 root root 6 5月 10 05:05 qw
drwxrwxr-x. 2 root root 6 5月 10 07:19 qwe
[root@ln ~]#
-t 按时间排序
[root@ln ~]# ls -lt
总用量 8
-rw-rw-r--. 1 root root 0 5月 10 07:20 4.txt
drwxrwxr-x. 2 root root 6 5月 10 07:19 qwe
-rw-r--r--. 1 root root 0 5月 10 07:17 3.txt
-rw-rw-r--. 1 root root 0 5月 10 07:16 1.txt
drwxrwxr-x. 2 root root 6 5月 10 05:05 qw
drwxrwxrwx. 3 root root 67 5月 10 05:04 qq
-rw-r--r--. 1 root root 0 5月 10 04:55 2.txt
-rw-------. 1 root root 1368 5月 4 06:24 anaconda-ks.cfg
-rw-r--r--. 1 root root 28 5月 3 23:03 666
-rw-r--r--. 1 root root 0 5月 3 22:51 1
[root@ln ~]#
-d 只显示目录
[root@ln ~]# ls -d
.
[root@ln ~]#
文件类型:
普通文件(-表示,可用ls -l查看)
目录(d)
字符设备文件(c)
块设备文件(b)
套接口文件(s)
管道(p)
符号链接文件(l)
Alias命令:
查看系统里面所有的命令别名
[root@ln ~]# alias
alias cp='cp -i'
alias egrep='egrep --color=auto'
alias fgrep='fgrep --color=auto'
alias grep='grep --color=auto'
alias l.='ls -d .* --color=auto'
alias ll='ls -l --color=auto'
alias ls='ls --color=auto'
alias mv='mv -i'
alias rm='rm -i'
alias which='alias | /usr/bin/which --tty-only --read-alias --show-dot --show-tilde'
[root@ln ~]#
创建一个别名 alias ln=‘ls -l’
[root@ln ~]# alias ln='ls -l'
[root@ln ~]# ln
总用量 8
-rw-r--r--. 1 root root 0 5月 3 22:51 1
-rw-rw-r--. 1 root root 0 5月 10 07:16 1.txt
-rw-r--r--. 1 root root 0 5月 10 04:55 2.txt
-rw-r--r--. 1 root root 0 5月 10 07:17 3.txt
-rw-rw-r--. 1 root root 0 5月 10 07:20 4.txt
-rw-r--r--. 1 root root 28 5月 3 23:03 666
-rw-------. 1 root root 1368 5月 4 06:24 anaconda-ks.cfg
drwxrwxrwx. 3 root root 67 5月 10 05:04 qq
drwxrwxr-x. 2 root root 6 5月 10 05:05 qw
drwxrwxr-x. 2 root root 6 5月 10 07:19 qwe
[root@ln ~]#
取消别名 unalias ln
[root@ln ~]# unalias ln
[root@ln ~]# ln
ln: 缺少了文件操作数
Try 'ln --help' for more information.
[root@ln ~]#
相对路径和绝对路径:
绝对路径:
从根开始的路径,它指定到的目录或者文件具有唯一性,意思是不管目前在哪一个目录下面,你只要使用绝对路径就可以定位到系统任何一个目录或文件。
相对路径:
相对于当前目录,要定位到一个目录或文件所经过的路径
CD命令:
cd 进入用户的家目录 等同于 cd ~
[root@ln /]# pwd
/
[root@ln /]# cd
[root@ln ~]# pwd
/root
[root@ln ~]#
cd . 表示当前的目录
[root@ln ~]# pwd
/root
[root@ln ~]# cd .
[root@ln ~]# pwd
/root
[root@ln ~]#
cd .. 表示进入上一级目录
[root@ln ~]# pwd
/root
[root@ln ~]# cd ..
[root@ln /]# pwd
/
[root@ln /]#
cd - 表示在当前目录和上一个目录之间来回切换
[root@ln ~]# cd -
/
[root@ln /]# cd -
/root
[root@ln ~]#
MKDIR and RMDIR:
MKDIR:创建目录
-p 递归创建目录
[root@ln ~]# mkdir -p /qw/ln/1
[root@ln ~]# tree /qw
/qw
└── ln
└── 1
2 directories, 0 files
[root@ln ~]#
RMDIR:删除目录
[root@ln ~]# rmdir /qw/ln/1
[root@ln ~]# tree /qw
/qw
└── ln
1 directory, 0 files
[root@ln ~]#
但仅能删除非空目录
[root@ln ~]# rmdir /qw/ln
rmdir: 删除 "/qw/ln" 失败: 目录非空
[root@ln ~]#
RM命令:
[root@ln ~]# ls
2.txt 3.txt 4.txt 666 anaconda-ks.cfg qq qw qwe
[root@ln ~]# rm 2.txt
rm:是否删除普通文件 "2.txt"?y
[root@ln ~]# ls
3.txt 4.txt 666 anaconda-ks.cfg qq qw qwe
[root@ln ~]#
-r 删除目录
[root@ln qw]# tree /qw
/qw
└── ln
└── 1
├── 2
└── 3
4 directories, 0 files
[root@ln qw]# rm -r /qw/ln/1/2
rm:是否删除目录 "/qw/ln/1/2"?y
[root@ln qw]# tree /qw
/qw
└── ln
└── 1
└── 3
3 directories, 0 files
[root@ln qw]#
-rf 没有提示直接删除
[root@ln ~]# ls
3.txt 4.txt 666 anaconda-ks.cfg qq qw qwe
[root@ln ~]# rm -rf 666
[root@ln ~]# ls
3.txt 4.txt anaconda-ks.cfg qq qw qwe
[root@ln ~]#
PATH环境变量:
新定义一个环境变量
[root@ln ~]# export HELLO='ln'
[root@ln ~]# echo $HELLO
ln
[root@ln ~]#
在环境变量中,可以直接查找,不用绝对路径。用echo $PATH查看环境变量
[root@ln ~]# echo $PATH
/usr/local/sbin:/usr/local/bin:/usr/sbin:/usr/bin:/root/bin
由于 ls 在/usr/bin/ 下 所以输入ls命令就不需要输入它的绝对路径。
[root@ln ~]# ls
3.txt 4.txt anaconda-ks.cfg qq qw qwe
[root@ln ~]# cp /usr/bin/ls /tmp/ls2
[root@ln ~]# /tmp/ls2
3.txt 4.txt anaconda-ks.cfg qq qw qwe
[root@ln ~]# ls2
-bash: ls2: 未找到命令
[root@ln ~]#
现在我在环境变量中增加一个 /tmp/ 目录 这样 ls2也就可以直接执行
1. 第一步 先 输入命令: vi /etc/profile
2. 进入后 把光标移动到最后 在最末尾增加一行命令 PATH=$PATH:/TMP/ 后 wq保存退出
完成之后 输入命令查看 echo $PATH 就会看到增加了一个 /tmp/
[root@ln ~]# echo $PATH
/usr/local/sbin:/usr/local/bin:/usr/sbin:/usr/bin:/tmp/:/root/bin
[root@ln ~]#
现在 输入 ls2 命令 就可以直接使用了.
[root@ln ~]# ls2
3.txt 4.txt anaconda-ks.cfg qq qw qwe
[root@ln ~]#
如果你不需要增加这个环境变量那么就还是进入/etc/profile 删除掉你增加的那一行就可以了
再次 echo $PATH 就没有这个环境变量了
[root@ln ~]# echo $PATH
/usr/local/sbin:/usr/local/bin:/usr/sbin:/usr/bin:/root/bin
[root@ln ~]# ls2
-bash: ls2: 未找到命令
[root@ln ~]#
这是在目录里增加环境变量的方法,还有一种 直接复制增加就行,步骤如下:
[root@ln ~]# echo $PATH
/usr/local/sbin:/usr/local/bin:/usr/sbin:/usr/bin:/root/bin
[root@ln ~]# PATH=/usr/local/sbin:/usr/local/bin:/usr/sbin:/usr/bin:/root/bin:/tmp/
[root@ln ~]# echo $PATH
/usr/local/sbin:/usr/local/bin:/usr/sbin:/usr/bin:/root/bin:/tmp/
[root@ln ~]# ls2
3.txt 4.txt anaconda-ks.cfg qq qw qwe
[root@ln ~]#
先查询PATH 然后直接复制你需要保留的部分,在末尾甚至其他地方增加你所需要加入的环境变量,格式 :/目录/
保存后在查询 就可以看到你后加的变量了。在输入ls2 也可以生效
CP命令:
-a:此参数的效果和同时指定"-dpR"参数相同;
-d:当复制符号连接时,把目标文件或目录也建立为符号连接,并指向与源文件或目录连接的原始文件或目录;
-f:强行复制文件或目录,不论目标文件或目录是否已存在;
-i:覆盖既有文件之前先询问用户;
-l:对源文件建立硬连接,而非复制文件;
-p:保留源文件或目录的属性;
-R/r:递归处理,将指定目录下的所有文件与子目录一并处理;
-s:对源文件建立符号连接,而非复制文件;
-u:使用这项参数后只会在源文件的更改时间较目标文件更新时或是名称相互对应的目标文件并不存在时,才复制文件;
-S:在备份文件时,用指定的后缀“SUFFIX”代替文件的默认后缀;
-b:覆盖已存在的文件目标前将目标文件备份;
-v:详细显示命令执行的操作。
复制3.txt文档到当前目录 并改名为 1.txt
[root@ln ~]# ls
3.txt 4.txt anaconda-ks.cfg qq qw qwe
[root@ln ~]# cp 3.txt 1.txt
[root@ln ~]# ls
1.txt 3.txt 4.txt anaconda-ks.cfg qq qw qwe
[root@ln ~]#
复制 qw目录下的所有文件至 wq下
[root@ln ~]# ls
1.txt 3.txt 4.txt anaconda-ks.cfg qq qw qwe
[root@ln ~]# ls /qw
ln
[root@ln ~]# tree /qw
/qw
└── ln
└── 1
└── 3
3 directories, 0 files
[root@ln ~]# cp -r /qw /wq
[root@ln ~]# tree /wq
/wq
└── ln
└── 1
└── 3
3 directories, 0 files
[root@ln ~]#
MV命令:
用来对文件或目录重新命名,或者将文件从一个目录移到另一个目录中
将 1.txt 改名为 2.txt
[root@ln ~]# ls
1.txt 3.txt 4.txt anaconda-ks.cfg qq qw qwe
[root@ln ~]# mv 1.txt 2.txt
[root@ln ~]# ls
2.txt 3.txt 4.txt anaconda-ks.cfg qq qw qwe
[root@ln ~]#
将 qw目录下的所有文件 移动至 当前目录
[root@ln ~]# ls
2.txt 3.txt 4.txt anaconda-ks.cfg qq qw qwe
[root@ln ~]# mv /qw/ln/* .
[root@ln ~]# ls
1 2.txt 3.txt 4.txt anaconda-ks.cfg qq qw qwe
[root@ln ~]# tree 1
1
└── 3
1 directory, 0 files
[root@ln ~]#
查看命令:cat more less head tail
cat 查看一个文件内容
[root@ln ~]# cat 2.txt
qwertyuiop
[root@ln ~]#
同时查看多个文件
[root@ln ~]# cat 2.txt 3.txt
qwertyuiop
sdfgh
[root@ln ~]#
more 以全屏幕的方式按页显示文本文件的内容
按Space键:显示文本的下一屏内容。
按Enier键:只显示文本的下一行内容。
按斜线符|:接着输入一个模式,可以在文本中寻找下一个相匹配的模式。
按H键:显示帮助屏,该屏上有相关的帮助信息。
按B键:显示上一屏内容。
按Q键:退出rnore命令
less 作用与more十分相似,都可以用来浏览文字档案的内容,不同的是less命令允许用户向前或向后浏览文件,而more命令只能向前浏览 用PageUp键向上翻页,用PageDown键向下翻页。要退出less程序,应按Q键。
-e:文件内容显示完毕后,自动退出;
-f:强制显示文件;
-g:不加亮显示搜索到的所有关键词,仅显示当前显示的关键字,以提高显示速度;
-l:搜索时忽略大小写的差异;
-N:每一行行首显示行号;
-s:将连续多个空行压缩成一行显示;
-S:在单行显示较长的内容,而不换行显示;
-x<数字>:将TAB字符显示为指定个数的空格字符。
head 用于显示文件的开头的内容 不输入参数,默认显示头十行
-n<数字>:指定显示头部内容的行数;
-c<字符数>:指定显示头部内容的字符数;
-v:总是显示文件名的头信息;
-q:不显示文件名的头信息。
head + 文件名 默认查看前十行
[root@ln ~]# head 2.txt
qwee
qwertyuiop
a
s
d
f
g
h
h
j
[root@ln ~]#
查看前3行
[root@ln ~]# head -n 3 2.txt
qwee
qwertyuiop
a
[root@ln ~]#
tail 用于输入文件中的尾部内容。tail命令默认在屏幕上显示指定文件的末尾10行
显示尾部十行
[root@ln ~]# tail 2.txt
h
j
k
k
l
l
l
[root@ln ~]#
CHMOD命令:
用来变更文件或目录的权限
chmod u+x,g+w f01 //为文件f01设置自己可以执行,组员可以写入的权限
chmod u=rwx,g=rw,o=r f01
chmod 764 f01
chmod a+x f01 //对文件f01的u,g,o都设置可执行属性
[root@ln ~]# ll
总用量 12
drwxr-xr-x. 3 root root 15 5月 10 12:05 1
-rw-r--r--. 1 root root 45 5月 13 09:50 2.txt
-rw-r--r--. 1 root root 6 5月 13 09:42 3.txt
-rw-rw-r--. 1 root root 0 5月 10 07:20 4.txt
-rw-------. 1 root root 1368 5月 4 06:24 anaconda-ks.cfg
drwxrwxrwx. 3 root root 67 5月 10 05:04 qq
drwxrwxr-x. 2 root root 6 5月 10 05:05 qw
drwxrwxr-x. 2 root root 6 5月 10 07:19 qwe
[root@ln ~]#
d 开头的是目录, - 开头的是普通文件。
rwx 为权限 以数字表示 r=4 w=2 x=1 满权限为 7
按ll 显示的内容 除去第一个字符外 后为 九个字符
分为3组 属主 属组 其他人 每组都是一个rwx 满权限为777
修改 1文件夹 权限为777
[root@ln ~]# chmod 777 1
[root@ln ~]# ll
总用量 12
drwxrwxrwx. 3 root root 15 5月 10 12:05 1
-rw-r--r--. 1 root root 45 5月 13 09:50 2.txt
-rw-r--r--. 1 root root 6 5月 13 09:42 3.txt
-rw-rw-r--. 1 root root 0 5月 10 07:20 4.txt
-rw-------. 1 root root 1368 5月 4 06:24 anaconda-ks.cfg
drwxrwxrwx. 3 root root 67 5月 10 05:04 qq
drwxrwxr-x. 2 root root 6 5月 10 05:05 qw
drwxrwxr-x. 2 root root 6 5月 10 07:19 qwe
[root@ln ~]#
1文件夹所有用户都不允许写入
[root@ln ~]# chmod a-w 1
[root@ln ~]# ll
总用量 12
dr-xr-xr-x. 3 root root 15 5月 10 12:05 1
-rw-r--r--. 1 root root 45 5月 13 09:50 2.txt
-rw-r--r--. 1 root root 6 5月 13 09:42 3.txt
-rw-rw-r--. 1 root root 0 5月 10 07:20 4.txt
-rw-------. 1 root root 1368 5月 4 06:24 anaconda-ks.cfg
drwxrwxrwx. 3 root root 67 5月 10 05:04 qq
drwxrwxr-x. 2 root root 6 5月 10 05:05 qw
drwxrwxr-x. 2 root root 6 5月 10 07:19 qwe
[root@ln ~]#
- R 修改目录下的目录及文件 权限
[root@ln ~]# ll 1
总用量 0
-rw-r--r--. 1 root root 0 5月 13 10:56 1.txt
drwxr-xr-x. 2 root root 6 5月 10 12:03 3
[root@ln ~]# chmod -R 440 1
[root@ln ~]# ll 1
总用量 0
-r--r-----. 1 root root 0 5月 13 10:56 1.txt
dr--r-----. 2 root root 6 5月 10 12:03 3
[root@ln ~]#
CHGRP and CHOWN命令:
CHGRP 用来改变文件或目录所属的用户组
[root@ln ~]# groupadd user1
[root@ln ~]# ll
总用量 12
dr--r-----. 3 root root 28 5月 13 10:56 1
-rw-r--r--. 1 root root 45 5月 13 09:50 2.txt
-rw-r--r--. 1 root root 6 5月 13 09:42 3.txt
-rw-rw-r--. 1 root root 0 5月 10 07:20 4.txt
-rw-------. 1 root root 1368 5月 4 06:24 anaconda-ks.cfg
drwxrwxrwx. 3 root root 67 5月 10 05:04 qq
drwxrwxr-x. 2 root root 6 5月 10 05:05 qw
drwxrwxr-x. 2 root root 6 5月 10 07:19 qwe
[root@ln ~]# chgrp user1 2.txt
[root@ln ~]# ll
总用量 12
dr--r-----. 3 root root 28 5月 13 10:56 1
-rw-r--r--. 1 root user1 45 5月 13 09:50 2.txt
-rw-r--r--. 1 root root 6 5月 13 09:42 3.txt
-rw-rw-r--. 1 root root 0 5月 10 07:20 4.txt
-rw-------. 1 root root 1368 5月 4 06:24 anaconda-ks.cfg
drwxrwxrwx. 3 root root 67 5月 10 05:04 qq
drwxrwxr-x. 2 root root 6 5月 10 05:05 qw
drwxrwxr-x. 2 root root 6 5月 10 07:19 qwe
[root@ln ~]#
-R 修改目录下的所有目录及文件的 组
[root@ln ~]# ll 1
总用量 0
-r--r-----. 1 root root 0 5月 13 10:56 1.txt
dr--r-----. 2 root root 6 5月 10 12:03 3
[root@ln ~]# chgrp -R user1 1
[root@ln ~]# ll 1
总用量 0
-r--r-----. 1 root user1 0 5月 13 10:56 1.txt
dr--r-----. 2 root user1 6 5月 10 12:03 3
[root@ln ~]#
CHOWN 用来改变文件或目录所属的用户组
[root@ln ~]# chown apache 3.txt
[root@ln ~]# ll
总用量 12
dr--r-----. 3 root user1 28 5月 13 10:56 1
-rw-r--r--. 1 root user1 45 5月 13 09:50 2.txt
-rw-r--r--. 1 apache root 6 5月 13 09:42 3.txt
-rw-rw-r--. 1 root root 0 5月 10 07:20 4.txt
-rw-------. 1 root root 1368 5月 4 06:24 anaconda-ks.cfg
drwxrwxrwx. 3 root root 67 5月 10 05:04 qq
drwxrwxr-x. 2 root root 6 5月 10 05:05 qw
drwxrwxr-x. 2 root root 6 5月 10 07:19 qwe
[root@ln ~]#
- R 修改目录下的所有目录及文件的 组
[root@ln ~]# ls -la /qq
总用量 0
drwxr-xr-x. 3 root root 19 5月 10 04:59 .
dr-xr-xr-x. 20 root root 275 5月 13 09:17 ..
drwxr-xr-x. 2 root root 6 5月 10 04:59 1.txt
[root@ln ~]# chown -R apache /qq/
[root@ln ~]# ls -la /qq
总用量 0
drwxr-xr-x. 3 apache root 19 5月 10 04:59 .
dr-xr-xr-x. 20 root root 275 5月 13 09:17 ..
drwxr-xr-x. 2 apache root 6 5月 10 04:59 1.txt
[root@ln ~]#
这里由于 ' .. ' 是代表上级目录 所以没有修改 而代表本级目录的 ' . ' 已经被修改了
UMASK命令:
umask 设置默认权限
输入umask 显示 系统 默认权限 0022 只看后三位 也就是 022 新建目录的权限为 755
[root@ln ~]# umask
0022
[root@ln ~]# mkdir asd
[root@ln ~]# ll
总用量 4
-rw-------. 1 root root 1368 5月 4 06:24 anaconda-ks.cfg
drwxr-xr-x. 2 root root 6 5月 13 11:24 asd
[root@ln ~]#
在umask不自定义前,目录权限值为:755,普通文件权限值为:644
[root@ln ~]# touch 1.txt
[root@ln ~]# ll
总用量 4
-rw-r--r--. 1 root root 0 5月 13 11:26 1.txt
-rw-------. 1 root root 1368 5月 4 06:24 anaconda-ks.cfg
drwxr-xr-x. 2 root root 6 5月 13 11:24 asd
[root@ln ~]#
设置umask为001 后新建目录及文件
[root@ln ~]# umask 001
[root@ln ~]# umask
0001
[root@ln ~]# mkdir zxc
[root@ln ~]# touch 2.txt
[root@ln ~]# ll
总用量 4
-rw-rw-rw-. 1 root root 0 5月 13 11:29 2.txt
-rw-------. 1 root root 1368 5月 4 06:24 anaconda-ks.cfg
drwxr-xr-x. 2 root root 6 5月 13 11:24 asd
drwxrwxrw-. 2 root root 6 5月 13 11:29 zxc
[root@ln ~]#
文件权限算法是: rw-rw-rw- (666) -- - - - - - - - -x(001 umask权限) = 666 由于 1权限是x 默认 666是 rw-rw-rw- 没有x的,所以权限就还是666
目录的权限则就是 777 - 001(umask权限) = 776


 1650
1650

 被折叠的 条评论
为什么被折叠?
被折叠的 条评论
为什么被折叠?
 到【灌水乐园】发言


