


2018年9月18日笔记
tensorflow是谷歌google的深度学习框架,tensor中文叫做张量,flow叫做流。
CNN是convolutional neural network的简称,中文叫做卷积神经网络。
MNIST是Mixed National Institue of Standards and Technology database的简称,中文叫做美国国家标准与技术研究所数据库。
此文在上一篇文章《基于tensorflow+DNN的MNIST数据集手写数字分类预测》的基础上修改模型为卷积神经网络模型,模型准确率从98%提升到99.2%
《基于tensorflow+DNN的MNIST数据集手写数字分类预测》文章链接:https://www.jianshu.com/p/9a4ae5655ca6
0.编程环境
操作系统:Win10
tensorflow版本:1.6
tensorboard版本:1.6
python版本:3.6
1.致谢声明
1.本文是作者学习《周莫烦tensorflow视频教程》的成果,感激前辈;
视频链接:https://morvanzhou.github.io/tutorials/machine-learning/tensorflow/
2.参考云水木石的文章,链接:https://mp.weixin.qq.com/s/MTugq-5AdPGik3yJb9yDJQ
2.配置环境
使用卷积神经网络模型要求有较高的机器配置,如果使用CPU版tensorflow会花费大量时间。
读者在有nvidia显卡的情况下,安装GPU版tensorflow会提高计算速度50倍。
安装教程链接:https://blog.csdn.net/qq_36556893/article/details/79433298
如果没有nvidia显卡,但有visa信用卡,请阅读我的另一篇文章《在谷歌云服务器上搭建深度学习平台》,链接:https://www.jianshu.com/p/893d622d1b5a
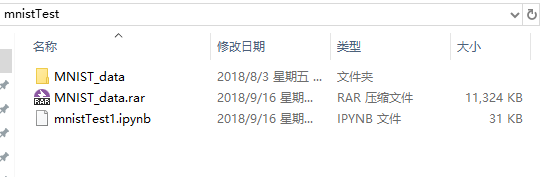
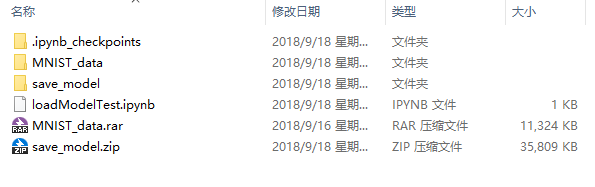
3.下载并解压数据集
MNIST数据集下载链接: https://pan.baidu.com/s/1fPbgMqsEvk2WyM9hy5Em6w 密码: wa9p
下载压缩文件MNIST_data.rar完成后,选择解压到当前文件夹,不要选择解压到MNIST_data。
文件夹结构如下图所示:
4.完整代码
此章给读者能够直接运行的完整代码,使读者有编程结果的感性认识。
如果下面一段代码运行成功,则说明安装tensorflow环境成功。
想要了解代码的具体实现细节,请阅读后面的章节。
import warnings
warnings.filterwarnings('ignore')
import tensorflow as tf
from tensorflow.examples.tutorials.mnist import input_data

mnist = input_data.read_data_sets('MNIST_data', one_hot=True)
batch_size = 100
X_holder = tf.placeholder(tf.float32)
y_holder = tf.placeholder(tf.float32)

X_images = tf.reshape(X_holder, [-1, 28, 28, 1])
#convolutional layer 1
conv1_Weights = tf.Variable(tf.truncated_normal([5, 5, 1, 32], stddev=0.1))
conv1_biases = tf.Variable(tf.constant(0.1, shape=[32]))
conv1_conv2d = tf.nn.conv2d(X_images, conv1_Weights, strides=[1, 1, 1, 1], padding='SAME') + conv1_biases
conv1_activated = tf.nn.relu(conv1_conv2d)
conv1_pooled = tf.nn.max_pool(conv1_activated, ksize=[1, 2, 2, 1], strides=[1, 2, 2, 1], padding='SAME')
#convolutional layer 2
conv2_Weights = tf.Variable(tf.truncated_normal([5, 5, 32, 64], stddev=0.1))
conv2_biases = tf.Variable(tf.constant(0.1, shape=[64]))
conv2_conv2d = tf.nn.conv2d(conv1_pooled, conv2_Weights, strides=[1, 1, 1, 1], padding='SAME') + conv2_biases
conv2_activated = tf.nn.relu(conv2_conv2d)
conv2_pooled = tf.nn.max_pool(conv2_activated, ksize=[1, 2, 2, 1], strides=[1, 2, 2, 1], padding='SAME')
#full connected layer 1
connect1_flat = tf.reshape(conv2_pooled, [-1, 7 * 7 * 64])
connect1_Weights = tf.Variable(tf.truncated_normal([7 * 7 * 64, 1024], stddev=0.1))
connect1_biases = tf.Variable(tf.constant(0.1, shape=[1024]))
connect1_Wx_plus_b = tf.add(tf.matmul(connect1_flat, connect1_Weights), connect1_biases)
connect1_activated = tf.nn.relu(connect1_Wx_plus_b)
#full connected layer 2
connect2_Weights = tf.Variable(tf.truncated_normal([1024, 10], stddev=0.1))
connect2_biases = tf.Variable(tf.constant(0.1, shape=[10]))
connect2_Wx_plus_b = tf.add(tf.matmul(connect1_activated, connect2_Weights), connect2_biases)
predict_y = tf.nn.softmax(connect2_Wx_plus_b)
#loss and train
loss = tf.reduce_mean(-tf.reduce_sum(y_holder * tf.log(predict_y), 1))
optimizer = tf.train.AdamOptimizer(0.0001)
train = optimizer.minimize(loss)

init = tf.global_variables_initializer()
session = tf.Session()
session.run(init)

for i in range(1001):
    train_images, train_labels = mnist.train.next_batch(200)
    session.run(train, feed_dict={X_holder:train_images, y_holder:train_labels})
    if i % 100 == 0:
        correct_prediction = tf.equal(tf.argmax(predict_y, 1), tf.argmax(y_holder, 1))
        accuracy = tf.reduce_mean(tf.cast(correct_prediction, tf.float32))
        test_images, test_labels = mnist.test.next_batch(2000)
        train_accuracy = session.run(accuracy, feed_dict={X_holder:train_images, y_holder:train_labels})
        test_accuracy = session.run(accuracy, feed_dict={X_holder:test_images, y_holder:test_labels})
        print('step:%d train accuracy:%.4f test accuracy:%.4f' %(i, train_accuracy, test_accuracy))
上面一段代码的运行结果如下图所示:
Extracting MNIST_data\train-images-idx3-ubyte.gz
Extracting MNIST_data\train-labels-idx1-ubyte.gz
Extracting MNIST_data\t10k-images-idx3-ubyte.gz
Extracting MNIST_data\t10k-labels-idx1-ubyte.gz
step:0 train accuracy:0.1750 test accuracy:0.1475
step:100 train accuracy:0.8900 test accuracy:0.9080
step:200 train accuracy:0.9150 test accuracy:0.9375
step:300 train accuracy:0.9600 test accuracy:0.9525
step:400 train accuracy:0.9600 test accuracy:0.9605
step:500 train accuracy:0.9400 test accuracy:0.9670
step:600 train accuracy:0.9700 test accuracy:0.9680
step:700 train accuracy:0.9750 test accuracy:0.9630
step:800 train accuracy:0.9850 test accuracy:0.9745
step:900 train accuracy:1.0000 test accuracy:0.9760
step:1000 train accuracy:0.9750 test accuracy:0.9795
5.数据准备
import warnings
warnings.filterwarnings('ignore')
import tensorflow as tf
from tensorflow.examples.tutorials.mnist import input_data

mnist = input_data.read_data_sets('MNIST_data', one_hot=True)
batch_size = 100
X_holder = tf.placeholder(tf.float32)
y_holder = tf.placeholder(tf.float32)
第1行代码导入warnings库,第2行代码表示不打印警告信息;
第3行代码导入tensorflow库,取别名tf;
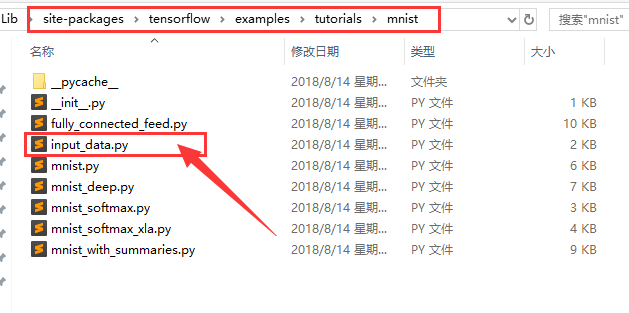
第4行代码人从tensorflow.examples.tutorials.mnist库中导入input_data文件;
本文作者使用anaconda集成开发环境,input_data文件所在路径:C:\ProgramData\Anaconda3\Lib\site-packages\tensorflow\examples\tutorials\mnist,如下图所示:
第6行代码调用input_data文件的read_data_sets方法,需要2个参数,第1个参数的数据类型是字符串,是读取数据的文件夹名,第2个关键字参数ont_hot数据类型为布尔bool,设置为True,表示预测目标值是否经过One-Hot编码;
第7行代码定义变量batch_size的值为100;
第8、9行代码中placeholder中文叫做占位符,将每次训练的特征矩阵X和预测目标值y赋值给变量X_holder和y_holder。
6.搭建神经网络
X_images = tf.reshape(X_holder, [-1, 28, 28, 1])
#convolutional layer 1
conv1_Weights = tf.Variable(tf.truncated_normal([5, 5, 1, 32], stddev=0.1), name='conv1_Weights')
conv1_biases = tf.Variable(tf.constant(0.1, shape=[32]), name='conv1_biases')
conv1_conv2d = tf.nn.conv2d(X_images, conv1_Weights, strides=[1, 1, 1, 1], padding='SAME') + conv1_biases
conv1_activated = tf.nn.relu(conv1_conv2d)
conv1_pooled = tf.nn.max_pool(conv1_activated, ksize=[1, 2, 2, 1], strides=[1, 2, 2, 1], padding='SAME')
#convolutional layer 2
conv2_Weights = tf.Variable(tf.truncated_normal([5, 5, 32, 64], stddev=0.1), name='conv2_Weights')
conv2_biases = tf.Variable(tf.constant(0.1, shape=[64]), name='conv2_biases')
conv2_conv2d = tf.nn.conv2d(conv1_pooled, conv2_Weights, strides=[1, 1, 1, 1], padding='SAME') + conv2_biases
conv2_activated = tf.nn.relu(conv2_conv2d)
conv2_pooled = tf.nn.max_pool(conv2_activated, ksize=[1, 2, 2, 1], strides=[1, 2, 2, 1], padding='SAME')
#full connected layer 1
connect1_flat = tf.reshape(conv2_pooled, [-1, 7 * 7 * 64])
connect1_Weights = tf.Variable(tf.truncated_normal([7 * 7 * 64, 1024], stddev=0.1), name='connect1_Weights')
connect1_biases = tf.Variable(tf.constant(0.1, shape=[1024]), name='connect1_biases')
connect1_Wx_plus_b = tf.add(tf.matmul(connect1_flat, connect1_Weights), connect1_biases)
connect1_activated = tf.nn.relu(connect1_Wx_plus_b)
#full connected layer 2
connect2_Weights = tf.Variable(tf.truncated_normal([1024, 10], stddev=0.1), name='connect2_Weights')
connect2_biases = tf.Variable(tf.constant(0.1, shape=[10]), name='connect2_biases')
connect2_Wx_plus_b = tf.add(tf.matmul(connect1_activated, connect2_Weights), connect2_biases)
predict_y = tf.nn.softmax(connect2_Wx_plus_b)
#loss and train
loss = tf.reduce_mean(-tf.reduce_sum(y_holder * tf.log(predict_y), 1))
optimizer = tf.train.AdamOptimizer(0.0001)
train = optimizer.minimize(loss)
第1行代码表示将1张图片的784个特征变形为28*28的矩阵;
第3-7这5行代码表示第1个卷积层;
第9-13这5行代码表示第2个卷积层;
卷积层的处理有3步:卷积——>激活——>池化;
第15-19这5行代码表示第1个全连接层;
第1个全连接层的处理有3步:展平——>矩阵计算——>激活
第21-24这4行代码表示第2个全连接层;
第2个全连接层的处理有2步:矩阵计算——>激活
第26-28行代码定义损失函数loss、优化器optimizer、训练过程train。
7.变量初始化
init = tf.global_variables_initializer()
session = tf.Session()
session.run(init)
对于神经网络模型,重要是其中的W、b这两个参数。
开始神经网络模型训练之前,这两个变量需要初始化。
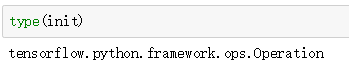
第1行代码调用tf.global_variables_initializer实例化tensorflow中的Operation对象。
第2行代码调用tf.Session方法实例化会话对象;
第3行代码调用tf.Session对象的run方法做变量初始化。
8.模型训练
for i in range(1001):
    train_images, train_labels = mnist.train.next_batch(200)
    session.run(train, feed_dict={X_holder:train_images, y_holder:train_labels})
    if i % 100 == 0:
        correct_prediction = tf.equal(tf.argmax(predict_y, 1), tf.argmax(y_holder, 1))
        accuracy = tf.reduce_mean(tf.cast(correct_prediction, tf.float32))
        test_images, test_labels = mnist.test.next_batch(2000)
        train_accuracy = session.run(accuracy, feed_dict={X_holder:train_images, y_holder:train_labels})
        test_accuracy = session.run(accuracy, feed_dict={X_holder:test_images, y_holder:test_labels})
        print('step:%d train accuracy:%.4f test accuracy:%.4f' %(i, train_accuracy, test_accuracy))
第1行代码表示模型迭代训练1001次;
第2行代码表示从训练集中随机选出过200个样本;
第3行代码表示模型训练,每运行1次此行代码则模型训练一次;
第4-10行代码表示每隔100次训练,打印模型的预测准确率;
第5-6行代码是计算准确率在tensorflow中的表达;
第7行代码表示从测试集中随机选出2000个样本;
第8行代码表示计算模型在训练集上的预测准确率,赋值给变量tran_accuracy;
第9行代码表示计算模型在测试集上的预测准确率,赋值给变量test_accuracy;
第10行代码打印步数、训练集预测准确率、测试集预测准确率。
为了节省读者的程序运行时间,只设置了1000次迭代。
本文作者迭代训练20000次后,模型准确率在99.2%左右。
上面一段代码的运行结果如下:
step:0 train accuracy:0.0850 test accuracy:0.1200
step:100 train accuracy:0.9200 test accuracy:0.8980
step:200 train accuracy:0.9400 test accuracy:0.9445
step:300 train accuracy:0.9400 test accuracy:0.9595
step:400 train accuracy:0.9450 test accuracy:0.9595
step:500 train accuracy:0.9750 test accuracy:0.9640
step:600 train accuracy:0.9800 test accuracy:0.9675
step:700 train accuracy:0.9800 test accuracy:0.9775
step:800 train accuracy:0.9900 test accuracy:0.9700
step:900 train accuracy:0.9850 test accuracy:0.9825
step:1000 train accuracy:0.9750 test accuracy:0.9765
9.保存模型
saver = tf.train.Saver()
save_path = saver.save(session, 'save_model/mnist_cnn.ckpt')
print('Save to path:', save_path)
第1行代码实例化模型保存对象;
第2行代码调用模型保存对象的save方法,第1个参数是tensorflow的会话,第2个参数是表示路径的字符串;
第3行代码打印保存路径。
10.加载模型
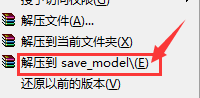
模型下载链接: https://pan.baidu.com/s/11_CV9LG5vzLvA3X-3l83bQ 提取码: 8ayr
压缩文件下载后放到代码文件同级路径,选择解压到save_model,如下图所示:
save_model文件夹与代码文件在同级目录下,即可成功运行下面的代码。
请读者对照下图,确保自己的 代码文件与 数据、模型放置在正确的路径下。
import warnings
warnings.filterwarnings('ignore')
import tensorflow as tf
from tensorflow.examples.tutorials.mnist import input_data

mnist = input_data.read_data_sets('MNIST_data', one_hot=True)
batch_size = 100
X_holder = tf.placeholder(tf.float32)
y_holder = tf.placeholder(tf.float32)

X_images = tf.reshape(X_holder, [-1, 28, 28, 1])
#convolutional layer 1
conv1_Weights = tf.Variable(tf.truncated_normal([5, 5, 1, 32], stddev=0.1), name='conv1_Weights')
conv1_biases = tf.Variable(tf.constant(0.1, shape=[32]), name='conv1_biases')
conv1_conv2d = tf.nn.conv2d(X_images, conv1_Weights, strides=[1, 1, 1, 1], padding='SAME') + conv1_biases
conv1_activated = tf.nn.relu(conv1_conv2d)
conv1_pooled = tf.nn.max_pool(conv1_activated, ksize=[1, 2, 2, 1], strides=[1, 2, 2, 1], padding='SAME')
#convolutional layer 2
conv2_Weights = tf.Variable(tf.truncated_normal([5, 5, 32, 64], stddev=0.1), name='conv2_Weights')
conv2_biases = tf.Variable(tf.constant(0.1, shape=[64]), name='conv2_biases')
conv2_conv2d = tf.nn.conv2d(conv1_pooled, conv2_Weights, strides=[1, 1, 1, 1], padding='SAME') + conv2_biases
conv2_activated = tf.nn.relu(conv2_conv2d)
conv2_pooled = tf.nn.max_pool(conv2_activated, ksize=[1, 2, 2, 1], strides=[1, 2, 2, 1], padding='SAME')
#full connected layer 1
connect1_flat = tf.reshape(conv2_pooled, [-1, 7 * 7 * 64])
connect1_Weights = tf.Variable(tf.truncated_normal([7 * 7 * 64, 1024], stddev=0.1), name='connect1_Weights')
connect1_biases = tf.Variable(tf.constant(0.1, shape=[1024]), name='connect1_biases')
connect1_Wx_plus_b = tf.add(tf.matmul(connect1_flat, connect1_Weights), connect1_biases)
connect1_activated = tf.nn.relu(connect1_Wx_plus_b)
#full connected layer 2
connect2_Weights = tf.Variable(tf.truncated_normal([1024, 10], stddev=0.1), name='connect2_Weights')
connect2_biases = tf.Variable(tf.constant(0.1, shape=[10]), name='connect2_biases')
connect2_Wx_plus_b = tf.add(tf.matmul(connect1_activated, connect2_Weights), connect2_biases)
predict_y = tf.nn.softmax(connect2_Wx_plus_b)
#loss and train
loss = tf.reduce_mean(-tf.reduce_sum(y_holder * tf.log(predict_y), 1))
optimizer = tf.train.AdamOptimizer(0.0001)
train = optimizer.minimize(loss)

session = tf.Session()
saver = tf.train.Saver()
saver.restore(session, 'save_model/mnist_cnn.ckpt')
correct_prediction = tf.equal(tf.argmax(predict_y, 1), tf.argmax(y_holder, 1))
accuracy = tf.reduce_mean(tf.cast(correct_prediction, tf.float32))
print('load model successful')
train_images, train_labels = mnist.train.next_batch(5000)
test_images, test_labels = mnist.test.next_batch(5000)
train_accuracy = session.run(accuracy, feed_dict={X_holder:train_images, y_holder:train_labels})
test_accuracy = session.run(accuracy, feed_dict={X_holder:test_images, y_holder:test_labels})
print('train accuracy:%.4f test accuracy:%.4f' %(train_accuracy, test_accuracy))
上面一段代码的运行结果如下:
Extracting MNIST_data\train-images-idx3-ubyte.gz
Extracting MNIST_data\train-labels-idx1-ubyte.gz
Extracting MNIST_data\t10k-images-idx3-ubyte.gz
Extracting MNIST_data\t10k-labels-idx1-ubyte.gz
INFO:tensorflow:Restoring parameters from save_model/mnist_cnn.ckpt
load model successful
train accuracy:1.0000 test accuracy:0.9903
11.模型测试
import math
import matplotlib.pyplot as plt
import numpy as np

def drawDigit2(position, image, title, isTrue):
    plt.subplot(*position)
    plt.imshow(image.reshape(-1, 28), cmap='gray_r')
    plt.axis('off')
    if not isTrue:
        plt.title(title, color='red')
    else:
        plt.title(title)

def batchDraw2(batch_size):
    images,labels = mnist.test.next_batch(batch_size)
    predict_labels = session.run(predict_y, feed_dict={X_holder:images, y_holder:labels})
    image_number = images.shape[0]
    row_number = math.ceil(image_number ** 0.5)
    column_number = row_number
    plt.figure(figsize=(row_number+8, column_number+8))
    for i in range(row_number):
        for j in range(column_number):
            index = i * column_number + j
            if index < image_number:
                position = (row_number, column_number, index+1)
                image = images[index]
                actual = np.argmax(labels[index])
                predict = np.argmax(predict_labels[index])
                isTrue = actual==predict
                title = 'actual:%d\npredict:%d' %(actual,predict)
                drawDigit2(position, image, title, isTrue)

batchDraw2(100)
plt.show()
上面一段代码的运行结果如下图所示:
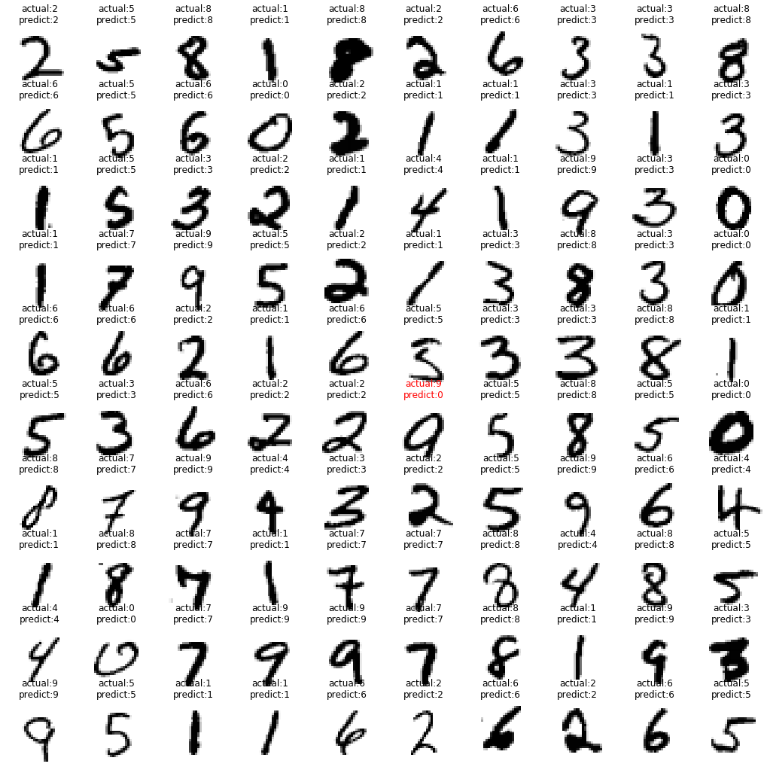
从上面的运行结果可以看出,100个数字中只错了1个,符合前1章准确率为99%左右的计算结果。
12.总结
1.这是本文作者写的第6篇关于tensorflow的文章,加深了对tensorflow框架的理解;
2.通过代码实践,本文作者掌握了卷积神经网络的构建,权重初始化,优化器选择等技巧;
3.tensorflow加载模型比sklearn加载模型稍有难度,保存模型时必须对变量命名,否则无法成功加载模型。


 141
141

 被折叠的 条评论
为什么被折叠?
被折叠的 条评论
为什么被折叠?
 到【灌水乐园】发言


