


软件行业竞争激烈,程序员写了软件还不行,老板硬要给软件程序添加插件。

谈起程序插件,很多软件都用到插件,插件脚本语言,比如输入法扩展插件lua,googl浏览器插件JavaScript。甚至连所有动态网站都离不开插件,插件,插件,即插即用。主要是满足用户的需求。
什么是插件式编程?
提起插件式,我们首先想到的是firefox, 用过firefox的人都知道它是一个插件式程序。当一个功能需要,完全可以从网上下载一个插件后,重启后,就能使用。这个功能给我们带来许多的方便之处,这就是插件式程序的好处。
插件的本质在于不修改程序主体(平台)的情况下对软件功能进行拓展与加强,当插件的接口公开后,任何公司或个人都可以制作自己的插件来解决一些操作上的不便或增加新功能,也就是真正意义上实现“即插即用”软件开发。
平台+插件软件结构是将一个待开发的目标软件分为两部分,一部分为软件的主体或框架,可定义为平台,这是预先编译后的程序。另一部分为功能或补充模块,可定义为插件。这个就是后来要进行安装的插件程序。
假设你的程序已经部署在用户的计算机上,并且能够正常运行了。但是有一天,用户打来电话——他们需要增加新的功能。确定了用户的需求后,你竟然发现原有的软件架构已经无法胜任新增任务的需求——你需要重新设计这个应用了!但问题是,就算你又用了一个开发周期完成了用户需要的应用,切不能保证用户的需求不会再次变更。也就是说,需求蔓延的可能性依然存在。因此,这种情况下插件架构更能显示出它的优越性。

可以这么说,用它可以带来方便的地方,而且开发它,也很简单。而且这样的主程序根本就不需要改动。需要插件时,拿来就能用,插件更新时,也只需更新这个插件即可。

而net平台与Java平台都能扩展软件插件。
现细谈各平台编程语言如何添加插件。
谈谈我学习java语言,用Java开发IDE插件
我一直不知道有插件开发这样一种技术路径,本想着这开发工具都给你备好了,直接用不就行了。但是总有些IT工厂,为了要节约成本,开发自己的开发工具,但是又要节省时间,总不能一切都自己来。毕竟开发一个eclipse也要很长时间的。因此,插件开发出现在历史舞台。
首先要了解插件开发,就得从SWT/JFACE说起了。SWT是一种开源的界面开发框架,以前学java的时候,总是用一些panel,就类似这个。JFace又是一种基于SWT的UI不见的API。Eclipse就是用这个开发出来的,它提供了Eclipse强大的扩展性,因此可以让用户任意的插入自己想要的插件,开发自己的IDE。
如何实现,let's start

首先认识一下Eclipse,这个大家应该很熟了!
1 红色部分是我们的工具栏
2 蓝色部分是视图
3 黄色部分是编辑器
通常我们使用编辑器,进行代码操作,或者业务操作。在视图,进行一些资源的查看等。红色引入一些常用的功能,辅助我们的操作。
我们先做一个简单的工具栏的控件,了解一下eclipse的插件开发流程!
首先,新建一个插件工程

给eclipse项目创建好的名称。

首先,写入自己的插件名字。
source folder 是插件的代码路径。
output folder是插件输出的目标路径。
下面是开发插件的eclipse的版本。
next,如何设置。 
ID 是插件的标识
version 是插件的版本
Name是插件的名字
Provider是开发者的信息
下面的Activator,是插件的激活类,用来管理插件的生命周期。
最后是选择是否开发RCP,富客户端应用,暂且不用,选否OK啦。
使用插件模块,创建一个插件工具。
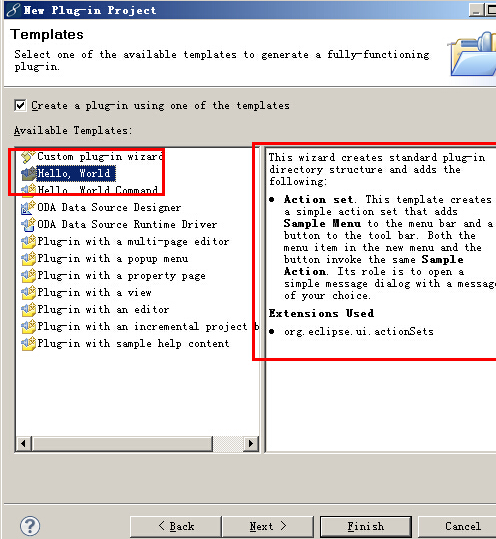
next,按钮信息设置。
默认会生成类的名字,路径(包名),以及工具栏按钮出发的消息提示。
点击finish,完成插件的创建。
插件完成,生成

导入了插件所需要用到的jar包
导入了插件依赖的库
源文件
插件按钮图片
插件的配置信息
MANIFEST.MF 插件的捆绑信息

Manifest-Version: 1.0
Bundle-ManifestVersion: 2
Bundle-Name: 我的插件
Bundle-SymbolicName: com.test.myplugin; singleton:=true
Bundle-Version: 1.0.0.qualifier
Bundle-Activator: com.test.myplugin.Activator
Bundle-Vendor: xingoo
Require-Bundle: org.eclipse.ui,
 org.eclipse.core.runtime
Bundle-ActivationPolicy: lazy
Name 是我们之前设置的插件名字
SymblicName 是我们插件的包名
version 是插件的版本
Activator 是插件的激活类
Vendor 是插件开发者的信息
Bundle 是插件以来的库
这些信息都对应着插件的overview页面的信息。
plugin.xml 插件的详细设置文档,包含插件的扩展点信息,以及插件自己的信息
<?xml version="1.0" encoding="UTF-8"?> <?eclipse version="3.4"?> <plugin> <extension point="org.eclipse.ui.actionSets"> <actionSet label="Sample Action Set" visible="true" id="com.test.myplugin.actionSet"><menu label="Sample &Menu" id="sampleMenu"> <separator name="sampleGroup"> </separator> </menu> <action label="&Sample Action" icon="icons/sample.gif" class="com.test.myplugin.actions.SampleAction" tooltip="Hello, Eclipse world" menubarPath="sampleMenu/sampleGroup" toolbarPath="sampleGroup" id="com.test.myplugin.actions.SampleAction"> </action> </actionSet> </extension> </plugin>
<plugin>元素清单的主体
<extension>插件的功能扩展,里面包括 point 扩展点的标识、id 扩展实例的标识、name 提供的用户的名称等等
build.properties 构建的元素列表
source.. = src/
output.. = bin/
bin.includes = plugin.xml,\
               META-INF/,\
               .,\
               icons/
里面包括插件的源文件目录,生成文件目录,还有一些配置信息的引入。
提供的插件类Activator.java
1 package com.test.myplugin; 2 3 import org.eclipse.jface.resource.ImageDescriptor; 4 import org.eclipse.ui.plugin.AbstractUIPlugin; 5 import org.osgi.framework.BundleContext; 6 7 /** 8 * The activator class controls the plug-in life cycle 9 */ 10 public class Activator extends AbstractUIPlugin { 11 12 // The plug-in ID 13 public static final String PLUGIN_ID = "com.test.myplugin"; 14 15 // The shared instance 16 private static Activator plugin; 17 18 /**19 * The constructor 20 */ 21 public Activator() { 22 } 23 24 /* 25 * (non-Javadoc) 26 * @see org.eclipse.ui.plugin.AbstractUIPlugin#start(org.osgi.framework.BundleContext) 27 */28 public void start(BundleContext context) throws Exception { 29 super.start(context); 30 plugin = this; 31 } 32 33 /*34 * (non-Javadoc) 35 * @see org.eclipse.ui.plugin.AbstractUIPlugin#stop(org.osgi.framework.BundleContext) 36 */ 37 public void stop(BundleContext context) throws Exception { 38 plugin = null; 39 super.stop(context); 40 } 41 42 /** 43 * Returns the shared instance 44 * 45 * @return the shared instance 46 */ 47 public static Activator getDefault() { 48 return plugin; 49 } 50 51 /** 52 * Returns an image descriptor for the image file at the given 53 * plug-in relative path 54 * 55 * @param path the path 56 * @return the image descriptor 57 */58 public static ImageDescriptor getImageDescriptor(String path) { 59 return imageDescriptorFromPlugin(PLUGIN_ID, path); 60 } 61 }运行插件图;start()和stop()分别用于插件开始与停止调用的函数。

启动方式1 直接在overview界面点击;
启动方式2 也可以点击运行或者DEBUG按钮,运行方式选择Eclipse Application。
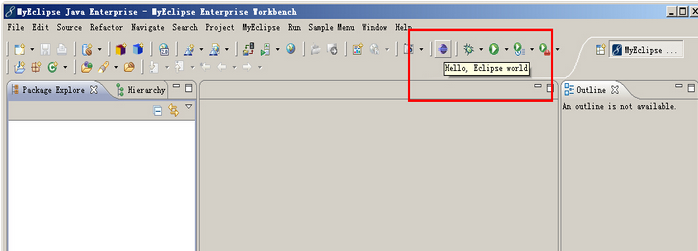
点击启动后,会为我们重新开启一个Eclipse,这个Eclipse就是带有我们创建的插件的新Eclipse。启动效果如下:

net平台,谈谈c#应用程序开发。
如何开发
从程序开发这角度,一般是先开发主程序,决定哪些功能由主程序来完成,然后再建立接口,申明接口的内容,这些内容决定着插件功能的扩展及方向的。这些都是有主程序开发者预先准备好的。插件开发者,从主程序开发者那里得到接口的内容,并书写继承这些接口的类,来完成具体的功能。
下面来写个例子,这个例子没实际意义,纯属学习思想。例子是网上的经过自己改造的,发现别人某些地方不合理。
首先,新建一个类库,里面定义接口,这里定义两个方法,一个有返回值的,一个无返回值的。
代码如下: using System;
using System.Collections.Generic;
using System.Text;
namespace IMsg
{
///<summary>
/// 这是插件必须实现的接口,也是主程序与插件通信的唯一接口
/// 换句话说,主程序只认识插件里的这些方法
///</summary>
publicinterface IMsgPlug
{
void OnShowDlg();
string OnShowInfo();
}
}
将上面的类库生成IMsg.dll, 新建一个类库MYPlugin1,添加刚出的引用,分别新建两个类来实现IMsg中定义的接口。
using System.Collections.Generic;
using System.Text;
using IMsg;
namespace MYPlugin1
{
public class myConsole : IMsgPlug
{
#region IMsgPlug 成员
public void OnShowDlg()
{
Console.WriteLine( " 控制台调用插件的OnShowDlg方法 " );
}
public string OnShowInfo()
{
return " myConsole " ;
}
#endregion
}
}
using System;
using System.Collections.Generic;
using System.Text;
using System.Windows.Forms;
using IMsg;
namespace MYPlugin1
{
public class MYDlg:Form,IMsgPlug
{
#region IMsgPlug 成员
public void OnShowDlg()
{
this .Text = " 插件子窗体 " ;
this .ShowDialog(); // 调用Form的ShowDialog,显示窗体
}
public string OnShowInfo()
{
return " MyDlg " ;
}
#endregion
}
}
将上面的都生成dll, 生成目录可以设置为新建exe工程的bin目录plugins文件夹下。Plugins文件夹是新建的,专门存放插件的。 新建一个 WinForm项目来使用刚才的插件.
图:
代码如下:
using System;
using System.ComponentModel;
using System.Data;
using System.Drawing;
using System.Text;
using System.Windows.Forms;
using System.Collections;
using System.IO;
using System.Reflection;
namespace MsgBoxMain
{
public partial class FormMain : Form
{
/// <summary>
/// 存放插件的集合
/// </summary>
private ArrayList plugins = new ArrayList();
public FormMain()
{
InitializeComponent();
}
/// <summary>
/// 载入所有插件
/// </summary>
private void LoadAllPlugs()
{
// 获取插件目录(plugins)下所有文件
string [] files = Directory.GetFiles(Application.StartupPath + @" \plugsins " );
foreach ( string file in files)
{
if (file.ToUpper().EndsWith( " .DLL " ))
{
try
{
// 载入dll
Assembly ab = Assembly.LoadFrom(file);
Type[] types = ab.GetTypes();
foreach (Type t in types)
{
// 如果某些类实现了预定义的IMsg.IMsgPlug接口,则认为该类适配与主程序(是主程序的插件)
if (t.GetInterface( " IMsgPlug " ) != null )
{
plugins.Add(ab.CreateInstance(t.FullName));
listBox1.Items.Add(t.FullName);
}
}
}
catch (Exception ex)
{
MessageBox.Show(ex.Message);
}
}
}
}
private void btnLoadPlug_Click( object sender, EventArgs e)
{
LoadAllPlugs();
}
// 调用插件的方法
private void btnExecute_Click( object sender, EventArgs e)
{
if ( this .listBox1.SelectedIndex == - 1 ) return ;
object selObj = this .plugins[ this .listBox1.SelectedIndex];
Type t = selObj.GetType();
MethodInfo OnShowDlg = t.GetMethod( " OnShowDlg " );
MethodInfo OnShowInfo = t.GetMethod( " OnShowInfo " );
OnShowDlg.Invoke(selObj, null );
object returnValue = OnShowInfo.Invoke(selObj, null );
this .lblMsg.Text = returnValue.ToString();
}
}
}
运行结果:图:
OK,大功告成。
最后,感谢上帝!
阿们!


 574
574

 被折叠的 条评论
为什么被折叠?
被折叠的 条评论
为什么被折叠?
 到【灌水乐园】发言


