


1.ceph
下面先来说一下ceph的部署,部署坏境为CentOS 6.4,ceph官方推出了一个部署工具ceph-deploy,我是使用这个来部署ceph的。
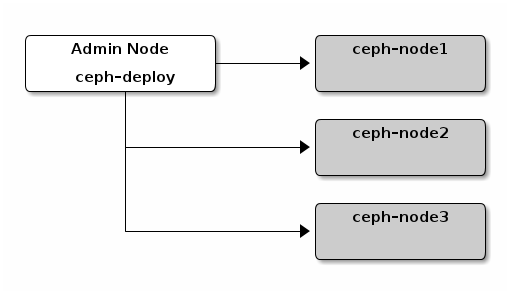
如上图所示,我们这次集群规模以3台服务器为例,并额外选取一台作为管理节点。
1)在管理节点上生成公钥,并在管理节点上建立到3台存储节点的信任关系。
|
1
2
3
4
|
ssh
-
keygen
ssh
-
copy
-
id
ceph
-
node1
ssh
-
copy
-
id
ceph
-
node2
ssh
-
copy
-
id
ceph
-
node3
|
2)添加源,在/etc/yum.repos.d/目录中创建ceph.repo文件,并写入如下内容。
|
1
2
3
4
5
6
7
|
[
ceph
-
noarch
]
name
=
Ceph
noarch
packages
baseurl
=
http
:
//ceph.com/rpm-{ceph-stable-release}/{distro}/noarch
enabled
=
1
gpgcheck
=
1
type
=
rpm
-
md
gpgkey
=
https
:
//ceph.com/git/?p=ceph.git;a=blob_plain;f=keys/release.asc
|
其中{}部分需要替换,目前ceph最新版本v0.72.1叫emperor,管理节点系统为centos 6.4。因此修改为的源文件如下所示。
|
1
2
3
4
5
6
7
|
[
ceph
-
noarch
]
name
=
Ceph
noarch
packages
baseurl
=
http
:
//ceph.com/rpm-emperor/el6/noarch
enabled
=
1
gpgcheck
=
1
type
=
rpm
-
md
gpgkey
=
https
:
//ceph.com/git/?p=ceph.git;a=blob_plain;f=keys/release.asc
|
3)更新源并安装
|
1
|
yum
update
&&
yum
install
ceph
-
deploy
|
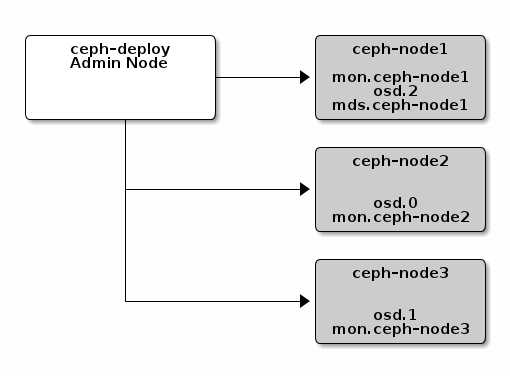
4)搭建存储集群,要搭建集群的架构如下图所示。
在搭建集群过程中会生成一些文件,因此我们最好先创建个文件夹,在文件夹当中进行操作。
|
1
|
ceph
-
deploy
new
{
ceph
-
node
}
|
这里new后面接mon节点主机名称,我们这里在每个存储节点上都运行mon进程,因此执行如下命令。
|
1
|
ceph
-
deploy
new
ceph
-
node1
ceph
-
node2
ceph
-
node3
|
成功执行该命令后,将会生成集群的配置文件,keyring文件以及日志文件。
接下来,将安装ceph。
|
1
|
ceph
-
deploy
install
ceph
-
node1
ceph
-
node2
ceph
-
node3
|
安装ceph monitor。
|
1
|
ceph
-
deploy
mon
create
ceph
-
node1
ceph
-
node2
ceph
-
node3
|
收集各个节点的keyring文件。
|
1
|
ceph
-
deploy
gatherkeys
ceph
-
node1
ceph
-
node2
ceph
-
node3
|
当成功执行上面命令的时候,在本地目录下会生成如下文件:
|
1
2
3
|
ceph
.
client
.
admin
.
keyring
ceph
.
bootstrap
-
osd
.
keyring
ceph
.
bootstrap
-
mds
.
keyring
|
添加3个OSD,使用过程中我把磁盘做成逻辑卷挂载在/opt/ceph目录下。在管理节点上执行如下命令。
|
1
|
ceph
-
deploy
osd
prepare
ceph
-
node1
:
/
opt
/
ceph
ceph
-
node2
:
/
opt
/
ceph
ceph
-
node3
:
/
opt
/
ceph
|
最后,激活这些OSD。
|
1
|
ceph
-
deploy
osd
active
ceph
-
node1
:
/
opt
/
ceph
ceph
-
node2
:
/
opt
/
ceph
ceph
-
node3
:
/
opt
/
ceph
|
至此,ceph共享存储集群就搭建完成。由于我们要使用ceph文件系统,因此我们至少还需要一台metadata服务器。在管理节点上执行如下命令创建一个metadata服务器。
|
1
|
ceph
-
deploy
mds
create
ceph
-
node1
|
官方建议目前即使在生产环境中只是用一台metadata服务器也是可以的,但并不是不可以使用多台metadata服务器,只不过是那种情况下将缺少商业支持。
接下来,我将挂载ceph文件系统到我们的服务器上,在该服务器上安装ceph-fuse。
|
1
|
yum
install
ceph
-
fuse
|
安装好ceph-fuse后,执行如下命令进行挂载。如果要使用ceph做OpenStack临时存储的话,就将ceph文件系统挂载到/var/lib/nova/instances目录下即可,这里我们测试就将ceph挂载到/mnt/ceph目录下。
|
1
|
ceph
-
fuse
-
m
{
ip
-
address
-
of
-
monitor
}
:
6789
/
mnt
/
ceph
|
2.glusterfs
在搭建glusterfs的时候出现些问题,给出要搭建glusterfs的同学如下建议。
1)在搭建过程中最好使用节点IP;
2)各个节点版本必须一致,目前最新版为3.4.1。
为了保证各个节点glusterfs版本一致,我们先更新各个节点源。
|
1
2
3
|
cd
/
etc
/
yum
.
repo
.
d
/
wget
http
:
//download.gluster.org/pub/gluster/glusterfs/3.4/3.4.1/CentOS/glusterfs-epel.repo
yum
update
|
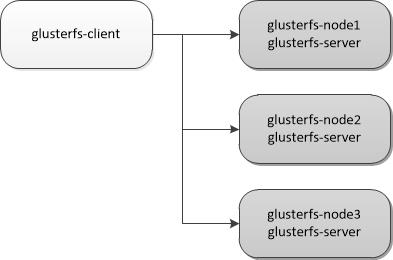
如上图所示,我们也选择三个存储节点组成glusterfs集群。在glusterfs-node01上安装glusterfs-node01。
|
1
2
|
yum
-
y
install
glusterfs
-
server
/
etc
/
init
.
d
/
glusterd
start
|
glusterfs-node02和glusterfs-node03同样执行如上操作。
1)添加节点,在 glusterfs-node01上进行添加节点。
|
1
2
3
4
|
gluster
peer
probe
{
ip
-
address
-
of
-
glusterfs
-
node02
}
gluster
peer
probe
{
ip
-
address
-
of
-
glusterfs
-
node03
}
#查看节点情况
gluster
peer
status
|
2)创建卷,为了测试和上面ceph类似,我们将逻辑卷挂载到/opt/glusterfs上。
|
1
2
3
|
gluster
volume
create
shared_vol
replica
3
{
ip
-
address
-
of
-
glusterfs
-
node01
}
:
/
opt
/
glusterfs
{
ip
-
address
-
of
-
glusterfs
-
node02
}
:
/
opt
/
glusterfs
{
ip
-
address
-
of
-
glusterfs
-
node03
}
:
/
opt
/
glusterfs
#查看卷状态
gluster
volume
info
|
我们这里设置的每份数据存3份。
3)启动卷。
|
1
|
gluster
volume
start
shared_vol
|
至此服务器端部署完成,下面来部署客户端。
4)安装客户端程序,这里要注意是否与服务器端版本一致。
|
1
|
yum
-
y
install
glusterfs
-
client
|
5)挂载目录
|
1
|
mount
.
glusterfs
{
ip
-
address
-
of
-
glusterfs
-
node01
}
:
/
shared_vol
/
mnt
/
glusterfs
|
至此ceph和glusterfs部署全部完成,其中ceph参考了官方文档,glusterfs参考了陈沙克老师的文章,在此感谢原作者。
3.性能测试
看了些文章,都说ceph的文件系统性能并不是很好,笔者使用fio对ceph和glusterfs文件系统的读写进行能简单的测试。
使用命令如下:
|
1
|
fio
--
direct
=
1
--
rw
=
rw
--
bs
=
1m
--
size
=
5g
--
numjobs
=
64
--
group_reporting
--
name
=
test
-
rw
|
ceph所得结果如下:
|
1
2
3
|
#ceph
READ
:
io
=
166400MB
,
aggrb
=
8680KB
/
s
,
minb
=
8680KB
/
s
,
maxb
=
8680KB
/
s
,
mint
=
19630496msec
,
maxt
=
19630496msec
WRITE
:
io
=
161280MB
,
aggrb
=
8412KB
/
s
,
minb
=
8412KB
/
s
,
maxb
=
8412KB
/
s
,
mint
=
19630496msec
,
maxt
=
19630496msec
|
glusterfs所得结果如下:
|
1
2
3
|
#glusterfs
READ
:
io
=
166400MB
,
aggrb
=
35152KB
/
s
,
minb
=
35152KB
/
s
,
maxb
=
35152KB
/
s
,
mint
=
4847257msec
,
maxt
=
4847257msec
WRITE
:
io
=
161280MB
,
aggrb
=
34070KB
/
s
,
minb
=
34070KB
/
s
,
maxb
=
34070KB
/
s
,
mint
=
4847257msec
,
maxt
=
4847257msec
|
可以看得出ceph的文件系统读写性能相比glusterfs,还是相差很多。
感觉目前最好的解决方案是文件系统用glusterfs,块存储用ceph,对象存储用swift,但是这么一来ceph的统一存储也荡然无存了,


 238
238

 被折叠的 条评论
为什么被折叠?
被折叠的 条评论
为什么被折叠?
 到【灌水乐园】发言


