


第6章 squid代理模式案例
6.1 squid传统正向代理生产使用案例
6.1.1 squid传统正向代理两种方案
(1)普通代理服务器
- 作为代理服务器,这是SQUID的最基本功能;通过在squid.conf文件里添加一系列访问及控制规则,用户在客户端设置服务器地址和端口,即可通过SQUID访问INTERNET,在下面的规则里,squid实现局域网用户代理和高速缓存功能:
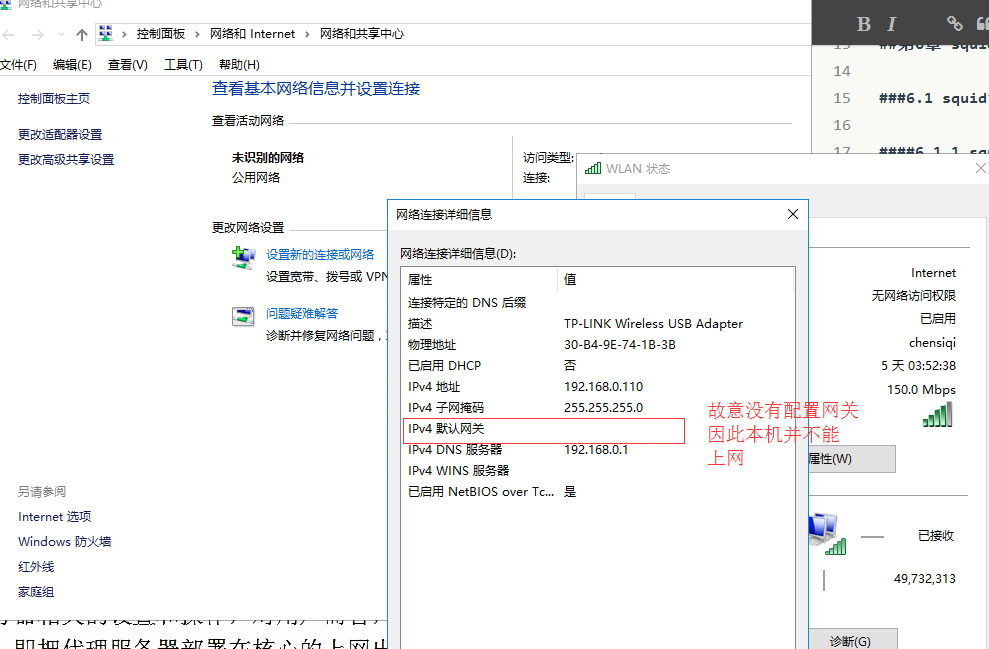
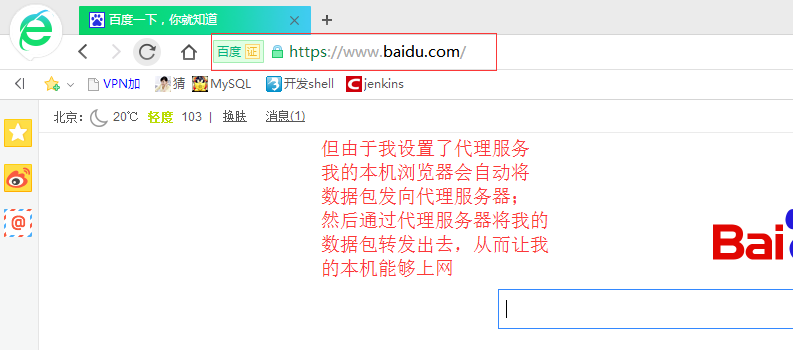
- 即通过浏览器设置代理服务器地址实现共享上网,这种方式不需要代理服务器在网络的出入口位置,只要代理服务器可以上网,其他的客户机就可以通过IE等客户端设置代理服务器的地址及端口进行上网(客户机不能上网,但是可以通过代理服务器来达到上网的目的)。本章节最开头的默认配置就是这样的例子,但是这个技术已经落后了,我们也仅仅提及下而已。
(2)透明代理服务器
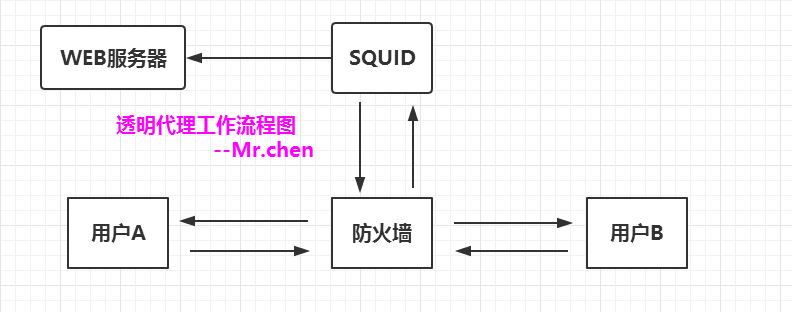
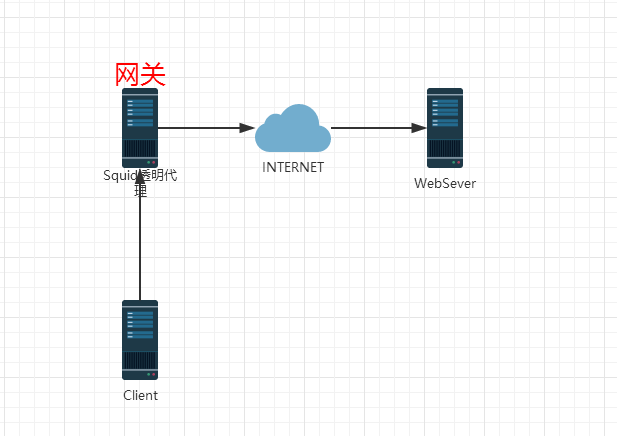
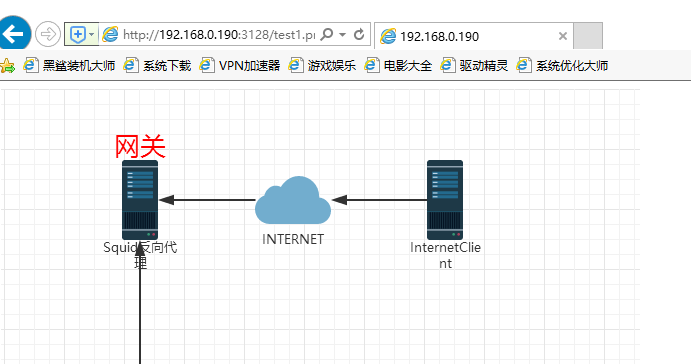
另一种就是透明代理,所谓透明代理,是相对于代理服务器而言,客户端不需要做任何和代理服务器相关的设置和操作,对用户而言,感觉不到代理服务器的存在,所以称之为透明代理。即把代理服务器部署在核心的上网出口,当用户上网浏览页面时,会交给代理服务器向外请求,如果结合iptables可以实现代理+网关+内容过滤+流量安全控制等完整的上网解决方案。
透明代理流程说明:
用户A发送一个访问请求到防火墙,由防火墙将该用户的访问请求转发到SQUID,SQUID在先检查自身缓存中有无该用户请求的访问内容,如果没有,则请求远端目的服务器,获取该用户的访问内容,再返回给用户的同时,在自身缓存保留一份记录以备下次调用;当用户B发送一个和用户A相同的访问请求时,由防火墙将转发该用户请求到SQUID,SQUID检查自身缓存发现有同样内容后,直接将该内容返回给用户。
注意:
在实际使用中,通常将SQUID和防火墙放在同一台机器上,为了更清楚的向浏览者描述其工作流程,在以下的流程图中将防火墙和SQUID分开显示。
6.1.2 squid透明代理案例说明
本例实现通过squid正向透明代理,实现企业单位,内部共享上网。
案例说明:
- 我曾经在一家知名的IT公司,整个集团有900人左右,曾经有这么一位网管,用一台配置256M内存,40G硬盘的pc机,为900多人提供安全的上网,而且网络高速稳定,半年基本没有发生网络异常。
- 那么,他是如何做到的呢?原来他用的是iptables与squid的完美统一,实现透明代理上网。
(1)上网行为控制
(2)节约网站带宽成本
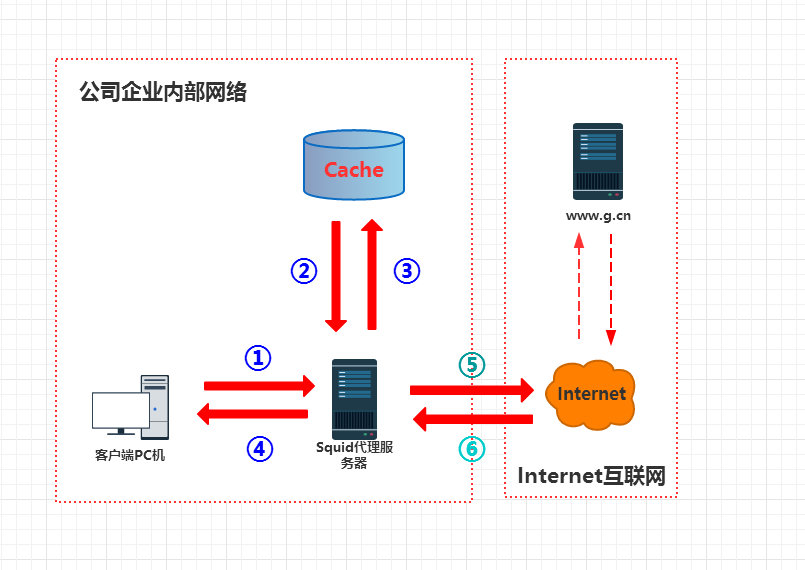
(3)提升员工上网速度- squid可以为局域网中的客户机做代理,用来加速用户的网页访问,第一次访问的时候,squid会把数据缓存到服务器上,当客户端第二次访问的时候,squid会对比文件的新旧,如果文件没有发生变化,则squid直接返回给用户数据,不需要在互联网上重新下载一份。整个上网代理的原理前面已经讲解过了。图形如下:
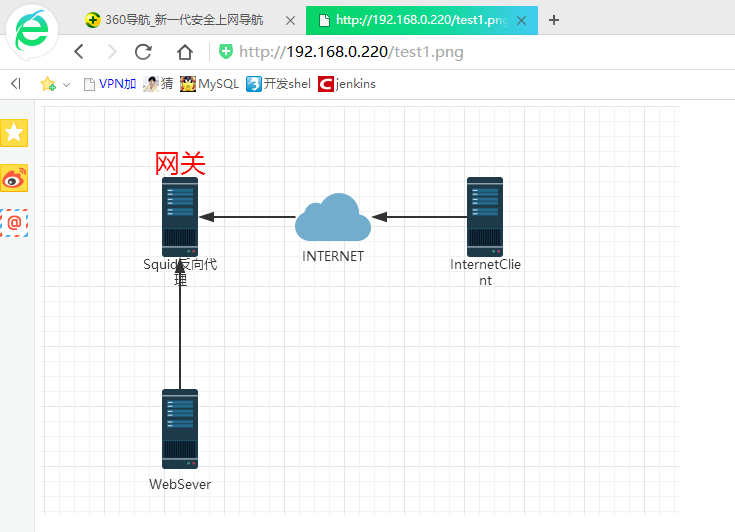
6.1.3 squid透明代理物理拓扑说明
作为透明代理的服务器,一般和公司上网网关放一起,即所有的客户机的网关都设置为代理服务器的IP。具体需求如下:
1)至少有两块网卡,一块连接路由器,一块连接内部公司网络
2)所有的上网请求都必须经过代理服务器(即把代理服务器设置为网关)
6.1.4 squid透明代理实战配置(学生实验)
| 主机名 | 内网卡 | 外网卡 | 网关IP | 用途 |
|---|---|---|---|---|
| Squid | 192.168.200.100 | 192.168.0.190 | 无网关 | 透明代理,网关 |
| WebServer | 192.168.0.220 | 无网关 | Web服务器 | |
| Client | 192.168.200.200 | 192.168.200.100 | 内网客户端 |
配置squid透明代理需要加上如下编译参数,否则日志报错
--enable-linux-netfilter    #激活透明代理对Linux的支持
--enable-linux-tproxy       #激活真实的透明代理对网站的支持

 如果没编译日志会报错:
/usr/local/squid/var/logs/cache.log
2017-9-22 17:44:40| WARNING:transparent proxying not supported 2017-9-22 17:44:42| WARNING:transparent proxying not supported
Squid做正向代理如何设置呢,我们以实例给大家解析:
#修改squid.conf,在squid监听端口后加transparent
[root@localhost ~]# awk '/http_port/{print NR,$0}' /usr/local/squid/etc/squid.conf
29 http_port 3128
[root@localhost ~]# sed -i '29 s#$# transparent#' /usr/local/squid/etc/squid.conf [root@localhost ~]# sed -n '29p' /usr/local/squid/etc/squid.conf http_port 3128 transparent
squid.conf添加如下代码:
[root@localhost ~]# tail -7 /usr/local/squid/etc/squid.conf
cache_mem 128 MB    #内存缓存大小
cache_swap_low 90
cache_swap_high 95 maximum_object_size 8192 KB #最大缓存对象大小 minimum_object_size 0 KB #最小缓存对象大小 maximum_object_size_in_memory 4096 KB memory_replacement_policy lru #缓存算法 emulate_httpd_log on #日志
启动squid服务,出现报错
[root@localhost ~]# killall squid
[root@localhost ~]# netstat -antup | grep 3128
[root@localhost ~]# squid -D
2017/09/22 02:57:25| WARNING cache_mem is larger than total disk cache space! #报错的原因是cache_mem设置小了。 [root@localhost ~]# tail -8 /usr/local/squid/etc/squid.conf cache_mem 99 MB #调小 cache_swap_low 90 cache_swap_high 95 maximum_object_size 8192 KB minimum_object_size 0 KB maximum_object_size_in_memory 4096 KB memory_replacement_policy lru emulate_httpd_log on #启动squid服务 [root@localhost ~]# killall squid [root@localhost ~]# killall squid squid: no process killed [root@localhost ~]# killall squid squid: no process killed [root@localhost ~]# squid -D [root@localhost ~]# netstat -antup | grep 3128 tcp 0 0 0.0.0.0:3128 0.0.0.0:* LISTEN 1666/(squid)
6.1.5 防火墙的设置
#在网关上操作(Squid)
[root@localhost ~]# /etc/init.d/iptables stop
[root@localhost ~]# iptables -t nat -A PREROUTING -i eth1 -p tcp --dport 80 -j REDIRECT --to-ports 3128        #eth1为内网网卡
[root@localhost ~]# iptables -t nat -L -nv
Chain PREROUTING (policy ACCEPT 0 packets, 0 bytes) pkts bytes target prot opt in out source destination 0 0 REDIRECT tcp -- eth1 * 0.0.0.0/0 0.0.0.0/0 tcp dpt:80 redir ports 3128 Chain POSTROUTING (policy ACCEPT 1 packets, 136 bytes) pkts bytes target prot opt in out source destination Chain OUTPUT (policy ACCEPT 1 packets, 136 bytes) pkts bytes target prot opt in out source destination #做出网转换 [root@localhost ~]# iptables -t nat -A POSTROUTING -o eth0 -s 192.168.200.0/24 -j MASQUERADE [root@localhost ~]# iptables -t nat -L -nv Chain PREROUTING (policy ACCEPT 0 packets, 0 bytes) pkts bytes target prot opt in out source destination 0 0 REDIRECT tcp -- eth1 * 0.0.0.0/0 0.0.0.0/0 tcp dpt:80 redir ports 3128 Chain POSTROUTING (policy ACCEPT 0 packets, 0 bytes) pkts bytes target prot opt in out source destination 0 0 MASQUERADE all -- * eth0 192.168.200.0/24 0.0.0.0/0 Chain OUTPUT (policy ACCEPT 0 packets, 0 bytes) pkts bytes target prot opt in out source destination #开启网关的转发功能 [root@localhost ~]# sed -n '7p' /etc/sysctl.conf net.ipv4.ip_forward = 1 [root@localhost ~]# sysctl -p net.ipv4.ip_forward = 1 net.ipv4.conf.default.rp_filter = 1 net.ipv4.conf.default.accept_source_route = 0 kernel.sysrq = 0 kernel.core_uses_pid = 1 net.ipv4.tcp_syncookies = 1 error: "net.bridge.bridge-nf-call-ip6tables" is an unknown key error: "net.bridge.bridge-nf-call-iptables" is an unknown key error: "net.bridge.bridge-nf-call-arptables" is an unknown key kernel.msgmnb = 65536 kernel.msgmax = 65536 kernel.shmmax = 68719476736 kernel.shmall = 4294967296 net.ipv4.ip_local_port_range = 4000 65000
6.1.6 测试透明代理
注意,请查看Web服务器是否关闭了iptables
(1)路由检查
#内网客户端(192.168.200.100为网关内网卡eth1)
[root@localhost ~]# route -n
Kernel IP routing table
Destination     Gateway         Genmask         Flags Metric Ref    Use Iface
192.168.200.0   0.0.0.0         255.255.255.0 U 0 0 0 eth0 169.254.0.0 0.0.0.0 255.255.0.0 U 1002 0 0 eth0 0.0.0.0 192.168.200.100 0.0.0.0 UG 0 0 0 eth0 #网关squid服务器(eth0网段192.168.0.0/24,eth1网段192.168.200.0/24,网关服务器无需设置网关) [root@localhost logs]# route -n Kernel IP routing table Destination Gateway Genmask Flags Metric Ref Use Iface 192.168.0.0 0.0.0.0 255.255.255.0 U 0 0 0 eth0 192.168.200.0 0.0.0.0 255.255.255.0 U 0 0 0 eth1 169.254.0.0 0.0.0.0 255.255.0.0 U 1002 0 0 eth0 169.254.0.0 0.0.0.0 255.255.0.0 U 1003 0 0 eth1 #WebServer(无需设置任何网关,模拟公网) [root@www ~]# route -n Kernel IP routing table Destination Gateway Genmask Flags Metric Ref Use Iface 192.168.0.0 0.0.0.0 255.255.255.0 U 0 0 0 eth0 169.254.0.0 0.0.0.0 255.255.0.0 U 1002 0 0 eth0
(2)代理测试
#在内网客户端上测试
[root@localhost ~]# echo "192.168.0.220 www.yunjisuan.com bbs.yunjisuan.com" >> /etc/hosts
[root@localhost ~]# tail -1 /etc/hosts
192.168.0.220 www.yunjisuan.com bbs.yunjisuan.com [root@localhost ~]# curl www.yunjisuan.com 192.168.0.220 www #測試成功 [root@localhost ~]# curl www.yunjisuan.com 192.168.0.220 www #測試成功 [root@localhost ~]# curl bbs.yunjisuan.com 192.168.0.220 bbs [root@localhost ~]# curl bbs.yunjisuan.com 192.168.0.220 bbs [root@localhost ~]# curl bbs.yunjisuan.com 192.168.0.220 bbs #查看squiid服务器代理日志 [root@localhost logs]# cat /usr/local/squid/var/logs/access.log 1506339377.298 2004 192.168.200.200 TCP_REFRESH_FAIL/200 462 GET http://www.yunjisuan.com/ - DIRECT/www.yunjisuan.com text/html 1506339378.421 0 192.168.200.200 TCP_REFRESH_FAIL/200 462 GET http://www.yunjisuan.com/ - DIRECT/www.yunjisuan.com text/html 1506339379.117 0 192.168.200.200 TCP_REFRESH_FAIL/200 462 GET http://www.yunjisuan.com/ - DIRECT/www.yunjisuan.com text/html 1506339399.213 0 192.168.200.200 TCP_REFRESH_FAIL/200 462 GET http://www.yunjisuan.com/ - DIRECT/www.yunjisuan.com text/html 1506339399.845 0 192.168.200.200 TCP_REFRESH_FAIL/200 462 GET http://www.yunjisuan.com/ - DIRECT/www.yunjisuan.com text/html 1506339405.320 2002 192.168.200.200 TCP_REFRESH_FAIL/200 462 GET http://bbs.yunjisuan.com/ - DIRECT/bbs.yunjisuan.com text/html 1506339406.182 0 192.168.200.200 TCP_REFRESH_FAIL/200 462 GET http://bbs.yunjisuan.com/ - DIRECT/bbs.yunjisuan.com text/html 1506339406.774 0 192.168.200.200 TCP_REFRESH_FAIL/200 462 GET http://bbs.yunjisuan.com/ - DIRECT/bbs.yunjisuan.com text/html 1506339409.957 0 192.168.200.200 TCP_REFRESH_FAIL/200 462 GET http://www.yunjisuan.com/ - DIRECT/www.yunjisuan.com text/html 1506339410.629 0 192.168.200.200 TCP_REFRESH_FAIL/200 462 GET http://www.yunjisuan.com/ - DIRECT/www.yunjisuan.com text/html 1506339411.205 0 192.168.200.200 TCP_REFRESH_FAIL/200 462 GET http://www.yunjisuan.com/ - DIRECT/www.yunjisuan.com text/html 1506339412.253 0 192.168.200.200 TCP_REFRESH_FAIL/200 462 GET http://bbs.yunjisuan.com/ - DIRECT/bbs.yunjisuan.com text/html 1506339412.885 0 192.168.200.200 TCP_REFRESH_FAIL/200 462 GET http://bbs.yunjisuan.com/ - DIRECT/bbs.yunjisuan.com text/html 1506339413.317 0 192.168.200.200 TCP_REFRESH_FAIL/200 462 GET http://bbs.yunjisuan.com/ - DIRECT/bbs.yunjisuan.com text/html 1506339468.616 2003 192.168.200.200 TCP_REFRESH_FAIL/200 462 GET http://www.yunjisuan.com/ - DIRECT/www.yunjisuan.com text/html 1506339469.525 0 192.168.200.200 TCP_REFRESH_FAIL/200 462 GET http://www.yunjisuan.com/ - DIRECT/www.yunjisuan.com text/html 1506339476.007 2002 192.168.200.200 TCP_REFRESH_FAIL/200 462 GET http://bbs.yunjisuan.com/ - DIRECT/bbs.yunjisuan.com text/html 1506339476.637 0 192.168.200.200 TCP_REFRESH_FAIL/200 462 GET http://bbs.yunjisuan.com/ - DIRECT/bbs.yunjisuan.com text/html 1506339477.133 0 192.168.200.200 TCP_REFRESH_FAIL/200 462 GET http://bbs.yunjisuan.com/ - DIRECT/bbs.yunjisuan.com text/html
6.1.7 squid配合iptables实现上网网关及访问控制
同学们需要回家在有Internet的环境下进行验证。
控制上网例子:限制下载BT文件下载mp3
#修改squid.conf
acl BT urlpath_regex -i \.torrent$
acl BT urlpath_regex -i \.torrent$\.mp3$
http_access deny BT
控制访问黄色网站
#修改squid.conf
acl sex url_regex -i ^http://.*sex.*$
http_access deny sex
acl ett url_regex -i http://.*yunjisuan.*
http_access deny ett
单个IP每秒最多请求(并发)30个:
可以用来防止多线程下载,爬虫等
acl OverConnLimit maxconn 30
http_access deny OverConnLimit
acl url_no_log urlpath_regex \.gif \.jpg \.css \.js \.swf \.GIF \.JPG \.SWF F5BigIP
acl method_no_log method PURGE HEAD
access_log /squid/logs/access.log combined !url_no_log !method_no_log   #不计入log日志
注意规则顺序:
一定要写到http_access deny all前
#检测squid语法
/usr/local/squid/sbin/squid -k parse

#重新加载squid服务
/usr/local/squid/sbin/squid -k reconfigure
重新加载完squid后,squid就可以作为局域网的代理服务器了。
需要注意acl规则写的先后顺序,因为squid中的acl是顺序执行的,满足就匹配,不会把所有规则全部执行完才匹配。同学们可以验证一下:
acl MyNetwork src all   #定义规则
http_access deny all    #设置规则“所有源地址”禁止
http_access allow MyNetwork     #设置规则“所有源地址”允许,但是上面的规则已经定义了,这条规则无效不执行
6.2 squid反向代理生产使用案例
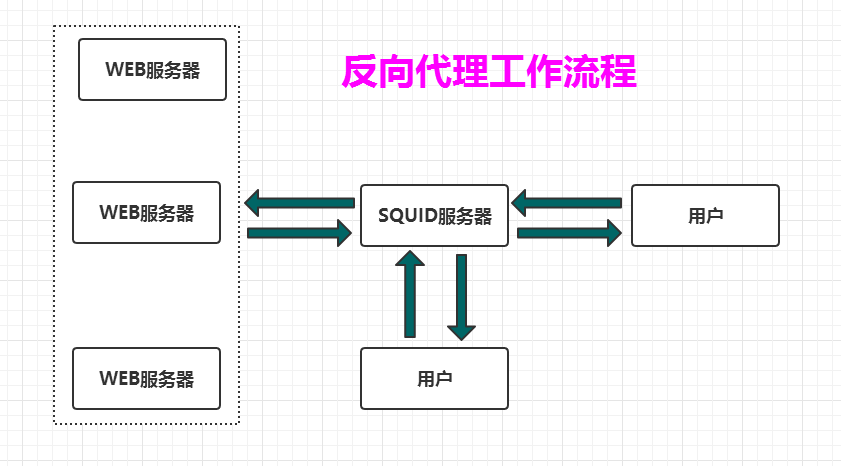
普通代理方式是代理内部网络用户访问internet上服务器的连接请求,客户端必须指定代理服务器,并将原本要直接发送到internet上服务器的连接请求发送给代理服务器处理。反向代理(Reverse Proxy)方式是指以代理服务器来接受internet上的连接请求,然后将请求转发给内部网络上的服务器,并将从服务器上得到的结果返回给internet上请求连接的客户端,此时代理服务器对外就表现为一个服务器。
反向代理流程说明:
SQUID作为反向代理服务器,通常工作在一个服务器集群的前端,在用户端看来,SQUID服务器就是他说要访问的服务器,而实际意义上SQUID只是接受用户的请求,同时将用户请求转发给内网真正的WEB服务器,如果SQUID本身有用户要访问的内容,则SQUID直接将数据返回给用户。
6.2.1 squid反向代理生产案例介绍
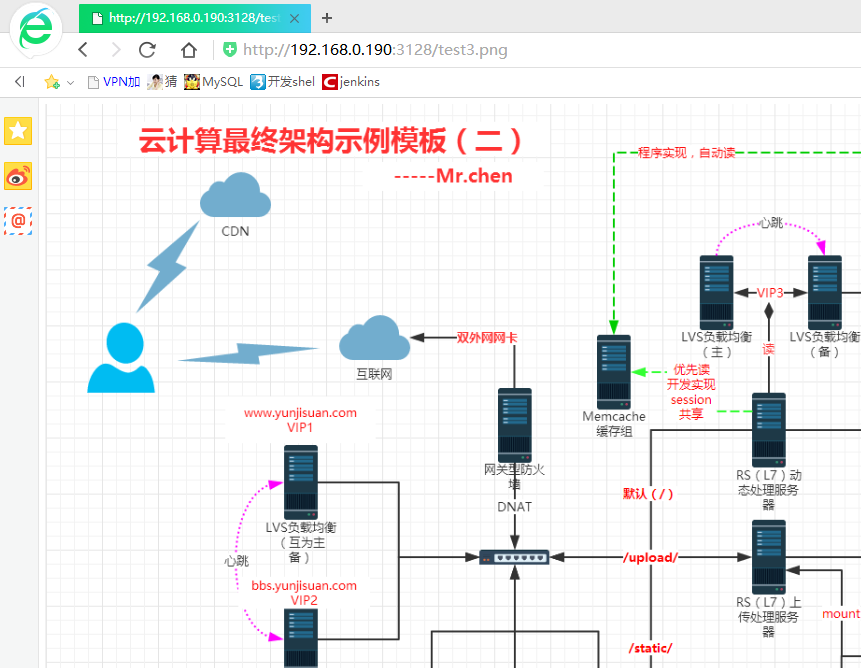
在很多大型互联网门户网站(sina,taobao)中,经常使用squid作为服务器的反向cache,提高了服务器的访问性能,这些cache服务器组有效减轻了后端Web服务器的负载,并且提高了访问速度,在某种程度上保护了后端的Web服务器。结合以往运维工作的经验,为同学们讲述一个大型的图片服务器前端的N台反向cache是如何搭建和如何管理的。
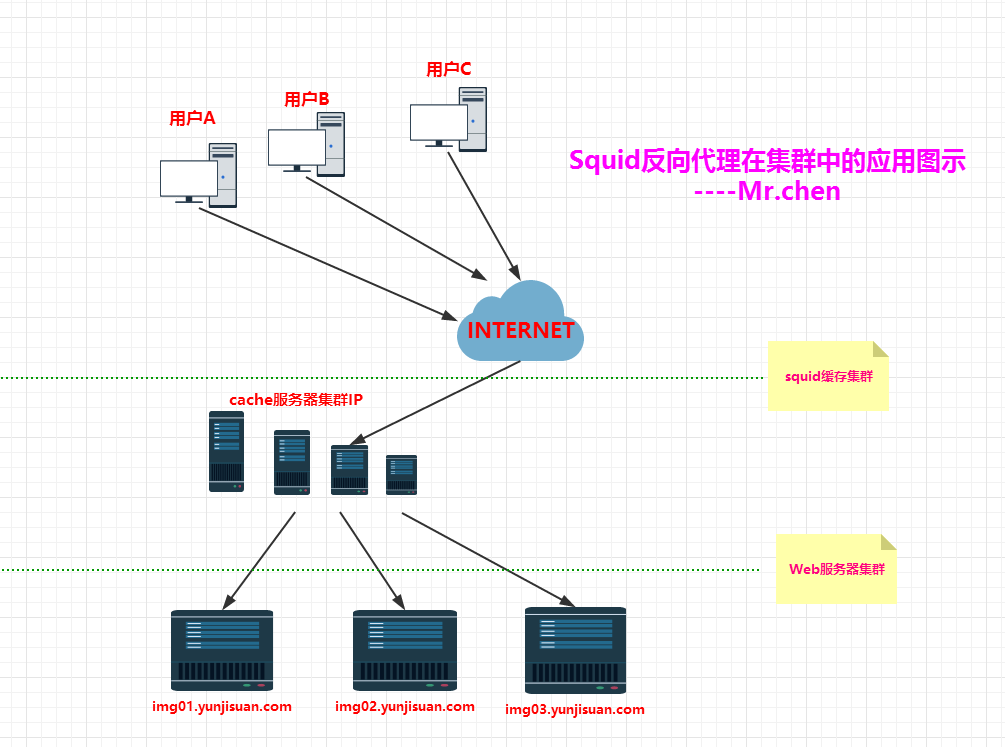
该方案是一个典型的门户网站的squid设计,其中用户通过访问不同的域名来访问不同的squid群组,集群squid可以支持多个虚拟主机,如图中的img01.yunjisuan.com,img02.yunjisuan.com,都是在一个squid群组中,用户直接访问这些cache服务器,而非直接访问后端的真实服务器,这样,既提高了用户的访问速度,又保护了后端真实服务器的安全。
6.2.2 squid反向代理如何获得数据更新
Squid反向代理一般只缓存可缓冲的数据(比如html网页,js,css和图片等),而一些CGI脚本程序或者ASP,JSP,PHP之类1的动态程序默认不缓存。它根据从WEB服务器返回的HTTP头标记来缓冲静态页面。有四个重要HTTP头标记:
- Last-Modified:告诉反向代理页面什么时间被修改;
- Expires:告诉反向代理页面什么时间应该从缓冲区中删除;
- Cache-Control:告诉反向代理页面是否应该被缓冲;
- Pragma:用来包含实现特定的指令,最常用的是Pragma:no-Cache
优先级对比(no-cache,expires,max-age)参考:
经验:
- 在Squid中Cache-Control:no-cache > Expires > refresh_pattern > Last-Modifide。靠最前面的最重要,前面的生效后,后面的基本就失效了。
- 另外,squid本身就能对比Last-Modified,但根据我的测试,Etag还是会要向源服务器发送请求头,来确认etag的。
- ETag默认是需要向源网站确认的,Last-Modified默认是不向源服务器确认的。
HTTP协议本身设计的优先级顺序如下:
最上面优先级最高,到下面最小:
Cache-Control:no-store
Cache-Control:no-cache
Cache-Control:must-revalidate
Cache-Control:max-age
Expires:
常用Header简单讲解(仅了解即可):
1,不缓存控制
- Cache-Control:no-store:禁止中间的缓存服务器存储这个对象。并把header转发给用户。
- Cachee-Control:no-cache:缓存服务器可以给文件缓存在本地缓存区,只是在和源站进行新鲜验证前,不能提供给客户端使用。
2,指定过期时间控制
- Cache-Control:max-age表示如果缓存服务器拿到这个文件后,这个对象多久之内是新鲜的,可用的,可以发给客户端使用的。
- Cache-Control:s-maxage行为和上面一样,只是只能使用于public地时候缓存
- Cache-Control:must-revalidate默认的情况下,缓存代理是可以提供给用户一些旧的对象的内容,以提高性能。但如果原始服务器不希望这样,就可以配置这个选项。进行严格检查,比如源站不可用时,回源验证过程会失败。默认会吐旧的数据。但配置了这个以后会吐504 Gateway Timeout。
- Expires:这个作用和max-age是一样的。但这是指定一个过期的日期,但不是秒数。所以不建议使用。因为很多缓存服务器和源服务器常常时间不同步,所以基于max-age是使用相对的时间来表示还剩下多少秒可用。不要使用Expires来使用绝对时间。
6.3 squid反向代理实战配置(学生实验)
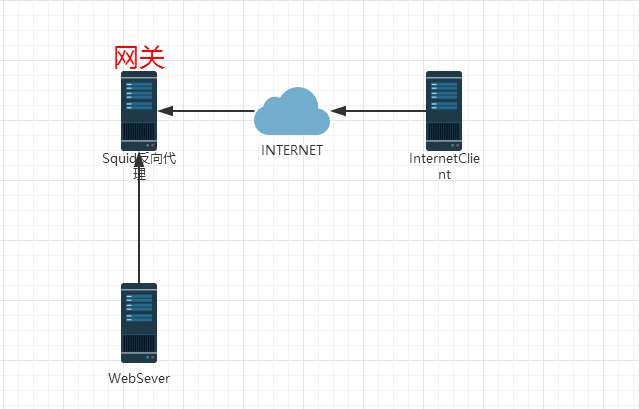
| 主机名 | 外网卡 | 内网卡 | 网关IP | 用途 |
|---|---|---|---|---|
| Squid | 192.168.200.100 | 192.168.0.190 | 无网关 | 反向代理,网关 |
| WebServer | 192.168.0.220 | 192.168.0.190 | 内网Web服务器 | |
| InternetClient | 192.168.200.200 | 无网关 | 外网客户端 |
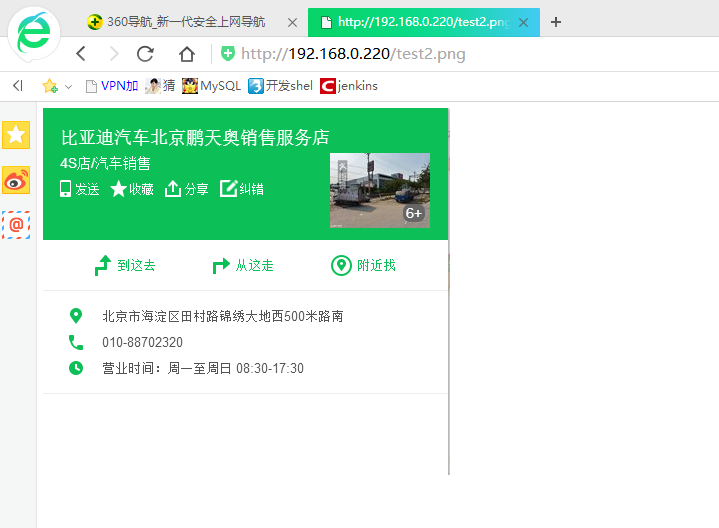
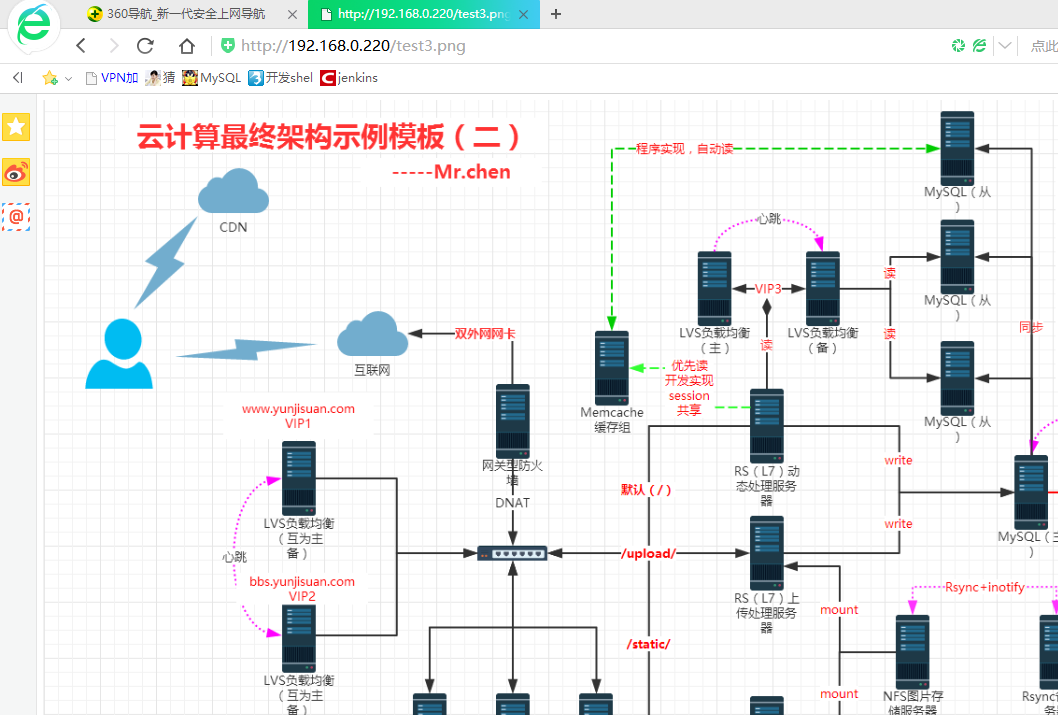
6.3.1 搭建Web服务器并上传3张图片到网页目录下
(1)nginxWeb服务器的配置文件如下:
[root@www ~]# cat /usr/local/nginx/conf/nginx.conf
worker_processes  1;
events {
    worker_connections  1024;
}
http {
    include       mime.types;
    default_type  application/octet-stream;
    sendfile        on;
    keepalive_timeout  65;
    server {
        listen 80; server_name www.yunjisuan.com; location / { root html/www; index index.html index.htm; } } server { listen 80; server_name bbs.yunjisuan.com; location / { root html/bbs; index index.html index.htm; } } }
(2)上传3张图片到/usr/local/nginx/html/www目录下
[root@www ~]# cd /usr/local/nginx/html/www/
[root@www www]# ls
index.html
[root@www www]# hostname -I
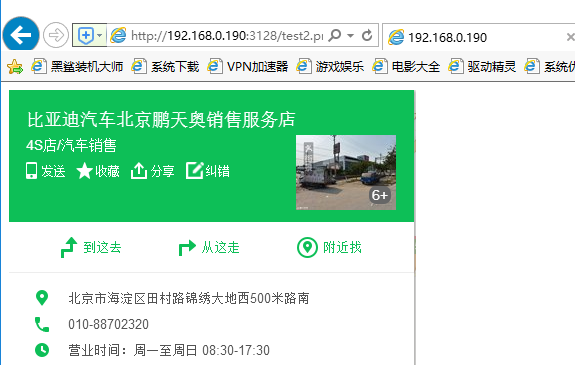
192.168.0.220 [root@www www]# ls index.html test1.png test2.png test3.png [root@www www]# (3)浏览器打开图片进行访问测试
6.3.2 squid反向代理的典型设置
- 我们以上面的案例做例子,来告诉大家如何对后端的真实服务器www.yunjisuan.com做反向代理,并且如何控制squid的缓存和存取的内容,以及如何管理这么多的squid服务器。
- 假设我们squid服务器有三台,地址分别是192.168.0.100,192.168.0.190,192.168.0.200。
- 我们拿其中一台配置,剩余几台的配置完全一样。
(1)准备squid.conf模板文件
[root@localhost ~]# cd /usr/local/squid/etc/
[root@localhost etc]# cp squid.conf{,.bak}  #备份原配置文件
[root@localhost etc]# egrep -v "^$|^#" squid.conf.default > squid.conf   #重新生成配置文件的初始模板
(2)将squid.conf配置文件修改为如下内容:
[root@localhost squid]# cat /usr/local/squid/etc/squid.conf
acl manager proto cache_object
acl localhost src 127.0.0.1/32 acl to_localhost dst 127.0.0.0/8 0.0.0.0/32 acl localnet src 10.0.0.0/8 # RFC1918 possible internal network acl localnet src 172.16.0.0/12 # RFC1918 possible internal network acl localnet src 192.168.0.0/16 # RFC1918 possible internal network acl SSL_ports port 443 acl Safe_ports port 80 # http acl Safe_ports port 21 # ftp acl Safe_ports port 443 # https acl Safe_ports port 70 # gopher acl Safe_ports port 210 # wais acl Safe_ports port 1025-65535 # unregistered ports acl Safe_ports port 280 # http-mgmt acl Safe_ports port 488 # gss-http acl Safe_ports port 591 # filemaker acl Safe_ports port 777 # multiling http acl CONNECT method CONNECT http_access allow manager localhost http_access deny manager http_access deny !Safe_ports http_access deny CONNECT !SSL_ports http_access allow localnet http_access deny all icp_access allow localnet icp_access deny all htcp_access allow localnet htcp_access deny all http_port 3128 accel vhost vport hierarchy_stoplist cgi-bin ? access_log /usr/local/squid3/var/logs/access.log squid refresh_pattern ^ftp: 1440 20% 10080 refresh_pattern ^gopher: 1440 0% 1440 refresh_pattern (cgi-bin|\?) 0 0% 0 refresh_pattern . 0 20% 4320 #################新增内容开始start################################### #refresh_pattern [-i] regexp min percent max [options] #强制缓存内容,违反http协议 refresh_pattern -i \.jpg$ 30 50% 4320 reload-into-ims #强制缓存内容,违反http协议 refresh_pattern -i \.png$ 30 50% 4320 reload-into-ims #强制缓存内容,违反http协议 refresh_pattern -i \.gif$ 30 50% 4320 reload-into-ims #强制缓存内容,违反http协议 ######################新增内容结束stop############################## #icp_port 3130 coredump_dir /usr/local/squid3/var/cache ##################新增内容开始start################################### cache_mem 99 MB #缓存大小设置 cache_swap_low 90 #缓存从最小占用90时开始逐渐清除旧缓存 cache_swap_high 95 #缓存从最大占用95时,立刻清除旧缓存 maximum_object_size 8192 KB #最大缓存对象大小 minimum_object_size 0 KB ##最小缓存对象大小 maximum_object_size_in_memory 4096 KB #缓存对象最大在内存中的大小 memory_replacement_policy lru ##缓存算法 emulate_httpd_log on #日志 ##################################################### cache_mgr 215379068@qq.com #管理员邮箱 cache_effective_user squid #程序用户 cache_effective_group squid #程序组 visible_hostname www.yunjisuan.com #squid主机名 ###################################################### cache_peer www.yunjisuan.com parent 80 0 no-query no-digest max-conn=32 originserver #反向代理的Web源站的域名,因为是域名所以squid本地必须做hosts映射 #cache_peer bbs.yunjisuan.com parent 80 0 no-query no-digest max-conn=32 originserver hosts_file /etc/hosts #域名映射文件位置 request_header_max_size 128 KB #请求头部的最大大小 ipcache_size 1024 ipcache_low 90 ipcache_high 95 ####################新增内容结束stop##################
(3)测试配置文件语法,并启动服务
 [root@localhost squid]# killall squid      #杀掉所有squid进程
[root@localhost squid]#
[root@localhost squid]# killall squid
[root@localhost squid]# killall squid
squid: no process killed #没了 [root@localhost squid]# squid -k parse #测试配置文件语法 2017/09/25 12:44:06| Processing Configuration File: /usr/local/squid3/etc/squid.conf (depth 0) 2017/09/25 12:44:06| WARNING: use of 'reload-into-ims' in 'refresh_pattern' violates HTTP #因为配置文件设置了强制缓存对象,这是违反http协议的,因此这里提出了警告,我们忽略他 2017/09/25 12:44:06| Initializing https proxy context [root@localhost squid]# squid -D #启动squid进程,忽略DNS反向解析 [root@localhost squid]# netstat -antup | grep squid tcp 0 0 0.0.0.0:3128 0.0.0.0:* LISTEN 2731/(squid) udp 0 0 0.0.0.0:3130 0.0.0.0:* 2731/(squid) udp 0 0 127.0.0.1:52542 127.0.0.1:24754 ESTABLISHED 2731/(squid)
(4)在squid本地hosts文件里做代理的源站域名映射
[root@localhost squid]# tail -1 /etc/hosts
192.168.0.220 www.yunjisuan.com bbs.yunjisuan.com
6.3.3 进行squid反向代理访问测试
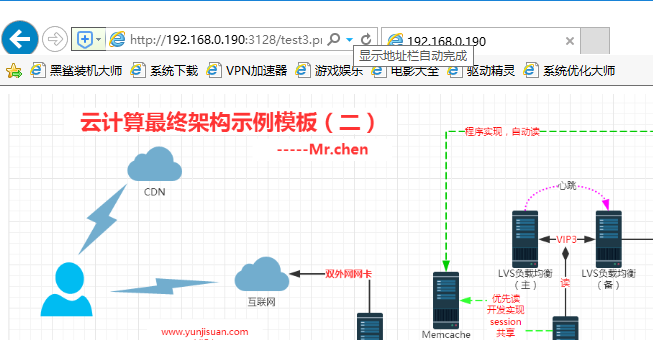
(1)在windows上输入squid反向代理服务器的地址,端口3128,进行图片的访问测试
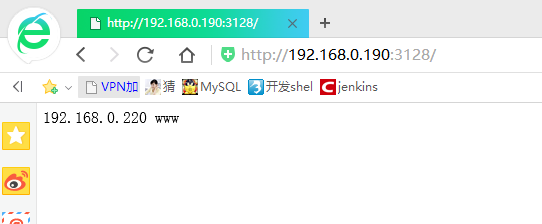


(2)观察squid服务器的访问日志
[root@localhost ~]# tail -f /usr/local/squid/var/logs/access.log
1506678413.735      9 192.168.0.110 TCP_CLIENT_REFRESH_MISS/200 140309 GET http://192.168.0.190:3128/test3.png - FIRST_UP_PARENT/www.yunjisuan.com image/png 1506678413.754 0 192.168.0.110 TCP_MISS/404 808 GET http://192.168.0.190:3128/favicon.ico - FIRST_UP_PARENT/www.yunjisuan.com text/html 1506678622.409 5 192.168.0.110 TCP_OFFLINE_HIT/200 140318 GET http://192.168.0.190:3128/test3.png - NONE/- image/png 1506678622.430 0 192.168.0.110 TCP_MISS/404 808 GET http://192.168.0.190:3128/favicon.ico - FIRST_UP_PARENT/www.yunjisuan.com text/html 1506678629.709 0 192.168.0.110 TCP_IMS_HIT/304 285 GET http://192.168.0.190:3128/test3.png - NONE/- image/png 1506678643.781 0 192.168.0.110 TCP_IMS_HIT/304 285 GET http://192.168.0.190:3128/test3.png - NONE/- image/png 1506678646.189 8 192.168.0.110 TCP_OFFLINE_HIT/200 140318 GET http://192.168.0.190:3128/test3.png - NONE/- image/png 1506678646.210 0 192.168.0.110 TCP_MEM_HIT/404 816 GET http://192.168.0.190:3128/favicon.ico - NONE/- text/html 1506678688.914 6 192.168.0.110 TCP_OFFLINE_HIT/200 140318 GET http://192.168.0.190:3128/test3.png - NONE/- image/png 1506678688.936 0 192.168.0.110 TCP_MEM_HIT/404 816 GET http://192.168.0.190:3128/favicon.ico - NONE/- text/html 1506678691.926 0 192.168.0.110 TCP_IMS_HIT/304 285 GET http://192.168.0.190:3128/test3.png - NONE/- image/png 1506678711.644 4 192.168.0.110 TCP_OFFLINE_HIT/200 140318 GET http://192.168.0.190:3128/test3.png - NONE/- image/png 1506678711.809 0 192.168.0.110 TCP_NEGATIVE_HIT/404 816 GET http://192.168.0.190:3128/favicon.ico - NONE/- text/html 1506679194.499 0 192.168.0.110 TCP_MEM_HIT/404 817 GET http://192.168.0.190:3128/favicon.ico - NONE/- text/html
6.3.4 进行squid离线缓存测试
在测试squid离线缓存前,请先用浏览器访问几次squid代理服务器(两块网卡都访问),从而建立squid缓存后,在进行测试...(nginx配置文件最好写上expires 1d的缓存时间)
(1)修改squid.conf配置文件
[root@localhost ~]# echo "offline_mode on" >>    /usr/local/squid/etc/squid.conf
[root@localhost ~]# tail -1 /usr/local/squid/etc/squid.conf
offline_mode on     #开启squid离线模式
(2)重启动squid服务
[root@localhost ~]# killall squid
[root@localhost ~]# killall squid
[root@localhost ~]# killall squid
squid: no process killed
[root@localhost ~]# squid -k parse 2017/09/29 06:08:20| Processing Configuration File: /usr/local/squid3/etc/squid.conf (depth 0) 2017/09/29 06:08:20| WARNING: use of 'reload-into-ims' in 'refresh_pattern' violates HTTP 2017/09/29 06:08:20| Initializing https proxy context [root@localhost ~]# squid -D [root@localhost ~]# netstat -antup | grep squid tcp 0 0 0.0.0.0:3128 0.0.0.0:* LISTEN 3163/(squid) udp 0 0 127.0.0.1:31632 127.0.0.1:45817 ESTABLISHED 3163/(squid)
(3)关闭后端RS节点的Web服务
[root@www logs]# /usr/local/nginx/sbin/nginx -s stop
[root@www logs]# netstat -antup | grep nginx
(4)清空浏览器缓存
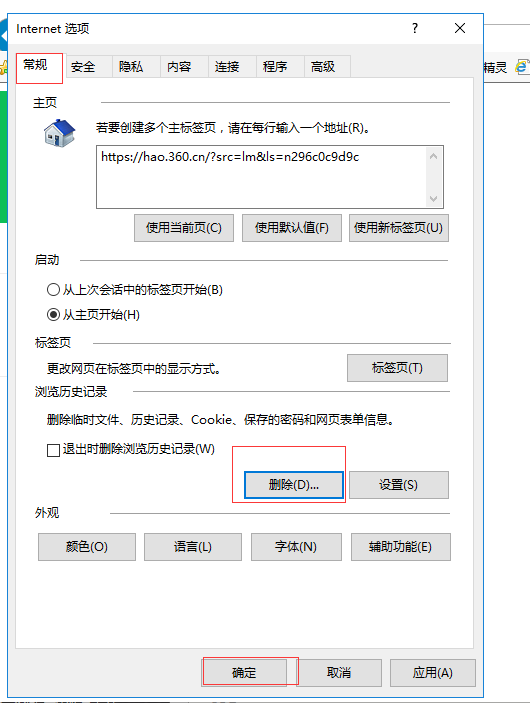
(5)用浏览器访问squid代理服务器的3128端口
经过测试,在离线模式下,关闭Web服务器仍旧访问成功。因此,缓存有效
(6)观察squid代理服务器的访问日志
[root@localhost ~]# tail -f /usr/local/squid/var/logs/access.log
1506680014.134      0 192.168.0.110 TCP_OFFLINE_HIT/200 13513 GET http://192.168.0.190:3128/test1.png - NONE/- image/png 1506680014.465 161 192.168.0.110 TCP_MISS/503 2061 GET http://192.168.0.190:3128/favicon.ico - FIRST_UP_PARENT/www.yunjisuan.com text/html 1506680040.733 0 192.168.0.110 TCP_OFFLINE_HIT/200 13513 GET http://192.168.0.190:3128/test1.png - NONE/- image/png 1506680040.740 0 192.168.0.110 TCP_MISS/503 2212 GET http://192.168.0.190:3128/favicon.ico - NONE/- text/html 1506680048.237 0 192.168.0.110 TCP_IMS_HIT/304 355 GET http://192.168.0.190:3128/test1.png - NONE/- image/png 1506680049.612 0 192.168.0.110 TCP_IMS_HIT/304 355 GET http://192.168.0.190:3128/test1.png - NONE/- image/png 1506680050.213 0 192.168.0.110 TCP_IMS_HIT/304 355 GET http://192.168.0.190:3128/test1.png - NONE/- image/png 1506680054.983 1 192.168.0.110 TCP_OFFLINE_HIT/200 31297 GET http://192.168.0.190:3128/test2.png - NONE/- image/png 1506680057.501 0 192.168.0.110 TCP_IMS_HIT/304 355 GET http://192.168.0.190:3128/test2.png - NONE/- image/png 1506680058.060 0 192.168.0.110 TCP_IMS_HIT/304 355 GET http://192.168.0.190:3128/test2.png - NONE/- image/png 1506680062.859 4 192.168.0.110 TCP_OFFLINE_HIT/200 140319 GET http://192.168.0.190:3128/test3.png - NONE/- image/png 1506680068.731 0 192.168.0.110 TCP_IMS_HIT/304 286 GET http://192.168.0.190:3128/test3.png - NONE/- image/png 1506680069.443 0 192.168.0.110 TCP_IMS_HIT/304 286 GET http://192.168.0.190:3128/test3.png - NONE/- image/png
(7)在Linux公网客户端利用curl -I进行访问测试
[root@localhost ~]# curl -I 192.168.200.100:3128/test1.png HTTP/1.0 200 OK #访问成功 Server: nginx/1.10.2 Date: Fri, 22 Sep 2017 12:55:15 GMT Content-Type: image/png #数据类型 Content-Length: 13066 #数据大小 Last-Modified: Fri, 22 Sep 2017 11:32:43 GMT #数据最后更新时间 ETag: "59c4f4db-330a" Accept-Ranges: bytes Age: 231 X-Cache: HIT from www.yunjisuan.com #HIT命中, Via: 1.0 www.yunjisuan.com (squid/3.0.STABLE20) Connection: close [root@localhost ~]# curl -I 192.168.200.100:3128/test2.png HTTP/1.0 200 OK Server: nginx/1.10.2 Date: Fri, 29 Sep 2017 10:35:20 GMT Content-Type: image/png Content-Length: 30850 Last-Modified: Fri, 22 Sep 2017 11:32:44 GMT ETag: "59c4f4dc-7882" Expires: Sat, 30 Sep 2017 10:35:20 GMT Cache-Control: max-age=86400 #缓存1天 Accept-Ranges: bytes Age: 389 X-Cache: HIT from www.yunjisuan.com Via: 1.0 www.yunjisuan.com (squid/3.0.STABLE20) Connection: close [root@localhost ~]# curl -I 192.168.200.100:3128/test3.png HTTP/1.0 200 OK Server: nginx/1.10.2 Date: Fri, 29 Sep 2017 10:37:58 GMT Content-Type: image/png Content-Length: 139909 Last-Modified: Fri, 22 Sep 2017 11:34:16 GMT ETag: "59c4f538-22285" Expires: Sat, 30 Sep 2017 10:37:58 GMT Cache-Control: max-age=86400 #缓存1天 Accept-Ranges: bytes Age: 232 X-Cache: HIT from www.yunjisuan.com Via: 1.0 www.yunjisuan.com (squid/3.0.STABLE20) Connection: close第7章 squid访问日志access.log结果编码
#TCP_HIT
Squid发现请求资源的貌似新鲜的拷贝,并将其立即发送到客户端。

#TCP_MISS
Squid没有请求资源的cache拷贝。
 #TCP_REFERSH_HIT Squid发现请求资源的貌似陈旧的拷贝,并发送确认请求到原始服务器。原始服务器返回304(未修改)响应,指示squid的拷贝仍旧是新鲜的。  #TCP_REF_FAIL_HIT Squid发现请求资源的貌似陈旧的拷贝,并发送确认请求到原始服务器。然而,原始服务器响应失败,或者返回的响应Squid不能理解。在此情形下,squid发送现有cache拷贝(很可能是陈旧的)到客户端。  #TCP_REFRESH_MISS Squid发现请求资源的貌似陈旧的拷贝,并发送确认请求到原始服务器。原始服务器响应新的内容,指示这个cache拷贝确实是陈旧的。  #TCP_CLIENT_REFRESH_MISS Squid发现了请求资源的拷贝,但客户端的请求包含了Cache-Control: no-cache指令。Squid转发客户端的请求到原始服务器,强迫cache确认。  #TCP_IMS_HIT 客户端发送确认请求,Squid发现更近来的、貌似新鲜的请求资源的拷贝。Squid发送更新的内容到客户端,而不联系原始服务器。  #TCP_SWAPFAIL_MISS Squid发现请求资源的有效拷贝,但从磁盘装载它失败。这时squid发送请求到原始服务器,就如同这是个cache丢失一样。  #TCP_NEGATIVE_HIT 在对原始服务器的请求导致HTTP错误时,Squid也会cache这个响应。在短时间内对这些资源的重复请求,导致了否命中。negative_ttl指令控制这些错误被cache的时间数量。请注意这些错误只在内存cache,不会写往磁盘。下列HTTP状态码可能导致否定cache(也遵循于其他约束): 204, 305, 400, 403, 404, 405, 414, 500, 501, 502, 503, 504。  #TCP_MEM_HIT Squid在内存cache里发现请求资源的有效拷贝,并将其立即发送到客户端。注意这点并非精确的呈现了所有从内存服务的响应。例如,某些cache在内存里,但要求确认的响应,会以TCP_REFRESH_HIT, TCP_REFRESH_MISS等形式记录。  #TCP_DENIED 因为http_access或http_reply_access规则,客户端的请求被拒绝了。注意被http_access拒绝的请求在第9域的值是NONE/-,然而被http_reply_access拒绝的请求,在相应地方有一个有效值。  #TCP_OFFLINE_HIT 当offline_mode激活时,Squid对任何cache响应返回cache命中,而不用考虑它的新鲜程度。 TCP_REDIRECT 重定向程序告诉Squid产生一个HTTP重定向到新的URI。正常的,Squid不会记录这些重定向。假如要这样做,必须在编译squid前,手工定义LOG_TCP_REDIRECTS预处理指令。  #NONE 无分类的结果用于特定错误,例如无效主机名。 相应于ICP查询,下列标签可能出现在access.log文件的第四域。  #UDP_HIT Squid在cache里发现请求资源的貌似新鲜的拷贝。  #UDP_MISS Squid没有在cache里发现请求资源的貌似新鲜的拷贝。假如同一目标通过HTTP请求,就可能是个cache丢失。请对比UDP_MISS_NOFETCH。  #UDP_MISS_NOFETCH 跟UDP_MISS类似,不同的是这里也指示了Squid不愿去处理相应的HTTP请求。假如使用了-Y命令行选项,Squid在启动并编译其内存索引时,会返回这个标签而不是UDP_MISS。  #UDP_DENIED 因为icp_access规则,ICP查询被拒绝。假如超过95%的到某客户端的ICP响应是UDP_DENIED,并且客户端数据库激活了,Squid在1小时内,停止发送任何ICP响应到该客户端。若这点发生,你也可在cache.log里见到一个警告。  #UDP_INVALID Squid接受到无效查询(例如截断的消息、无效协议版本、URI里的空格等)。Squid发送UDP_INVALID响应到客户端。
第8章 清空squid过期缓存文件
手动或通过程序清空
8.1 通过squidclient命令查看缓存情况
查看squidclient命令帮助
[root@localhost ~]# /usr/local/squid/bin/squidclient -h
Version: 3.0.STABLE20
Usage: /usr/local/squid/bin/squidclient [-arsv] [-i IMS] [-h remote host] [-l local host] [-p port] [-m method] [-t count] [-I ping-interval] [-H 'strings'] [-T timeout] url
Options:
    -P file      PUT request.
    -a           Do NOT include Accept: header. -r Force cache to reload URL. -s Silent. Do not print data to stdout. -v Verbose. Print outgoing message to stderr. -i IMS If-Modified-Since time (in Epoch seconds). -h host Retrieve URL from cache on hostname. Default is localhost. -l host Specify a local IP address to bind to. Default is none. -p port Port number of cache. Default is 3128. -m method Request method, default is GET. #请求方法,默认GET -t count Trace count cache-hops -g count Ping mode, "count" iterations (0 to loop until interrupted). -I interval Ping interval in seconds (default 1 second). -H 'string' Extra headers to send. Use '\n' for new lines. -T timeout Timeout value (seconds) for read/write operations. -u user Proxy authentication username -w password Proxy authentication password -U user WWW authentication username -W password WWW authentication password
重要命令:
[root@localhost ~]# /usr/local/squid/bin/squidclient -h localhost -p 3128 mgr:objects
这个命令能知道如下重要信息:
a.打印出的是所有缓存在内存和硬盘上的数据,对象是以key来表示,每个key代表不同的对象。
b.列出对象是否存放在内存,还是硬盘
实际执行结果如下:
[root@localhost ~]# /usr/local/squid/bin/squidclient -h localhost -p 3128 mgr:objects | head -40 HTTP/1.0 200 OK Server: squid/3.0.STABLE20 Mime-Version: 1.0 Date: Fri, 29 Sep 2017 12:26:01 GMT Content-Type: text/plain Expires: Fri, 29 Sep 2017 12:26:01 GMT Last-Modified: Fri, 29 Sep 2017 12:26:01 GMT X-Cache: MISS from www.yunjisuan.com Via: 1.0 www.yunjisuan.com (squid/3.0.STABLE20) Connection: close KEY 07A0ABCDD8F4CCB76F909B4B53DA3674 STORE_OK NOT_IN_MEMORY SWAPOUT_DONE PING_NONE CACHABLE,DISPATCHED,VALIDATED LV:1506049878 LU:1506049878 LM:1224673576 EX:-1 0 locks, 0 clients, 1 refs Swap Dir 0, File 0X000A5A KEY 0960D3841A64599B80AEEAF0C2484B46 STORE_OK NOT_IN_MEMORY SWAPOUT_DONE PING_NONE CACHABLE,DISPATCHED,VALIDATED LV:1506049435 LU:1506049436 LM:1506087262 EX:1821409435 0 locks, 0 clients, 1 refs Swap Dir 0, File 0X000838 KEY 0CA0B1E0E6DC1AF821B361855FF8A8E4 STORE_OK NOT_IN_MEMORY SWAPOUT_DONE PING_NONE CACHABLE,DISPATCHED,VALIDATED LV:1506057117 LU:1506057119 LM:1506047423 EX:1506057417 0 locks, 0 clients, 1 refs Swap Dir 0, File 0X000E70 KEY 11C0A8B760FA2CF306206048BD2F88B8 STORE_OK NOT_IN_MEMORY SWAPOUT_DONE PING_NONE CACHABLE,DISPATCHED,VALIDATED LV:1504970491 LU:1506037806 LM:0 EX:1507598491 0 locks, 0 clients, 1 refs Swap Dir 0, File 0X000457 KEY 11A0BD3D16CF9F67FF7B8E4F345B88BF #以下省略若干...squidclient常用命令:
- 取得squid运行状态信息:squidclient -p 80 mgr:info
- 取得squid内存使用情况:squidclient -p 80 mgr:mem
- 取得squid已经缓存的列表:squidclient -p 80 mgr:diskd
- 强制更新某个url:squidclient -p 80 -m PURGE http://www.yunjisuan.com/static.php
- 更多1请查看:squidclient -h或者squidclient -p 80 mgr:
如果要查看所有的mgr后的对象:
squidclient -h localhost -p 80 mgr:8.2 通过squidclient命令清空cache中的文件
(1)方法一(重新缓存对象):
- 当你的用户抱怨总接收到过时的数据;
- 当你的cache因为某个响应而“中毒”;
- 当Squid的cache索引在经历磁盘I/O错误或频繁的crash和重启后,变得有问题;
- 你想删除一些大目标来释放空间给新的数据;
- Squid总从本地服务器中cache响应,现在你不想它这样做。
假如必要,你总可以使用squidclient程序来reload缓存目标。
% squidclient -m purge -p 80 -r http://www.yunjisuan.com/test1.png > /dev/null
假如你碰巧在refresh_pattern指令里设置了ignore-reload选项,你和你的用户将不能强迫缓存响应更新。在这样的情况下,你最好清除这些有错误的缓存对象。
(2)方法二(指定删除对象):
squidclient -m purge -p 80 http://192.168.0.190/test1.png
要清空某个具体的url缓存,squid acl要设置如下规则,否则你无权清理缓存内容:
#修改squid配置文件squid.conf
[root@localhost ~]# cat /usr/local/squid/etc/squid.conf
acl manager proto cache_object
acl localhost src 127.0.0.1/32 acl to_localhost dst 127.0.0.0/8 0.0.0.0/32 acl localnet src 10.0.0.0/8 acl localnet src 172.16.0.0/12 acl localnet src 192.168.0.0/16 acl SSL_ports port 443 acl Safe_ports port 80 acl Safe_ports port 21 acl Safe_ports port 443 acl Safe_ports port 70 acl Safe_ports port 210 acl Safe_ports port 1025-65535 acl Safe_ports port 280 acl Safe_ports port 488 acl Safe_ports port 591 acl Safe_ports port 777 acl CONNECT method CONNECT http_access allow manager localhost ########################################### http_access allow PURGE localhost #配置为文件加入本行,注意代码插入位置 http_access allow PURGE localnet #配置为文件加入本行,注意代码插入位置 http_access deny PURGE #配置为文件加入本行,注意代码插入位置 ############################################ http_access deny manager http_access deny !Safe_ports http_access deny CONNECT !SSL_ports http_access allow localnet http_access deny all icp_access allow localnet icp_access deny all htcp_access allow localnet htcp_access deny all http_port 3128 accel vhost vport hierarchy_stoplist cgi-bin ? access_log /usr/local/squid3/var/logs/access.log squid refresh_pattern ^ftp: 1440 20% 10080 refresh_pattern ^gopher: 1440 0% 1440 refresh_pattern (cgi-bin|\?) 0 0% 0 refresh_pattern . 0 20% 4320 #################################################### #refresh_pattern [-i] regexp min percent max [options] refresh_pattern -i \.jpg$ 30 50% 4320 reload-into-ims refresh_pattern -i \.png$ 30 50% 4320 reload-into-ims refresh_pattern -i \.gif$ 30 50% 4320 reload-into-ims #################################################### #icp_port 3130 coredump_dir /usr/local/squid3/var/cache ##################################################### cache_mem 99 MB cache_swap_low 90 cache_swap_high 95 maximum_object_size 8192 KB minimum_object_size 0 KB maximum_object_size_in_memory 4096 KB memory_replacement_policy lru emulate_httpd_log on ##################################################### cache_mgr 215379068@qq.com cache_effective_user squid cache_effective_group squid visible_hostname www.yunjisuan.com ###################################################### cache_peer www.yunjisuan.com parent 80 0 no-query no-digest max-conn=32 originserver #cache_peer bbs.yunjisuan.com parent 80 0 no-query no-digest max-conn=32 originserver hosts_file /etc/hosts request_header_max_size 128 KB ipcache_size 1024 ipcache_low 90 ipcache_high 95 #offline_mode on
重启squid服务
[root@localhost ~]# killall squid
[root@localhost ~]# killall squid
[root@localhost ~]# killall squid
squid: no process killed
[root@localhost ~]# squid -k parse 2017/09/29 17:15:56| Processing Configuration File: /usr/local/squid3/etc/squid.conf (depth 0) 2017/09/29 17:15:56| WARNING: use of 'reload-into-ims' in 'refresh_pattern' violates HTTP 2017/09/29 17:15:56| Initializing https proxy context [root@localhost ~]# squid -D [root@localhost ~]# netstat -antup | grep squid tcp 0 0 0.0.0.0:3128 0.0.0.0:* LISTEN 1208/(squid) udp 0 0 127.0.0.1:39343 127.0.0.1:9395 ESTABLISHED 1208/(squid)
进行squid缓存删除测试
#客户端curl -I代理服务器查看命中情况
[root@localhost ~]# curl -I 192.168.200.100:3128/test1.png
HTTP/1.0 200 OK     #访问正常
Server: nginx/1.10.2
Date: Fri, 22 Sep 2017 12:55:15 GMT Content-Type: image/png Content-Length: 13066 Last-Modified: Fri, 22 Sep 2017 11:32:43 GMT ETag: "59c4f4db-330a" Accept-Ranges: bytes Age: 634018 Warning: 113 www.yunjisuan.com (squid/3.0.STABLE20) This cache hit is still fresh and more than 1 day old X-Cache: HIT from www.yunjisuan.com #缓存命中 Via: 1.0 www.yunjisuan.com (squid/3.0.STABLE20) Connection: close #在squid代理服务器本地删除URL的缓存 [root@localhost ~]# squidclient -m purge -p 3128 http://192.168.200.100:3128/test1.png HTTP/1.0 200 OK #删除缓存成功 Server: squid/3.0.STABLE20 Mime-Version: 1.0 Date: Fri, 29 Sep 2017 21:18:47 GMT Content-Length: 0 X-Cache: MISS from www.yunjisuan.com Via: 1.0 www.yunjisuan.com (squid/3.0.STABLE20) Connection: close #继续在客户端进行访问测试 [root@localhost ~]# curl -I 192.168.200.100:3128/test1.png HTTP/1.0 503 Service Unavailable #访问失败 Server: squid/3.0.STABLE20 Mime-Version: 1.0 Date: Fri, 29 Sep 2017 21:19:30 GMT Content-Type: text/html Content-Length: 1693 X-Squid-Error: ERR_CONNECT_FAIL 113 X-Cache: MISS from www.yunjisuan.com #未命中 Via: 1.0 www.yunjisuan.com (squid/3.0.STABLE20) Connection: close
8.3 如何对一组cache服务器清空缓存
首先需要对每台squid服务器设置一个管理地址,如这里的192.168.200.200(client),然后允许这个管理地址对squid有purge权限。
调整acl列表,允许指定IP端执行PURGE
acl AdminBoxes src 127.0.0.1 172.16.0.1 192.168.0.1 10.0.0.0/24 acl Purge method PURGE http_access allow AdminBoxes Purge #设置允许purge的来源地址 http_access deny Purge #拒绝其他主机Purge文件第9章 Squid集群做CDN全网加速(只有入职CDN公司才会用的上)
主服务器群,然后在利用Squid逆向缓存Web 80 端口来加速自己的网站。各大门户网站像163,sina,chinaitlab之类基本都是使用的这种技术,好处是大大的有。比如加速了网络和可以防黑客(因为他们见到的都是CDN的主机)
这是利用Squid逆向集群模式做的一种应用
(1)网络环境
主服务器群:
源Web服务器群:位于公网ip:220.220.220.10 port:80(后台才是WEB的服务器)
注:要保证TCP 80,UDP 3130 在防火墙上是开的(供icp_port通讯使用,多台Squid集群才会用到)
全国各地分服务器:
A服务器公网IP:124.42.61.88
B服务器公网IP:204.82.18.88
注:要保证TCP 80,UDP 3130 在防火墙上是开的(供icp_port通讯使用,多台squid集群才会用到)
(2)需要解决的问题:
全国的所有用户,无论是电信,还是网通,都能速度很好的打开网站
(3)集群实施:
- 分别在主服务器群和全国各地分服务器的三台服务器安装Squid。
- 分别配置Squid,这里只重点叙述Squid集群配置要点。
#主服务器群Squid的配置:
#让Squid监听本机IP的80端口
http_port 220.220.220.10:80 vhost vport

#多台squid通信使用 icp_port 3130 #设置源Web服务器群的ip和端口 cache_peer "内网web服务器的地址" parent 80 0 no-query originserver no-digest name=cache0 #让远程的squid连接本地Squid工作在sibling模式并指定其端口 cache_peer 220.220.220.10 sibling 80 3130 name=cache1 cache_peer 124.42.61.88 sibling 80 3130 name=cache2 #A服务器 cache_peer 204.82.18.88 sibling 80 3130 name=cache3 #B服务器 #配置本机squid允许接受访问的域名,即业务服务域名 cache_peer_domain cache0 www.yunjisuan.com #允许以下端口的代理 acl Safe_ports port 80 acl Safe_ports port 3130 #全国各地分服务器Squid的配置: A服务器: http_port 124.42.61.88:80 vhost vport icp_port 3130 #设置主服务器群服务器为源服务器 cache_peer 220.220.220.10 parent 80 0 no-query originserver no-digest name=cache0 cache_peer 124.42.61.88 sibling 80 3130 name=cache1 cache_peer 220.220.220.10 sibling 80 3130 name=cache2 cache_peer 204.82.18.88 sibling 80 3130 name=cache3 cache_peer_domain cache0 www.yunjisuan.com acl Safe_ports port 80 acl Safe_ports port 3130 B服务器: http_port 204.82.18.88:80 vhost vport icp_port 3130 cache_peer 220.220.220.10 parent 80 0 no-query originserver no-digest name=cache0 cache_peer 204.82.18.88 sibling 80 3130 name=cache1 cache_peer 220.220.220.10 sibling 80 3130 name=cache2 cache_peer 124.42.61.88 sibling 80 3130 name=cache3 cache_peer_domain cache0 www.yunjisuan.com acl Safe_ports port 80 acl Safe_ports port 3130
虽然配置好了1,但是如何让电信和网通的用户能有选择的访问两个不同镜像呢?
配置智能DNS或到https://www.dnspod.com 申请双线,电信网通的转发服务
注:下面看看cache_peer的参数
- 通过squid.conf配置文件中的cache_peer选项来配置代理服务器阵列,通过其他的选项来控制选择代理伙伴的方法。Cache_peer的使用格式如下:
cache_peer hostname type http_port icp_port- 一共有5个额选项可以配置
1,hostname:指被请求的同级子代理服务器或父代理服务器。可以用主机名或IP地址表示;
2,type:指明hostname的类型,是同级子代理服务器还是父代理服务器,也即parent(父)还是sibling(子);
3,http_port:hostname的监听端口;
4,icp_port:hostname上的ICP监听端口,对于不支持ICP协议的可指定7;
5,options:可以包含一个或多个关键字- Options可能的关键字有:
1,proxy-only:指明从peer得到的数据在本地不进行缓存,缺省地,squid是要缓存这部分数据的;
2,weight=n:用于你有多个peer的情况,这时如果多于一个以上的peer拥有你请求的数据时,squid通过计算每个peer的ICP响应时间来决定其weight的值,然后squid向其中拥有最大weight的peer发出ICP请求。也即weight值越大,其优先级越高。当然你也可以手工指定其weight值。
3,no-query:不向该peer发送ICP请求。如果该peer不可用时,可以使用该选项;
4,Default:有点像路由表中的缺省路由,该peer将被用作最后的尝试手段。当你只有一个父代理服务器并且其不支持ICP协议时,可以使用default和no-query选项让所有请求都发送到该父代理服务器;
5,login=user:password:当你的父代理服务器要求用户认证时可以使用该选项来进行认证。


 1663
1663


 被折叠的 条评论
为什么被折叠?
被折叠的 条评论
为什么被折叠?
 到【灌水乐园】发言


