


一、首先安装Nginx:
- # yum -y install pcre-devel
- # groupadd -r nginx
- # useradd -r -g nginx -s /sbin/nologin -M nginx
- # tar xf nginx-1.2.3.tar.gz
- # cd nginx-1.2.3
- # ./configure \
- --prefix=/usr \
- --sbin-path=/usr/sbin/nginx \
- --conf-path=/etc/nginx/nginx.conf \
- --error-log-path=/var/log/nginx/error.log \
- --http-log-path=/var/log/nginx/access.log \
- --pid-path=/var/run/nginx/nginx.pid \
- --lock-path=/var/lock/nginx.lock \
- --user=nginx \
- --group=nginx \
- --with-http_ssl_module \
- --with-http_flv_module \
- --with-http_stub_status_module \
- --with-http_gzip_static_module \
- --http-client-body-temp-path=/var/tmp/nginx/client/ \
- --http-proxy-temp-path=/var/tmp/nginx/proxy/ \
- --http-fastcgi-temp-path=/var/tmp/nginx/fcgi/ \
- --http-uwsgi-temp-path=/var/tmp/nginx/uwsgi \
- --http-scgi-temp-path=/var/tmp/nginx/scgi \
- --with-pcre
- # make && make install
新建文件/etc/rc.d/init.d/nginx,内容如下:
- #!/bin/sh
- #
- # nginx - this script starts and stops the nginx daemon
- #
- # chkconfig: - 85 15
- # description: Nginx is an HTTP(S) server, HTTP(S) reverse \
- # proxy and IMAP/POP3 proxy server
- # processname: nginx
- # config: /etc/nginx/nginx.conf
- # config: /etc/sysconfig/nginx
- # pidfile: /var/run/nginx.pid
- # Source function library.
- . /etc/rc.d/init.d/functions
- # Source networking configuration.
- . /etc/sysconfig/network
- # Check that networking is up.
- [ "$NETWORKING" = "no" ] && exit 0
- nginx="/usr/sbin/nginx"
- prog=$(basename $nginx)
- NGINX_CONF_FILE="/etc/nginx/nginx.conf"
- [ -f /etc/sysconfig/nginx ] && . /etc/sysconfig/nginx
- lockfile=/var/lock/subsys/nginx
- make_dirs() {
- # make required directories
- user=`nginx -V 2>&1 | grep "configure arguments:" | sed 's/[^*]*--user=\([^ ]*\).*/\1/g' -`
- options=`$nginx -V 2>&1 | grep 'configure arguments:'`
- for opt in $options; do
- if [ `echo $opt | grep '.*-temp-path'` ]; then
- value=`echo $opt | cut -d "=" -f 2`
- if [ ! -d "$value" ]; then
- # echo "creating" $value
- mkdir -p $value && chown -R $user $value
- fi
- fi
- done
- }
- start() {
- [ -x $nginx ] || exit 5
- [ -f $NGINX_CONF_FILE ] || exit 6
- make_dirs
- echo -n $"Starting $prog: "
- daemon $nginx -c $NGINX_CONF_FILE
- retval=$?
- echo
- [ $retval -eq 0 ] && touch $lockfile
- return $retval
- }
- stop() {
- echo -n $"Stopping $prog: "
- killproc $prog -QUIT
- retval=$?
- echo
- [ $retval -eq 0 ] && rm -f $lockfile
- return $retval
- }
- restart() {
- configtest || return $?
- stop
- sleep 1
- start
- }
- reload() {
- configtest || return $?
- echo -n $"Reloading $prog: "
- killproc $nginx -HUP
- RETVAL=$?
- echo
- }
- force_reload() {
- restart
- }
- configtest() {
- $nginx -t -c $NGINX_CONF_FILE
- }
- rh_status() {
- status $prog
- }
- rh_status_q() {
- rh_status >/dev/null 2>&1
- }
- case "$1" in
- start)
- rh_status_q && exit 0
- $1
- ;;
- stop)
- rh_status_q || exit 0
- $1
- ;;
- restart|configtest)
- $1
- ;;
- reload)
- rh_status_q || exit 7
- $1
- ;;
- force-reload)
- force_reload
- ;;
- status)
- rh_status
- ;;
- condrestart|try-restart)
- rh_status_q || exit 0
- ;;
- *)
- echo $"Usage: $0 {start|stop|status|restart|condrestart|try-restart|reload|force-reload|configtest}"
- exit 2
- esac
而后为此脚本赋予执行权限:
# chmod +x /etc/rc.d/init.d/nginx
添加至服务管理列表,并让其开机自动启动:
# chkconfig --add nginx
# chkconfig nginx on
而后就可以启动服务并测试了:
# service nginx start
二、URL重写:
格式如下
rewrite <源匹配类型> <替换后的地址> <标识>
例:rewrite /p_w_picpaths/(.*\.jpg) http://192.168.80.146/p_w_picpaths/$1 permanent;
将访问本机的任何以.jpg结尾的都永久重定向到http://192.168.80.146/p_w_picpaths/下的.jpg去
标识有以下四种:
last —— 持续标识,替换后的规则在继续匹配,拿更改后的地址重新去匹配,会产生死循环
例:location /p_w_picpath/ {
rewrite /p_w_picpaths/.*\.jpg http://192.168.80.143/p_w_picpaths/a.jpg last;
}
这样就残生死循环了,所以在定义的时候要避免重复
break —— 结束标识,表示到此为止,不再继续匹配
redirect —— 临时重定向标识,http协议代码为302
permanent —— 永久重定向标识,http协议代码为301
例:在192.168.80.146上定义重写如下
location / {
rewrite ^/forum/(test.html)$ http://192.168.80.143/bbs/$1 permanent;
}
# server nginx restart
并在192.168.80.143上建立/var/www/html/bbs/test.html文件
在浏览器中输入http://192.168.80.146/forum/test.html 访问看看:
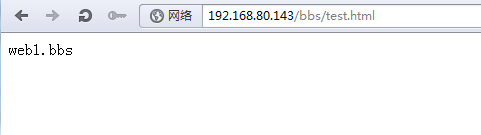
可以看到自动重写为http://192.168.80.143/bbs/test.html
这里重定向也可以使用if指令:
语法: if (condition) { ... }
应用环境: server, location
条件:
1、变量名; false values are: empty string ("", or any string starting with "0";)
2、对于变量进行的比较表达式,可使用=或!=进行测试;
3、正则表达式的模式匹配:
~ 区分大小的模式匹配
~* 不区分字母大小写的模式匹配
!~ 和 !~* 分别对上面的两种测试取反
4、测试文件是否存在-f或!-f
5、测试目录是否存在-d或!-d
6、测试目录、文件或链接文件的存在性-e或!-e
7、检查一个文件的执行权限-x或!-x
例:如果用户请求的页面不存在,实现自定义跳转:
if (!-f $request_filename) {
rewrite ^(/.*)$ /rewrite.html permanent;
}
三、配置反向代理缓存:
nginx : 192.168.80.146
web1:192.168.80.143
web1配置:
- # yum -y install httpd
- # echo "web1" > /var/www/html/index.html
- # service httpd start
nginx配置:
- # egrep -v "^$|#" /etc/nginx/nginx.conf
- worker_processes 1;
- events {
- worker_connections 1024;
- }
- http {
- include mime.types;
- default_type application/octet-stream;
- proxy_cache_path /var/www/cache levels=1:2 keys_zone=mycache:20m max_size=2048m inactive=60m; //指定缓存目录/var/www/cache,levels定义缓存级别,缓存名字mycache,最大缓存2048M,非活动时间
- proxy_temp_path /var/www/cache/tmp; //临时缓存目录
- sendfile on;
- keepalive_timeout 65;
- server {
- listen 80;
- server_name localhost;
- location / {
- proxy_pass http://192.168.80.143; //指定web服务器
- proxy_cache mycache; //指定前面定义的缓存名字
- proxy_cache_valid 200 302 60m; //定义http协议200,302 的缓存60min
- proxy_cache_valid 404 1m; //http协议404缓存1min
- }
- error_page 500 502 503 504 /50x.html;
- location = /50x.html {
- root html;
- }
- }
- }
- # mkdir -p /var/www/cache
- # service nginx restart
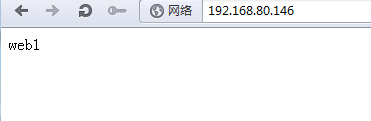
配置好了以后先访问先80.146看到是默认nginx的页面:

之后我们启动服务开始代理,在访问80.146看到的后端web1的页面:
四、nginx负载均衡:
nginx:192.168.80.146
web1:192.168.80.143
web2:192.168.80.144(web2同web1即可)
- # egrep -v "^$|#" /etc/nginx/nginx.conf
- worker_processes 1;
- events {
- worker_connections 1024;
- }
- http {
- include mime.types;
- default_type application/octet-stream;
- upstream peace { //名字为peace
- server 192.168.80.143 weight=1; //定义节点信息,weight指定权重
- server 192.168.80.144 weight=2;
- }
- sendfile on;
- keepalive_timeout 65;
- server {
- listen 80;
- server_name localhost;
- location / {
- proxy_pass http://peace; //引用peace的负载均衡
- }
- error_page 500 502 503 504 /50x.html;
- location = /50x.html {
- root html;
- }
- }
- }
- # service nginx restart
下面访问下nginx可以看到有轮询
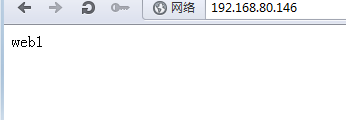
但是这里有个问题就是没有状态检查,有错误时还照样轮询,所以这里使用第三方来做健康监测
五、nginx 负载均衡+ 第三方模块,健康状态检测
开始打算用cep21-healthcheck_nginx_upstreams-16d6ae7.zip来做的,但是发现有版本错误,在网上找了篇文章,http://www.myhack58.com/Article/sort099/sort0102/2012/34260.htm 可以再1.2.1以上使用了,结合了healthcheck_nginx_upstreams的来做
https://github.com/yaoweibin/nginx_upstream_check_module 下载软件
需要打补丁,并且重新编译
- # unzip yaoweibin-nginx_upstream_check_module-v0.1.6-17-gdfee401.zip
- # cd nginx-1.2.3
- # patch -p1 < /root/yaoweibin-nginx_upstream_check_module-dfee401/check_1.2.1+.patch
- (如果nginx版本不是1.2.1以上的,用patch -p1 < /usr/local/yaoweibin-nginx_upstream_check_module-dfee401/check.patch打补丁)
- # ./configure \
- --prefix=/usr \
- --sbin-path=/usr/sbin/nginx \
- --conf-path=/etc/nginx/nginx.conf \
- --error-log-path=/var/log/nginx/error.log \
- --http-log-path=/var/log/nginx/access.log \
- --pid-path=/var/run/nginx/nginx.pid \
- --lock-path=/var/lock/nginx.lock \
- --user=nginx \
- --group=nginx \
- --with-http_ssl_module \
- --with-http_flv_module \
- --with-http_stub_status_module \
- --with-http_gzip_static_module \
- --http-client-body-temp-path=/var/tmp/nginx/client/ \
- --http-proxy-temp-path=/var/tmp/nginx/proxy/ \
- --http-fastcgi-temp-path=/var/tmp/nginx/fcgi/ \
- --with-pcre \
- --add-module=/root/yaoweibin-nginx_upstream_check_module-dfee401/
- # make && make install
修改配置文件:
- # egrep -v "^$|#" /etc/nginx/nginx.conf
- worker_processes 1;
- events {
- worker_connections 1024;
- }
- http {
- include mime.types;
- default_type application/octet-stream;
- upstream peace {
- server 192.168.80.143 weight=1; //指定节点web1
- server 192.168.80.144 weight=2; //指定节点web2
- check interval=1000 rise=2 fall=2 timeout=1000; //interval检测间隔时间,rsie请求2次正常的话为up,fail请求2次失败的话为down,timeout检查超时时间(毫秒)
- check_http_send "GET /.test.html HTTP/1.0"; //所发送的检测请求
- }
- sendfile on;
- keepalive_timeout 65;
- server {
- listen 80;
- server_name localhost;
- location / {
- proxy_pass http://peace; //引用
- }
- location /status { //定义一个类似stub_status的方式输出检测信息
- check_status;
- }
- error_page 500 502 503 504 /50x.html;
- location = /50x.html {
- root html;
- }
- }
- }
- # service nginx restart
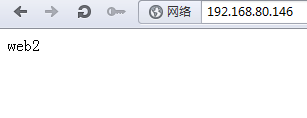
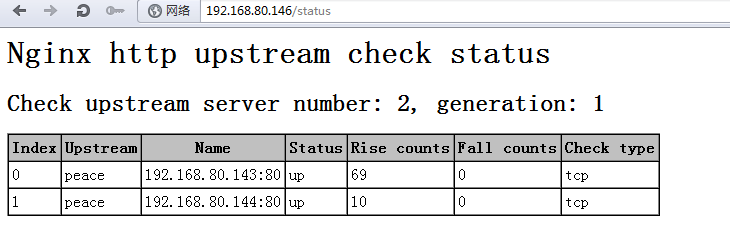
下面访问下192.168.80.146/status可以看到两台都up,并且页面正常:
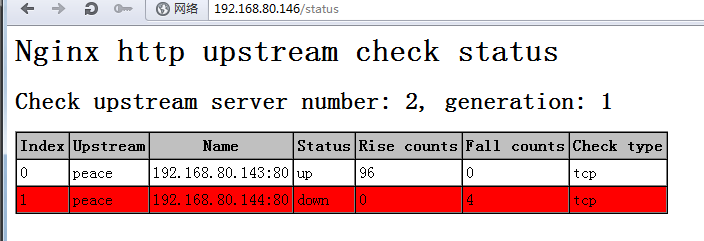
之后关闭一台web2,可以看到已经down,并且访问都是web1工作:
至此Nginx的相关扩展就结束了,如有错误请指出,非常感谢!
转载于:https://blog.51cto.com/peaceweb/958928


 319
319


 被折叠的 条评论
为什么被折叠?
被折叠的 条评论
为什么被折叠?
 到【灌水乐园】发言


