


转载请注明本文出自大苞米的博客(http://blog.csdn.net/a396901990),谢谢支持!
开篇废话:
这个项目准备分四部分介绍:
一:创建可旋转的“3D球”:3D语音天气球(源代码分享)——创建可旋转的3D球
二:通过天气服务,从网络获取时实天气信息并动态生成“3D球”:3D语音天气球(源代码分享)——通过天气服务动态创建3D球
三:Android语音服务和Unity的消息传递:3D语音天气球(源代码分享)——在Unity中使用Android语音服务
四:Unity3D端和Android端的结合:3D语音天气球(源代码分享)——完结篇
关于项目的具体介绍和3D球的创建请看上面第一篇文章(重要)
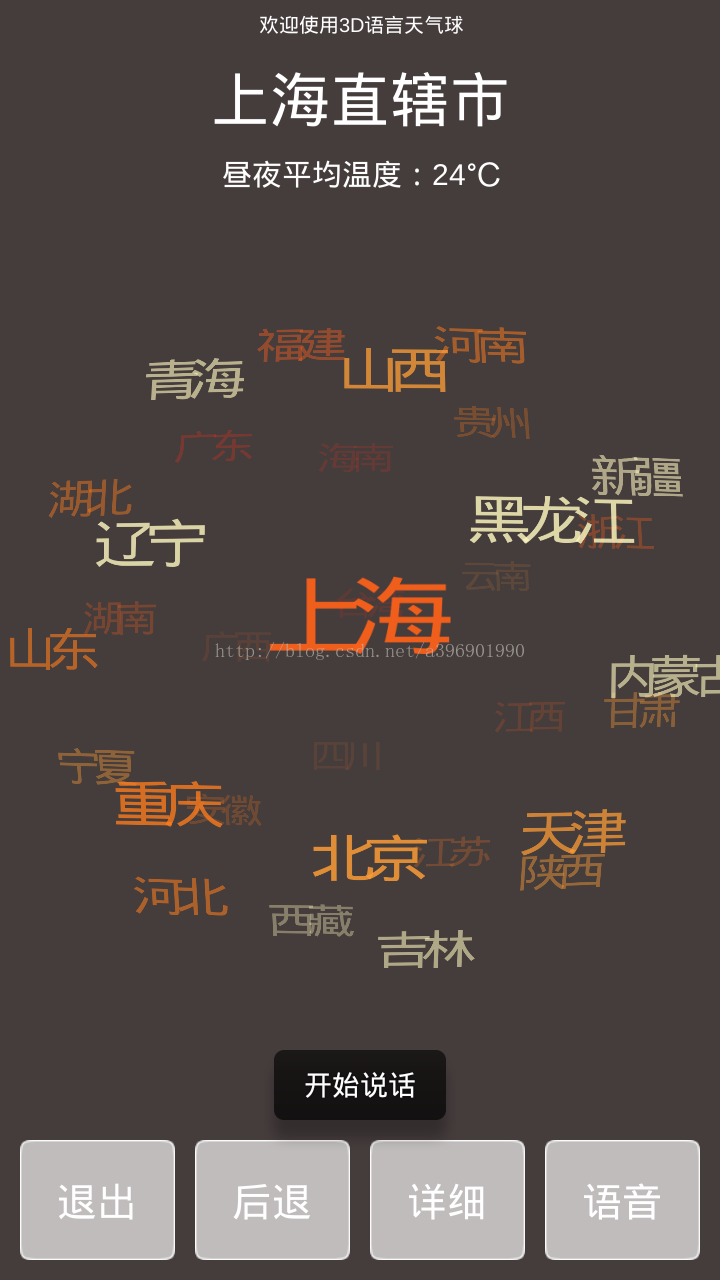
今天主要解说怎样通过获取实时的天气信息去动态的创建3D球。效果图例如以下:
左边是Unity做出后在电脑上执行效果图(本节须要实现的效果)
右边是Unity结合Android和语音控制之后在手机执行的效果图(全部都介绍完后的终于效果):

天气服务:
我们须要通过站点提供的天气服务来获取实时的城市天气信息。
网上能够搜到非常多这类的天气服务,基本都是通过传入固定的城市ID返回天气信息,这些天气信息的格式一般都是json或xml,解析之后就能够使用了。
我对照网上好多的天气服务,以下两个是比較好用的,免费不用注冊不用申请。直接浏览器打上就能够用:
简略天气:http://www.weather.com.cn/data/cityinfo/101010100.html
具体天气:http://weather.51wnl.com/weatherinfo/GetMoreWeather?
cityCode=101010100&weatherType=0
最后面的101010100就是北京的编号。城市的天气编号大家能够上网查(demo里也有),返回的结果分别例如以下:
{"weatherinfo":{"city":"天津","cityid":"101030100","temp1":"-6℃","temp2":"4℃","weather":"晴","img1":"n0.gif","img2":"d0.gif","ptime":"18:00"}}{"weatherinfo":{"city":"北京","city_en":"beijing","date_y":"2014年12月16日","date":"十月廿五","week":"星期二","fchh":"18","cityid":"101010100","temp1":"-6℃~5℃","temp2":"-7℃~4℃","temp3":"-5℃~3℃","temp4":"-5℃~1℃","temp5":"-7℃~3℃","temp6":"-6℃~5℃","tempF1":"21.2℉~41℉","tempF2":"19.4℉~39.2℉","tempF3":"23℉~37.4℉","tempF4":"23℉~33.8℉","tempF5":"19.4℉~37.4℉","tempF6":"21.2℉~41℉","weather1":"晴","weather2":"晴转多云","weather3":"多云","weather4":"晴","weather5":"晴","weather6":"晴","img1":"0","img2":"99","img3":"0","img4":"1","img5":"1","img6":"99","img7":"0","img8":"99","img9":"0","img10":"99","img11":"0","img12":"99","img_single":"0","img_title1":"晴","img_title2":"晴","img_title3":"晴","img_title4":"多云","img_title5":"多云","img_title6":"多云","img_title7":"晴","img_title8":"晴","img_title9":"晴","img_title10":"晴","img_title11":"晴","img_title12":"晴","img_title_single":"晴","wind1":"北风3-4级转微风","wind2":"微风","wind3":"微风转北风4-5级","wind4":"北风3-4级","wind5":"微风","wind6":"微风","fx1":"北风","fx2":"微风","fl1":"3-4级转小于3级","fl2":"小于3级","fl3":"小于3级转4-5级","fl4":"3-4级","fl5":"小于3级","fl6":"小于3级","index":"较冷","index_d":"建议着厚外套加毛衣等服装。年老体弱者宜着大衣、呢外套加羊毛衫。","index48":"","index48_d":"","index_uv":"中等","index48_uv":"","index_xc":"较适宜","index_tr":"适宜","index_co":"较舒适","st1":"4","st2":"-6","st3":"4","st4":"-5","st5":"3","st6":"-4","index_cl":"适宜","index_ls":"基本适宜","index_ag":"极不易发"}}
解析数据:
相信解析Json大家都不陌生,本例中的Json解析使用的是LitJson插件,下载LitJson插件放入Unity中并在使用时导包就可以。
以下
仅仅简单贴出本例的解析方法,具体用法网上教程非常多这里就不细说了。
简略天气:http://www.weather.com.cn/data/cityinfo/101010100.html
	public void parseJson(string result)
	{
		JsonData jd = JsonMapper.ToObject(result);
		JsonData jdResult = jd["weatherinfo"];

		this.name = (string)jdResult["city"];
		this.temperature = (string)jdResult["temp1"];
		this.temperature2 = (string)jdResult["temp2"];
		setTempture (temperature, temperature2);
		this.weather = (string)jdResult ["weather"];
		this.img1 = (string)jdResult ["img1"];
		this.img2 = (string)jdResult ["img2"];
	}
具体天气:http://weather.51wnl.com/weatherinfo/GetMoreWeather?cityCode=
101010100
&weatherType=0
	public void parseJson(string result)
	{
		JsonData jd = JsonMapper.ToObject(result);
		JsonData jdResult = jd["weatherinfo"];

		this.name = (string)jdResult["city"];
		this.date_y = (string)jdResult["date_y"];
		this.date = (string)jdResult["date"];
		this.week = (string)jdResult["week"];
		this.temperature = (string)jdResult["temp1"];
		this.weather = (string)jdResult ["weather1"];
		this.wind = (string)jdResult ["wind1"];
		this.fl = (string)jdResult ["fl1"];
		this.index = (string)jdResult ["index"];
		this.index_uv = (string)jdResult ["index_uv"];
		this.index_xc = (string)jdResult ["index_xc"];
		this.index_tr = (string)jdResult ["index_tr"];
		this.index_co = (string)jdResult ["index_co"];
		this.index_cl = (string)jdResult ["index_cl"];
		this.index_ls = (string)jdResult ["index_ls"];
		this.index_ag = (string)jdResult ["index_ag"];
	}
动态生成天气球:
眼下已经知道怎样从网上获取实时天气服务并解析。
如今能够依据它来动态生成我们的3D球了。
Unity.StartCoroutine:
因为涉及到网络。所以首先想到的就是使用线程来生成每一个小球。在Unity中能够使用StartCoroutine(协程)来实现:
在Unity3D中。使用StartCoroutine(string methodName)和StartCoroutine(IEnumerator routine)都能够开启一个线程。差别在于使用字符串作为參数能够开启线程并在线程结束前终止线程。相反使用IEnumerator 作为參数仅仅能等待线程的结束而不能随时终止(除非使用StopAllCoroutines()方法);另外使用字符串作为參数时。开启线程时最多仅仅能传递一个參数。而且性能消耗会更大一点,而使用IEnumerator 作为參数则没有这个限制。
主要代码:
以下的代码是以上篇文章为基础。
上篇文章已经具体介绍了怎样在大球中生成平均分布的小球。接下来的任务就是为生成的小球gameobject设置各种属性:
	// 获取天气信息
	public void getWeather(City city, GameObject text)
	{
		// 依据城市id得到获取天气服务的url
		string url = "http://www.weather.com.cn/data/cityinfo/" + city.getCityID() +".html";
		// 通过url来给小球赋值
		StartCoroutine(GET(url,city,text));
} IEnumerator GET(string url, City city, GameObject text)
{
WWW www = new WWW (url);
yield return www;
//GET请求失败
if (www.error != null)
{
Debug.Log ("error is :" + www.error);
}
//GET请求成功
else
{
//Debug.Log(www.text);
// 解析天气信息,给对象赋值
city.parseJson (www.text);
// 依据当前city对象中的属性给小球复制
TextMesh tm = (TextMesh)text.GetComponent<TextMesh> ();
ChangeColor changeColor = text.GetComponent<ChangeColor>();
// 推断当前对象是城市还是省份来分别赋值
if (isCity) {
tm.text = city.getName ();
changeColor.name = city.getName();
changeColor.id = city.getCityID();
changeColor.tempture = city.getTempture();
}
else
{
tm.text = city.getProName();
changeColor.name = city.getProName();
changeColor.tempture = city.getTempture();
}
// 设置当前颜色
tm.color = city.getWeatherColor();
// 依据城市和省份的不同来推断是否设置图片
foreach (Transform child in text.transform) {
if (isCity) {
if (child.tag == "pic1") {
//Debug.Log(getPicPath(city.getImg1()));
Texture2D pic = (Texture2D)Resources.Load(Util.getPicPath(city.getImg1()));
child.renderer.material.shader = Shader.Find ("Unlit/Transparent");
child.renderer.material.mainTexture = (Texture)pic;
}
else if (child.tag == "pic2")
{
//Debug.Log(getPicPath(city.getImg2()));
Texture2D pic = (Texture2D)Resources.Load(Util.getPicPath(city.getImg2()));
child.renderer.material.shader = Shader.Find ("Unlit/Transparent");
child.renderer.material.mainTexture = (Texture)pic;
}
else
{
TextMesh tm2 = (TextMesh)child.GetComponent<TextMesh> ();
tm2.text = city.getDetailsName ();
tm2.color = city.getWeatherColor();
}
}
else
{
child.active = false;
}
}
// 设置小球大小
text.transform.localScale = city.getSize();
text.GetComponent<ChangeColor>().oldScale = text.transform.localScale;
}
}
最后:
本节介绍的内容不多。但更新的代码不少,已经能够单独作为一个Unity项目使用了。
没有具体介绍的原因主要是写的比較搓,由于为了高速完毕功能所以逻辑比較混乱,用法和代码风格也不知道对不正确所以就没贴出来。
大家假设有兴趣的话能够下载下来看看:
剩余的内容仅仅剩下Android语音搜索,和Android、Unity相互结合。我会尽快更新,敬请期待。
。。


 858
858

 被折叠的 条评论
为什么被折叠?
被折叠的 条评论
为什么被折叠?
 到【灌水乐园】发言


