


本篇教程为第一篇,仅实现在一个UIView的子控件上绘制纯文本。
Github地址:https://github.com/JlongTian/JLCoreTextOne
学习CoreText需要有一些基础知识储备,关于字符和字形的知识请点击这里以及这里。另外还需要对NSAttributedString有一些了解,CoreText对文本和图片的绘制就是依赖于NSAttributedString属性字符串的。
说下CoreText的绘制过程,先上一张图片:
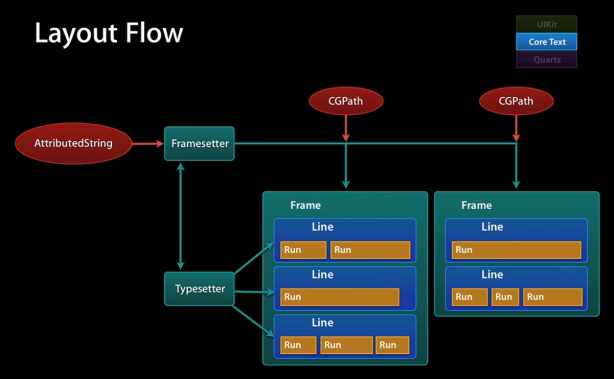
整个流程大概是:获取上下文-》翻转坐标系-》创建NSAttributedString-》根据NSAttributedString创建CTFramesetterRef-》创建绘制区域CGPathRef-》根据CTFramesetterRef和CGPathRef创建CTFrame-》CTFrameDraw绘制。
上图大概显示了后半部分的结构。 CTFrame是指整个该UIView子控件的绘制区域,CTLine则是指每一行,CTRun则是每一段具有一样属性的字符串。比如某段字体大小、颜色都一致的字符串为一个CTRun,CTRun不可以跨行,不管属性一致或不一致。通常的结构是每一个CTFrame有多个CTLine,每一个CTLine有多个CTRun。
本次纯文本实现的效果图如下:
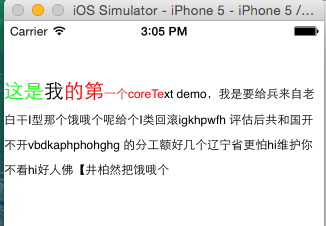
控制器的代码处理很简单,UIView子控件的drawRect的代码如下:
-(void)drawRect:(CGRect)rect{

    [super drawRect:rect];

    // 1.获取上下文
    CGContextRef contextRef = UIGraphicsGetCurrentContext();

    // [a,b,c,d,tx,ty]
    NSLog(@"转换前的坐标:%@",NSStringFromCGAffineTransform(CGContextGetCTM(contextRef)));

    // 2.转换坐标系,CoreText的原点在左下角,UIKit原点在左上角
    CGContextSetTextMatrix(contextRef, CGAffineTransformIdentity);

    // 这两种转换坐标的方式效果一样
    // 2.1
    // CGContextTranslateCTM(contextRef, 0, self.bounds.size.height);
    // CGContextScaleCTM(contextRef, 1.0, -1.0);

    // 2.2
    CGContextConcatCTM(contextRef, CGAffineTransformMake(1, 0, 0, -1, 0, self.bounds.size.height));

    NSLog(@"转换后的坐标:%@",NSStringFromCGAffineTransform(CGContextGetCTM(contextRef)));


    // 3.创建绘制区域,可以对path进行个性化裁剪以改变显示区域
    CGMutablePathRef path = CGPathCreateMutable();
    CGPathAddRect(path, NULL, self.bounds);
    // CGPathAddEllipseInRect(path, NULL, self.bounds);

    // 4.创建需要绘制的文字
    NSMutableAttributedString *attributed = [[NSMutableAttributedString alloc] initWithString:@"这是我的第一个coreText demo,我是要给兵来自老白干I型那个饿哦个呢给个I类回滚yes we can 评估后共和国开不开vbdkaphphohghg 的分工额好几个辽宁省更怕hi维护你不看hi好人佛【井柏然把饿哦个"];

    [attributed addAttribute:NSFontAttributeName value:[UIFont systemFontOfSize:20] range:NSMakeRange(0, 5)];

    // 两种方式皆可
    [attributed addAttribute:NSForegroundColorAttributeName value:[UIColor redColor] range:NSMakeRange(3, 10)];
    [attributed addAttribute:(id)kCTForegroundColorAttributeName value:[UIColor greenColor] range:NSMakeRange(0, 2)];

    // 设置行距等样式
    CGFloat lineSpace = 10; // 行距一般取决于这个值
    CGFloat lineSpaceMax = 20;
    CGFloat lineSpaceMin = 2;
    const CFIndex kNumberOfSettings = 3;

    // 结构体数组
    CTParagraphStyleSetting theSettings[kNumberOfSettings] = {

        {kCTParagraphStyleSpecifierLineSpacingAdjustment,sizeof(CGFloat),&lineSpace},
        {kCTParagraphStyleSpecifierMaximumLineSpacing,sizeof(CGFloat),&lineSpaceMax},
        {kCTParagraphStyleSpecifierMinimumLineSpacing,sizeof(CGFloat),&lineSpaceMin}

    };
    CTParagraphStyleRef theParagraphRef = CTParagraphStyleCreate(theSettings, kNumberOfSettings);

    // 单个元素的形式
    // CTParagraphStyleSetting theSettings = {kCTParagraphStyleSpecifierLineSpacingAdjustment,sizeof(CGFloat),&lineSpace};
    // CTParagraphStyleRef theParagraphRef = CTParagraphStyleCreate(&theSettings, kNumberOfSettings);

    // 两种方式皆可
    // [attributed addAttribute:(id)kCTParagraphStyleAttributeName value:(__bridge id)theParagraphRef range:NSMakeRange(0, attributed.length)];

    // 将设置的行距应用于整段文字
    [attributed addAttribute:NSParagraphStyleAttributeName value:(__bridge id)(theParagraphRef) range:NSMakeRange(0, attributed.length)];

    CFRelease(theParagraphRef);

    //设置字间距
    long number = 2.0;
    CFNumberRef num = CFNumberCreate(kCFAllocatorDefault,kCFNumberSInt8Type,&number);
    [attributed addAttribute:(id)kCTKernAttributeName value:(__bridge id)num range:NSMakeRange(0,[attributed length])];

    CFRelease(num);


    // 5.根据NSAttributedString生成CTFramesetterRef
    CTFramesetterRef framesetter = CTFramesetterCreateWithAttributedString((CFAttributedStringRef)attributed);

    CTFrameRef ctFrame = CTFramesetterCreateFrame(framesetter, CFRangeMake(0, attributed.length), path, NULL);

    // 6.绘制除图片以外的部分
    CTFrameDraw(ctFrame, contextRef);


    // 7.内存管理,ARC不能管理CF开头的对象,需要我们自己手动释放内存
    CFRelease(path);
    CFRelease(framesetter);
    CFRelease(ctFrame);

}
在整个绘制过程中,NSMutableAttributedString是最重要的,给字符串设定不同的字体大小,颜色,乃至行距都是靠它,包括后面用空白占位符来给图片占位,也依然是依赖该字符串。


 795
795

 被折叠的 条评论
为什么被折叠?
被折叠的 条评论
为什么被折叠?
 到【灌水乐园】发言


