


ParisGabriel
每天坚持手写 一天一篇 决定坚持几年 为了梦想为了信仰
 开局一张图
开局一张图
存储引擎(处理表的处理器)
基本操作:
查看所有存储引擎
show engines;
查看已有
表的存储
引擎
show create table 表名;
创建表指定引擎:
create table 表名()engine=myisam;
已有表
添加引擎:
alter table 表名 engine=innodb;
MySQL锁:(自动加锁)
目的:
解决客户端并发访问的冲突问题
锁分类:
类型:
1.
读锁(
共享锁)
select :加读锁后别人
不能更改表记录,但
可以查询
2.
写锁(
互次锁、排他锁)
insert、delete、update :加写锁后别人
不能查也不能改
锁粒度:
1.表级锁:
myisam
1.行级锁:
innodb
常用的存储引擎特点
InnoDB特点:
1.共享表空间
表名
.frm:表结构和索引文件
表名
.idb:表记录、
支持
行
级锁
支持
外键
、
事物
操作
Myisam特点:
独享表空间
表名
.frm:表结构
表名
.myd:表记录mydata
表名
.myi:索引文件 myindex
支持
表级锁
如何决定使用哪个存储引擎?
执行
查询操作
多的表
用MyISAM(使用
InoDB浪费资源)
执行
写操作
多的表
用InnoDB
MySQL调优:
1.选择合适的存储引擎
读操作多:MyISAM
写操作多:InnoDB
2.创建索引
在select、where、order by 经常涉及到的字段建立索引
3.SQL语句优化
1).
where子句
中尽量不使用
!= 否则放弃索引
全表扫描
2).尽量避免
NULL 值判断 否则放弃索引
全表扫描
优化前:
select number from t1 where number isnull;
优化后:
在number列上
设置默认值0,
确保number列
无NULL值
select number from t1 where number=0;
3).尽量避免
or 连接条件,否则放弃索引
全表扫描
优化前:
select id from t1 where id=0 or id=20;
优化后:
select id from t1 where id=10
union all
select id from t1 where id=20
union all
select id from t1 where id=30;
union all:
将查询结果连接起来
4).模糊查询尽量避免使用
前置%,否者
全表扫描
select name from t1 where name like “%c%”;
5).尽量避免使用
in 和 not in 否则
全表扫描
优化前:
select id from t1 where id in(1,2,3,4);
优化后:
select id from t1 where id between 1 and 4;
6).尽量避免使用
*
不要返回任何用不到的字段
事物和事物回滚
定义:一件事从
开始发生到结束的整个
过程
作用:
确保数据的一致性
事物和事物回滚应用
MySQL中SQL命令
会自动commit到数据库
show variables like“autocommit”
事物应用:
开始事物
begin;此时autocommit被禁用
提交事物:
commit;
终止事物
rollback;
与python交互:
交互类型
python3:
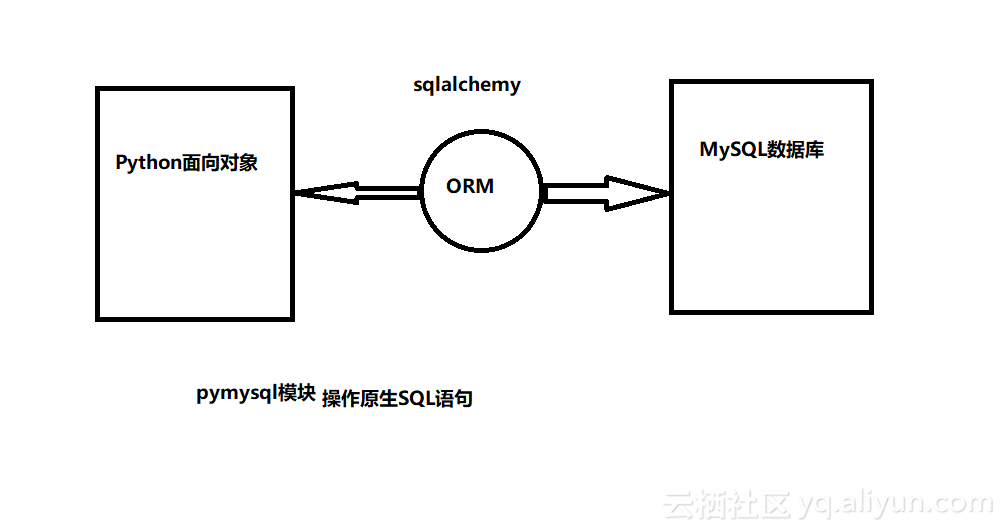
pymysql 模块
安装:
在线:sudo pip3 install pymysql
离线:pymysql-0.7.11.tar.gz
tar -zxvf pymysql-0.7.11.tar.gz
cd pymysql-0.7.11
sudo python3 setup.py install
python2: 模块:MySQLdb
安装:sudo pip install mysql-python
pymysql使用流程:
1.建立
数据库链接:(db =
pymysql.connect(....))
2.
创建游标对象:(c = db.
cursor())
3.
游标方法:(c.
execute(“insert .....”))
4.
提交到数据库:db.
commit()
5.
关闭游标对象:c.
close()
6.
断开数据库链接:db.close()
connect对象:
db = pymysql.connect(
参数列表)
1.
host:主机地址,本地 localhost
2.
port:端口,默认3306,8080(可省略)
3.
user:用户名
4.
password:密码
5.
database:库
6.
charset:编码方式,推荐使用utf8
数据库
链接对象(
db)
的方法:
1.
db.close() 关闭链接
2.
db.commit()提交到数据库
3.
db.rollback()回滚
4.
cur = db.cursor()返回游标对象,用于
执行具体
SQL命令
游标对象(
cur)
的方法:
1.
cur.
execute(SQL命令,[列表])
执行SQL命令
2.cur.
close()
关闭游标对象
3.cur.
fetchone()
获取查询结果的
第一条数据
4.cur.
fetchmany(n)
获取n条记录
5.cur.
fetchall()
获取所有记录
示例:
增、删、改、查、参数化
# frist.py
import pymysql

# 创建数据库对象
db = pymysql.connect(host="localhost", user="root",
                     password="123456", database="db4",
                     charset="utf8")
# 利用db方法创建游标对象
cur = db.cursor()

# 利用游标对象的execute()方法执行SQL命令
cur.execute("insert into sheng values\
             (16,300000,'台湾省');")
# 提交到数据库
db.commit()
# 关闭游标对象
cur.close()
# 断开数据库链接
db.close()


# 增 删 改

import pymysql
# 创建数据库链接
# 链接到db4库
db = pymysql.connect(host="localhost", user="root",
                     password="123456", database="db4",
                     charset="utf8")

# 创建游标
cur = db.cursor()
try:
    # 添加记录
    cur.execute("insert into sheng values (17,168800,'浙江');")
    # 修改记录
    cur.execute("update sheng set id=666 where id=17;")
    # 删除记录
    cur.execute("delete from sheng where s_name='浙江';")
# 截获EXception类型错误
except Exception as e:
    # 出现异常后回滚
    db.rollback()
    # 输出错误
    print("Error ", e)
else:
    # 提交数据
    db.commit()


# 关闭游标
cur.close()
# 断开数据库链接
db.close()


# 查询

import pymysql
# 创建数据库链接
db = pymysql.connect(host="localhost", user="root",
                     password="123456", database="db4",
                     charset="utf8")
# 创建游标
cur = db.cursor()
try:
    # 查找
    cur.execute("select * from sheng;")
    # 取出一条记录就少一条
    print("***************************")
    data1 = cur.fetchone()
    print(data1)
    print("***************************")
    data2 = cur.fetchmany(3)
    for i in data2:
        print(i)
    print("***************************")
    # 遍历取出数据
    data3 = cur.fetchall()
    for x in data3:
        print(x)
    # 提交数据
    db.commit()

except Exception as e:
    db.rollback()
    print("Error ", e)

# 关闭游标
cur.close()
# 断开数据库链接
db.close()


# 参数化

import pymysql
# 创建数据库链接
db = pymysql.connect(host="localhost", user="root",
                     password="123456", database="db4",
                     charset="utf8")
# 创建游标
cur = db.cursor()
try:
    s_id = input("请输入省的编号")
    s_name = input("请输入省的名字")
    # 用占位符参数化数据
    sql_insert = "insert into sheng(s_id,s_name) values(%s,%s)"
    # execute方法 传参必须是列表
    cur.execute(sql_insert, [s_id, s_name])

    # 提交数据
    db.commit()

except Exception as e:
    db.rollback()
    print("Error ", e)

# 关闭游标
cur.close()
# 断开数据库链接
db.close()
封装类
# mysqlpython.py

# 导入mysql模块
from pymysql import *


class MysqlPython:
    def __init__(self, database,  # 库
                 host="127.0.0.1",  # ip地址
                 user="root",  # 用户名
                 password="123456",  # 密码
                 port=3306,  # 端口
                 charset="utf8"):  # 字符集
        self.host = host
        self.database = database
        self.user = user
        self.password = password
        self.port = port
        self.charset = charset

    def open(self):  # 创建数据库链接函数
        self.db = connect(host=self.host,
                          database=self.database,
                          user=self.user,
                          password=self.password,
                          port=self.port,
                          charset=self.charset)
        self.cur = self.db.cursor()  # 创建游标对象

    def close(self):  # 创建断开数据库链接 关闭游标函数
        self.cur.close()
        self.db.close()

    def zhixing(self, sql, L=[]):  # 创建pymysql.execute() 方法函数
        try:
            self.open()  # 链接数据库
            self.cur.execute(sql, L)  # 参数化执行SQL命令
            self.db.commit()  # 提交数据
            print("ok")
        except Exception as e:
            self.db.rollback()  # 出错取消提交
            print("Failed", e)
        self.close()  # 断开数据库链接 关闭游标

    def all(self, sql, L=[]):
        try:
            self.open()
            self.cur.execute(sql, L)
            result = self.cur.fetchall()
            return result
        except Exception as e:
            print("Failed", e)
self.close() # frist.py
from mysqlpython import MysqlPython
# 创建数据库链接
sqlh = MysqlPython("db4")
# 创建数据库对象
sql_update = "update sheng set s_name='辽宁省'\
where s_name='云南省';"
# 调用xiugai函数 执行SQL命令:sql_update
sqlh.zhixing(sql_update)
sql_select = "select * from sheng where id=%s;"
# 调用all函数 执行SQL命令:sql_select
date = sqlh.all(sql_select, [1])
print(date)
用户登录系统示例:
from mysqlpython import Mysqlpython
from hashlib import sha1

uname = input("请输入用户名:")
pwd = input("请输入密码:")
# 用sha1给pwd加密

s1 = sha1()  # 创建sha1加密对象
s1.update(pwd.encode("utf8"))  # 指定编码
pwd2 = s1.hexdigest()  # 返回16进制加密结果

sqlh = Mysqlpython("db4")
select = "select password from user where \
          username=%s;"
result = sqlh.all(select, [uname])
# print(result)
# (('7c4a8d09ca3762af61e59520943dc26494f8941b',),)

if len(result) == 0:
    print("用户名不存在")
elif result[0][0] == pwd2:
    print("登录成功")
else:
    print("密码错误")
orm(Object Relation Mapping)
对象关系映射
1.定义
把对象模型映射到MySQL数据库中
2、sqlalchemy安装:
在线 :sudo pip3 install sqlalchemy
离线 :
$ tar -zxvf SQLAlchemy-1.2.10.tar.gz
$ cd SQLAlchemy-1.2.10
$ sudo python3 setup.py install
验证:
$ python3
>>> import sqlalchemy
>>>
示例:
# 创建一张表

# 连接数据库的模块
from sqlalchemy import create_engine
from sqlalchemy.ext.declarative import declarative_base
from sqlalchemy import Column, Integer, String

engine = create_engine("mysql+pymysql://root:123456@localhost/db4", encoding="utf8")
Base = declarative_base()  # orm基类

class User(Base):  # 继承Base基类
    __tablename__ = "t123"
    id = Column(Integer, primary_key=True)
    name = Column(String(20))
    address = Column(String(40))

Base.metadata.create_all(engine)
ER模型:
定义: 关系模型 用于数据库设计
三个概念
1.实体:矩形框
2.属性:椭圆形
3.椭圆形:实体之间的关系
1).一对一关系(1:1)
2).一对多关系(1:n)
3).多对多关系(m,n)


 66
66


 被折叠的 条评论
为什么被折叠?
被折叠的 条评论
为什么被折叠?
 到【灌水乐园】发言


