


14.1 NFS介绍
14.2 NFS服务端安装配置
14.3 NFS配置选项
14.1 NFS介绍:
~1.NFS是Network File System的缩写
是基于网络层面的,是借助网络实现数据的同步
~2.NFS最早由Sun公司开发,分2,3,4三个版本,2和3由Sun起草开发,4.0开始Netapp公司参与并主导开发,最新为4.1版本
其实并没有想象的更新的那么快。但并不应该NFS使用的广泛性
~3.NFS数据传输基于RPC协议,RPC为Remote Procedure Call的简写。
!!RPC说白了就是要为NFS这个服务提供支持。服务端与客户端通信的时候,本身不能直接通信,需要借助RPC协议来完成
~4.NFS应用场景是:A,B,C三台机器上需要保证被访问到的文件是一样的,A共享数据出来,B和C分别去挂载A共享的数据目录,从而B和C访问到的数据和A上的一致
也就是在ABC这三台机器上,任何一台更新了数据,其他两台马上就能看到。
A机器负载很高,B和C作为A的负载均衡

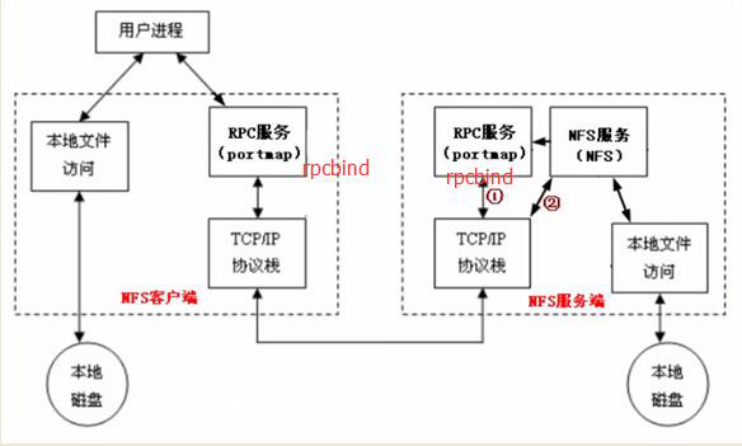
NFS的原理:
如下图,服务端要启动NFS的服务,那这个服务要想与客户端提供服务,就要借助RPC协议。那RPC协议是以RPCbind服务实现的(centos5以及之前的版本叫做portmap,centos6以及之后的叫rpcbind。实际上是一个东西),最终实现RPC之间的通信。
NFS服务本身不监听任何端口。最终监听端口,实现tcp/ip通信的过程是由rpcbind服务所产生的RPC协议实现的。rpcbind监听111端口
tcp/ip两者之间先通信。NFS会在RPC协议里面去注册一个端口(比如某某端口),告诉RPC通信的端口是什么。然后rpcbind在告诉客户端的rpcbind端口是什么。然后NFS这台机器在和服务端的这个端口去通信。最终实现数据的传输
!!总之一句话。NFS这个服务需要借助RPC协议来通信
~~~~~~~~~~~~~~~~~~~~~~~~~~~~~~~~~~~~~~~~~~~~~~~~~~~~~~~~~~~~~~~~~~~~~~~~
14.2 NFS服务端安装配置:
~1.yum install -y nfs-utils rpcbind //服务端安装这两个包。客户端安装nfs-utils
~2.vim /etc/exports//加入如下内容
/home/nfstestdir
//这一段表示分享出去的目录。就是服务端要保持一致的目录是哪一个192.168.208.0/24(rw,sync,all_squash,anonuid=1000,anongid=1000)
//这一段表示,你要跟那个机器去共享目录
保存配置文件后,执行如下准备操作
~4.mkdir /home/nfstestdir
~5.chmod 777 /home/nfstestdir
777为了方便实验
~6.systemctl start rpcbind
~7.systemctl start nfs
~8.systemctl enable rpcbind
~9.systemctl enable nfs
知识点:
如果在安装一个文件的时候,发现一个包(比如epel.repo)安装太慢了,我们可以暂时先禁掉他。
cd /etc/yum.repos.d/
mv epel.repo epel.repo1 改一下名字就行了
实例:
[root@axinlinux-01 ~]# yum install -y nfs-utils rpcbind A机器(服务端)上安装这两个包
[root@axinlinux-02 ~]# yum install -y nfs-utils B机器(客户端)上安装nfs-utils
[root@axinlinux-01 ~]# vim /etc/exports 在A机器上vim这个文件
/home/nfstestdir 192.168.208.0/24(rw,sync,all_squash,anonuid=1000,anongid=1000)
[root@axinlinux-01 ~]# mkdir /home/nfstestdir
[root@axinlinux-01 ~]# chmod 777 /home/nfstestdir
[root@axinlinux-01 ~]# netstat -lntp 看一下端口
Active Internet connections (only servers)
Proto Recv-Q Send-Q Local Address Foreign Address State PID/Program name
tcp 0 0 0.0.0.0:111 0.0.0.0:* LISTEN 527/rpcbind #实际上已经启动了111端口
tcp 0 0 0.0.0.0:80 0.0.0.0:* LISTEN 1151/nginx: master
tcp 0 0 0.0.0.0:22 0.0.0.0:* LISTEN 1030/sshd
tcp 0 0 127.0.0.1:25 0.0.0.0:* LISTEN 1392/master
tcp 0 0 0.0.0.0:443 0.0.0.0:* LISTEN 1151/nginx: master
tcp6 0 0 :::111 :::* LISTEN 527/rpcbind
tcp6 0 0 :::22 :::* LISTEN 1030/sshd
tcp6 0 0 ::1:25 :::* LISTEN 1392/master
tcp6 0 0 :::3306 :::* LISTEN 1418/mysqld
[root@axinlinux-02 ~]# netstat -lntp #阿鑫在做的时候客户端要重启才可以显示111
Active Internet connections (only servers)
Proto Recv-Q Send-Q Local Address Foreign Address State PID/Program name
tcp 0 0 0.0.0.0:111 0.0.0.0:* LISTEN 542/rpcbind
tcp 0 0 0.0.0.0:22 0.0.0.0:* LISTEN 879/sshd
tcp 0 0 127.0.0.1:25 0.0.0.0:* LISTEN 1110/master
tcp6 0 0 :::111 :::* LISTEN 542/rpcbind
tcp6 0 0 :::22 :::* LISTEN 879/sshd
tcp6 0 0 ::1:25 :::* LISTEN 1110/master
[root@axinlinux-01 ~]# systemctl restart rpcbind 开启这两个
[root@axinlinux-01 ~]# systemctl restart nfs
[root@axinlinux-01 ~]# systemctl enable rpcbind 开机启动这两个
[root@axinlinux-01 ~]# systemctl enable nfs
~~~~~~~~~~~~~~~~~~~~~~~~~~~~~~~~~~~~~~~~~~~~~~~~~~~~~~~~~~~~~~~~~~~~~~~~~~~~~~~~~~~~
14.3 NFS配置选项:
我们刚才vi了/etc/exports,并写入了
/home/nfstestdir 192.168.208.0/24(rw,sync,all_squash,anonuid=1000,anongid=1000)
看一下括号里都可以写哪些选项呢:
~1.rw 读写
~2.ro 只读
~3.sync 同步模式,内存数据实时写入磁盘
sync会很快地写入到磁盘里去,但是相应的会降低磁盘的效率
~4.async 非同步模式
与sync对应的。不需要实时的写入到磁盘里去。每个一段时间会将内存的数据刷新到磁盘里去。好处是能保证磁盘的效率,不好的地方是万一断电,会造成数据丢失
~5.no_root_squash 客户端挂载NFS共享目录后,root用户不受约束,权限很大
相当于客户端root用户读写共享目录,在本地的操作
~6.root_squash 与上面选项相对,客户端上的root用户收到约束,被限定成某个普通用户
与no_root_squash相对应的,客户端root访问共享目录时,会受限制,成为普通用户
~7.all_squash 客户端上所有用户在使用NFS共享目录时都被限定为一个普通用户
~8.anonuid/anongid 和上面几个选项搭配使用,定义被限定用户的uid和gid
定义用户被限定为谁。无论客户端上登录的用户是谁,都默认成uid和gid设定的用户(我们之前设定的为1000)
客户端挂载:
~1.yum install -y nfs-utils
安装后就不需要启动什么了
~2.showmount -e 192.168.208.128 //该ip为NFS服务端ip
机器上做了nfs的服务,看一下,有没有权限。报错的话查看服务端rpcbind是否监听111端口,或基本是双方防火墙未关闭
~3.mount -t nfs 192.168.133.130:/home/nfstestdir /mnt
~4.df -h
~5.touch /mnt/aminglinux.txt
~6.ls -l /mnt/aminglinux.txt //可以看到文件的属主和属组都为1000
实例:
[root@axinlinux-02 ~]# showmount -e 192.168.208.128 在客户端是showmount一下
clnt_create: RPC: Port mapper failure - Unable to receive: errno 113 (No route to host) 报错
[root@axinlinux-02 ~]# systemctl stop firewalld 关闭客户端防火墙
[root@axinlinux-02 ~]# setenforce 0 关闭selinux
[root@axinlinux-02 ~]# getenforce 查看是否关闭selinux
Permissive
[root@axinlinux-01 ~]# systemctl stop firewalld 客户端上也要关闭防火墙
[root@axinlinux-01 ~]# getenforce 查看是否关闭selinux
Disabled
[root@axinlinux-02 ~]# showmount -e 192.168.208.128 再次showmount,OK
Export list for 192.168.208.128:
/home/nfstestdir 192.168.208.130/24 可以看到共享的目录,以及共享的IP
[root@axinlinux-02 ~]# mount -t nfs 192.168.208.128:/home/nfstestdir /mnt/ 挂载。需要指定-t nfs,还有服务端的IP以及共享的目录
[root@axinlinux-02 ~]# df -h 看一下
文件系统 容量 已用 可用 已用% 挂载点
/dev/sda3 28G 1010M 27G 4% /
devtmpfs 907M 0 907M 0% /dev
tmpfs 916M 0 916M 0% /dev/shm
tmpfs 916M 8.6M 908M 1% /run
tmpfs 916M 0 916M 0% /sys/fs/cgroup
/dev/sda1 187M 113M 75M 61% /boot
tmpfs 184M 0 184M 0% /run/user/0
192.168.208.128:/home/nfstestdir 28G 8.4G 20G 30% /mnt
[root@axinlinux-02 ~]# cd /mnt 我们测试一下,进入到mnt,touch一个axin.txt
[root@axinlinux-02 mnt]# touch axin.txt
[root@axinlinux-02 mnt]# ls -l axin.txt 可以看到室友这个文件的,他的属主与属组都是我们之前创建1000
-rw-r--r--. 1 1000 1000 0 8月 25 23:06 axin.txt
[root@axinlinux-01 ~]# ls -l /home/nfstestdir/axin.txt 在回到服务端看一下这个文件。也是有的
-rw-r--r-- 1 1000 axin 0 8月 25 23:06 /home/nfstestdir/axin.txt


 429
429


 被折叠的 条评论
为什么被折叠?
被折叠的 条评论
为什么被折叠?
 到【灌水乐园】发言


