


本人学习的时候基本上是按照behave的tutorial教程一步步学习的,这篇文章就当Behave教程的翻译版吧(*^__^*) 嘻嘻……。
1安装behave
安装好python后,使用 pip install behave命令安装behave
2一个简单的实例
新建下面几个文件,文件结构如下
firstCase
firstCase/wordcheck.feature
firstCase/steps
firstCase/steps/wordcheck.py
wordcheck.feature的内容如下:
Feature:word check
Scenario:Check letters
GivenI have a letter y
WhenI input letter yThenthe inputed letter is Equal with y
wordcheck.py内容如下:
__author__ = 'helen'
frombehave import*
@Given('I have a letter')
defstep_impl(context):
pass@When('I input letter {letter}')
defstep_impl(context,letter):
context.letter = letter
@Then('the inputed letter is Equal with {TargetLetter}')
defstep_impl(context,TargetLetter):
assertcontext.letter iscontext.TargetLetter
完成这两个文件,我们的第一个case就完成了,下面通过cmd命令来执行它。
第一次运行,结果如下,说没有TargetLetter参数。
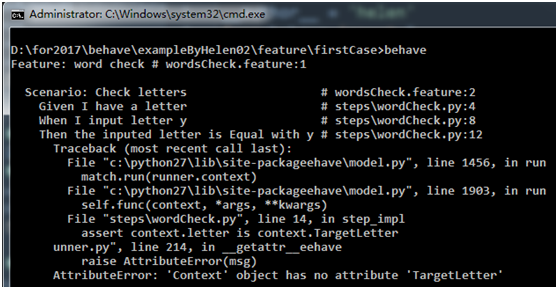
检查了wordcheck.py,发现@Then的部份忘记给TargetLetter赋值了,加上红框部份。

第二次运行,执行通过,如下图所示:
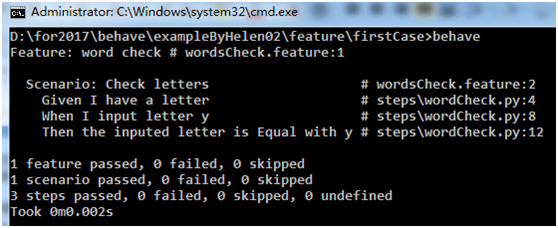
就这样,一个简单的实例就完成了,是不是好简单(*^__^*) 嘻嘻……
3features文件夹
我上面写的例子中的 “firstCase” 文件夹就相当于现在说的features文件夹。
下面简单说一下.feature和.py文件:
1) .feature文件是用于编写测试场,你可以把各种场景和数据写在里面,支持中文;
2) .py文件就是根据你写的测试场景和数据来执行测试。
3) 最好.feature文件与.py文件一一对应。
如官网教程所说,简单点的项目文件结构如下:
features/
features/everything.feature
features/steps/
features/steps/steps.py
复杂一点的结构如下:
features/
features/signup.feature
features/login.feature
features/account_details.feature
features/environment.py
features/steps/
features/steps/website.py
features/steps/utils.py
4.feature文件介绍
一个.feature文件里可以写多个Scenario,如下所示:
Feature:comparison
Scenario:comparison two words
GivenI have two words
Wheninput a and aThentwo words Equal
Scenario:comparison two numbers
GivenI have two numbers
WhenI input number1 3 and number2 2Thenthe first number big then the last number
下面对这些关键词做一些简单的解析:
1) Feature:功能名称
2) Scenario:场景名称
3) Given:给出测试前提条件;
4) when:相当我们的测试步骤;
5) Then:给出期望结果
有一个值得注意的是,你可以把“And”或“But”加到这些步骤中,如下:
Feature:word check
Scenario:Check letters
GivenI have a letter
WhenI input letter yButI just want to show the key word "But"
Thenthe inputed letter is Equal with yAndcontinue to next case
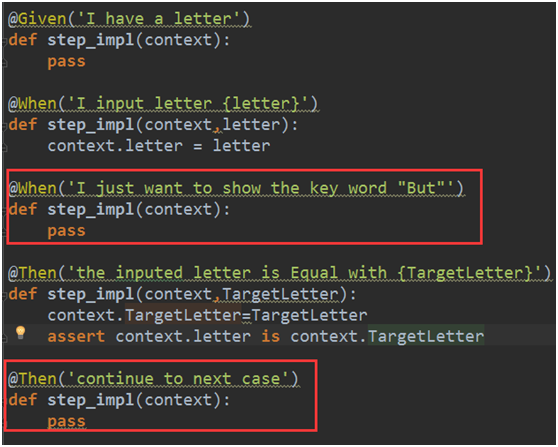
但是要注意,你在.py中要写入相应的步骤处理方法,如下图所示,你要加入“When I just want to show the key word "But"”和“Then continue to next case”相对应的方法,
4.1Scenario Outlines
在测试同一个场景时,很多时候我们需要输入各种各样的数据来验证不同的结果输出,这时我们用Scenario Outlines就可以实现了。如下图分别输大小写字母来验证场景
Feature:word check
Scenario Outline:Check letters
GivenI have a letter
WhenI input letter Thenthe inputed letter is Equal with Examples:Lowercase letters
|keyword|targetword|
|a|a|
|b|b|
Examples:Capital letters
|keyword|targetword|
|F|F|
|D|D|
执行结果如下:

4.2在场景中添加注释
在场景中,你可以通过"""来输出更多注释信息,这些注释会成为Context的“.text”属性值,如下图分别在Given\When\Then中加入注释:
Feature:word check
Scenario :show notes
GivenI want to show some notes
"""
This is Given Notes
"""
Whenjust want to show some notes
"""
This is When notes
"""
Thenthere is a word "Then" in the attribute ".text"
"""
This is Then notes
"""
然后在py文件中,我们最后判断"Then"是否存在Context.text中,如下代码:
__author__ = 'helen'
frombehave import*
@Given('I want to show some notes')
defstep_impl(context):
pass@When('just want to show some notes')
defstep_impl(context):
pass@Then('there is a word "Then" in the attribute ".text"')
defstep_impl(context):
assertcontext.text.find("Then")
最后执行通过,执行结果如下,在结果中输出了注释:

4.3使用table
跟上面的context.text一样,在场景中可以一个表格作为context.table属性值,如下图在Given中加入表格:
Feature:show the table
Scenario:some scenario
Givena set of specific users
|name|department|
|Barry|Beer Cans|
|Pudey|Silly Walks|
|Two-Lumps|Silly Walks|
Whenwe count the number of people in each department
Thenwe will find two people in "Silly Walks"
Butwe will find one person in "Beer Cans"
6Environment.py
Environment.py是个非常重要的文件,放在feature文件夹下,与.feature文件并列。下面是Environment.py中定义的一些方法:
before_step(context, step), after_step(context, step)
These run before and after every step.
before_scenario(context, scenario), after_scenario(context, scenario)
These run before and after each scenario is run.
before_feature(context, feature), after_feature(context, feature)
These run before and after each feature file is exercised.
before_tag(context, tag), after_tag(context, tag)
These run before and after a section tagged with the given name. They are invoked for each tag encountered in the order they’re found in the feature file. See controlling things with tags.
before_all(context), after_all(context)
These run before and after the whole shooting match.
下面是一个简单的例子,大家可以根据自己的需要定义方法:
# coding:utf-8
__author__ = 'helen'
importsys
frombehave import*
fromselenium importwebdriver
# 开始测试前,定义系统编码为utf-8
defbefore_all(context):
reload(sys)
sys.setdefaultencoding('utf-8')
defbefore_feature(context):
context.driver = webdriver.Firefox()
defafter_feature(context):
context.driver.quit()
7通过标签tag来控制测试执行
标签以@开头,如下示例:
Feature:find a look
@valid
Scenario:look up a book
GivenI search for a valid book
Thenthe result page will include "success"
@invalid
Scenario:look up an invalid book
GivenI search for a invalid book
Thenthe result page will include "failure"
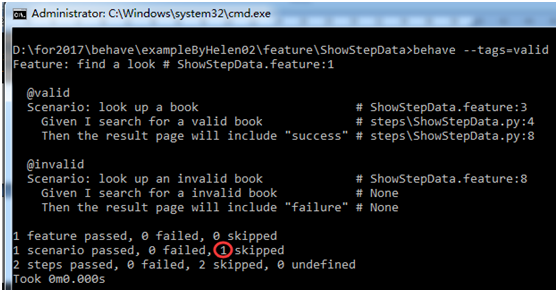
执行的时候在behave 后面加上tag 标签即可,如我只测试“valid”这个场景,那么就输入“behave --tags=valid”,执行如下图所示,一个场景跳过忽略:
如果你想执行若干个不同标签的场景,你可以这么写“behave --tags=valid,invalid”;
如果你想执行除了@invalid外的所有场景,你可以这么写“behave --tags=-invalid”;
如果你要执行标签包含了 “valid”和“invalid”两个签标的场景,你可以这么写“behave --tags=valid --tags=invalid”
当然,tags在py文件中也起作用,例如
defbefore_feature(context):
if'browser' infeature.tags:
context.driver = webdriver.Firefox()
defafter_feature(context):
if'browser' infeature.tags:
context.driver.quit()


 660
660


 被折叠的 条评论
为什么被折叠?
被折叠的 条评论
为什么被折叠?
 到【灌水乐园】发言


