


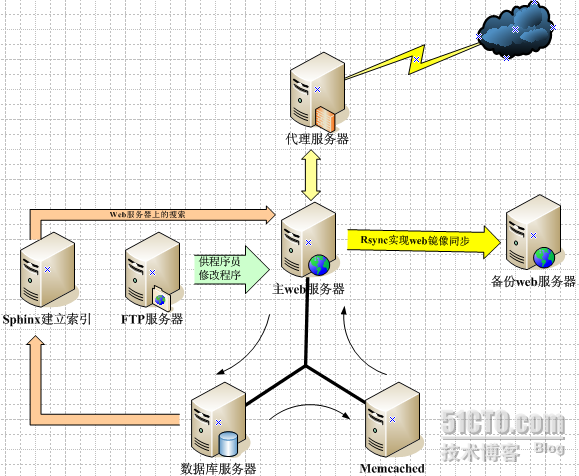
说明:本实验均采用最基本的软件,但是依然能实现在线服务,可以结合这些软件实现一个web服务器的正常在线服务,其中vsftp是用来为后台程序员提供程序的改动,并方便上传和和修改的,这里为了保证系统的安全,使用vsftpd的虚拟用户,而web服务器依然采用最稳定的apache,结合php,整合memcached,为数据库提供缓存,同事结合squid来提供缓存服务器,当然你可以选择nginx和varnish这些轻量级的软件来完成这些功能;为了提高查询的速度,使用sphinx来建立索引,同时在保证web页面的备份,使用rsync来实现镜像的备份,本实验是自己结合废弃的dell2950来实现的这些功能,好了,废话不多说配置细的安装和配置过程本实例中虽然使用的是一台服务器做的,但是里面的架构还是很明显的,如下图所示,我就把他逐个分解开,方便理解!
硬件环境:
# dmidecode -s system-product-name 硬件制造商
PowerEdge 2950
# dmidecode -s system-product-name 硬件制造商
PowerEdge 2950
# lsb_release -a 系统版本
LSB Version: :core-4.0-amd64:core-4.0-ia32:core-4.0-noarch:graphics-4.0-amd64:graphics
LSB Version: :core-4.0-amd64:core-4.0-ia32:core-4.0-noarch:graphics-4.0-amd64:graphics
-4.0-ia32:graphics-4.0-noarch:printing-4.0-amd64:printing-4.0-ia32:printing-4.0-noarch
Distributor ID: CentOS
Description: CentOS release 5.7 (Final)
Release: 5.7
Codename: Final
Distributor ID: CentOS
Description: CentOS release 5.7 (Final)
Release: 5.7
Codename: Final
# ethtool -i eth0 网卡的驱动版本
driver: bnx2
version: 2.0.21
firmware-version: bc 2.9.1
bus-info: 0000:05:00.0
driver: bnx2
version: 2.0.21
firmware-version: bc 2.9.1
bus-info: 0000:05:00.0
# free -m |grep "Mem" | awk '{print $2}' 内存大小
3947
3947
# cat /proc/cpuinfo |grep -c processor cpu的个数
4
4
LAMP+vsftpd+memcached+sphinx+rsync
规划及配置:
(一)所用到的用户名和密码:
1.系统的用户名和密码:
root centos123
user redhat
(一)所用到的用户名和密码:
1.系统的用户名和密码:
root centos123
user redhat
2.mysql的用户名和密码:
root redhat
root redhat
3.vftpd的虚拟用户名和密码:
admin 123456 读 写 删除
ftpuser 123456 读 写
ooopic 123456 读 (下载)
admin 123456 读 写 删除
ftpuser 123456 读 写
ooopic 123456 读 (下载)
(二)所有的软件包安装在/usr/local/下对应的软件的名字
1.http--->/user/local/apache/
对应的文件:
配置文件目录:/etc/httpd/
数据文件目录:/usr/local/apache/htdocs
虚拟主机目录(整合到ftp上,方便程序员更新):/home/ftp/
2.mysql--->/user/local/mysql/
对应的文件:
配置文件:/etc/my.cnf
数据文件:/mydata/data
3.php--->/usr/local/php
4.vsftp使用rpm包安装的
对应的文件:
配置文件:/etc/vsftpd/vsftpd.conf
网页存放的目录:/var/ftp/webpages
5.memcache--->/usr/local/memcached/
6.sphin--->/usr/local/sphin
对应的文件:
配置文件目录:/usr/local/sphinx/etc/sphinx.conf
索引产生的数据文件:/usr/local/sphinx/var/data
7.squid---/usr/local/squid2.6
对应的文件
配置文件:/usr/local/squid2.6/etc/squid.conf
缓存数据目录:/var/spool/squid/
8.rsync---/usr/local/rsync
对应的文件
配置文件:/usr/local/rsync/etc/rsyncd.conf
(三)安装和实施的过程:
rpm -qa|grep httpd
rpm -e httpd
rpm -qa|grep mysql
rpm -e mysql
rpm -qa|grep php
rpm -e php
yum -y remove httpd
#编译环境的初始化
yum -y install yum-fastestmirror
yum -y update
yum -y install patch make gcc gcc-c++ gcc-g77 flex bison file
yum -y install libtool libtool-libs autoconf kernel-devel
yum -y install libjpeg libjpeg-devel libpng libpng-devel libpng10 libpng10-devel gd gd-devel
yum -y install freetype freetype-devel libxml2 libxml2-devel zlib zlib-devel
yum -y install glib2 glib2-devel bzip2 bzip2-devel libevent libevent-devel
yum -y install ncurses ncurses-devel curl curl-devel e2fsprogs
yum -y install e2fsprogs-devel krb5 krb5-devel libidn libidn-devel
yum -y install openssl openssl-devel vim-minimal nano sendmail
yum -y install fonts-chinese gettext gettext-devel
yum -y install ncurses-devel
yum -y install gmp-devel pspell-devel
yum -y install unzip
yum -y install autoconf libjpeg libjpeg-devel libpng libpng-devel freetype freetype-devel libxml2
libxml2-devel zlib zlib-devel glibc glibc-devel glib2 glib2-devel bzip2 bzip2-devel ncurses ncurses-devel
curl curl-devel e2fsprogs e2fsprogs-devel krb5 krb5-devel libidn libidn-devel openssl openssl-devel
openldap openldap-devel nss_ldap openldap-clients openldap-servers
#安装libmcrypt
wget -c http://soft.vpser.net/web/libmcrypt/libmcrypt-2.5.8.tar.gz
tar zxvf libmcrypt-2.5.8.tar.gz
cd libmcrypt-2.5.8/
./configure
make && make install
/sbin/ldconfig
cd libltdl/
./configure --enable-ltdl-install
make && make install
cd http://www.cnblogs.com/
wget -c http://soft.vpser.net/web/libmcrypt/libmcrypt-2.5.8.tar.gz
tar zxvf libmcrypt-2.5.8.tar.gz
cd libmcrypt-2.5.8/
./configure
make && make install
/sbin/ldconfig
cd libltdl/
./configure --enable-ltdl-install
make && make install
cd http://www.cnblogs.com/
#安装mhash
wget -c http://soft.vpser.net/web/mhash/mhash-0.9.9.9.tar.gz
tar zxvf mhash-0.9.9.9.tar.gz
cd mhash-0.9.9.9/
./configure
make && make install
cd ../
wget -c http://soft.vpser.net/web/mhash/mhash-0.9.9.9.tar.gz
tar zxvf mhash-0.9.9.9.tar.gz
cd mhash-0.9.9.9/
./configure
make && make install
cd ../
#安装libiconv
wget -c http://soft.vpser.net/web/libiconv/libiconv-1.13.tar.gz
tar zxvf libiconv-1.13.tar.gz
cd libiconv-1.13/
./configure --prefix=/usr/local
make && make install
cd ../
wget -c http://soft.vpser.net/web/libiconv/libiconv-1.13.tar.gz
tar zxvf libiconv-1.13.tar.gz
cd libiconv-1.13/
./configure --prefix=/usr/local
make && make install
cd ../
#添加链接
ln -s /usr/local/lib/libmcrypt.la /usr/lib/libmcrypt.la
ln -s /usr/local/lib/libmcrypt.so /usr/lib/libmcrypt.so
ln -s /usr/local/lib/libmcrypt.so.4 /usr/lib/libmcrypt.so.4
ln -s /usr/local/lib/libmcrypt.so.4.4.8 /usr/lib/libmcrypt.so.4.4.8
ln -s /usr/local/lib/libmhash.a /usr/lib/libmhash.a
ln -s /usr/local/lib/libmhash.la /usr/lib/libmhash.la
ln -s /usr/local/lib/libmhash.so /usr/lib/libmhash.so
ln -s /usr/local/lib/libmhash.so.2 /usr/lib/libmhash.so.2
ln -s /usr/local/lib/libmhash.so.2.0.1 /usr/lib/libmhash.so.2.0.1
#安装mcrypt
wget -c http://soft.vpser.net/web/mcrypt/mcrypt-2.6.8.tar.gz
tar zxvf mcrypt-2.6.8.tar.gz
cd mcrypt-2.6.8/
./configure
make && make install
cd ../
wget -c http://soft.vpser.net/web/mcrypt/mcrypt-2.6.8.tar.gz
tar zxvf mcrypt-2.6.8.tar.gz
cd mcrypt-2.6.8/
./configure
make && make install
cd ../
#mysql的安装和配置
添加用户和组
#groupadd -g 3306 mysql
#useradd -u 3306 -g mysql -M -s /sbin/nologin mysql
#chown -R mysql:mysql /mydata/ //把当前的文件的属主和属组改成mysql
#tar xvf mysql-5.5.15-linux2.6-i686.tar.gz -C /usr/local //解压到/usr/local目录下
#ln -sv /usr/local/mysql-5.5.15-linux2.6-i686 /usr/local/mysql //做一个链接
#cd /usr/local/mysql
#chown -R root:mysql . //设置当前的文件的属主为root属组为mysql
#scripts/mysql_install_db --user=mysql --datadir=/mydata/data //安装mysql,并且指定用户和数
据存放的位置。
#cp support-files/mysql.server /etc/init.d/mysqld
#chkconfig --add mysqld //启动
这个时候就可以启动mysql服务了,但是这个时候会报错,以为没有mysql的配置文件。
#cp support-files/my-large.cnf /etc/my.cnf //拷贝样例修改成
#vim /etc/my.cnf
添加一行: datadir=/mydata/data 来指定数据的存放位置
这个时候就可以启动服务了
#service mysqld start
但是这个时候运行mysql的时候会出现没有这样的命令,这是由于执行此命令的二进制文件
在/usr/local/mysql/bin下,而系统的PATH不包含这个路径,所以这个时候需要修改环境变量
export PATH=$PATH:/usr/local/mysql/bin 这只是暂时的,如果想要长久有效可以修改/etc/profile 文
export PATH=$PATH:/usr/local/mysql/bin 这只是暂时的,如果想要长久有效可以修改/etc/profile 文
件,在其中加入
PATH=$PATH:/usr/local/mysql/bin ,然后source /etc/profile 重新读取一下文件就行了。
这个时候在你还会发现mysql的lib库不是正常的路径,如果不进行特意指定,会在以后的运行中出现
PATH=$PATH:/usr/local/mysql/bin ,然后source /etc/profile 重新读取一下文件就行了。
这个时候在你还会发现mysql的lib库不是正常的路径,如果不进行特意指定,会在以后的运行中出现
错误,所有要指定一下lib的位置,这个可以通过编辑/etc/ld.so.conf.d/*.conf文件进行配置,
#vim /etc/ld.so.conf.d/mysql.conf
添加/usr/local/mysql/lib 保存退出
# ldconfig //这个命令很关键,就是同步一下库文件的,如果不使用这个命令,即使做了修改也不
#vim /etc/ld.so.conf.d/mysql.conf
添加/usr/local/mysql/lib 保存退出
# ldconfig //这个命令很关键,就是同步一下库文件的,如果不使用这个命令,即使做了修改也不
会同步信息的。
当然还有头文件,这个需要做一个连接如下:
#ln -sv /usr/local/mysql/include /usr/include/mysql
我们还会考虑到帮助文件,而帮助文件的修改在/etc/man.conf中进行
#echo "MANPATH /usr/local/mysql/man" >> /etc/man.conf
这样一个完整的mysql的配置就算完成了。
当然还有头文件,这个需要做一个连接如下:
#ln -sv /usr/local/mysql/include /usr/include/mysql
我们还会考虑到帮助文件,而帮助文件的修改在/etc/man.conf中进行
#echo "MANPATH /usr/local/mysql/man" >> /etc/man.conf
这样一个完整的mysql的配置就算完成了。
mysqladmin -u root password redhat
创建数据库ro和表test,并且插入数据,如下所示:
mysql> CREATE DATABASE ro;
mysql> USE ro;
mysql> CREATE TABLE test (ID bigint (20) NOT NULL AUTO_INCREMENT UNIQUE,Name varchar(30)
创建数据库ro和表test,并且插入数据,如下所示:
mysql> CREATE DATABASE ro;
mysql> USE ro;
mysql> CREATE TABLE test (ID bigint (20) NOT NULL AUTO_INCREMENT UNIQUE,Name varchar(30)
NOT NULL ,Age INT(10),Gender enum('F','M') DEFAULT 'M');
mysql> INSERT INTO test (Name) VALUE ('luowei');
mysql> INSERT INTO test (Name) VALUE ('test2');
mysql> INSERT INTO test (Name) VALUE ('test3');
mysql> INSERT INTO test (Name) VALUE ('test4');
mysql> INSERT INTO test (Name) VALUE ('test5');
mysql> INSERT INTO test (Name) VALUE ('luowei');
mysql> INSERT INTO test (Name) VALUE ('test2');
mysql> INSERT INTO test (Name) VALUE ('test3');
mysql> INSERT INTO test (Name) VALUE ('test4');
mysql> INSERT INTO test (Name) VALUE ('test5');
#编译安装apache
#tar xf httpd-2.2.19.tar.bz2
#./configure --prefix=/usr/local/apache --sysconfdir=/etc/httpd --enable-so --enable-
#tar xf httpd-2.2.19.tar.bz2
#./configure --prefix=/usr/local/apache --sysconfdir=/etc/httpd --enable-so --enable-
modules=most --enable-mods-shared=most
#make
#make install
这样简单的编译安装算是结束,接下来就是配置了,首先从其他机器上拷贝一个/etc/init.d/httpd的脚
#make
#make install
这样简单的编译安装算是结束,接下来就是配置了,首先从其他机器上拷贝一个/etc/init.d/httpd的脚
本,然后进行修改,把里面的
apachectl=/usr/local/apache/bin/apachectl
httpd=${HTTPD-/usr/local/apache/httpd} //对应到apache路径
然后把httpd放到/etc/init.d/目录下。
附上apache的启动脚本:
#vim /etc/init.d/httpd
#!/bin/bash
#
# httpd Startup script for the Apache HTTP Server
#
# chkconfig: - 85 15
# description: Apache is a World Wide Web server. It is used to serve \
# HTML files and CGI.
# processname: httpd
# config: /etc/httpd/conf/httpd.conf
# config: /etc/sysconfig/httpd
# pidfile: /var/run/httpd.pid
# Source function library.
. /etc/rc.d/init.d/functions
. /etc/rc.d/init.d/functions
if [ -f /etc/sysconfig/httpd ]; then
. /etc/sysconfig/httpd
fi
. /etc/sysconfig/httpd
fi
# Start httpd in the C locale by default.
HTTPD_LANG=${HTTPD_LANG-"C"}
HTTPD_LANG=${HTTPD_LANG-"C"}
INITLOG_ARGS=""
apachectl=/usr/local/apache/bin/apachectl
httpd=${HTTPD-/usr/local/apache/bin/httpd}
prog=httpd
pidfile=${PIDFILE-/usr/local/apache/logs/httpd.pid}
lockfile=${LOCKFILE-/var/lock/subsys/httpd}
RETVAL=0
STOP_TIMEOUT=${STOP_TIMEOUT-10}
httpd=${HTTPD-/usr/local/apache/bin/httpd}
prog=httpd
pidfile=${PIDFILE-/usr/local/apache/logs/httpd.pid}
lockfile=${LOCKFILE-/var/lock/subsys/httpd}
RETVAL=0
STOP_TIMEOUT=${STOP_TIMEOUT-10}
start() {
echo -n $"Starting $prog: "
LANG=$HTTPD_LANG daemon --pidfile=${pidfile} $httpd $OPTIONS
RETVAL=$?
echo
[ $RETVAL = 0 ] && touch ${lockfile}
return $RETVAL
}
echo -n $"Starting $prog: "
LANG=$HTTPD_LANG daemon --pidfile=${pidfile} $httpd $OPTIONS
RETVAL=$?
echo
[ $RETVAL = 0 ] && touch ${lockfile}
return $RETVAL
}
stop() {
echo -n $"Stopping $prog: "
killproc -p ${pidfile} -d ${STOP_TIMEOUT} $httpd
RETVAL=$?
echo
[ $RETVAL = 0 ] && rm -f ${lockfile} ${pidfile}
}
reload() {
echo -n $"Reloading $prog: "
if ! LANG=$HTTPD_LANG $httpd $OPTIONS -t >&/dev/null; then
RETVAL=$?
echo $"not reloading due to configuration syntax error"
failure $"not reloading $httpd due to configuration syntax error"
else
killproc -p ${pidfile} $httpd -HUP
RETVAL=$?
fi
echo
}
case "$1" in
start)
start
;;
stop)
stop
;;
status)
status -p ${pidfile} $httpd
RETVAL=$?
;;
restart)
stop
start
;;
condrestart)
if [ -f ${pidfile} ] ; then
stop
start
fi
;;
reload)
reload
;;
graceful|help|configtest|fullstatus)
$apachectl $@
RETVAL=$?
;;
*)
echo $"Usage: $prog
start)
start
;;
stop)
stop
;;
status)
status -p ${pidfile} $httpd
RETVAL=$?
;;
restart)
stop
start
;;
condrestart)
if [ -f ${pidfile} ] ; then
stop
start
fi
;;
reload)
reload
;;
graceful|help|configtest|fullstatus)
$apachectl $@
RETVAL=$?
;;
*)
echo $"Usage: $prog
{start|stop|restart|condrestart|reload|status|fullstatus|graceful|help|configtest}"
exit 1
esac
exit 1
esac
exit $RETVAL
配置apache文件:
vim /usr/loal/apache/conf/httpd.conf
注释掉DocumentRoot "/usr/local/apache/htdocs"
取消Include conf/extra/httpd-vhosts.conf 前面的注释
添加如下内容:
User vuser
Group vuser //这个是为后面网页位于ftp上,是使用的用户
DirectoryIndex index.php index.html
AddType application/x-httpd-php .php
AddType application/x-httpd-php-source .phps
到/usr/local/apache/conf/extra修改httpd-vhosts.conf文件
如下所示:
NameVirtualHost 192.168.0.114:80
<VirtualHost 192.168.0.114:80>
DocumentRoot "/home/ftp/"
ServerName web.test.com
ErrorLog "/var/log/webpages/web.test.com.error_log"
CustomLog "/var/log/webpages/web.test.com.access_log" common
<Directory "/home/ftp/">
Order Deny,Allow
allow from ALL
</Directory>
</VirtualHost>
配置伪静态
首先,打开 Apache 的配置文件 httpd.conf ,确保LoadModule rewrite_module modules/mod_rewrite
是开启的;
然后启动.htaccess 把AllowOverride None 修改为: AllowOverride All
最后在 httpd.conf中添加mod_rewrite 规则修正符:
<IfModule mod_rewrite.c>
RewriteEngine On
#RewriteCond %{ENV:SCRIPT_URL} (?:index|dispbbs)[-0-9]+\.html
RewriteRule ^(.*?(?:index|dispbbs))-([-0-9]+)\.html$ $1.php?
然后启动.htaccess 把AllowOverride None 修改为: AllowOverride All
最后在 httpd.conf中添加mod_rewrite 规则修正符:
<IfModule mod_rewrite.c>
RewriteEngine On
#RewriteCond %{ENV:SCRIPT_URL} (?:index|dispbbs)[-0-9]+\.html
RewriteRule ^(.*?(?:index|dispbbs))-([-0-9]+)\.html$ $1.php?
__is_apache_rewrite=1&__rewrite_arg=$2
</IfModule>
</IfModule>
# 安装php
php的安装包使用的是php-5.3.6.tar.bz2,这是目前最新的稳定的版本。
编译安装:
#tar xf php-5.3.6.tar.bz2
#cd php-5.3.6
# ./configure --prefix=/usr/local/php5 --sysconfdir=/etc/php --enable-mbstring --with-
php的安装包使用的是php-5.3.6.tar.bz2,这是目前最新的稳定的版本。
编译安装:
#tar xf php-5.3.6.tar.bz2
#cd php-5.3.6
# ./configure --prefix=/usr/local/php5 --sysconfdir=/etc/php --enable-mbstring --with-
apxs2=/usr/local/apache/bin/apxs --with-mysql=/usr/local/mysql
#make //编译
#make install //安装
#cp php.ini-production /usr/local/php5/lib/php.ini
这是php基本上最后的一个配置文件,这个时候要想让apache识别php结尾的网页,还要
#make //编译
#make install //安装
#cp php.ini-production /usr/local/php5/lib/php.ini
这是php基本上最后的一个配置文件,这个时候要想让apache识别php结尾的网页,还要
想/etc/httpd/httpd.conf文件中添加如下信息
AddType application/x-httpd-php .php
AddType application/x-httpd-php-source .phps
LoadModule php5_module modules/libphp5.so
同时还要修改DirectoryIndex index.php index.html
AddType application/x-httpd-php .php
AddType application/x-httpd-php-source .phps
LoadModule php5_module modules/libphp5.so
同时还要修改DirectoryIndex index.php index.html
cp /usr/lib64/httpd/modules/libphp5.so /usr/local/apache/modules/ //如果编译未发现php的模块的时
候,可以通过这个方法来解决加载php类库的模块的问题
# vim /usr/local/php5/lib/php.ini的文件,当然你可以简单的使用下面的命令进行修改
# php extensions
sed -i 's#output_buffering = Off#output_buffering = On#' /usr/local/php5/lib/php.ini
sed -i 's/post_max_size = 8M/post_max_size = 50M/g' /usr/local/php5/lib/php.ini
sed -i 's/upload_max_filesize = 2M/upload_max_filesize = 50M/g' /usr/local/php5/lib/php.ini
sed -i 's/;date.timezone =/date.timezone = PRC/g' /usr/local/php5/lib/php.ini
# 安装zend
wget http://soft.vpser.net/web/zend/ZendOptimizer-3.3.9-linux-glibc23-i386.tar.gz
tar zxvf ZendOptimizer-3.3.9-linux-glibc23-i386.tar.gz
mkdir -p /usr/local/zend/
cp ZendOptimizer-3.3.9-linux-glibc23-i386/data/5_2_x_comp/ZendOptimizer.so /usr/local/zend/
wget http://soft.vpser.net/web/zend/ZendOptimizer-3.3.9-linux-glibc23-i386.tar.gz
tar zxvf ZendOptimizer-3.3.9-linux-glibc23-i386.tar.gz
mkdir -p /usr/local/zend/
cp ZendOptimizer-3.3.9-linux-glibc23-i386/data/5_2_x_comp/ZendOptimizer.so /usr/local/zend/
cat >>/usr/local/php/etc/php.ini<<EOF
[Zend Optimizer]
zend_optimizer.optimization_level=1
zend_extension="/usr/local/zend/ZendOptimizer.so"
EOF
[Zend Optimizer]
zend_optimizer.optimization_level=1
zend_extension="/usr/local/zend/ZendOptimizer.so"
EOF
# 安装PHP加速缓存插件eAccelerator
wget http://soft.vpser.net/web/eaccelerator/eaccelerator-0.9.5.3.tar.bz2
tar jxvf eaccelerator-0.9.5.3.tar.bz2
cd eaccelerator-0.9.5.3/
/usr/local/php5/bin/phpize
显示结果:
[root@centos eaccelerator-0.9.5.3]# /usr/local/php5/bin/phpize
Configuring for:
PHP Api Version: 20041225
Zend Module Api No: 20060613
Zend Extension Api No: 220060519
./configure --enable-eaccelerator=shared --with-php-config=/usr/local/php5/bin/php-config
make
make install
cd ../
make
make install
cd ../
mkdir -p /usr/local/eaccelerator_cache
cat >>/usr/local/php/etc/php.ini<<EOF
[eaccelerator]
zend_extension="/usr/local/php5/lib/php/extensions/no-debug-non-zts-20060613/eaccelerator.so"
eaccelerator.shm_size="16"
eaccelerator.cache_dir="/usr/local/eaccelerator_cache"
eaccelerator.enable="1"
eaccelerator.optimizer="1"
eaccelerator.check_mtime="1"
eaccelerator.debug="0"
eaccelerator.filter=""
eaccelerator.shm_max="0"
eaccelerator.shm_ttl="3600"
eaccelerator.shm_prune_period="3600"
eaccelerator.shm_only="0"
eaccelerator.compress="1"
eaccelerator.compress_level="9"
eaccelerator.keys = "disk_only"
eaccelerator.sessions = "disk_only"
eaccelerator.content = "disk_only"
EOF
####################
# 启动apache
service httpd start
# 启动apache
service httpd start
# 重启apache
service httpd restart
# 启动mysql
/etc/init.d/mysql start
service httpd restart
# 启动mysql
/etc/init.d/mysql start
# 开机自动启动
vi /etc/rc.local
# 然后添加如下内容
ulimit -SHn 51200
/etc/init.d/mysql start
/etc/init.d/httpd start
(四)虚拟用户配置
需求 建立三个用户使用相同根目录
每个用户权限不同
admin 读 写 删除
ftpuser 读 写
haifeng 读 (下载)
1. 创建虚拟用户的口令库文件,即用户的账户密码
vi /etc/vsftpd/user.txt
admin
123456
ftpuser
123456
ooopic
123456
格式为奇数行是账号名,偶数行是对应的密码。
2. 生成vsftpd的认证库文件(以 .db 结尾的数据库文件)
db_load -T -t hash -f /etc/vsftpd/user.txt /etc/vsftpd/rz.db
chmod 600 rz.db
注:如果没有db_load命令,可以使用 yum –y install db4 db4-utils安装
3. 建立虚拟用户所需要的pam配置文件 =》调用上面的认证文件
vi /etc/pam.d/vsftpd.vu(新建)
auth required /lib64/security/pam_userdb.so db=/etc/vsftpd/rz
account required /lib64/security/pam_userdb.so db=/etc/vsftpd/rz
4. 建立虚拟用户要访问的目录并设置相应的权限
useradd -d /home/ftp/ vuser
chmod 700 /home/ftp
5. 在主配置文件vsftpd.conf中添加如下设置
guest_enable=YES
guest_username=vuser
pam_service_name=vsftpd.vu
6. 针对不同虚拟用户设置不同权限
① .创建目录
. mkdir /etc/vsftpd/vuser_conf
② . 在主配置文件vsftpd.conf中添加如下设
user_config_dir=/etc/vsftpd/vuser_conf
③ .在目录中设置个用户的权限
Vi /etc/vsftpd/vuser_conf/admin
## 读写下载
write_enable=YES
anonymous_enable=NO
anon_world_readable_only=NO
anon_upload_enable=YES
anon_mkdir_write_enable=YES
anon_other_write_enable=YES
local_umask=022
download_enable=Yes
Vi /etc/vsftpd/vuser_conf/ftpuser
## 读写
write_enable=YES
anon_world_readable_only=NO
anon_upload_enable=YES
anon_mkdir_write_enable=YES
anon_other_write_enable=YES
local_umask=022
download_enable=NO
Vi /etc/vsftpd/vuser_conf/ooopic
##只能下载
write_enable=NO
anon_world_readable_only=NO
anon_upload_enable=NO
anon_mkdir_write_enable=NO
anon_other_write_enable=NO
local_umask=022
download_enable=yes
7. 重启vsftpd服务
Service vsftpd restart
(五)squid的安装和配置
#squid编译安装
1,设置“文件描述符”,并设置用户同时打开文件数量
# vi /usr/include/bits/typesizes.h
# vi /usr/include/linux/posix_types.h
把里边的 #define __FD_SETSIZE 1024 改成 65536
2,设置当前环境
# ulimit -Hs 65536
# ulimit -n 65536
H参数是硬性限制,s是堆栈上限,n是文件描述符上限
也可以永久修改这些限制,开机自动生效,配置如下:
vi /etc/security/limits.conf,添加以下内容
* soft nofile 65536
* hard nofile 65536
3,下载编译squid
可以到官方网站下载自己需要的版本,这里选用2.6版本
http://www.squid-cache.org/Versions/v2/2.6/squid-2.6.STABLE23.tar.gz
tar xf squid-2.6.STABLE23.tar.gz
cd squid-2.6.STABLE23
./configure --prefix=/usr/local/squid2.6 \
--enable-gnuregex \
--enable-icmp \
--enable-linux-netfilter \
--enable-default-err-language="Simplify_Chinese" \
--enable-follow-x-forwarded-for \
--enable-storeio=aufs,ufs \
--enable-kill-parent-hack \
--enable-cache-digests \
--with-maxfd=65536 \
--with-pthreads \
--enable-dlmalloc \
--enable-poll \
--enable-stacktraces \
--enable-removal-policies=heap,lru \
--enable-delay-pools
make
makeinstall
安装完毕后,可以到/usr/local/squid2.6目录去查看相关生成的文件,一般编译不出错,不会有啥问题
。
4,配置squid.conf配置文件
squid.conf 配置详细参数:
http_port 3128
4,配置squid.conf配置文件
squid.conf 配置详细参数:
http_port 3128
#一般squid仅对80端口的HTTP服务加速。使用http_port指令让squid侦听在该端口:
http_port 80
假如想让squid既作cache代理,又作加速器,那么列出这2个端口,但是所有指定的端口都必须在一条
命令行上:
http_port 80 http_port 3128
logfile_rotate 3
#周期性的滚动日志文件,以阻止它们变得太大。为了合理控制磁盘空间消耗,在cron里使用如下命
令:
%squid -k rotate
例如,如下任务接口在每天的早上4点滚动日志:
0 4 * * * /usr/local/squid/sbin/squid -k rotate
工作过程:该命令做两件事。首先,它关闭当前打开的日志文件。然后,通过在文件名后加数字扩展
名,它重命名cache.log,store.log,和access.log。例如,cache.log变成cache.log.0,cache.log.0变成
cache.log.1,如此继续,滚动到logfile_rotate选项指定的值。
cache_mem 1024 MB
指定squid可以使用的内存理想值,建议设为内存的1/3.
#此参数并非指定进程的最大值,它只是设定一个squid能够用于多少额外的内存来缓存对象的限制值
,squid在其他方面也需要使用内存。
read-only
read-only选项指示Squid继续从cache_dir读取文件,但不往里面写新目标。他在squid.conf文件里看起
read-only选项指示Squid继续从cache_dir读取文件,但不往里面写新目标。他在squid.conf文件里看起
来如下:
cache_dir ufs /cache0 7000 16 256 read-only
如果你想把cache文件从一个磁盘迁移到另一个磁盘,那么可使用该选项。如果你简单的增加一个
cache_dir ufs /cache0 7000 16 256 read-only
如果你想把cache文件从一个磁盘迁移到另一个磁盘,那么可使用该选项。如果你简单的增加一个
cache_dir,并且删除另一个,squid的命中率会显著下降。在旧目录是read-only时,你仍能从那里获
取cache命中。在一段时间后,就能从设置文件里删除read-only缓存目录。
max-size
使用该选项,你能指定存储在cache目录里的最大目标大小。例如:
cache_dir ufs /cache0 7000 16 256 max-size=1048576
注意值是以字节为单位的。在大多数情况下,你不必增加该选项。如果你做了,请尽力将所有
max-size
使用该选项,你能指定存储在cache目录里的最大目标大小。例如:
cache_dir ufs /cache0 7000 16 256 max-size=1048576
注意值是以字节为单位的。在大多数情况下,你不必增加该选项。如果你做了,请尽力将所有
cache_dir行以max-size大小顺序来存放(从小到大)。
#cache_swap_low和cache_swap_high指令控制了存储在磁盘上的对象的置换。它们的值是最大cache
体积的百分比,这个最大cache体积来自于所有cache_dir大小的总和。例如:
cache_swap_low 90
cache_swap_high 95
如果总共磁盘使用低于cache_swap_low,squid不会删除cache目标。如果cache体积增加,squid会逐
渐删除目标。在稳定状态下,你发现磁盘使用总是相对接近cache_swap_low值。你可以通过请求
cache管理器的storedir页面来查看当前磁盘使用状况
请注意,改变cache_swap_high也许不会对squid的磁盘使用有太大效果。在squid的早期版本里,该参
数有重要作用;然而现在,它不是这样了。
如果不想squid缓存任何文件,如某些空间有限的专有系统,可以使用null文件系统(这样不需要哪些
缓存策略)
cache_dir null /tmp
cache_vary on (默认 on 表示可以缓存静态文件)
acl apache rep_header Server ^Apache
broken_vary_encoding allow apache
cache_replacement_policy heap GDSF
memory_replacement_policy heap GDSF
#cache的替换策略,对于小文件比较多的缓存服务器,采用GDSF容易获得比较好的命中
率,特别是内存命中率.
率,特别是内存命中率.
minimum_object_size 0 KB
maximum_object_size 6 MB
大于该值得对象将不被存储。如果要提高访问速度,就降低该值;如果想最大限度的节约带宽,降低成
本,就增加该值。
maximum_object_size_in_memory 1024 KB
设置较小的maximum_object_size_in_memory值有助于有效控制squid过度占用内存
cache_dir aufs /opt/squid/cache 4000 16 32
cache_dir aufs /opt/squid/cachedir/cache01 4000 16 32
cache_log /opt/squid/var/logs/cache.log
#cache_dir指令是squid.conf配置文件里最重要的指令之一。它告诉squid以何种方式存储cache文件到
磁盘的什么位置。cache_dir指令取如下参数:
#缓存目录的设置,可以设置多个缓存目录,语法为:<cache_dir> <aufs|ufs> <目录所在> <MBytes大小
> <dir1> <dir2>
cache_dir aufs /opt/squid/cachedir/cache01 4000 16 32表示
其中4000该目录下使用的缓冲值为4000MB 16是cache01下子目录数量 32是cache01下子目录的下一
级目录的数量
strip_query_terms off
#该指令是另一个隐私保护功能。在记录请求前,Squid删除了查询条件。假如日志文件不幸落入坏人
之手,他们不会找到任何用户名和密码。当该指令激活时,在问号(?)之后的所有字节被删除。例如,
某个URl如下:
会被记录为:
acl nolog urlpath_regex -i \.dll
emulate_httpd_log on
logformat combined %>a %ui %un [%tl] "%rm %ru HTTP/%rv" %Hs %<st "%{Referer}>h"
"%{User-Agent}>h" %Ss:%Sh !nolog
#所有日志格式按照apache 标准格式输出,并且不记录nolog定义的访问日志 eg:192.168.19.212 - -
[23/Oct/2008:00:00:24 +0800] "GET
http://p_w_picpaths.zhaopin.com/new4/p_w_picpaths/nub/1.gif HTTP/1.0"
304 0 "
http://www.zhaopin.com/beijing/?
DYWE=1224581170741.435762.1224638441.1224644873.3" "Mozilla/4.0 (compatible; MSIE 6.0;
Windows NT 5.1; SV1; .NET CLR 2.0.50727; .NET CLR 3.0.04506.30)" TCP_IMS_HIT:NONE
要记录源IP地址:
logformat combined %{X-Forwarded-For1}>h %>a %ui %un [%tl] "%rm %ru HTTP/%rv"
%Hs %<st "%{Referer}>h" "%{User-Agent}>h" %Ss:%Sh
日志即为:82.145.157.175 192.168.10.114 - - [14/Dec/2009:09...
同理:
acl nolog urlpath_regex -i \.css \.js \.swf
cache_access_log /opt/squid/var/logs/access.log combined !nolog
access_log /opt/squid/var/logs/newaccess.log !nolog
上面记录的日志中就不包含 \.css \.js \.swf类型的访问日志
注:apache格式串变量的含义:
%...a: 远程IP地址
%...A: 本地IP地址
%...B: 已发送的字节数,不包含HTTP头
%...b: CLF格式的已发送字节数量,不包含HTTP头。例如当没有发送数据时,写入‘-’而不是0。
%...{FOOBAR}e: 环境变量FOOBAR的内容
%...f: 文件名字
%...h: 远程主机
%...H 请求的协议
%...{Foobar}i: Foobar的内容,发送给服务器的请求的标头行。
%...l: 远程登录名字(来自identd,如提供的话)
%...m 请求的方法
%...{Foobar}n: 来自另外一个模块的注解“Foobar”的内容
%...{Foobar}o: Foobar的内容,应答的标头行
%...p: 服务器响应请求时使用的端口
%...P: 响应请求的子进程ID。
%...q 查询字符串(如果存在查询字符串,则包含“?”后面的部分;否则,它是一个空字符串。)
%...r: 请求的第一行
%...s: 状态。对于进行内部重定向的请求,这是指*原来*请求 的状态。如果用%...s,则是指后来的
请求。
%...t: 以公共日志时间格式表示的时间(或称为标准英文格式)
%...{format}t: 以指定格式format表示的时间
%...T: 为响应请求而耗费的时间,以秒计
%...u: 远程用户(来自auth;如果返回状态(%s)是401则可能是伪造的)
%...U: 用户所请求的URL路径
%...v: 响应请求的服务器的ServerName
%...V: 依照UseCanonicalName设置得到的服务器名字
%...t: 以公共日志时间格式表示的时间(或称为标准英文格式)
%...{format}t: 以指定格式format表示的时间
%...T: 为响应请求而耗费的时间,以秒计
%...u: 远程用户(来自auth;如果返回状态(%s)是401则可能是伪造的)
%...U: 用户所请求的URL路径
%...v: 响应请求的服务器的ServerName
%...V: 依照UseCanonicalName设置得到的服务器名字
cache_store_log none
#跟其他日志文件一样,Squid将最新的日志条目写到该文件的末尾。某个给定的URI可能出现在日志
文件里多次。例如,它先被cache,然后删除,接着又cache住。仅仅最近来的日志条目才反映目标的
当前值。
Log_fqdn:如Client有domain name的话,access.log便会把domain name完整的记录下来。否则只记录
IP地址,由于开启之后,squid需要访问DNS来解析客户的域名,会加重服务器负载,导致性能下降。
ftp_user:假如需要使用 anonymous ftp来获取档案,会送出后面所接的字串当 password。
Dns_children: Squid本身附有一个dnsserver程序来处理Client端domain name的需求,一般来说,当
proxy有较大的使用量时,dns children设定较多可以处理的domain name request较多也较快,但当设
定过多的dnsserver对系统的performance也会有相当的影响,可使用cache manger来观看每个
dnsserver的使用量决定数量的多少。
reference_age:物件的LRU,若比值大的话便清除cache中的物件。例如设定一星期,如一星期内没有
reference_age:物件的LRU,若比值大的话便清除cache中的物件。例如设定一星期,如一星期内没有
存取动作,就把物件从cache中移出,假如值为零的话,物件会存放于cache中直到cache swap上限。
Read_time:当proxy与web连接后,经过read_time的时间接收不到web站传送资料便断线,有可能是
remote server或是网络连接突然性的中断等因素。
Shutdown_lifetime:当cache server收到SIGTERM或是SIGHUP时,squid会对使用端发出"shutdown
pending"讯息,并关掉所有正在进行中的动作,直到squid重新启动。
Err_html_text:使用者浏览网页中,常常遇到不存在或连线中断的网站,squid本身会回应一个error
Err_html_text:使用者浏览网页中,常常遇到不存在或连线中断的网站,squid本身会回应一个error
message至用户端,squid管理者可使用这个参数来改变回应至用户端的error message,来连接至管理
者的homepage。
Deny_html_text:若遇到access control fail的情况,回应一个access fail message,squid本身提供一个
简单的message,可利用此功能连接至homepage。
ipcache_size 1024
# ip对应cache的大小为1024
ipcache_low 95
ipcache_high 95
fqdncache_size 1024 域名全称cache的大小为1024(默认1024)
#禁止缓存
hierarchy_stoplist cgi-bin ?
hierarchy_stoplist -i ^https:\\ ?
acl QUERY urlpath_regex -i cgi-bin \? \.asp \.php \.jsp \.cgi
acl denyssl urlpath_regex -i ^https:\\
no_cache deny QUERY
no_cache deny denyssl
#上面几个就是说遇到URL中有包含cgi-bin和以https:\\开头的都不要缓存,
#还有asp、cgi、php等动态脚本也不要缓存,
#因为这些脚本通常都是动态更新的,这样数据不同步。
#还有https://开通的不缓存是因为一般我们进行电子商务交易,
#例如银行付款等都是采用这个的,如果把信用卡号什么缓存那不是很危险。
本机器的配置文件如下:
#vim /usr/local/squid2.6/etc/squid.conf
acl all src 0.0.0.0/0.0.0.0
acl manager proto cache_object
acl localhost src 127.0.0.1/255.255.255.255
acl to_localhost dst 127.0.0.0/8
acl SSL_ports port 443
acl Safe_ports port 80 # http
acl Safe_ports port 21 # ftp
acl Safe_ports port 443 # https
acl Safe_ports port 70 # gopher
acl Safe_ports port 210 # wais
acl Safe_ports port 1025-65535 # unregistered ports
acl Safe_ports port 280 # http-mgmt
acl Safe_ports port 488 # gss-http
acl Safe_ports port 591 # filemaker
acl Safe_ports port 777 # multiling http
acl CONNECT method CONNECT
http_access allow manager localhost
http_access deny manager
http_access deny !Safe_ports
http_access deny CONNECT !SSL_ports
visible_hostname squid.abcd.cn
http_access allow localhost
http_access allow all
access_log /var/log/squid/access.log squid
cache_log /var/log/squid/cache.log
cache_store_log /var/log/squid/store.log
pid_filename /var/log/squid/squid.pid
cache_effective_user nobody
cache_effective_group nobody
http_port 80 vhost vport
cache_peer 10.10.10.1 parent 80 0 no-query no-digest originserver name=mail
cache_peer_domain mail mail.abcd.cn
cache_peer_access mail allow all
hierarchy_stoplist cgi-bin ?
cache_vary on #cache the static pages
cache_mem 1024 MB # 1/3 of mem
cache_swap_low 90 #the min % swap cache of cache_dir
cache_swap_high 95 #the max % swap cache of cache_dir
minimum_object_size 0 KB
#the minimum of the object size
#the minimum of the object size
maximum_object_size 6 MB
#the max of the object size ,if bigger,it will not be cached
#if you want to improve the v,please let it bigger,else ,you can save the bandwith
#the max of the object size ,if bigger,it will not be cached
#if you want to improve the v,please let it bigger,else ,you can save the bandwith
broken_vary_encoding allow apache
cache_replacement_policy heap GDSF
memory_replacement_policy heap GDSF
#the small file size ,the max cached when used GDSF
cache_replacement_policy heap GDSF
memory_replacement_policy heap GDSF
#the small file size ,the max cached when used GDSF
maximum_object_size_in_memory 1024 KB
#small ,you can easy control the mem used
#small ,you can easy control the mem used
ipcache_size 1024 #the ip cache,default is 1024
ipcache_low 90 #the min ip cache
ipcache_high 95 #the max ip cache
fqdncache_size 1024 # the fqdn cache size (default is 1024)
ipcache_low 90 #the min ip cache
ipcache_high 95 #the max ip cache
fqdncache_size 1024 # the fqdn cache size (default is 1024)
cache_replacement_policy lru
memory_replacement_policy lru
cache_dir ufs /var/spool/squid 7000 16 256 max_size=1048576
acl QUERY urlpath_regex cgi-bin \? \.js
cache deny QUERY
refresh_pattern ^ftp: 1440 20% 10080
refresh_pattern ^gopher: 1440 0% 1440
refresh_pattern . 0 20% 4320
acl apache rep_header Server ^Apache
broken_vary_encoding allow apache
coredump_dir /var/spool/squid
############################
header_access Via deny all
header_access Server deny all
header_access X-Cache deny all
header_access X-Cache-Lookup deny all
httpd_suppress_version_string off
header_access Server deny all
header_access X-Cache deny all
header_access X-Cache-Lookup deny all
httpd_suppress_version_string off
#below the ,it doesn't cached include https,.php,.asp,.jsp,.cgi
hierarchy_stoplist cgi-bin ?
hierarchy_stoplist -i ^https:\\ ?
acl QUERY urlpath_regex -i cgi-bin \? \.asp \.php \.jsp \.cgi
acl denyssl urlpath_regex -i ^https:\\
no_cache deny QUERY
no_cache deny denyssl
hierarchy_stoplist cgi-bin ?
hierarchy_stoplist -i ^https:\\ ?
acl QUERY urlpath_regex -i cgi-bin \? \.asp \.php \.jsp \.cgi
acl denyssl urlpath_regex -i ^https:\\
no_cache deny QUERY
no_cache deny denyssl
# mkdir /var/log/squid //建立日志目录
# chown nobody:nobody /var/log/squid //用户nobody用户和组来运行squid
# mkdir /var/spool/squid //建立squid缓存目录
# chown nobody:nobody /var/spool/squid //同样,给权限
# PATH=$PATH:/usr/local/squid2.6/sbin/ //修改环境变量(临时有效)
# vim /etc/profile //添加上面的语句也能实现(永久,但是重启后生效)
# squid -z //建立缓存目录
# ls /var/spool/squid //查看是否建立成功
5,开机自动运行squid
vi /etc/rc.d/rc.local
将以下内容添加最下边
ulimit -Hs 65536
ulimit -n 65536
/usr/local/squid2.6/sbin/squid
如果你添加ulimit到/etc/security/limits.conf配置文件了,就不需要在这里写了。
更改配置文件后,重新加载:
/usr/local/squid2.6/sbin/squid -k reconfigure
停止squid程序:
/usr/local/squid2.6/sbin/squid -k shutdown
查看缓存信息:
squidclient -p 80 mgr:info
squidclient -p 80 mgr:mem
(六)memcached的安装和配置
#memcached的编译安装
wget http://memcached.googlecode.com/files/memcached-1.4.4.tar.gz
wget http://monkey.org/~provos/libevent-1.4.13-stable.tar.gz
#memcached的编译安装
wget http://memcached.googlecode.com/files/memcached-1.4.4.tar.gz
wget http://monkey.org/~provos/libevent-1.4.13-stable.tar.gz
tar xf libevent-1.4.13-stable.tar.gz
cd libevent-1.4.13-stable
./configure --prefix=/usr/local/libevent
make && make install
cd libevent-1.4.13-stable
./configure --prefix=/usr/local/libevent
make && make install
tar xf memcached-1.4.4.tar.gz
cd memcached-1.4.4
./configure --prefix=/usr/local/memcached --with-libevent=/usr/local/libevent
make && make install
cd memcached-1.4.4
./configure --prefix=/usr/local/memcached --with-libevent=/usr/local/libevent
make && make install
/usr/local/memcached/bin/memcached -d -m 10 -u root -l 127.0.0.1 -p 12000 -c 256 -P
/tmp/memcached.pid
memcached的基本设置:
1.启动Memcache的服务器端:
# /usr/local/memcached/bin/memcached -d -m 10 -u root -l 127.0.0.1 -p 12000 -c 256 -P
memcached的基本设置:
1.启动Memcache的服务器端:
# /usr/local/memcached/bin/memcached -d -m 10 -u root -l 127.0.0.1 -p 12000 -c 256 -P
/tmp/memcached.pid
-d选项是启动一个守护进程,
-m是分配给Memcache使用的内存数量,单位是MB,我这里是10MB,
-u是运行Memcache的用户,我这里是root,
-l是监听的服务器IP地址,如果有多个地址的话,我这里指定了服务器的IP地址127.0.0.1,
-p是设置Memcache监听的端口,我这里设置了12000,最好是1024以上的端口,
-c选项是最大运行的并发连接数,默认是1024,我这里设置了256,按照你服务器的负载量来设定,
-P是设置保存Memcache的pid文件,我这里是保存在 /tmp/memcached.pid,
-m是分配给Memcache使用的内存数量,单位是MB,我这里是10MB,
-u是运行Memcache的用户,我这里是root,
-l是监听的服务器IP地址,如果有多个地址的话,我这里指定了服务器的IP地址127.0.0.1,
-p是设置Memcache监听的端口,我这里设置了12000,最好是1024以上的端口,
-c选项是最大运行的并发连接数,默认是1024,我这里设置了256,按照你服务器的负载量来设定,
-P是设置保存Memcache的pid文件,我这里是保存在 /tmp/memcached.pid,
2.如果要结束Memcache进程,执行:
# kill `cat /tmp/memcached.pid`
也可以启动多个守护进程,不过端口不能重复。
检测:
[root@centos memcached-1.4.4]# netstat -tunl | grep 12000
tcp 0 0 127.0.0.1:12000 0.0.0.0:* LISTEN
udp 0 0 127.0.0.1:12000 0.0.0.0:*
[root@centos memcached-1.4.4]# netstat -tunl | grep 12000
tcp 0 0 127.0.0.1:12000 0.0.0.0:* LISTEN
udp 0 0 127.0.0.1:12000 0.0.0.0:*
(七)sphinx的安装和配置过程
#sphinx的安装和配置
wget http://sphinxsearch.com/files/sphinx-0.9.9.tar.gz
yum install mysql-devel -y
tar xf sphinx-0.9.9
cd sphinx-0.9.9
#cd /usr/local/sphinx
#cp etc/sphinx.conf.dist etc/sphinx.conf
#vim etc/sphinx.conf #修改配置文件
# Minimal Sphinx configuration sample (clean, simple, functional)
#
#sphinx的安装和配置
wget http://sphinxsearch.com/files/sphinx-0.9.9.tar.gz
yum install mysql-devel -y
tar xf sphinx-0.9.9
cd sphinx-0.9.9
#cd /usr/local/sphinx
#cp etc/sphinx.conf.dist etc/sphinx.conf
#vim etc/sphinx.conf #修改配置文件
# Minimal Sphinx configuration sample (clean, simple, functional)
#
source ooopic_src
{
type = mysql
{
type = mysql
sql_host = 127.0.0.1
sql_user = root
sql_pass = redhat
sql_db = ro //我使用的是上面测试的时候使用的数据库ro
sql_port = 3306 # optional, default is 3306
sql_user = root
sql_pass = redhat
sql_db = ro //我使用的是上面测试的时候使用的数据库ro
sql_port = 3306 # optional, default is 3306
sql_query = SELECT * FROM test
# sql_attr_uint = ID
#sql_attr_timestamp = created
#sql_attr_timestamp = created
sql_query_info = SELECT ID FROM test WHERE id=$id
}
}
index ooopic_index
{
source = ooopic_src
path = /usr/local/sphinx/var/data/ooopic_index
docinfo = extern
charset_type = utf-8
}
indexer
{
mem_limit = 1024M
}
searchd
{
port = 9312
log = /usr/local/sphinx/var/log/searchd.log
query_log = /usr/local/sphinx/var/log/query.log
read_timeout = 5
max_children = 30
pid_file = /usr/local/sphinx/var/log/searchd.pid
max_matches = 1000
seamless_rotate = 1
preopen_indexes = 0
unlink_old = 1
}
4. 建立索引
#/usr/local/sphinx/bin/indexer --config sphinx.conf --all ooopic_index
5. 启动sphinx后台服务
# /usr/local/sphinx/bin/searchd -c /usr/local/sphinx/etc/sphinx.conf -i ooopic_index &
# /usr/local/sphinx/bin/searchd -c /usr/local/sphinx/etc/sphinx.conf -i ooopic_index &
(八)rsync的安装和配置
tar xf rsync-3.0.9.tar.gz
cd rsync-3.0.9
./configure --prefix=/usr/local/rsync
make && make install
#vim /etc/rsyncd.conf 修改配置文件如下所示:
uid = nobody
gid = nobody
use chroot = no
max connections = 5
pid file = /var/run/rsync.pid
lock file = /var/run/rsync.lock
log file = /var/log/rsync.log
[apache]
path = </user/ooopic/apache>
ignore errors
read only = no
list = yes
auth users = rsync
secrets file = /etc/rsyncd.secrets
path = </user/ooopic/apache>
ignore errors
read only = no
list = yes
auth users = rsync
secrets file = /etc/rsyncd.secrets
编辑/etc/rsyncd.secrets文件
#vim /etc/rsyncd.secrets 添加如下内容
jack:password
*注:一定要把rsyncd.secrets的权限设为600,否则不能正常进行身份认证。
包括--password-file指向的密码文件,也必须设成600权限
#vim /etc/rsyncd.secrets 添加如下内容
jack:password
*注:一定要把rsyncd.secrets的权限设为600,否则不能正常进行身份认证。
包括--password-file指向的密码文件,也必须设成600权限
修改/etc/xinetd.d/rsync的文件如下所示:
service rsync
{
disable = no
socket_type = stream
wait = no
user = root
server = /usr/bin/rsync
server_args = --daemon
log_on_failure += USERID
}
service rsync
{
disable = no
socket_type = stream
wait = no
user = root
server = /usr/bin/rsync
server_args = --daemon
log_on_failure += USERID
}
# echo "/usr/local/bin/rsync --daemon" >> /etc/rc.local //添加到开机自动启动
实现本地目录之间的同步:
# rsync -av --progress --temp-dir=/tmp /home/ftp/ /user/ooopic/apache/ //我这里因为使用的
# rsync -av --progress --temp-dir=/tmp /home/ftp/ /user/ooopic/apache/ //我这里因为使用的
是一个服务器上面做的,所以就只是做一个目录之间的同步了,你可以实现不同主机之间的数据同步
,这个可以结合网上资料,然后自己做改正,下面也有不同主机之间同步的命令。
实现远程主机之间的同步:
a) rsync -avz --progress <src-dir> /">jack@192.168.0.1::<dst-dir>/
b) rsync -avz --progress <src-dir> /">jack@192.168.0.1::<dst-dir>/ --password-
a) rsync -avz --progress <src-dir> /">jack@192.168.0.1::<dst-dir>/
b) rsync -avz --progress <src-dir> /">jack@192.168.0.1::<dst-dir>/ --password-
file=/home/jack/rsync.jack
c) rsync -avuz --progress --delete <src-dir> /">jack@192.168.0.1::<dst-dir>/ --password-
c) rsync -avuz --progress --delete <src-dir> /">jack@192.168.0.1::<dst-dir>/ --password-
file=/home/jack/rsync.jack
d) rsync -avz --progress /jack@192.168.0.1::<dst-dir>/<src-dir> <dst-dir>
d) rsync -avz --progress /jack@192.168.0.1::<dst-dir>/<src-dir> <dst-dir>
开机自动添加到任务列表中进行指定时间内同步
vim /etc/rc.local 添加如下内容
echo "* * * * * /usr/bin/rsync -av --progress --temp-dir=/tmp /home/ftp/ /user/ooopic/apache/
vim /etc/rc.local 添加如下内容
echo "* * * * * /usr/bin/rsync -av --progress --temp-dir=/tmp /home/ftp/ /user/ooopic/apache/
>/dev/null" >/var/spool/cron/root
前面的功能都实现之后,我在原有的基础之上编译安装nginx,当让这个nginx是一个轻量级的软件,
他不仅可以充当web服务器,还可以实现反向代理,值得学习,我下面只是介绍一下这个软件的编译
安装过程以及简单的配置,想学习更多,可以到其官网
http://www.nginx.com/上查询更多知料。
(九)nginx的安装和配置
yum install gcc openssl-devel pcre-devel zlib-devel
yum install gcc openssl-devel pcre-devel zlib-devel
# groupadd nginx
# useradd -g nginx -s /bin/false -M nginx
# useradd -g nginx -s /bin/false -M nginx
./configure \
--prefix=/usr \
--sbin-path=/usr/sbin/nginx \
--conf-path=/etc/nginx/nginx.conf \
--error-log-path=/var/log/nginx/error.log \
--http-log-path=/var/log/nginx/access.log \
--pid-path=/var/run/nginx/nginx.pid \
--lock-path=/var/lock/nginx.lock \
--user=nginx \
--group=nginx \
--with-http_ssl_module \
--with-http_flv_module \
--with-http_stub_status_module \
--with-http_gzip_static_module \
--http-client-body-temp-path=/var/tmp/nginx/client/ \
--http-proxy-temp-path=/var/tmp/nginx/proxy/ \
--http-fastcgi-temp-path=/var/tmp/nginx/fcgi/ \
--with-pcre
make && make install
修改配置文件
vim /etc/nginx/nginx.conf
把端口号改为8080防止和apache冲突
修改的内容如下:
worker_processes 4; //我是用的是4个cpu所以就改为4
当然如果我想使用nginx来提供web服务的时候,我可以在下面做具体的设置,做缓存服务器的时候,
修改配置文件
vim /etc/nginx/nginx.conf
把端口号改为8080防止和apache冲突
修改的内容如下:
worker_processes 4; //我是用的是4个cpu所以就改为4
当然如果我想使用nginx来提供web服务的时候,我可以在下面做具体的设置,做缓存服务器的时候,
需要使用正则了,比如缓存图片格式的设置
作为缓存服务器,如下所示(仅是例子)
http
{
proxy_cache_path /data/nginx/cache levels=1:2 keys_zone=STATIC:10m
inactive=24h max_size=1g;
server {
location / {
proxy_pass http://192.168.0.114;
proxy_set_header Host $host;
proxy_cache STATIC;
proxy_cache_valid 200 1d;
proxy_cache_use_stale error timeout invalid_header updating
http_500 http_502 http_503 http_504;
}
}
}
然后就是添加nginx的服务启动脚本
vim /etc/init.d/nginx
#!/bin/sh
#
# nginx - this script starts and stops the nginx daemon
#
# chkconfig: - 85 15
# description: Nginx is an HTTP(S) server, HTTP(S) reverse \
# proxy and IMAP/POP3 proxy server
# processname: nginx
# config: /etc/nginx/nginx.conf
# config: /etc/sysconfig/nginx
# pidfile: /var/run/nginx.pid
# Source function library.
. /etc/rc.d/init.d/functions
# Source networking configuration.
. /etc/sysconfig/network
# Check that networking is up.
[ "$NETWORKING" = "no" ] && exit 0
nginx="/usr/sbin/nginx"
prog=$(basename $nginx)
NGINX_CONF_FILE="/etc/nginx/nginx.conf"
[ -f /etc/sysconfig/nginx ] && . /etc/sysconfig/nginx
lockfile=/var/lock/subsys/nginx
make_dirs() {
# make required directories
user=`nginx -V 2>&1 | grep "configure arguments:" | sed 's/[^*]*--user=\([^ ]*\).*/\1/g' -`
options=`$nginx -V 2>&1 | grep 'configure arguments:'`
for opt in $options; do
if [ `echo $opt | grep '.*-temp-path'` ]; then
value=`echo $opt | cut -d "=" -f 2`
if [ ! -d "$value" ]; then
# echo "creating" $value
mkdir -p $value && chown -R $user $value
fi
fi
done
}
start() {
[ -x $nginx ] || exit 5
[ -f $NGINX_CONF_FILE ] || exit 6
make_dirs
echo -n $"Starting $prog: "
daemon $nginx -c $NGINX_CONF_FILE
retval=$?
echo
[ $retval -eq 0 ] && touch $lockfile
return $retval
}
stop() {
echo -n $"Stopping $prog: "
killproc $prog -QUIT
retval=$?
echo
[ $retval -eq 0 ] && rm -f $lockfile
return $retval
}
restart() {
configtest || return $?
stop
sleep 1
start
}
reload() {
configtest || return $?
echo -n $"Reloading $prog: "
killproc $nginx -HUP
RETVAL=$?
echo
}
force_reload() {
restart
}
configtest() {
$nginx -t -c $NGINX_CONF_FILE
}
rh_status() {
status $prog
}
rh_status_q() {
rh_status >/dev/null 2>&1
}
case "$1" in
start)
rh_status_q && exit 0
$1
;;
stop)
rh_status_q || exit 0
$1
;;
restart|configtest)
$1
;;
reload)
rh_status_q || exit 7
$1
;;
force-reload)
force_reload
;;
status)
rh_status
;;
condrestart|try-restart)
rh_status_q || exit 0
;;
*)
echo $"Usage: $0 {start|stop|status|restart|condrestart|try-restart|reload|force-
reload|configtest}"
exit 2
esac
exit 2
esac
chmod +x /etc/init.d/nginx //赋予执行的权限
总结:
Linux的哲学思想之一:组合小程序完成大任务,一切都是使用最基本的软件完成更多的功能,大家可
Linux的哲学思想之一:组合小程序完成大任务,一切都是使用最基本的软件完成更多的功能,大家可
以在工作和学习中进行扩展,接下来我将列举出Linux的哲学思想(个人意见,仅供参考):
1、一切皆文件
2、短小,且目的单一的程序组成
3、串联多个小程序完成复杂任务
4、尽量避免捕获用户接口
5、通过文本文件保存软件的配置信息
1、一切皆文件
2、短小,且目的单一的程序组成
3、串联多个小程序完成复杂任务
4、尽量避免捕获用户接口
5、通过文本文件保存软件的配置信息
通过本个实验,希望大家能对Linux有个全新的认识,同时对于初学者不要有任何恐惧的心里,其实很easy!
转载于:https://blog.51cto.com/luoweiro/707932


 488
488


 被折叠的 条评论
为什么被折叠?
被折叠的 条评论
为什么被折叠?
 到【灌水乐园】发言


