


python web框架Django学习(二)
目录:
三、Django创建APP
四、创建登录页面,实现用户交互,后台管理用户(非数据库方式)
=================================================================================================
三、Django创建App
=================================================================================================
1、首先使用django-admin创建好一个django项目
django-admin startproject test01
2、在test01目录下面执行命令
D:\python2.7.13\exercise\test01>python manage.py startapp cmdb #app名称为cmdb
D:\python2.7.13\exercise\test01>python manage.py startapp openstack
3、查看目录(使用pycharm打开查看),确认是否创建成功!

4、实现浏览器中访问项目cmdb
1) 新创建的cmdb App中的目录有:

2) 修改cmdb中的views.py文件,具体配置如下:
from django.shortcuts import render
from django.shortcuts import HttpResponse  #加入

# Create your views here.
def home(request):                         #定义函数home
    return HttpResponse('<h1>这是我的第一个Django--App程序!!!<h1>')                        HttpResponse()
3) 修改项目中的urls.py文件
from django.conf.urls import url
from django.contrib import admin
from django.shortcuts import HttpResponse #导入HttpServer模块
import time #加入
from cmdb import views #导入cmdb app中的views
def home(request): #定义函数home
return HttpResponse('<h1>这是我的第一个Django程序!!!<h1>')
urlpatterns = [
url(r'^admin/', admin.site.urls),
url(r'^index.html',home), #添加index.html
url(r'^cmdb',views.home), #将cmdb app添加到url中
]
4) 开启django服务器:
5) 浏览器访问测试:

==================================================================================================
四、创建登录页面,实现用户交互,后台管理用户(非数据库方式)
=================================================================================================
1、在项目test01目录下面创建一个templates目录,并且在templates目录中创建一个html文件index.html。
2、在html文件中写入内容如下:
<!DOCTYPE html>
<html lang="en">
<head>
<meta charset="UTF-8">
<title>Title</title>
<style>
label{
width: 120px;
text-align: right;
display: inline-block;
}
</style>
</head>
<body>
<form action="/login" method="post">
<p>
<label for="username">请输入用户名</label>
<input id="username" type="text" />
</p>
<p>
<label for="password">请输入密码</label>
<input id="password" type="text" />
<input type="submit" values="提交"/>
</p>
</form>
</body>
</html>
3、在APP文件cmdb目录下的views.py文件中写入以下内容:
from django.shortcuts import HttpResponse #加入
# Create your views here.
def login(request): #定义函数home
f = open('templates/index.html','r',encoding='utf8')
data = f.read()
f.close()
return HttpResponse(data)
【注意】:可以将views.py中的以上内容修改为:
from django.shortcuts import render
def login(request):
return render(request,'index.html')
并且修改项目文件test01中的setting.py中的TEMPLATES中的DIRS,修改为:
'DIRS': [os.path.join(BASE_DIR,'templates')],
表示默认模板位置在templates目录下面。

4、在项目文件夹test01下面的urls.py文件中加入
urlpatterns = [
url(r'^admin/', admin.site.urls),
url(r'^index.html',home), #添加index.html
url(r'^login',views.login), #将cmdb app添加到url中
]
5、开启django服务器,浏览器访问效果为:

到此,浏览器能够正常访问前端页面,但是不能实现用户交互!!!
下面将实现用户输入正确的用户名和密码时跳转到百度首页;输入错误的用户名或者密码时,提示“用户名或密码错误”
6、在app文件cmdb中的views.py中加入:
from django.shortcuts import render
from django.shortcuts import redirect
def login(request):
if request.method == "POST":
user = request.POST.get('user',None) #得到用户输入的用户名
pwd = request.POST.get('pwd', None) #得到用户输入的密码
print(user,pwd) #在后台打印用户输入的用户名和密码
if user == 'root' and pwd == '123456': #判断
return redirect('http://www.baidu.com') #跳转到百度
return render(request, 'index.html')
当用户输入用户名为root,密码为123456时,跳转到百度首页!!!
7、继续设计当用户输入错误信息是,返回“用户名或密码错误”
1) 在index.html文件中加入一行:<span style="color: red;">` error_message `</span>
加入后,index.html文件为:
<!DOCTYPE html>
<html lang="en">
<head>
<meta charset="UTF-8">
<title>Title</title>
<style>
label{
width: 120px;
text-align: right;
display: inline-block;
}
</style>
</head>
<body>
<form action="/login" method="post">
<p>
<label for="username">请输入用户名:</label>
<input id="username" type="text" name="user"/>
</p>
<p>
<label for="pwd">请输入密码:</label>
<input id="pwd" type="password" name="pwd"/>
<input type="submit" values="提交" />
<span style="color: red;">` error_message `</span>
</p>
</form>
</body>
</html>
2)在app文件views.py文件中修改为:
from django.shortcuts import render
from django.shortcuts import redirect
def login(request):
error_message=""
if request.method == "POST":
user = request.POST.get('user',None)
pwd = request.POST.get('pwd', None)
print(user,pwd)
if user == 'root' and pwd == '123456':
return redirect('http://www.baidu.com')
else:
error_message = "用户名或密码错误"
return render(request, 'index.html',{'error_message':error_message})
3) 当输入错误信息时,浏览器访问效果为:

到此,能够实现用户名为root密码为123456的用户登录,并且跳转到百度首页。而且实现了当用户输入错误的用户名或密码时,提示“用户名或者密码错误”!
下面将实现后台管理用户。
8、首先在templates目录中创建一个名为home.html的HTML文件,文件内容如下:
<!DOCTYPE html>
<html lang="en">
<head>
<meta charset="UTF-8">
<title>Title</title>
</head>
<body>
<table>
<tr>
<td>张三</td>
<td>1992</td>
<td>女</td>
</tr>
<tr>
<td>李四</td>
<td>1993</td>
<td>男</td>
</tr>
<tr>
<td>王五</td>
<td>1997</td>
<td>男</td>
</tr>
</table>
</body>
<html>
9、在APP文件cmdb中的views.py中定义home函数,并把redirect中的地址改为/home
from django.shortcuts import render
from django.shortcuts import redirect
def login(request):
error_message=""
if request.method == "POST":
user = request.POST.get('user',None)
pwd = request.POST.get('pwd', None)
print(user,pwd)
if user == 'root' and pwd == '123456':
return redirect('/home')
else:
error_message = "用户名或密码错误"
return render(request, 'index.html',{'error_message':error_message})
def home(request):
return render(request,'home.html')
10、在项目文件test01的urls.py中加入映射关系from django.conf.urls import url
from django.contrib import admin
from django.shortcuts import HttpResponse #导入HttpServer模块
import time #加入
from cmdb import views #导入cmdb app中的views
def home(request): #定义函数home
return HttpResponse('<h1>这是我的第一个Django程序!!!<h1>')
urlpatterns = [
url(r'^admin/', admin.site.urls),
url(r'^index.html',home), #添加index.html
url(r'^login',views.login), #将cmdb app添加到url中
url(r'^home',views.home)
]
11、浏览器测试
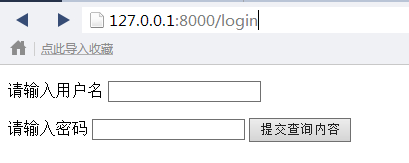
1) 浏览器中输入用户登录地址:127.0.0.1:8000/login

2) 输入正确的用户名和密码,正常跳转到127.0.0.1:8000/home页面

到此,当用户输入正确的用户名和密码时,能够实现跳转,并且能够能够看到之前在home.html文件中输入的三位用户的信息,但是这些用户的信息无法灵活改变,已经在html文件中写死了。
下面将进行将后台列表中的用户,用循环的方式,打印在前端页面上。
12、首先需要在home.html文件中添加一个循环,添加后home.html文件如下:
<!DOCTYPE html><html lang="en">
<head>
<meta charset="UTF-8">
<title>Title</title>
</head>
<body>
<table>
{% for row in user_list %}
<tr>
<td> ` row`.`username `</td>
<td> ` row`.`gender `</td>
<td> ` row`.`email `</td>
</tr>
{% endfor %}
<tr>
<td>李四</td>
<td>1993</td>
<td>男</td>
</tr>
<tr>
<td>王五</td>
<td>1997</td>
<td>男</td>
</tr>
</table>
</body>
<html>
【注意】:
1) Django中在html文件中加入文件的方法:
{% for row in user_list %} #循环的开始,需要一对大括号,并且里面有两个%
<tr>
<td>` row`.`username `</td>
<td>` row`.`gender `</td>
<td>` row`.`email `</td>
</tr>
{% endfor %} #循环的结尾也得有一对大括号和两个%
2) row表示一个字典
3) 引入单变量值时需要两个大括号
{% for row in user_list %}
<tr>
<td>` row`.`username `</td>
<td>` row`.`gender `</td>
<td>` row`.`email `</td>
</tr>
{% endfor %}
这里的username、gender和email与APP文件中views.py中的username、gender、email相对应。
13、修改APP文件中的views.py文件,加入USER_LIST列表和一个循环,修改后的views.py文件如下:
from django.shortcuts import renderfrom django.shortcuts import redirect
def login(request):
error_message=""
if request.method == "POST":
user = request.POST.get('user',None)
pwd = request.POST.get('pwd', None)
print(user,pwd)
if user == 'root' and pwd == '123456':
return redirect('/home')
else:
error_message = "用户名或密码错误"
return render(request, 'index.html',{'error_message':error_message})
USER_LIST=[
{'username':'qiuuuu','email':'abcdefg','gender':'male'}
]
for index in range(20):
temp = {'username':'qiuuuu'+str(index),'email':'abcdef','gender':'male'}
USER_LIST.append(temp)
#str(index)表示将index的值变为字符型,range(20)表示数字1到20之间的整数从小到大排列。
def home(request):
return render(request,'home.html',{'user_list':USER_LIST})
14、在项目文件test01中的urls.py中加入对应关系,加入后的urls.py文件如下:
from django.conf.urls import urlfrom django.contrib import admin
from django.shortcuts import HttpResponse #导入HttpServer模块
import time #加入
from cmdb import views #导入cmdb app中的views
def home(request): #定义函数home
return HttpResponse('<h1>这是我的第一个Django程序!!!<h1>')
urlpatterns = [
url(r'^admin/', admin.site.urls),
url(r'^index.html',home), #添加index.html
url(r'^login',views.login), #将cmdb app添加到url中
url(r'^home',views.home),
]
15、浏览器输入127.0.0.1:8000/login,然后输入正确的用户名和密码后跳转到home.html页面的效果为:

转载于:https://blog.51cto.com/doublelinux/1970548


 74
74

 被折叠的 条评论
为什么被折叠?
被折叠的 条评论
为什么被折叠?
 到【灌水乐园】发言


