


1. 当然复杂的3d模型我们是可以通过更专业的工具做出来,然后导入项目中,我们只是方便演示,选择简单的图形。
Tip: 关于摄像机的NearPlaneDistance和FarPlaneDistance属性用来设置盲区。比NearPlaneDistance更近的对象根本不会显示,比FarPlaneDistance更远的对象是不会显示的。改变这些值以防出现渲染伪影。最常见的例子当复杂的网格离摄像机非常近时,可能会导致z-fighting问题(拼接问题)。
我们上节课说了三角形,这节课我们复习下上节的步骤。
1. 摄像机
2.MeshGeometry3D的数据
3.添加模型材质
4.光源设置,关于光的MSDN讲解:https://msdn.microsoft.com/zh-cn/library/office/jj171024.aspx
5.可选的辅助工具
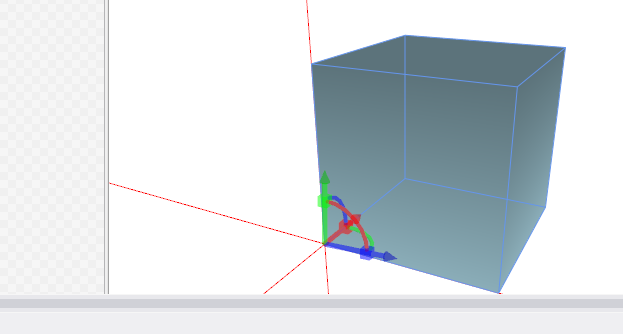
<Window x:Class="ay3dDemo.Window3"
        xmlns="http://schemas.microsoft.com/winfx/2006/xaml/presentation"
        xmlns:x="http://schemas.microsoft.com/winfx/2006/xaml"
        xmlns:tools="clr-namespace:_3DTools;assembly=3DTools"
        Title="Window3" Height="400" Width="600">
    <Grid>
        <Viewport3D>
            <Viewport3D.Camera>
                <PerspectiveCamera
          FarPlaneDistance="100"
          LookDirection="2,-1,-1"
          UpDirection="0,1,0"
          NearPlaneDistance="1"
          Position="-20,15,15"
          FieldOfView="60"
            >

                </PerspectiveCamera>
            </Viewport3D.Camera>
            <ModelVisual3D>
                <ModelVisual3D.Content>
                    <DirectionalLight
             Color="White"
             Direction="-2,-3,-1" />
                </ModelVisual3D.Content>
            </ModelVisual3D>

            <ModelVisual3D>
                <ModelVisual3D.Content>
                    <DirectionalLight
             Color="White"
             Direction="2,3,1" />
                </ModelVisual3D.Content>

            </ModelVisual3D>
            <ModelVisual3D>
                <ModelVisual3D.Content>
                    <GeometryModel3D  x:Name="cubeGeometry">
                        <GeometryModel3D.Geometry>
                            <MeshGeometry3D   Positions="0,0,0 10,0,0 0,10,0 10,10,0
                                           0,0,10 10,0,10 0,10,10 10,10,10"
                        TriangleIndices="0,2,1 1,2,3 0,4,2 2,4,6
                                                 0,1,4 1,5,4 1,7,5 1,3,7
                                                 4,5,6 7,6,5 2,6,3 3,6,7"
                         Normals="0,1,0 0,1,0 1,0,0 1,0,0
                                 0,1,0 0,1,0 1,0,0 1,0,0" />
                        </GeometryModel3D.Geometry>
                        <GeometryModel3D.Material>
                            <DiffuseMaterial Brush="LightBlue" />
                        </GeometryModel3D.Material>
                    </GeometryModel3D>
                </ModelVisual3D.Content>
                <ModelVisual3D.Transform>
                    <RotateTransform3D>
                        <RotateTransform3D.Rotation>
                            <AxisAngleRotation3D x:Name="rotate"
                                     Axis="0 1 0" />
                        </RotateTransform3D.Rotation>
                    </RotateTransform3D>
                </ModelVisual3D.Transform>
            </ModelVisual3D>


            <tools:ScreenSpaceLines3D Points="0,-20,0 0,20,0"
          Thickness="1" Color="Red">
            </tools:ScreenSpaceLines3D>
            <tools:ScreenSpaceLines3D Points="-20,0,0 20,0,0"
          Thickness="1" Color="Red">
            </tools:ScreenSpaceLines3D>
            <tools:ScreenSpaceLines3D Points="0,0,-20 0,0,20"
          Thickness="1" Color="Red">
            </tools:ScreenSpaceLines3D>
        </Viewport3D>
    </Grid>
</Window>
如上是个正方体:有时候太纠结细节,会学的很累,这里我们跳过吧,在企业开发中,MeshGeometry3D一般都是美工提供的模型。这里不要太纠结。
=============潇洒的版权线==========www.ayjs.net===== Aaronyang ========= AY =========== 安徽 六安 杨洋 ========== 未经允许不许转载 =========
博客内容已经迁移到:http://www.ayjs.net/2015/03/61/
OK,下篇文章,我们讲3d中的交互和动画,比如命中测试,3d表面上的控件。
=============潇洒的版权线==========www.ayjs.net===== Aaronyang ========= AY =========== 安徽 六安 杨洋 ========== 未经允许不许转载 =========
-------------------小小的推荐,作者的肯定,读者的支持。推不推荐不重要,重要的是希望大家能把WPF推广出去,别让这么好的技术消失了,求求了,让我们为WPF技术做一份贡献。-----------------


 3578
3578


 被折叠的 条评论
为什么被折叠?
被折叠的 条评论
为什么被折叠?
 到【灌水乐园】发言


