


涉及到的样式都在代码中有说明:


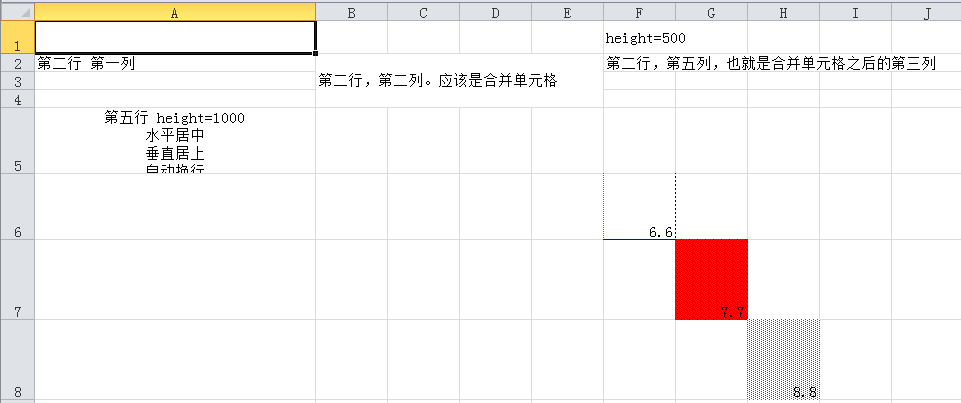
  1 package com.it.poiTest;
  2
  3 import java.io.FileNotFoundException;
  4 import java.io.FileOutputStream;
  5 import java.io.IOException;
  6
  7 import org.apache.poi.hssf.util.HSSFColor;
  8 import org.apache.poi.sl.usermodel.Sheet;
  9 import org.apache.poi.ss.usermodel.Cell;
 10 import org.apache.poi.ss.usermodel.Color;
 11 import org.apache.poi.ss.usermodel.IndexedColors;
 12 import org.apache.poi.ss.usermodel.Row;
 13 import org.apache.poi.ss.util.CellRangeAddress;
 14 import org.apache.poi.xssf.usermodel.XSSFCellStyle;
 15 import org.apache.poi.xssf.usermodel.XSSFColor;
 16 import org.apache.poi.xssf.usermodel.XSSFSheet;
 17 import org.apache.poi.xssf.usermodel.XSSFWorkbook;
 18
 19 public class MoreStyleCell {
 20     public static void main(String[] args) {
 21         XSSFWorkbook workbook = new XSSFWorkbook();
 22         try {
 23             FileOutputStream out = new FileOutputStream("moreStyleWrokNook.xlsx");
 24             XSSFSheet sheet = workbook.createSheet("stylesheet");
 25
 26             /**
 27              * 简单设置行高
 28              */
 29             //第一行
 30             Row row0 = sheet.createRow(0);
 31             row0.setHeight((short) (500));
 32             //第6列
 33             Cell cell = row0.createCell(5);
 34             cell.setCellValue("height=500");
 35
 36
 37             /**
 38              * 测试合并单元格之后的各个位置
 39              */
 40             //合并单元格                                参数1:第一行  /     参数2:最后一行 /   参数3:第一列 /  参数4:最后一列 [在此范围之内]
 41             sheet.addMergedRegion(new CellRangeAddress(1,3,1,4));
 42             Row  row1 = sheet.createRow(1);
 43             Cell cell1 = row1.createCell(0);
 44             cell1.setCellValue("第二行 第一列");
 45             Cell cell2 = row1.createCell(1);
 46             cell2.setCellValue("第二行,第二列。应该是合并单元格");
 47             //既然合并了单元格,查看一下1.2在什么位置  【证明并没有出现】
 48             Cell cell3 = row1.createCell(2);
 49             cell3.setCellValue("第二行,第三列");
 50
 51             Cell cell4 = row1.createCell(5);
 52             cell4.setCellValue("第二行,第五列,也就是合并单元格之后的第三列");
 53
 54             /**
 55              * 测试cellstyle的设置--单元格居中设置以及单元格内文字换行设置
 56              */
 57             row0 = sheet.createRow(4);
 58             row0.setHeight((short)1000);
 59             cell1 = row0.createCell(0);
 60             cell1.setCellValue("第五行 height=1000");
 61             //设置某一列的宽度
 62             sheet.setColumnWidth(0, 9000);
 63             XSSFCellStyle style1 = workbook.createCellStyle();
 64             //设置style---cell中水平的对齐方式
 65             style1.setAlignment(XSSFCellStyle.ALIGN_CENTER);
 66             //设置style---cell中垂直方向的对齐方式
 67             style1.setVerticalAlignment(XSSFCellStyle.VERTICAL_TOP);
 68             //给某个确定的cell设置样式
 69             cell1.setCellStyle(style1);
 70             //为cell单元格追加内容
 71             //获取到cell内的值【getRichStringCellValue获取富文本类型的值,除了小数类型的使用这个方法获取getNumericCellValue,其余类型均可以使用此方法获取toString之后就可以转化为其他的数据类型】
 72             String cell1Value = cell1.getRichStringCellValue().toString();
 73             //cell1.getNumericCellValue();
 74             //加上\n之后无法自动换行
 75             cell1.setCellValue(cell1Value+"\n"+"水平居中"+"\n"+"垂直居上");
 76             //设置style自动换行    这样就可以自动换行了
 77             style1.setWrapText(true);
 78             cell1.setCellValue(cell1Value+"\n"+"水平居中"+"\n"+"垂直居上"+"\n"+"自动换行");
 79             System.out.println(cell1Value);
 80
 81             /**
 82              * style样式设置--设置border的边框样式以及颜色
 83              */
 84             row0 = sheet.createRow(5);
 85             row0.setHeight((short)1000);
 86             cell1 = row0.createCell(5);
 87             cell1.setCellValue(6.6);
 88             XSSFCellStyle style2 = workbook.createCellStyle();
 89             style2.setBorderBottom(XSSFCellStyle.BORDER_THIN);
 90             style2.setBorderLeft(XSSFCellStyle.BORDER_HAIR);
 91             style2.setBorderRight(XSSFCellStyle.BORDER_DOTTED);
 92             style2.setBorderTop(XSSFCellStyle.BORDER_NONE);
 93             //颜色三种方式 给出   方式1:
 94             style2.setBottomBorderColor(IndexedColors.BLUE.getIndex());
 95             //方式2
 96             XSSFColor color = new XSSFColor();
 97             byte[] a = {127,0,13};
 98             //color.setRGB(a);
 99             color.setARGBHex("FF2906");
100             style2.setLeftBorderColor(color);
101             //方式3
102             style2.setRightBorderColor(HSSFColor.BLACK.index);
103             cell1.setCellStyle(style2);
104
105             /**
106              * style设置---设置单元格的背景色与填充效果
107              */
108             row0 = sheet.createRow(6);
109             row0.setHeight((short) 1200);
110             cell1 = row0.createCell(6);
111             cell1.setCellValue(7.7);
112             XSSFCellStyle style3 = workbook.createCellStyle();
113             style3.setFillBackgroundColor(HSSFColor.RED.index);
114             //设置单元格的填充效果
115             style3.setFillPattern(XSSFCellStyle.LEAST_DOTS);
116             cell1.setCellStyle(style3);
117
118
119             /**
120              * style设置--设置单元格的前置填充颜色
121              */
122             row0 = sheet.createRow(7);
123             row0.setHeight((short) 1200);
124             cell1 = row0.createCell(7);
125             cell1.setCellValue(8.8);
126             XSSFCellStyle style4 = workbook.createCellStyle();
127             style4.setFillForegroundColor(IndexedColors.GREEN.index);
128             style4.setFillPattern(XSSFCellStyle.ALIGN_FILL);
129             cell1.setCellStyle(style4);
130
131
132             workbook.write(out);
133
134         } catch (FileNotFoundException e) {
135             e.printStackTrace();
136         } catch (IOException e) {
137             e.printStackTrace();
138         }
139     }
140 }
【着重说明一点】:
合并单元格的方法
hssfSheet.addMergedRegion(new CellRangeAddress(3,11,1,4))
参数1 从第4行开始
参数2 到第12行结束 包含第12行
参数3 从第2列开始
参数4 到第5列结束 包含第5列
如果【开始行和结束行在同一行】 或者 【开始列和结束列在同一列】
这两种情况允许同时出现一种或者都不出现。
如果【开始行和结束行在同一行】 和 【开始列和结束列在同一列】同时出现的话,那就没有合并单元格的意义了。同时就会报错:【错误行号和上面例子中行号并不匹配,不必在意】
java.lang.IllegalArgumentException: Merged region B4 must contain 2 or more cells
同样,如果控制不好,还会出现如下错误:
java.lang.IllegalStateException: Cannot add merged region B5:B6 to sheet because it overlaps with an existing merged region (B4:B5).
不能将合并的区域B5:B6添加到表格,因为它与现有的合并区域重叠(B4:B5)
就是你在下面合并的单元格 想要把上面已经合并的一部分单元格重叠了。
样式最后的图例:
其中,cell的边框类型分别如下:
| 边框范例图 | 对应的静态值 |
|
| HSSFCellStyle. BORDER_DOTTED |
|
| HSSFCellStyle. BORDER_HAIR |
|
| HSSFCellStyle. BORDER_DASH_DOT_DOT |
|
| HSSFCellStyle. BORDER_DASH_DOT |
|
| HSSFCellStyle. BORDER_DASHED |
|
| HSSFCellStyle. BORDER_THIN |
|
| HSSFCellStyle. BORDER_MEDIUM_DASH_DOT_DOT |
|
| HSSFCellStyle. BORDER_SLANTED_DASH_DOT |
|
| HSSFCellStyle. BORDER_MEDIUM_DASH_DOT |
|
| HSSFCellStyle. BORDER_MEDIUM_DASHED |
|
| HSSFCellStyle. BORDER_MEDIUM |
|
| HSSFCellStyle. BORDER_THICK |
|
| HSSFCellStyle. BORDER_DOUBLE |
其中,cell的背景纹理图片如下:
| 图案样式 | 常量 |
|
| HSSFCellStyle. NO_FILL |
|
| HSSFCellStyle. ALT_BARS |
|
| HSSFCellStyle. FINE_DOTS |
|
| HSSFCellStyle. SPARSE_DOTS |
|
| HSSFCellStyle. LESS_DOTS |
|
| HSSFCellStyle. LEAST_DOTS |
|
| HSSFCellStyle. BRICKS |
|
| HSSFCellStyle. BIG_SPOTS |
|
| HSSFCellStyle. THICK_FORWARD_DIAG |
|
| HSSFCellStyle. THICK_BACKWARD_DIAG |
|
| HSSFCellStyle. THICK_VERT_BANDS |
|
| HSSFCellStyle. THICK_HORZ_BANDS |
|
| HSSFCellStyle. THIN_HORZ_BANDS |
|
| HSSFCellStyle. THIN_VERT_BANDS |
|
| HSSFCellStyle. THIN_BACKWARD_DIAG |
|
| HSSFCellStyle. THIN_FORWARD_DIAG |
|
| HSSFCellStyle. SQUARES |
|
| HSSFCellStyle. DIAMONDS |
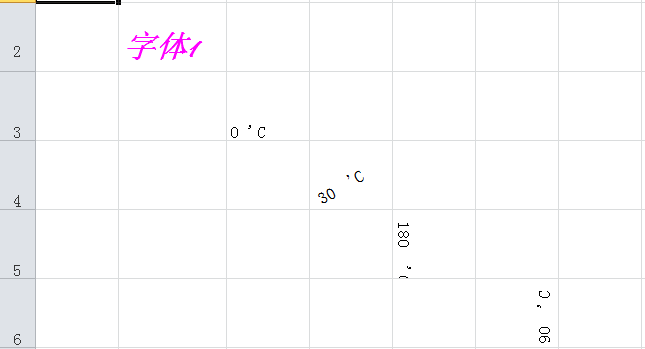
下面使用POI对字体进行设置:
  1 package com.it.poiTest;
  2
  3 import java.io.FileInputStream;
  4 import java.io.FileNotFoundException;
  5 import java.io.FileOutputStream;
  6 import java.io.IOException;
  7
  8 import org.apache.poi.hssf.util.HSSFColor;
  9 import org.apache.poi.ss.usermodel.Cell;
 10 import org.apache.poi.ss.usermodel.IndexedColors;
 11 import org.apache.poi.ss.usermodel.Row;
 12 import org.apache.poi.xssf.usermodel.XSSFCellStyle;
 13 import org.apache.poi.xssf.usermodel.XSSFFont;
 14 import org.apache.poi.xssf.usermodel.XSSFSheet;
 15 import org.apache.poi.xssf.usermodel.XSSFWorkbook;
 16
 17 public class FontTest {
 18
 19     public static void main(String[] args) {
 20             try {
 21                 XSSFWorkbook workbook = new XSSFWorkbook();
 22                 FileOutputStream out = new FileOutputStream("FontSet.xlsx");
 23                 XSSFSheet sheet = workbook.createSheet("font  set");
 24                 sheet.setColumnWidth(1, 3000);
 25                 Row row = sheet.createRow(1);
 26                 row.setHeight((short) 900);
 27                 Cell cell = row.createCell(1);
 28                 cell.setCellValue("字体1");
 29
 30                 /**
 31                  * font设置---设置字体样式
 32                  */
 33                 XSSFFont font1 = workbook.createFont();
 34                 //设置行高使用HSSFRow对象的setHeight和setHeightInPoints方法,这两个方法的区别在于setHeightInPoints的单位是点,而setHeight的单位是1/20个点,所以setHeight的值永远是setHeightInPoints的20倍。
 35                 //设置字号大小
 36                 //font1.setFontHeight(20);
 37                 //设置字号大小
 38                 font1.setFontHeightInPoints((short) 20);
 39                 //设置字体
 40                 font1.setFontName("Pristina");
 41                 //设置加粗
 42                 font1.setBold(true);
 43                 //设置斜体
 44                 font1.setItalic(true);
 45                 //设置字体颜色
 46                 font1.setColor(IndexedColors.PINK.getIndex());
 47                 //或者
 48                 //font1.setColor(HSSFColor.YELLOW.index);
 49                 XSSFCellStyle style = workbook.createCellStyle();
 50                 style.setFont(font1);
 51                 cell.setCellStyle(style);
 52
 53
 54                 /**
 55                  * 设置字体角度  顺时针旋转
 56                  */
 57                 row = sheet.createRow(2);
 58                 row.setHeight((short) 900);
 59                 cell = row.createCell(2);
 60                 XSSFCellStyle style1 = workbook.createCellStyle();
 61                 style1.setRotation((short) 0);
 62                 cell.setCellValue("0 'C");
 63                 cell.setCellStyle(style1);
 64
 65                 row = sheet.createRow(3);
 66                 row.setHeight((short) 900);
 67                 cell = row.createCell(3);
 68                 XSSFCellStyle style2 = workbook.createCellStyle();
 69                 style2.setRotation((short) 30);
 70                 cell.setCellValue("30  'C");
 71                 cell.setCellStyle(style2);
 72
 73                 row = sheet.createRow(4);
 74                 row.setHeight((short) 900);
 75                 cell = row.createCell(4);
 76                 XSSFCellStyle style3 = workbook.createCellStyle();
 77                 style3.setRotation((short) 180);
 78                 cell.setCellValue("180  'C");
 79                 cell.setCellStyle(style3);
 80
 81                 row = sheet.createRow(5);
 82                 row.setHeight((short) 900);
 83                 cell = row.createCell(5);
 84                 XSSFCellStyle style4 = workbook.createCellStyle();
 85                 style4.setRotation((short) 90);
 86                 cell.setCellValue("90  'C");
 87                 cell.setCellStyle(style4);
 88
 89
 90
 91
 92
 93
 94
 95
 96                 workbook.write(out);
 97                 out.close();
 98             } catch (FileNotFoundException e) {
 99                 e.printStackTrace();
100             } catch (IOException e) {
101                 e.printStackTrace();
102             }
103     }
104
105 }
样式显示如下:


 596
596


 被折叠的 条评论
为什么被折叠?
被折叠的 条评论
为什么被折叠?
 到【灌水乐园】发言


