


项目简介:
最近在做一个有趣的项目,需要对某网站的验证码进行识别。
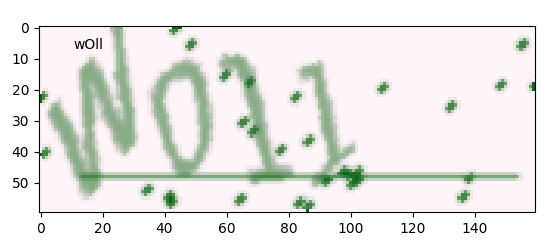
某网站验证码如图: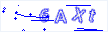 ,像素大小:30x106x3
通过人工标记的验证码数量约为1000条: 
现在需要通过机器学习方法来进行识别新验证码,设计的方案有如下四种:
-
KNN + 原样本图;需要对图像去噪、二值化、切割等处理。对数据量要求没CNN高。
-
CNN + 原样本图;缺点:样本少,优点:数据质量高。
-
CNN + 构造类似验证码图;缺点:构造验证码是否和和原验证码类似,需要较高技术;优点:样本多。
-
CNN + 单字符样本图;优点:输入图像小,且输出类别少。
-
其他:如用pytesseract+去噪+二值化等,简单尝试了一下准确率很低,pass掉了
方案一:KNN + 原样本图
步骤:
-
去噪: 原图:
	 class NoiseDel():
		#去除干扰噪声
		def noise_del(self,img):
			height = img.shape[0]
			width = img.shape[1]
			channels = img.shape[2]

			# 清除四周噪点
			for row in [0,height-1]:
				for column in range(0, width):
					if img[row, column, 0] == 0 and img[row, column, 1] == 0:
						img[row, column, 0] = 255
						img[row, column, 1] = 255
			for column in [0,width-1]:
				for row in range(0, height):
					if img[row, column, 0] == 0 and img[row, column, 1] == 0:
						img[row, column, 0] = 255
						img[row, column, 1] = 255

			# 清除中间区域噪点
			for row in range(1,height-1):
				for column in range(1,width-1):
					if img[row, column, 0] == 0 and img[row, column, 1] == 0:
						a = img[row - 1, column]  # 上
						b = img[row + 1, column]  # 下
						c = img[row, column - 1]  # 左
						d = img[row, column + 1]  # 右
						ps = [p for p in [a, b, c, d] if 1 < p[1] < 255]
						# 如果上下or左右为白色,设置白色
						if  (a[1]== 255 and b[1]== 255) or (c[1]== 255 and d[1]== 255):
							img[row, column, 0] = 255
							img[row, column, 1] = 255
						# 设置灰色

						elif len(ps)>1:
							kk = np.array(ps).mean(axis=0)
							img[row, column, 0] = kk[0]
							img[row, column, 1] = kk[1]
							img[row, column, 2] = kk[2]
						else:
							img[row, column, 0] = 255
							img[row, column, 1] = 255
			return img
	    # 灰度化
		def convert2gray(self,img):
			if len(img.shape) > 2:
				gray = np.mean(img, -1)
				# 上面的转法较快,正规转法如下
				# r, g, b = img[:,:,0], img[:,:,1], img[:,:,2]
				# gray = 0.2989 * r + 0.5870 * g + 0.1140 * b
				return gray
			else:
				return img

		# 二值化
		def binarizing(self,img,threshold, cov=False):
			w, h = img.shape
			if cov:
				for y in range(h):
					for x in range(w):
						if img[x, y] > threshold:
							img[x, y] = 0
						else:
							img[x, y] = 255
			else:
				for y in range(h):
					for x in range(w):
						if img[x, y] < threshold:
							img[x, y] = 0
						else:
							img[x, y] = 255
			return img
去噪后:

-
切分最小图
	def cut_box(img,resize=(64,18)):

		# 灰度,二值化
		image = nd.convert2gray(img)
		image = nd.binarizing(image,190, True)

		image = Image.fromarray(image)
		img0 = Image.fromarray(img)
		box = image.getbbox()
		box1 = (box[0]-2,box[1]-2,box[2]+2,box[3]+2)
		image = img0.crop(box1)
		image = image.resize(resize)

		return np.array(image)
切分后:

-
分割字符串:
	def seg_img(img):
		h,w,c = img.shape
		d = int(w/4)
		img_list = []
		for i in range(4):
			img_list.append(img[:,i*d:(i+1)*d])
		return img_list
分割后:
 ,
, ,
, ,
,
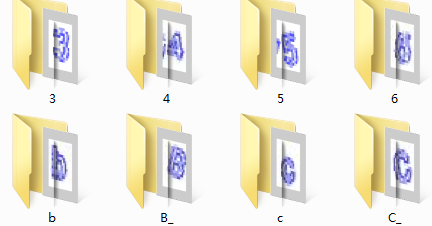
经过对1000张标记好的图片进行处理,得到各个字母数字对应的单字符图片数据集:
-
KNN训练及预测:
对图像进行灰度处理
import os from PIL import Image import numpy as np from cut_prc import cut_box,seg_img from noise_prc import NoiseDel from sklearn import neighbors, svm,tree,linear_model from sklearn.model_selection import train_test_split nd = NoiseDel() def predict_img(img, clf): text = '' image = nd.noise_del(img) image = cut_box(image) image_list = seg_img(image) for im in image_list: im = nd.convert2gray(im) im = im.reshape(-1) c = clf.predict([im,])[0] text += c return text if __name__=="__main__": # 获取训练数据 path = 'data/png_cut' classes = os.listdir(path) x = [] y = [] for c in classes: c_f = os.path.join(path, c) if os.path.isdir(c_f): files = os.listdir(c_f) for file in files: img = Image.open(os.path.join(c_f, file)) img = np.array(img) img = nd.convert2gray(img) img = img.reshape(-1) x.append(img) y.append(c.replace('_','')) x = np.array(x) y = np.array(y) # 拆分训练数据与测试数据 x_train, x_test, y_train, y_test = train_test_split(x, y, test_size=0.02) # 训练KNN分类器 clf = neighbors.KNeighborsClassifier(n_neighbors=5) clf.fit(x_train, y_train) # 预测测试集 test_pre = clf.predict(x_test) print("KNN accuracy score:", (test_pre == y_test).mean()) # 预测新样本集 newpath = 'data/png_new' newfiles = os.listdir(newpath) for file in newfiles: image = Image.open(os.path.join(newpath,file)) image = np.array(image) text = predict_img(image, clf) print(text) # # 训练svm分类器 # clf = svm.LinearSVC() ### # clf.fit(x_train, y_train) # # test_pre = clf.predict(x_test) # print("SVM accuracy score:", (test_pre == y_test).mean()) # # # 训练dt分类器 # clf = tree.DecisionTreeClassifier() # clf.fit(x_train, y_train) # # test_pre = clf.predict(x_test) # print("DT accuracy score:", (test_pre == y_test).mean()) # # # 训练lr分类器 # clf = linear_model.LogisticRegression() ### t # clf.fit(x_train, y_train) # # test_pre = clf.predict(x_test) # print("LR accuracy score:", (test_pre == y_test).mean()) -
运行结果:(单个字符预测精度),KNN最高,达到80%,而SVM,DT,LR均较低
	KNN accuracy score: 0.8170731707317073
	SVM accuracy score: 0.6341463414634146
	DT accuracy score: 0.4878048780487805
	LR accuracy score: 0.5975609756097561
KNN 预测图片:
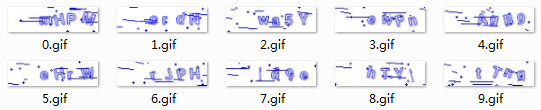
	mHFM
	crdN
	wa5Y
	swFn
	ApB9
	eBrN
	rJpH
	fd9e
	kTVt
	t7ng
方案二:CNN+原样本图
步骤:
-
处理样本数据1020张图,灰度化 ,像素大小30*106,标签为小写字符(标记人员太懒了);
-
拆分数据:train:80%, val:20%
-
网络模型:输入数据维度30*106,采用三层CNN,每一层输出特征维数分别:16,128,16,FC层输出 512维,最后全连接输出4x63,每行代表预测字符的概率。
-
结果:验证集字符准确率最高到达了50%
方案三: CNN+ 构造类似验证码图
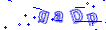
第三方库生成的验证码如下所示:
from captcha.image import ImageCaptcha # pip install captcha
下载相应的字体(比较难找),然后修改第三方库中image.py文件,修改了第三方库后生成的验证码: 
效果和我们需要的验证码比较相似了,但还是有区别。
    fonts = ["font/TruenoBdOlIt.otf", "font/Euro Bold.ttf", "STCAIYUN.TTF"]
    image = ImageCaptcha(width=106, height=30,fonts=[fonts[0]],font_sizes=(18,18,18))
    captcha = image.generate(captcha_text)
image.py
略..
采用自动生成的验证码,用于CNN训练模型,训练和验证精度都达到了98%,但测试原图1000样本的字符精度最高只有40%,由此可见,生成的验证码还是与目标验证码相差较大。
step: 18580/20000...  loss: 0.0105...
step: 18600/20000...  loss: 0.0121...
step: 18600/20000...  --------- val_acc: 0.9675     best: 0.9775  --------- test_acc2: 0.4032
step: 18620/20000...  loss: 0.0131...
step: 18640/20000...  loss: 0.0139...
step: 18660/20000...  loss: 0.0135...
step: 18680/20000...  loss: 0.0156...
step: 18700/20000...  loss: 0.0109...
step: 18700/20000...  --------- val_acc: 0.9625     best: 0.9775  --------- test_acc2: 0.3995
方案四: CNN+ 字符样本集
由于只有1000样本,直接经过CNN端到端输出字符序列,很难到达精度要求,为此方案三采用自动创建样本集的方法,但样本质量和真实样本之间存在差异,导致预测不准。为此,将原1000样本进行分割处理为单字符集,样本数量约4000左右,且输入维度减小很多,同时输出类别也减小很多。分析后改方案有一定可行性。
样本集处理与之前KNN一样: 经过对1000张标记好的图片进行处理,得到各个字母数字对应的单字符图片数据集:
import os
import numpy as np
import tensorflow as tf
from PIL import Image

from noise_prc import NoiseDel
from cut_prc import cut_box,seg_img
from sklearn.model_selection import train_test_split
from sklearn.preprocessing import LabelBinarizer

nd = NoiseDel()

class Config():
    file_name = 'char_02'  # 存放模型文件夹

    w_alpha = 0.01  #cnn权重系数
    b_alpha = 0.1  #cnn偏执系数
    image_h = 18
    image_w = 16


    cnn_f = [16,32,32,512]  # [cov1输出特征维度,cov2输出特征维度,cov3输出特征维度,全连接层输出维度]

    max_captcha = 1  #验证码最大长度
    char_set_len = 50  #字符集长度

    lr = 0.001
    batch_size = 32  # 每批训练大小
    max_steps = 200000  # 总迭代batch数

    log_every_n = 20  # 每多少轮输出一次结果
    save_every_n = 100  # 每多少轮校验模型并保存


class Model():

    def __init__(self, config):
        self.config = config

        self.input()
        self.cnn()

        # 初始化session
        self.saver = tf.train.Saver()
        self.session = tf.Session()
        self.session.run(tf.global_variables_initializer())

    def input(self):
        self.X = tf.placeholder(tf.float32, [None, self.config.image_h * self.config.image_w])
        self.Y = tf.placeholder(tf.float32, [None, self.config.max_captcha * self.config.char_set_len])
        self.keep_prob = tf.placeholder(tf.float32)  # dropout

        # 两个全局变量
        self.global_step = tf.Variable(0, trainable=False, name="global_step")
        self.global_loss = tf.Variable(0, dtype=tf.float32, trainable=False, name="global_loss")

    def cnn(self):
        x = tf.reshape(self.X, shape=[-1, self.config.image_h , self.config.image_w, 1])

        # 3 conv layer
        w_c1 = tf.Variable(self.config.w_alpha * tf.random_normal([3, 3, 1, self.config.cnn_f[0]]))
        b_c1 = tf.Variable(self.config.b_alpha * tf.random_normal([self.config.cnn_f[0]]))
        conv1 = tf.nn.relu(tf.nn.bias_add(tf.nn.conv2d(x, w_c1, strides=[1, 1, 1, 1], padding='SAME'), b_c1))
        conv1 = tf.nn.max_pool(conv1, ksize=[1, 2, 2, 1], strides=[1, 2, 2, 1], padding='SAME')
        conv1 = tf.nn.dropout(conv1, self.keep_prob)

        w_c2 = tf.Variable(self.config.w_alpha * tf.random_normal([3, 3, self.config.cnn_f[0], self.config.cnn_f[1]]))
        b_c2 = tf.Variable(self.config.b_alpha * tf.random_normal([self.config.cnn_f[1]]))
        conv2 = tf.nn.relu(tf.nn.bias_add(tf.nn.conv2d(conv1, w_c2, strides=[1, 1, 1, 1], padding='SAME'), b_c2))
        conv2 = tf.nn.max_pool(conv2, ksize=[1, 2, 2, 1], strides=[1, 2, 2, 1], padding='SAME')
        conv2 = tf.nn.dropout(conv2, self.keep_prob)

        w_c3 = tf.Variable(self.config.w_alpha * tf.random_normal([3, 3, self.config.cnn_f[1], self.config.cnn_f[2]]))
        b_c3 = tf.Variable(self.config.b_alpha * tf.random_normal([self.config.cnn_f[2]]))
        conv3 = tf.nn.relu(tf.nn.bias_add(tf.nn.conv2d(conv2, w_c3, strides=[1, 1, 1, 1], padding='SAME'), b_c3))
        conv3 = tf.nn.max_pool(conv3, ksize=[1, 2, 2, 1], strides=[1, 2, 2, 1], padding='SAME')
        conv3 = tf.nn.dropout(conv3, self.keep_prob)

        # Fully connected layer
        h =tf.cast( conv3.shape[1],tf.int32)
        w = tf.cast( conv3.shape[2],tf.int32)
        f = tf.cast( conv3.shape[3],tf.int32)

        w_d = tf.Variable(self.config.w_alpha * tf.random_normal([h* w * f, self.config.cnn_f[3]]))
        b_d = tf.Variable(self.config.b_alpha * tf.random_normal([self.config.cnn_f[3]]))
        dense = tf.reshape(conv3, [-1, w_d.get_shape().as_list()[0]])
        dense = tf.nn.relu(tf.add(tf.matmul(dense, w_d), b_d))
        dense = tf.nn.dropout(dense, self.keep_prob)

        w_out = tf.Variable(self.config.w_alpha * tf.random_normal([self.config.cnn_f[3], self.config.max_captcha * self.config.char_set_len]))
        b_out = tf.Variable(self.config.b_alpha * tf.random_normal([self.config.max_captcha * self.config.char_set_len]))
        out = tf.add(tf.matmul(dense, w_out), b_out)
        # out = tf.nn.softmax(out)

        # loss
        # loss = tf.reduce_mean(tf.nn.softmax_cross_entropy_with_logits(output, Y))
        self.loss = tf.reduce_mean(tf.nn.sigmoid_cross_entropy_with_logits(logits=out, labels=self.Y))

        # optimizer 为了加快训练 learning_rate应该开始大,然后慢慢衰
        self.optimizer = tf.train.AdamOptimizer(learning_rate=self.config.lr).minimize(self.loss,global_step=self.global_step)

        predict = tf.reshape(out, [-1, self.config.max_captcha, self.config.char_set_len])
        self.max_idx_p = tf.argmax(predict, 2)
        max_idx_l = tf.argmax(tf.reshape(self.Y, [-1, self.config.max_captcha, self.config.char_set_len]), 2)
        correct_pred = tf.equal(self.max_idx_p, max_idx_l)
        self.accuracy = tf.reduce_mean(tf.cast(correct_pred, tf.float32))


    def load(self, checkpoint):
        self.saver.restore(self.session, checkpoint)
        print('Restored from: {}'.format(checkpoint))


    def train(self, get_next_batch, model_path, x_train, y_train, x_test, y_test):
        with self.session as sess:
            while True:
                batch_x, batch_y = get_next_batch(x_train, y_train,self.config.batch_size)
                _, loss_ = sess.run([self.optimizer, self.loss], feed_dict={self.X: batch_x, self.Y: batch_y, self.keep_prob: 0.75})

                if self.global_step.eval() % self.config.log_every_n == 0:
                    print('step: {}/{}... '.format(self.global_step.eval(), self.config.max_steps),
                          'loss: {:.4f}... '.format(loss_))

                # 每100 step计算一次准确率
                if self.global_step.eval() % self.config.save_every_n == 0:
                    # batch_x_test, batch_y_test = get_next_batch(100)
                    acc = sess.run(self.accuracy, feed_dict={self.X: x_test, self.Y: y_test, self.keep_prob: 1.})
                    print('step: {}/{}... '.format(self.global_step.eval(), self.config.max_steps),
                          '--------- acc: {:.4f} '.format(acc),
                          '   best: {:.4f} '.format(self.global_loss.eval()))

                    if acc > self.global_loss.eval():
                        print('save best model...')
                        update = tf.assign(self.global_loss, acc)  # 更新最优值
                        sess.run(update)
                        self.saver.save(sess, os.path.join(model_path, 'model'), global_step=self.global_step)
                    if self.global_step.eval() >= self.config.max_steps:
                        #self.saver.save(sess, os.path.join(model_path, 'model_last'), global_step=self.global_step)
                        break

    def test(self, batch_x_test):
        sess = self.session
        max_idx_p = sess.run(self.max_idx_p, feed_dict={self.X: batch_x_test, self.keep_prob: 1.})
        return max_idx_p


def get_next_batch( train_x, train_y, batch_size=32):
    n = train_x.shape[0]
    chi_list = np.random.choice(n, batch_size)
    return train_x[chi_list],train_y[chi_list]


def img_cut_to_arry(img):
    imgs = []
    image = nd.noise_del(img)
    image = cut_box(image)
    image_list = seg_img(image)
    for im in image_list:
        im = nd.convert2gray(im)
        im = im.reshape(-1)
        imgs.append(im)
    return imgs


if __name__=="__main__":
    # nd = NoiseDel()
    # 获取训练数据
    path = 'data/png_cut'
    classes = os.listdir(path)
    x = []
    y = []
    for c in classes:
        c_f = os.path.join(path, c)
        if os.path.isdir(c_f):
            files = os.listdir(c_f)
            for file in files:
                img = Image.open(os.path.join(c_f, file))
                img = np.array(img)
                img = nd.convert2gray(img)
                img = img.reshape(-1)
                x.append(img)
                y.append(c.replace('_',''))

    lb = LabelBinarizer()
    ly = lb.fit_transform(y)  # one-hot
    x = np.array(x)
    y = np.array(ly)

    # 拆分训练数据与测试数据
    x_train, x_test, y_train, y_test = train_test_split(x, y, test_size=0.02)


    # 创建模型目录
    model_path = os.path.join('c_models', Config.file_name)
    if os.path.exists(model_path) is False:
        os.makedirs(model_path)

    # 加载上一次保存的模型
    model = Model(Config)
    checkpoint_path = tf.train.latest_checkpoint(model_path)
    if checkpoint_path:
        model.load(checkpoint_path)

    # train and val
    print('start to training...')
    model.train(get_next_batch, model_path, x_train,y_train, x_test, y_test)


    # test

    # 预测新样本集
    newpath = 'data/png_new'
    newfiles = os.listdir(newpath)
    for file in newfiles:
        pre_text=''
        image = Image.open(os.path.join(newpath,file))
        image = np.array(image)
        imgs= img_cut_to_arry(image)
        for img in imgs:
            p = model.test([img,])
            p_arr = np.zeros([1,50])
            p_arr[0,p] =1
            c = lb.inverse_transform(p_arr)
            pre_text += c[0]


        print(pre_text)
- 运行结果:字符预测精度95%以上
step: 2500/200000...  loss: 0.0803...
step: 2500/200000...  --------- acc: 0.0854     best: 0.1341
step: 2520/200000...  loss: 0.0818...
step: 2540/200000...  loss: 0.0844...
step: 2560/200000...  loss: 0.0827...
step: 2580/200000...  loss: 0.0794...
step: 2600/200000...  loss: 0.0823...
step: 2600/200000...  --------- acc: 0.1951     best: 0.1341
save best model...
step: 2620/200000...  loss: 0.0775...
step: 2640/200000...  loss: 0.0754...
step: 2660/200000...  loss: 0.0823...
step: 2680/200000...  loss: 0.0678...
step: 2700/200000...  loss: 0.0763...
step: 2700/200000...  --------- acc: 0.3049     best: 0.1951
.
.
.
.
step: 41400/200000...  --------- acc: 0.8659     best: 0.9512
step: 41450/200000...  loss: 0.0091...
step: 41500/200000...  loss: 0.0134...
step: 41550/200000...  loss: 0.0151...
step: 41600/200000...  loss: 0.0256...
step: 41600/200000...  --------- acc: 0.9390     best: 0.9512
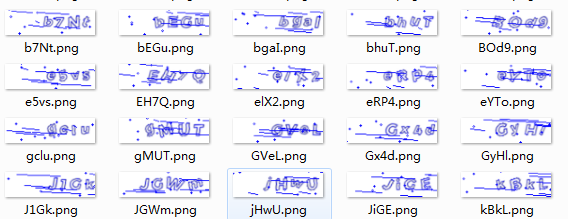
预测图片:
mHPM
srdN
wa5Y
eWpn
AgB9
eHr8
rJpH
fd9e
bTYt
tTwg
最后,附上源码地址:github


 1921
1921

 被折叠的 条评论
为什么被折叠?
被折叠的 条评论
为什么被折叠?
 到【灌水乐园】发言


