


=====================================================
SDL源码分析系列文章列表:
SDL2源码分析5:更新纹理(SDL_UpdateTexture())
SDL2源码分析6:拷贝到渲染器(SDL_RenderCopy())
SDL2源码分析7:显示(SDL_RenderPresent())
=====================================================
上一篇文章分析了SDL更新纹理像素数据的函数SDL_UpdateTexture()。这篇文章继续分析SDL的源码。本文分析SDL纹理拷贝到渲染目标的函数SDL_RenderCopy()。

SDL播放视频的代码流程例如以下所看到的。
初始化:
SDL_Init(): 初始化SDL。循环渲染数据:
SDL_CreateWindow(): 创建窗体(Window)。
SDL_CreateRenderer(): 基于窗体创建渲染器(Render)。
SDL_CreateTexture(): 创建纹理(Texture)。
SDL_UpdateTexture(): 设置纹理的数据。上篇文章分析了该流程中的第5个函数SDL_UpdateTexture()。本文继续分析该流程中的第6个函数SDL_RenderCopy()。
SDL_RenderCopy(): 纹理复制给渲染器。
SDL_RenderPresent(): 显示。
SDL_RenderCopy()
函数简单介绍
SDL使用SDL_RenderCopy()将纹理数据复制给渲染目标。SDL_RenderCopy()的原型例如以下。
int SDLCALL SDL_RenderCopy(SDL_Renderer * renderer,
                                           SDL_Texture * texture,
                                           const SDL_Rect * srcrect,
                                           const SDL_Rect * dstrect);
參数的含义例如以下。
renderer:渲染目标。
texture:输入纹理。
srcrect:选择输入纹理的一块矩形区域作为输入。设置为NULL的时候整个纹理作为输入。
dstrect:选择渲染目标的一块矩形区域作为输出。设置为NULL的时候整个渲染目标作为输出。
成功的话返回0,失败的话返回-1。
函数调用关系图
SDL_RenderCopy()关键函数的调用关系能够用下图表示。
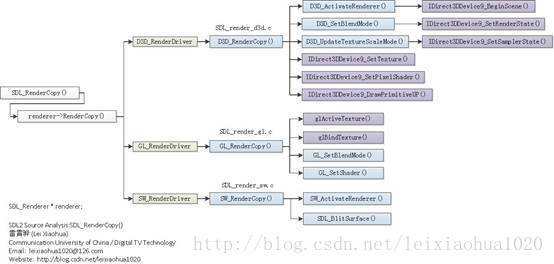
上面的图片不太清晰,更清晰的图片上传到了相冊里面:
http://my.csdn.net/leixiaohua1020/album/detail/1793911
源码分析
SDL_RenderCopy()的源码位于render\SDL_render.c中。例如以下所看到的。
int SDL_RenderCopy(SDL_Renderer * renderer, SDL_Texture * texture,
               const SDL_Rect * srcrect, const SDL_Rect * dstrect)
{
    SDL_Rect real_srcrect = { 0, 0, 0, 0 };
    SDL_Rect real_dstrect = { 0, 0, 0, 0 };
    SDL_FRect frect;


    CHECK_RENDERER_MAGIC(renderer, -1);
    CHECK_TEXTURE_MAGIC(texture, -1);


    if (renderer != texture->renderer) {
        return SDL_SetError("Texture was not created with this renderer");
    }


    real_srcrect.x = 0;
    real_srcrect.y = 0;
    real_srcrect.w = texture->w;
    real_srcrect.h = texture->h;
    if (srcrect) {
        if (!SDL_IntersectRect(srcrect, &real_srcrect, &real_srcrect)) {
            return 0;
        }
    }


    SDL_RenderGetViewport(renderer, &real_dstrect);
    real_dstrect.x = 0;
    real_dstrect.y = 0;
    if (dstrect) {
        if (!SDL_HasIntersection(dstrect, &real_dstrect)) {
            return 0;
        }
        real_dstrect = *dstrect;
    }


    if (texture->native) {
        texture = texture->native;
    }


    /* Don't draw while we're hidden */
    if (renderer->hidden) {
        return 0;
    }


    frect.x = real_dstrect.x * renderer->scale.x;
    frect.y = real_dstrect.y * renderer->scale.y;
    frect.w = real_dstrect.w * renderer->scale.x;
    frect.h = real_dstrect.h * renderer->scale.y;


    return renderer->RenderCopy(renderer, texture, &real_srcrect, &frect);
}
从源码中能够看出,SDL_RenderCopy()的大致流程例如以下。
1. 检查输入參数的合理性。2. 调用SDL_Render的RenderCopy ()方法复制纹理到渲染目标。
这一步是整个函数的核心。
以下我们具体看一下几种不同的渲染器的RenderCopy()的方法。
1. Direct3D
Direct3D 渲染器中相应RenderCopy()的函数是D3D_RenderCopy(),它的源码例如以下所看到的(位于render\direct3d\SDL_render_d3d.c)。static int D3D_RenderCopy(SDL_Renderer * renderer, SDL_Texture * texture,
const SDL_Rect * srcrect, const SDL_FRect * dstrect)
{
D3D_RenderData *data = (D3D_RenderData *) renderer->driverdata;
D3D_TextureData *texturedata;
LPDIRECT3DPIXELSHADER9 shader = NULL;
float minx, miny, maxx, maxy;
float minu, maxu, minv, maxv;
DWORD color;
Vertex vertices[4];
HRESULT result;
if (D3D_ActivateRenderer(renderer) < 0) {
return -1;
}
texturedata = (D3D_TextureData *)texture->driverdata;
if (!texturedata) {
SDL_SetError("Texture is not currently available");
return -1;
}
minx = dstrect->x - 0.5f;
miny = dstrect->y - 0.5f;
maxx = dstrect->x + dstrect->w - 0.5f;
maxy = dstrect->y + dstrect->h - 0.5f;
minu = (float) srcrect->x / texture->w;
maxu = (float) (srcrect->x + srcrect->w) / texture->w;
minv = (float) srcrect->y / texture->h;
maxv = (float) (srcrect->y + srcrect->h) / texture->h;
color = D3DCOLOR_ARGB(texture->a, texture->r, texture->g, texture->b);
vertices[0].x = minx;
vertices[0].y = miny;
vertices[0].z = 0.0f;
vertices[0].color = color;
vertices[0].u = minu;
vertices[0].v = minv;
vertices[1].x = maxx;
vertices[1].y = miny;
vertices[1].z = 0.0f;
vertices[1].color = color;
vertices[1].u = maxu;
vertices[1].v = minv;
vertices[2].x = maxx;
vertices[2].y = maxy;
vertices[2].z = 0.0f;
vertices[2].color = color;
vertices[2].u = maxu;
vertices[2].v = maxv;
vertices[3].x = minx;
vertices[3].y = maxy;
vertices[3].z = 0.0f;
vertices[3].color = color;
vertices[3].u = minu;
vertices[3].v = maxv;
D3D_SetBlendMode(data, texture->blendMode);
D3D_UpdateTextureScaleMode(data, texturedata, 0);
result =
IDirect3DDevice9_SetTexture(data->device, 0, (IDirect3DBaseTexture9 *)
texturedata->texture);
if (FAILED(result)) {
return D3D_SetError("SetTexture()", result);
}
if (texturedata->yuv) {
shader = data->ps_yuv;
D3D_UpdateTextureScaleMode(data, texturedata, 1);
D3D_UpdateTextureScaleMode(data, texturedata, 2);
result =
IDirect3DDevice9_SetTexture(data->device, 1, (IDirect3DBaseTexture9 *)
texturedata->utexture);
if (FAILED(result)) {
return D3D_SetError("SetTexture()", result);
}
result =
IDirect3DDevice9_SetTexture(data->device, 2, (IDirect3DBaseTexture9 *)
texturedata->vtexture);
if (FAILED(result)) {
return D3D_SetError("SetTexture()", result);
}
}
if (shader) {
result = IDirect3DDevice9_SetPixelShader(data->device, shader);
if (FAILED(result)) {
return D3D_SetError("SetShader()", result);
}
}
result =
IDirect3DDevice9_DrawPrimitiveUP(data->device, D3DPT_TRIANGLEFAN, 2,
vertices, sizeof(*vertices));
if (FAILED(result)) {
return D3D_SetError("DrawPrimitiveUP()", result);
}
if (shader) {
result = IDirect3DDevice9_SetPixelShader(data->device, NULL);
if (FAILED(result)) {
return D3D_SetError("SetShader()", result);
}
}
return 0;
}从代码中能够看出,D3D_RenderCopy()函数依照运行的顺序调用了例如以下函数:
D3D_ActivateRenderer():激活渲染器。其内部使用Direct3D的API函数IDirect3DDevice9_BeginScene()開始一个D3D的场景。
D3D_SetBlendMode():设置渲染器状态。其内部使用Direct3D的API函数IDirect3DDevice9_SetRenderState()设置渲染器的状态。
D3D_UpdateTextureScaleMode():设置纹理採样方式。其内部调用使用Direct3D的API函数IDirect3DDevice9_SetSamplerState()设置D3D的纹理採样方式。
IDirect3DDevice9_SetTexture():Direct3D的API。用于设置当前启用的纹理。
IDirect3DDevice9_SetPixelShader():Direct3D的API。用于设置使用的像素着色器。IDirect3DDevice9_DrawPrimitiveUP():Direct3D的API,用于渲染。
上述几个函数中,前3个函数是SDL中的函数,后3个函数是Direct3D的API。
在此附上前三个函数的代码。
D3D_ActivateRenderer():激活渲染器。
static int D3D_ActivateRenderer(SDL_Renderer * renderer)
{
    D3D_RenderData *data = (D3D_RenderData *) renderer->driverdata;
    HRESULT result;


    if (data->updateSize) {
        SDL_Window *window = renderer->window;
        int w, h;


        SDL_GetWindowSize(window, &w, &h);
        data->pparams.BackBufferWidth = w;
        data->pparams.BackBufferHeight = h;
        if (SDL_GetWindowFlags(window) & SDL_WINDOW_FULLSCREEN) {
            data->pparams.BackBufferFormat =
                PixelFormatToD3DFMT(SDL_GetWindowPixelFormat(window));
        } else {
            data->pparams.BackBufferFormat = D3DFMT_UNKNOWN;
        }
        if (D3D_Reset(renderer) < 0) {
            return -1;
        }


        data->updateSize = SDL_FALSE;
    }
    if (data->beginScene) {
        result = IDirect3DDevice9_BeginScene(data->device);
        if (result == D3DERR_DEVICELOST) {
            if (D3D_Reset(renderer) < 0) {
                return -1;
            }
            result = IDirect3DDevice9_BeginScene(data->device);
        }
        if (FAILED(result)) {
            return D3D_SetError("BeginScene()", result);
        }
        data->beginScene = SDL_FALSE;
    }
    return 0;
}
D3D_SetBlendMode():设置渲染器状态。
static void D3D_SetBlendMode(D3D_RenderData * data, int blendMode)
{
    switch (blendMode) {
    case SDL_BLENDMODE_NONE:
        IDirect3DDevice9_SetRenderState(data->device, D3DRS_ALPHABLENDENABLE,
                                        FALSE);
        break;
    case SDL_BLENDMODE_BLEND:
        IDirect3DDevice9_SetRenderState(data->device, D3DRS_ALPHABLENDENABLE,
                                        TRUE);
        IDirect3DDevice9_SetRenderState(data->device, D3DRS_SRCBLEND,
                                        D3DBLEND_SRCALPHA);
        IDirect3DDevice9_SetRenderState(data->device, D3DRS_DESTBLEND,
                                        D3DBLEND_INVSRCALPHA);
        if (data->enableSeparateAlphaBlend) {
            IDirect3DDevice9_SetRenderState(data->device, D3DRS_SRCBLENDALPHA,
                                            D3DBLEND_ONE);
            IDirect3DDevice9_SetRenderState(data->device, D3DRS_DESTBLENDALPHA,
                                            D3DBLEND_INVSRCALPHA);
        }
        break;
    case SDL_BLENDMODE_ADD:
        IDirect3DDevice9_SetRenderState(data->device, D3DRS_ALPHABLENDENABLE,
                                        TRUE);
        IDirect3DDevice9_SetRenderState(data->device, D3DRS_SRCBLEND,
                                        D3DBLEND_SRCALPHA);
        IDirect3DDevice9_SetRenderState(data->device, D3DRS_DESTBLEND,
                                        D3DBLEND_ONE);
        if (data->enableSeparateAlphaBlend) {
            IDirect3DDevice9_SetRenderState(data->device, D3DRS_SRCBLENDALPHA,
                                            D3DBLEND_ZERO);
            IDirect3DDevice9_SetRenderState(data->device, D3DRS_DESTBLENDALPHA,
                                            D3DBLEND_ONE);
        }
        break;
    case SDL_BLENDMODE_MOD:
        IDirect3DDevice9_SetRenderState(data->device, D3DRS_ALPHABLENDENABLE,
                                        TRUE);
        IDirect3DDevice9_SetRenderState(data->device, D3DRS_SRCBLEND,
                                        D3DBLEND_ZERO);
        IDirect3DDevice9_SetRenderState(data->device, D3DRS_DESTBLEND,
                                        D3DBLEND_SRCCOLOR);
        if (data->enableSeparateAlphaBlend) {
            IDirect3DDevice9_SetRenderState(data->device, D3DRS_SRCBLENDALPHA,
                                            D3DBLEND_ZERO);
            IDirect3DDevice9_SetRenderState(data->device, D3DRS_DESTBLENDALPHA,
                                            D3DBLEND_ONE);
        }
        break;
    }
}
D3D_UpdateTextureScaleMode():设置纹理採样方式。
static void D3D_UpdateTextureScaleMode(D3D_RenderData *data, D3D_TextureData *texturedata, unsigned index)
{
    if (texturedata->scaleMode != data->scaleMode[index]) {
        IDirect3DDevice9_SetSamplerState(data->device, index, D3DSAMP_MINFILTER,
                                         texturedata->scaleMode);
        IDirect3DDevice9_SetSamplerState(data->device, index, D3DSAMP_MAGFILTER,
                                         texturedata->scaleMode);
        data->scaleMode[index] = texturedata->scaleMode;
    }
}
2. OpenGL
OpenGL渲染器中相应RenderCopy()的函数是GL_RenderCopy(),它的源码例如以下所看到的(位于render\opengl\SDL_render_gl.c)。
static int GL_RenderCopy(SDL_Renderer * renderer, SDL_Texture * texture,
              const SDL_Rect * srcrect, const SDL_FRect * dstrect)
{
    GL_RenderData *data = (GL_RenderData *) renderer->driverdata;
    GL_TextureData *texturedata = (GL_TextureData *) texture->driverdata;
    GLfloat minx, miny, maxx, maxy;
    GLfloat minu, maxu, minv, maxv;


    GL_ActivateRenderer(renderer);


    data->glEnable(texturedata->type);
    if (texturedata->yuv) {
        data->glActiveTextureARB(GL_TEXTURE2_ARB);
        data->glBindTexture(texturedata->type, texturedata->vtexture);


        data->glActiveTextureARB(GL_TEXTURE1_ARB);
        data->glBindTexture(texturedata->type, texturedata->utexture);


        data->glActiveTextureARB(GL_TEXTURE0_ARB);
    }
    data->glBindTexture(texturedata->type, texturedata->texture);


    if (texture->modMode) {
        GL_SetColor(data, texture->r, texture->g, texture->b, texture->a);
    } else {
        GL_SetColor(data, 255, 255, 255, 255);
    }


    GL_SetBlendMode(data, texture->blendMode);


    if (texturedata->yuv) {
        GL_SetShader(data, SHADER_YV12);
    } else {
        GL_SetShader(data, SHADER_RGB);
    }


    minx = dstrect->x;
    miny = dstrect->y;
    maxx = dstrect->x + dstrect->w;
    maxy = dstrect->y + dstrect->h;


    minu = (GLfloat) srcrect->x / texture->w;
    minu *= texturedata->texw;
    maxu = (GLfloat) (srcrect->x + srcrect->w) / texture->w;
    maxu *= texturedata->texw;
    minv = (GLfloat) srcrect->y / texture->h;
    minv *= texturedata->texh;
    maxv = (GLfloat) (srcrect->y + srcrect->h) / texture->h;
    maxv *= texturedata->texh;


    data->glBegin(GL_TRIANGLE_STRIP);
    data->glTexCoord2f(minu, minv);
    data->glVertex2f(minx, miny);
    data->glTexCoord2f(maxu, minv);
    data->glVertex2f(maxx, miny);
    data->glTexCoord2f(minu, maxv);
    data->glVertex2f(minx, maxy);
    data->glTexCoord2f(maxu, maxv);
    data->glVertex2f(maxx, maxy);
    data->glEnd();


    data->glDisable(texturedata->type);


    return GL_CheckError("", renderer);
}
从代码中能够看出。GL_RenderCopy()函数调用了OpenGL的API函数glActiveTexture(),glBindTexture()创建了一个纹理。而且使用GL_SetBlendMode(),GL_SetShader()设置了有关的一些參数。
有一点须要注意,在OpenGL渲染器中。假设输入像素格式是YUV,就会使用3个纹理。
3. Software
Software渲染器中相应RenderCopy()的函数是SW_RenderCopy()。它的源码例如以下所看到的(位于render\software\SDL_render_sw.c)。
static int SW_RenderCopy(SDL_Renderer * renderer, SDL_Texture * texture,
              const SDL_Rect * srcrect, const SDL_FRect * dstrect)
{
    SDL_Surface *surface = SW_ActivateRenderer(renderer);
    SDL_Surface *src = (SDL_Surface *) texture->driverdata;
    SDL_Rect final_rect;


    if (!surface) {
        return -1;
    }


    if (renderer->viewport.x || renderer->viewport.y) {
        final_rect.x = (int)(renderer->viewport.x + dstrect->x);
        final_rect.y = (int)(renderer->viewport.y + dstrect->y);
    } else {
        final_rect.x = (int)dstrect->x;
        final_rect.y = (int)dstrect->y;
    }
    final_rect.w = (int)dstrect->w;
    final_rect.h = (int)dstrect->h;


    if ( srcrect->w == final_rect.w && srcrect->h == final_rect.h ) {
        return SDL_BlitSurface(src, srcrect, surface, &final_rect);
    } else {
        return SDL_BlitScaled(src, srcrect, surface, &final_rect);
    }
}
该函数的源码还没有具体分析。


 381
381


 被折叠的 条评论
为什么被折叠?
被折叠的 条评论
为什么被折叠?
 到【灌水乐园】发言


