


• 为什么设计拦截器?
1. 为了在webservice请求过程中,能动态操作请求和响应数据, CXF设计了拦截器.
• 拦截器分类:
2. 按所处的位置分:服务器端拦截器,客户端拦截器
3. 按消息的方向分:入拦截器,出拦截器
4. 按定义者分:系统拦截器,自定义拦截器

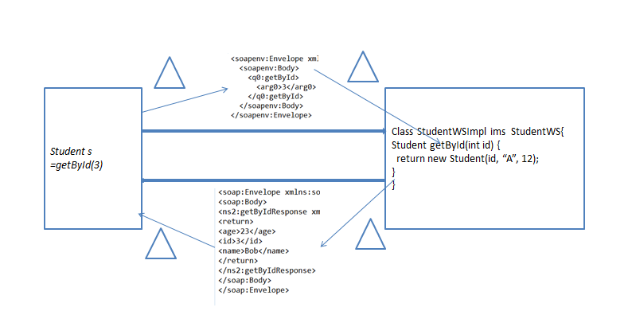
以下是服务器代码实例:
import javax.jws.WebMethod;
import javax.jws.WebService;
import com.atguigu.day02_ws_cxf_spring.bean.Order;
public interface OrderWS {
@WebMethod
public Order getOrderById(int id);
}
import javax.jws.WebService;
import com.atguigu.day02_ws_cxf_spring.bean.Order;
public class OrderWSImpl implements OrderWS {
public OrderWSImpl() {
System.out.println("OrderWSImpl()");
}
@Override
public Order getOrderById(int id) {
System.out.println("server getOrderById(int id)"+id);
return new Order(id, "宝马", 10000000);
}
}
import java.util.List;
import javax.xml.namespace.QName;
import org.apache.cxf.binding.soap.SoapMessage;
import org.apache.cxf.headers.Header;
import org.apache.cxf.interceptor.Fault;
import org.apache.cxf.phase.AbstractPhaseInterceptor;
import org.apache.cxf.phase.Phase;
import org.w3c.dom.Element;
/**
* 查检用户的拦截器
* @author Administrator
*
*/
public class CheckUserInterceptor extends AbstractPhaseInterceptor<SoapMessage> {
public CheckUserInterceptor() {
super(Phase.PRE_PROTOCOL);
System.out.println("CheckUserInterceptor()");
}
/*
<Envelope>
<head>
<atguigu>
<name>xfzhang</name>
<password>123456</password>
</atguigu>
<atguigu2>
<name>xfzhang</name>
<password>123456</password>
</atguigu2>
<head>
<Body>
<sayHello>
<arg0>BOB</arg0>
<sayHello>
</Body>
</Envelope>
*/
@Override
public void handleMessage(SoapMessage message) throws Fault {
Header header = message.getHeader(new QName("atguigu"));
if(header!=null) {
Element atguiguEle = (Element) header.getObject();
String name = atguiguEle.getElementsByTagName("name").item(0).getTextContent();
String password = atguiguEle.getElementsByTagName("password").item(0).getTextContent();
if("xfzhang".equals(name) && "123456".equals(password)) {
System.out.println("Server 通过拦截器....");
return;
}
}
//不能通过
System.out.println("Server 没有通过拦截器....");
throw new Fault(new RuntimeException("请求需要一个正确的用户名和密码!"));
}
}
beans.xml
<?xml version="1.0" encoding="UTF-8"?>
<beans xmlns="http://www.springframework.org/schema/beans"
xmlns:xsi="http://www.w3.org/2001/XMLSchema-instance"
xmlns:jaxws="http://cxf.apache.org/jaxws"
xsi:schemaLocation="http://www.springframework.org/schema/beans http://www.springframework.org/schema/beans/spring-beans.xsd
http://cxf.apache.org/jaxws http://cxf.apache.org/jaxws">
<!-- 引cxf的一些核心配置 -->
<import resource="classpath:META-INF/cxf/cxf.xml" />
<import resource="classpath:META-INF/cxf/cxf-extension-soap.xml" />
<import resource="classpath:META-INF/cxf/cxf-servlet.xml" />
<!-- implementor 实现类的全类名 id address 自定义
jaxws:inInterceptors 入拦截器
bean 配置自定义的入拦截器 全类名-->
<jaxws:endpoint
id="orderWS"
implementor="com.atguigu.day02_ws_cxf_spring.ws.OrderWSImpl"
address="/orderws">
<jaxws:inInterceptors>
<bean class="com.atguigu.day01_ws.interceptor.CheckUserInterceptor"></bean>
</jaxws:inInterceptors>
</jaxws:endpoint>
</beans>
web.xml
<?xml version="1.0" encoding="UTF-8"?>
<web-app xmlns:xsi="http://www.w3.org/2001/XMLSchema-instance" xmlns="http://java.sun.com/xml/ns/javaee" xsi:schemaLocation="http://java.sun.com/xml/ns/javaee http://java.sun.com/xml/ns/javaee/web-app_2_5.xsd" id="WebApp_ID" version="2.5">
<display-name>day02_ws_cxf_spring</display-name>
<welcome-file-list>
<welcome-file>index.html</welcome-file>
<welcome-file>index.htm</welcome-file>
<welcome-file>index.jsp</welcome-file>
<welcome-file>default.html</welcome-file>
<welcome-file>default.htm</welcome-file>
<welcome-file>default.jsp</welcome-file>
</welcome-file-list>
<!-- 配置beans.xml -->
<context-param>
<param-name>contextConfigLocation</param-name>
<param-value>classpath:beans.xml</param-value>
</context-param>
<!--
应用启动的一个监听器
-->
<listener>
<listener-class>
org.springframework.web.context.ContextLoaderListener
</listener-class>
</listener>
<!--
所有请求都会先经过cxf框架
-->
<servlet>
<servlet-name>CXFServlet</servlet-name>
<servlet-class>
org.apache.cxf.transport.servlet.CXFServlet
</servlet-class>
<load-on-startup>1</load-on-startup>
</servlet>
<servlet-mapping>
<servlet-name>CXFServlet</servlet-name>
<url-pattern>/*</url-pattern>
</servlet-mapping>
</web-app>
以下是客户端代码实例:
client-beans.xml
<?xml version="1.0" encoding="UTF-8"?>
<beans xmlns="http://www.springframework.org/schema/beans"
xmlns:xsi="http://www.w3.org/2001/XMLSchema-instance"
xmlns:jaxws="http://cxf.apache.org/jaxws"
xsi:schemaLocation="http://www.springframework.org/schema/beans
http://www.springframework.org/schema/beans/spring-beans.xsd
http://cxf.apache.org/jaxws http://cxf.apache.org/jaxws">
<!--1.首先生成客户端的wsdl路径下的代码 找到代理对象
2.serviceClass 配置动态产生接口的代理对象的全类名
3. 服务器端的地址 http://localhost/day02_ws_cxf_spring/orderws 项目名称+暴露的 address="/orderws"组合地址-->
<jaxws:client id="orderClient"
serviceClass= "com.atguigu.day02_ws_cxf_spring.ws.OrderWS"
address= "http://localhost:8080/day02_ws_cxf_spring/orderws">
<!--jaxws:inInterceptors 出拦截器 bean 配置自定义的出拦截器 全类名-->
<jaxws:outInterceptors>
<!-- <bean class="org.apache.cxf.interceptor.LoggingOutInterceptor"/> -->
<bean class="com.atguigu.day01_ws_cxf_client.interceptor.AddUserInterceptor">
<constructor-arg name="name" value="xfzhang"/>
<constructor-arg name="password" value="1234567"/>
</bean>
</jaxws:outInterceptors>
</jaxws:client>
</beans>
import java.util.List;
import javax.xml.namespace.QName;
import org.apache.cxf.binding.soap.SoapMessage;
import org.apache.cxf.headers.Header;
import org.apache.cxf.interceptor.Fault;
import org.apache.cxf.phase.AbstractPhaseInterceptor;
import org.apache.cxf.phase.Phase;
import org.apache.xml.utils.DOMHelper;
import org.w3c.dom.Document;
import org.w3c.dom.Element;
/**
* 创建用户拦截器
* @author Administrator
*
*/
public class AddUserInterceptor extends AbstractPhaseInterceptor<SoapMessage> {
private String name;
private String password;
public AddUserInterceptor(String name, String password) {
super(Phase.PRE_PROTOCOL);//准备协议化时拦截
this.name = name;
this.password = password;
}
/*
<Envelope>
<head>
<atguigu>
<name>xfzhang</name>
<password>123456</password>
</atguigu>
<atguigu2>
<name>xfzhang</name>
<password>123456</password>
</atguigu2>
<head>
<Body>
<sayHello>
<arg0>BOB</arg0>
<sayHello>
</Body>
</Envelope>
*/
@SuppressWarnings("deprecation")
@Override
public void handleMessage(SoapMessage msg) throws Fault {
List<Header> headers = msg.getHeaders();
/*
<atguigu>
<name>xfzhang</name>
<password>123456</password>
</atguigu>
*/
Document document = DOMHelper.createDocument();
Element rootEle = document.createElement("atguigu");
Element nameELe = document.createElement("name");
nameELe.setTextContent(name);
rootEle.appendChild(nameELe);
Element passwordELe = document.createElement("password");
passwordELe.setTextContent(password);
rootEle.appendChild(passwordELe);
headers.add(new Header(new QName("atguigu"), rootEle));
System.out.println("client handleMessage()....");
}
}
import org.springframework.context.support.ClassPathXmlApplicationContext;
import com.atguigu.day02_ws_cxf_spring.ws.Order;
import com.atguigu.day02_ws_cxf_spring.ws.OrderWS;
public class ClientTest {
public static void main(String[] args) {
//client-beans.xml 配置在当前项目下的src目录下 直接引用
ClassPathXmlApplicationContext context = new ClassPathXmlApplicationContext(new String[] {"client-beans.xml"});
OrderWS orderWS = (OrderWS) context.getBean("orderClient");//通过配置的id来配置要一致
Order order = orderWS.getOrderById(24);//代理对象回调方法请求数据
System.out.println(order);
}
wsdl生成的bean对象
import javax.xml.bind.annotation.XmlAccessType;
import javax.xml.bind.annotation.XmlAccessorType;
import javax.xml.bind.annotation.XmlType;
/**
* <p>order complex type的 Java 类。
*
* <p>以下模式片段指定包含在此类中的预期内容。
*
* <pre>
* <complexType name="order">
* <complexContent>
* <restriction base="{http://www.w3.org/2001/XMLSchema}anyType">
* <sequence>
* <element name="id" type="{http://www.w3.org/2001/XMLSchema}int"/>
* <element name="name" type="{http://www.w3.org/2001/XMLSchema}string" minOccurs="0"/>
* <element name="price" type="{http://www.w3.org/2001/XMLSchema}double"/>
* </sequence>
* </restriction>
* </complexContent>
* </complexType>
* </pre>
*
*
*/
@XmlAccessorType(XmlAccessType.FIELD)
@XmlType(name = "order", propOrder = {
"id",
"name",
"price"
})
public class Order {
protected int id;
protected String name;
protected double price;
/**
* 获取id属性的值。
*
*/
public int getId() {
return id;
}
/**
* 设置id属性的值。
*
*/
public void setId(int value) {
this.id = value;
}
/**
* 获取name属性的值。
*
* @return
* possible object is
* {@link String }
*
*/
public String getName() {
return name;
}
/**
* 设置name属性的值。
*
* @param value
* allowed object is
* {@link String }
*
*/
public void setName(String value) {
this.name = value;
}
/**
* 获取price属性的值。
*
*/
public double getPrice() {
return price;
}
/**
* 设置price属性的值。
*
*/
public void setPrice(double value) {
this.price = value;
}
@Override
public String toString() {
return "Order [id=" + id + ", name=" + name + ", price=" + price + "]";
}
}
}


 76
76

 被折叠的 条评论
为什么被折叠?
被折叠的 条评论
为什么被折叠?
 到【灌水乐园】发言


