本文通过 OscPress 同步至oschina,获取最新版本和更好的阅读体验请查看原文:
http://www.cellmean.com/?p=1526
摘要:官方文档介绍地址:https://access.redhat.com/documentation/en-US/Red_Hat_Enterprise_Linux/7/html/Security_Guide/sec-Using_Firewalls.html#sec-Introduction_to_firewalld1一、firewall介绍CentOS 7中防火墙是 …
官方文档介绍地址:
https://access.redhat.com/documentation/en-US/Red_Hat_Enterprise_Linux/7/html/Security_Guide/sec-Using_Firewalls.html#sec-Introduction_to_firewalld1
一、firewall介绍
CentOS 7中防火墙是一个非常的强大的功能,在CentOS 6.5中在iptables防火墙中进行了升级了。
1、官方介绍
The dynamic firewall daemon firewalld provides a dynamically managed firewall with support for network “zones” to assign a level of trust to a network and its associated connections and interfaces. It has support for IPv4 and IPv6 firewall settings. It supports Ethernet bridges and has a separation of runtime and permanent configuration options. It also has an interface for services or applications to add firewall rules directly.
2、什么是区域Zone:
网络区域定义了网络连接的可信等级。这是一个 一对多的关系,这意味着一次连接可以仅仅是一个区域的一部分,而一个区域可以用于很多连接。
3、哪个区域可用?
由firewalld 提供的区域按照从不信任到信任的顺序排序。
4、区域的分类?
Firewalls can be used to separate networks into different zones based on the level of trust the user has decided to place on the devices and traffic within that network. NetworkManager informs firewalld to which zone an interface belongs. An interface’s assigned zone can be changed by NetworkManager or via the firewall-config tool which can open the relevant NetworkManager window for you.
The zone settings in /etc/firewalld/ are a range of preset settings which can be quickly applied to a network interface. They are listed here with a brief explanation:
drop、block 、public 、external 、dmz 、work 、home、internal 、trusted
注:具体内容,请参见官方文档介绍!
二、firewall配置
The configuration for firewalld is stored in various XML files in /usr/lib/firewalld/ and /etc/firewalld/.
This allows a great deal of flexibility as the files can be edited, written to, backed up, used as templates for other installations and so on.
注意:以下firewalld 的操作只有重启之后才有效:service firewalld restart 重启
1、系统配置目录
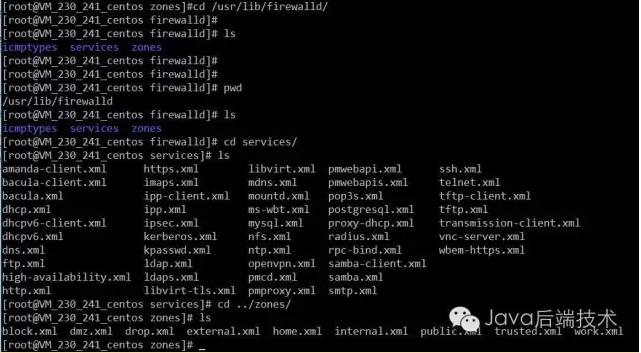
/usr/lib/firewalld/services
目录中存放定义好的网络服务和端口参数,系统参数,不能修改。
2、用户配置目录
/etc/firewalld/
3、如何自定义添加端口
用户可以通过修改配置文件的方式添加端口,也可以通过命令的方式添加端口,注意,修改的内容会在/etc/firewalld/ 目录下的配置文件中还体现。
- 3.1、命令的方式添加端口
firwall–cmd —permanent —add–port=9527/tcp
参数介绍:
1、firwall–cmd:是Linux提供的操作firewall的一个工具;
2、—permanent:表示设置为持久;
3、—add–port:标识添加的端口;
另外,firewall中有Zone的概念,可以将具体的端口制定到具体的zone配置文件中。
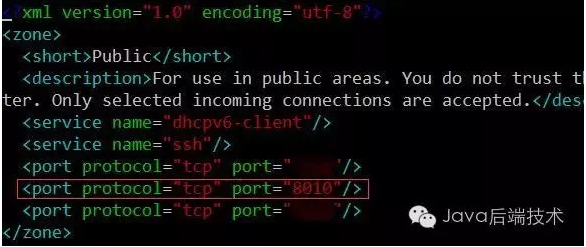
例如:添加8010端口
firewall–cmd —zone=public —permanent —add–port=8010/tcp
–zone=public:指定的zone为public;
添加结果如下:
如果–zone=dmz 这样设置的话,会在dmz.xml文件中新增一条。
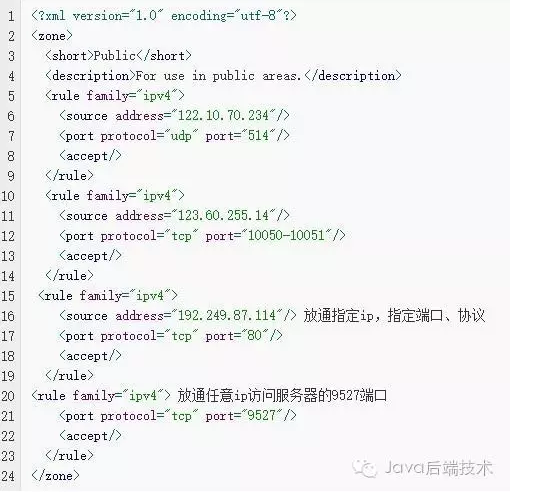
- 3.2、修改配置文件的方式添加端口
上述的一个配置文件可以很好的看出:
1、添加需要的规则,开放通源ip为122.10.70.234,端口514,协议tcp;
2、开放通源ip为123.60.255.14,端口10050-10051,协议tcp;
3、开放通源ip为任意,端口9527,协议tcp;
三、firewall常用命令
1、重启、关闭、开启firewalld.service服务
service firewalld restart 重启 service firewalld start 开启 service firewalld stop 关闭
注意:以上对firewalld 的操作只有重启之后才有效
2、查看firewall服务状态
systemctl status firewall
3、查看firewall的状态
firewall–cmd —state
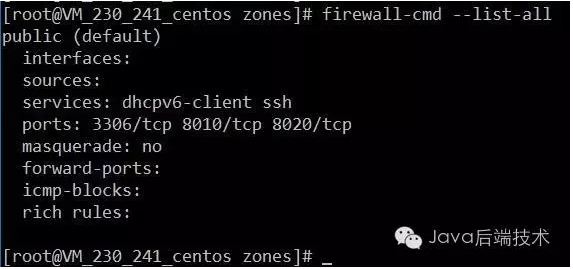
4、查看防火墙规则
firewall-cmd —list-all
四、CentOS切换为iptables防火墙
切换到iptables首先应该关掉默认的firewalld,然后安装iptables服务。
1、关闭firewall:
service firewalld stop
systemctl disable firewalld.service #禁止firewall开机启动
2、安装iptables防火墙
yum install iptables-services #安装
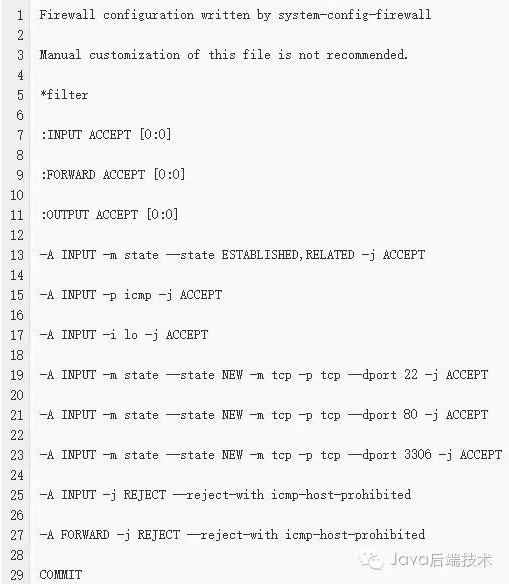
3、编辑iptables防火墙配置
vi /etc/sysconfig/iptables #编辑防火墙配置文件
下边是一个完整的配置文件:
:wq! #保存退出
service iptables start #开启
systemctl enable iptables.service #设置防火墙开机启动
转载自:http://www.phpchina.com/portal.php?mod=view&aid=40252
【更新】
学习apache安装的时候需要打开80端口,由于centos 7版本以后默认使用firewalld后,网上关于iptables的设置方法已经不管用了,想着反正iptable也不会用,索性直接搬官方文档,学习firewalld了,好像比iptables要简单点了。
官方文档地址:https://access.redhat.com/documentation/en-US/Red_Hat_Enterprise_Linux/7/html/Security_Guide/sec-Using_Firewalls.html#sec-Introduction_to_firewalld
1、firewalld简介
firewalld是centos7的一大特性,最大的好处有两个:支持动态更新,不用重启服务;第二个就是加入了防火墙的“zone”概念
firewalld有图形界面和工具界面,由于我在服务器上使用,图形界面请参照官方文档,本文以字符界面做介绍
firewalld的字符界面管理工具是 firewall-cmd
firewalld默认配置文件有两个:/usr/lib/firewalld/ (系统配置,尽量不要修改)和 /etc/firewalld/ (用户配置地址)
zone概念:
硬件防火墙默认一般有三个区,firewalld引入这一概念系统默认存在以下区域(根据文档自己理解,如果有误请指正):
drop:默认丢弃所有包
block:拒绝所有外部连接,允许内部发起的连接
public:指定外部连接可以进入
external:这个不太明白,功能上和上面相同,允许指定的外部连接
dmz:和硬件防火墙一样,受限制的公共连接可以进入
work:工作区,概念和workgoup一样,也是指定的外部连接允许
home:类似家庭组
internal:信任所有连接
对防火墙不算太熟悉,还没想明白public、external、dmz、work、home从功能上都需要自定义允许连接,具体使用上的区别还需高人指点
2、安装firewalld
root执行 # yum install firewalld firewall-config
3、运行、停止、禁用firewalld
启动:# systemctl start firewalld
查看状态:# systemctl status firewalld 或者 firewall-cmd --state
停止:# systemctl disable firewalld
禁用:# systemctl stop firewalld
4、配置firewalld
查看版本:$ firewall-cmd --version
查看帮助:$ firewall-cmd --help
查看设置:
显示状态:$ firewall-cmd --state
查看区域信息: $ firewall-cmd --get-active-zones
查看指定接口所属区域:$ firewall-cmd --get-zone-of-interface=eth0
拒绝所有包:# firewall-cmd --panic-on
取消拒绝状态:# firewall-cmd --panic-off
查看是否拒绝:$ firewall-cmd --query-panic
更新防火墙规则:# firewall-cmd --reload
# firewall-cmd --complete-reload
两者的区别就是第一个无需断开连接,就是firewalld特性之一动态添加规则,第二个需要断开连接,类似重启服务
将接口添加到区域,默认接口都在public
# firewall-cmd --zone=public --add-interface=eth0
永久生效再加上 --permanent 然后reload防火墙
设置默认接口区域
# firewall-cmd --set-default-zone=public
立即生效无需重启
打开端口(貌似这个才最常用)
查看所有打开的端口:
# firewall-cmd --zone=dmz --list-ports
加入一个端口到区域:
# firewall-cmd --zone=dmz --add-port=8080/tcp
若要永久生效方法同上
打开一个服务,类似于将端口可视化,服务需要在配置文件中添加,/etc/firewalld 目录下有services文件夹,这个不详细说了,详情参考文档
# firewall-cmd --zone=work --add-service=smtp
移除服务
# firewall-cmd --zone=work --remove-service=smtp
还有端口转发功能、自定义复杂规则功能、lockdown,由于还没用到,以后再学习






 152
152


 被折叠的 条评论
为什么被折叠?


