


LNNP架构一
LNNP架构
LNMP架构介绍目录概要
和LAMP不同的是,提供web服务的是Nginx

并且php是作为一个独立服务存在的,这个服务叫做php-fpm

Nginx直接处理静态请求,动态请求会转发给php-fpm
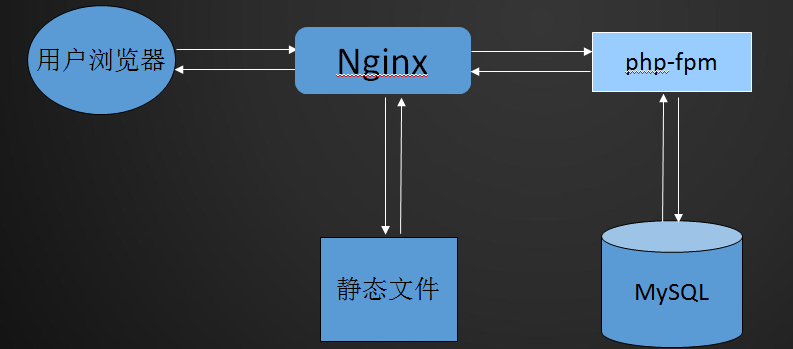
LAMP和LNMP两个架构类似
在LAMP架构中,PHP和Apache是一个整体,php解析是交给Apache来执行的,只不过需要加一个php的模块libphp.so

在LNMP架构中,提供web服务的是Nginx,PHP会启动一个php-fpm服务,Nginx会把用户请求的php交给php-fpm服务去进行处理(用户数据与mysql的交互就是由php-fpm来做的,处理好的结果在高速Nginx,然后通过Nginx告诉用户的浏览器),用户的静态请求将由Nginx直接进行处理(Nginx在处理静态数据的性能上要比Apache快)

Nginx对静态为主的网站,处理用户并发会很大,速度也会快很多

mysql安装
由于之前做LAMP步骤时已经安装过了,如果想再次安装的话,请先删除
rm -rf /usr/local/mysql

rm -rf /etc/init.d/mysqld
具体安装操作流程如下:
cd /usr/local/src/      //建议以后所有软件包都放到这个目录下

wget  http://mirrors.sohu.com/mysql/MySQL-5.6/mysql-5.6.36-linux-glibc2.5-x86_64.tar.gz

下载5.6版本包
下载完成后需要进行如下操作:
tar zxf mysql-5.6.35-linux-glibc2.5-x86_64.tar.gz      //解压

mv mysql-5.6.35-linux-glibc2.5-x86_64 /usr/local/mysql  //移动到local目录下的mysql里

cd /usr/local/mysql

useradd mysql //创建mysql用户

mkdir /data/ 创建目录,为了存放mysql数据

./scripts/mysql_install_db --user=mysql --datadir=/data/mysql    初始化,指定用户mysql和目录为/data/mysql

cp support-files/my-default.cnf /etc/my.cnf   复制配置文件到/etc/my.cnf   /etc/下默认有,所以这条命令会提示你是否覆盖,可选YES,

但也可直接使用/etc/my.cnf    首先 vim /etc/my.cnf

[root[@www](https://my.oschina.net/licomernwater) ~]# cat /etc/my.cnf

[mysqld]

datadir=/data/mysql

socket=/tmp/mysql.sock

# Disabling symbolic-links is recommended to prevent assorted security risks

symbolic-links=0

# Settings user and group are ignored when systemd is used.

# If you need to run mysqld under a different user or group,

# customize your systemd unit file for mariadb according to the

# instructions in http://fedoraproject.org/wiki/Systemd

[mysqld_safe]

# log-error=/var/log/mariadb/mariadb.log

# pid-file=/var/run/mariadb/mariadb.pid

#

# include all files from the config directory

#

# !includedir /etc/my.cnf.d

[root[@www](https://my.oschina.net/licomernwater) ~]#

大多都是注释文件。真正修改的就是datadir和socket  修改后的内容如上

修改完成后,cp support-files/mysql.server /etc/init.d/mysqld  复制启动文件去/etc/init.d/下

chmod 755 /etc/init.d/mysqld   修改权限

vim /etc/init.d/mysqld  进入配置文件    需要修改内容的地方如下:

	basedir=/usr/local/mysql

	datadir=/data/mysql

basedir是mysql包所在得路径     datadir是定义存放数据的地方。

上面的操作完成后,就可以启动mysqld服务了

但你也可以设置一个开启启动mysql,操作如下:

chkconfig  --add mysqld

[root[@www](https://my.oschina.net/licomernwater) ~]# chkconfig --list

注:该输出结果只显示 SysV 服务,并不包含

原生 systemd 服务。SysV 配置数据

可能被原生 systemd 配置覆盖。

	要列出 systemd 服务,请执行 'systemctl list-unit-files'。

	查看在具体 target 启用的服务请执行

	 'systemctl list-dependencies [target]'。

mysqld         	0:关	1:关	2:开	3:开	4:开	5:开	6:关

netconsole     	0:关	1:关	2:开	3:开	4:开	5:开	6:关

network        	0:关	1:关	2:开	3:开	4:开	5:开	6:关

[root[@www](https://my.oschina.net/licomernwater) ~]#
启动mysqld服务
service mysqld start  为启动mysqld服务命令

/etc/init.d/mysqld start  一样可以启动

[root[@www](https://my.oschina.net/licomernwater) ~]# service mysqld start

Starting MySQL.................. SUCCESS!

[root@www ~]# service mysqld stop

Shutting down MySQL.. SUCCESS!

[root@www ~]# /etc/init.d/mysqld start

Starting MySQL. SUCCESS!

[root@www ~]#
以上即成功启动服务。
PHP安装
清除以前配置的PHP
[root@www src]# cd php-5.6.32

[root@www php-5.6.32]# make clean

find . -name *.gcno -o -name *.gcda | xargs rm -f

find . -name *.lo -o -name *.o | xargs rm -f

find . -name *.la -o -name *.a | xargs rm -f

find . -name *.so | xargs rm -f

find . -name .libs -a -type d|xargs rm -rf

rm -f libphp5.la sapi/cli/php sapi/cgi/php-cgi    libphp5.la modules/* libs/*

[root@www php-5.6.32]#
初始化:
[root@www php-5.6.32]# ./configure --prefix=/usr/local/php-fpm --with-config-file- path=/usr/local/php-fpm/etc --enable-fpm --with-fpm-user=php-fpm --with-fpm-group=php-fpm --with-mysql=/usr/local/mysql --with-mysqli=/usr/local/mysql/bin/mysql_config --with-pdo-mysql=/usr/local/mysql --with-mysql-sock=/tmp/mysql.sock --with-libxml-dir --with-gd --with-jpeg-dir --with-png-dir --with-freetype-dir --with-iconv-dir --with-zlib-dir --with-mcrypt --enable-soap --enable-gd-native-ttf --enable-ftp --enable-mbstring --enable-exif --with-pear --with-curl --with-openssl
出现错误:
configure: error: Please reinstall the libcurl distribution -

	 easy.h should be in <curl-dir>/include/curl/
解决方法:
[root@www php-5.6.32]# yum install libcurl-devel -y
再继续初始化,然后使用 echo $? 检测是否正确
[root@www php-5.6.32]# echo $?

0

[root@www php-5.6.32]#
然后接着 make && make install
[root@www php-5.6.32]# make && make install

[root@www php-5.6.32]# echo $?

0

[root@www php-5.6.32]#
查看目录
[root@www php-5.6.32]# ls /usr/local/php-fpm/

bin  etc  include  lib  php  sbin  var

[root@www php-5.6.32]# ls /usr/local/php/

bin  etc  include  lib  php

[root@www php-5.6.32]# ls /usr/local/php-fpm/sbin/

php-fpm

[root@www php-5.6.32]# ls /usr/local/php-fpm/var/

log  run

[root@www php-5.6.32]#

较之前的/usr/local/php/ 多了 sbin 和 var 目录

在sbin目录下有一个php-fpm文件,就是用来启动php-fpm的 php-fpm

在var目录下有 log 和 run 文件,log文件存放日志的,run存放pid的,日志和pid路径都是可以指定的
/usr/local/php-fpm/sbin/php-fpm 和 /usr/local/php-fpm/bin/php 的用法是基本一致的
/usr/local/php-fpm/sbin/php-fpm -m       查看模块

/usr/local/php-fpm/sbin/php-fpm -i

/usr/local/php-fpm/sbin/php-fpm -t       测试配置文件文件语法
检测语法:
[root@www php-5.6.32]# /usr/local/php-fpm/sbin/php-fpm -t

[26-Jun-2018 01:45:14] ERROR: failed to open configuration file '/usr/local/php-fpm/etc/php-	fpm.conf': No such file or directory (2)

[26-Jun-2018 01:45:14] ERROR: failed to load configuration file '/usr/local/php-fpm/etc/php-fpm.conf'

[26-Jun-2018 01:45:14] ERROR: FPM initialization failed

[root@www php-5.6.32]#

这里会提示配置文件并不存在,若想要启动php-fpm服务,首先需要去配置配置文件
拷贝cp php.ini-production /usr/local/php-fpm/etc/php.ini文件
查看目录发现/usr/local/src/php-5.6.30 有2个配置文件

	php.ini-development 适合开发环境使用

	php.ini-production 适合生产环境使用

	两者区别在于,错误日志不同
操作如下:
[root@www php-5.6.32]# cp php.ini-production  /usr/local/php-fpm/etc/php.ini

[root@www php-5.6.32]# cd /usr/local/php

php/     php7/    php-fpm/

[root@www php-5.6.32]# cd /usr/local/php-fpm/etc/

[root@www etc]# ls

pear.conf  php-fpm.conf.default  php.ini

[root@www etc]# vim php-fpm.conf

[root@www etc]# cat php-fpm.conf

[global]                    全局配置

pid = /usr/local/php-fpm/var/run/php-fpm.pid              定义PID

error_log = /usr/local/php-fpm/var/log/php-fpm.log        错误日志

[www]               模块名字,启动服务的时候就能看到

listen = /tmp/php-fcgi.sock         监听的地址

listen.mode = 666                      当监听的是sock的时候,这个语句才会生效,这个语句用来定义sock文件权限的

user = php-fpm                      用户,定义是哪个用户启动的

group = php-fpm                组,定义是哪个组启动的

pm = dynamic

pm.max_children = 50

pm.start_servers = 20

pm.min_spare_servers = 5

pm.max_spare_servers = 35

pm.max_requests = 500

rlimit_files = 1024

[root@www etc]#
上面的样例来自: https://coding.net/u/aminglinux/p/aminglinux-book/git/blob/master/D15Z/php-fpm.conf?public=true
linsten 可以监听sock、tcp 可以写成 linsten = 127.0.0.1:9000(默认端口就是9000,可自定义),一般监听的到是“127.0.0.1 ”IP,因为php-fpm这个服务是针对内部使用的、在本机上用的,也就是说Nginx和php通常是在一台机器上,两者之间通信直接使用内部网络就可以了;在这块选择的linsten配置不同,到之后的配置Nginx配置,也就是告诉Nginx到哪里找php的配置语句也是不同
进入目录,拷贝启动脚本:
[root@www etc]# cd /usr/local/src/php-5.6.32/

[root@www php-5.6.32]# cp sapi/fpm/init.d.php-fpm /etc/init.d/php-fpm
启动服务:
[root@www php-5.6.32]# chmod 755 /etc/init.d/php-fpm

[root@www php-5.6.32]# chkconfig --add php-fpm

[root@www php-5.6.32]# chkconfig php-fpm on

[root@www php-5.6.32]# service php-fpm start

Starting php-fpm [26-Jun-2018 02:58:04] ERROR: [pool www] cannot get uid for user 'php-fpm'

[26-Jun-2018 02:58:04] ERROR: FPM initialization failed

 failed

[root@www php-5.6.32]# useradd php-fpm

[root@www php-5.6.32]# service php-fpm start

Starting php-fpm  done

[root@www php-5.6.32]#

[root@www php-5.6.32]# chkconfig --list

注:该输出结果只显示 SysV 服务,并不包含

原生 systemd 服务。SysV 配置数据

可能被原生 systemd 配置覆盖。

  要列出 systemd 服务,请执行 'systemctl list-unit-files'。

  查看在具体 target 启用的服务请执行

  'systemctl list-dependencies [target]'。

mysqld         	0:关	1:关	2:开	3:开	4:开	5:开	6:关

netconsole     	0:关	1:关	2:开	3:开	4:开	5:开	6:关

network        	0:关	1:关	2:开	3:开	4:开	5:开	6:关

php-fpm        	0:关	1:关	2:开	3:开	4:开	5:开	6:关

[root@www php-5.6.32]#
查看php-fpm是否启动
[root@www php-5.6.32]# ps aux | grep php-fpm

root     26278  0.1  0.4 123652  4948 ?        Ss   02:58   0:00 php-fpm: master process (/usr/local/php-		fpm/etc/php-fpm.conf)

php-fpm  26279  0.0  0.4 123652  4708 ?        S    02:58   0:00 php-fpm: pool www

php-fpm  26280  0.0  0.4 123652  4708 ?        S    02:58   0:00 php-fpm: pool www

php-fpm  26281  0.0  0.4 123652  4708 ?        S    02:58   0:00 php-fpm: pool www

php-fpm  26282  0.0  0.4 123652  4708 ?        S    02:58   0:00 php-fpm: pool www

php-fpm  26283  0.0  0.4 123652  4712 ?        S    02:58   0:00 php-fpm: pool www

php-fpm  26284  0.0  0.4 123652  4712 ?        S    02:58   0:00 php-fpm: pool www

php-fpm  26285  0.0  0.4 123652  4712 ?        S    02:58   0:00 php-fpm: pool www

php-fpm  26286  0.0  0.4 123652  4712 ?        S    02:58   0:00 php-fpm: pool www

php-fpm  26287  0.0  0.4 123652  4712 ?        S    02:58   0:00 php-fpm: pool www

php-fpm  26289  0.0  0.4 123652  4716 ?        S    02:58   0:00 php-fpm: pool www

php-fpm  26290  0.0  0.4 123652  4716 ?        S    02:58   0:00 php-fpm: pool www

php-fpm  26291  0.0  0.4 123652  4716 ?        S    02:58   0:00 php-fpm: pool www

php-fpm  26294  0.0  0.4 123652  4716 ?        S    02:58   0:00 php-fpm: pool www

php-fpm  26295  0.0  0.4 123652  4716 ?        S    02:58   0:00 php-fpm: pool www

php-fpm  26296  0.0  0.4 123652  4716 ?        S    02:58   0:00 php-fpm: pool www

php-fpm  26297  0.0  0.4 123652  4716 ?        S    02:58   0:00 php-fpm: pool www

php-fpm  26298  0.0  0.4 123652  4716 ?        S    02:58   0:00 php-fpm: pool www

php-fpm  26299  0.0  0.4 123652  4716 ?        S    02:58   0:00 php-fpm: pool www

php-fpm  26300  0.0  0.4 123652  4716 ?        S    02:58   0:00 php-fpm: pool www

php-fpm  26301  0.0  0.4 123652  4716 ?        S    02:58   0:00 php-fpm: pool www

root     26321  0.0  0.0 112720   980 pts/0    R+   03:00   0:00 grep --color=auto php-fpm

[root@www php-5.6.32]#
Nginx介绍
Nginx官网 nginx.org,最新版1.15,最新稳定版1.14 (stable版本) //这个软件是有俄国人开发的,因为对静态文件的处理性能上比Apache强很多,所以在慢慢的取代Apache

Nginx应用场景:web服务、反向代理、负载均衡

Nginx著名分支,淘宝基于Nginx开发的Tengine,使用上和Nginx一致,服务名,配置文件名都一样,和Nginx的最大区别在于Tenging增加了一些定制化模块,在安全限速方面表现突出,另外它支持对js,css合并

Nginx核心+lua相关的组件和模块组成了一个支持lua的高性能web容器openresty,
[参考文章](http://jinnianshilongnian.iteye.com/blog/2280928)

Nginx虽然功能不多,但可以去扩展一些第三方的模块进来
Nginx安装
首先切换回src目录
[root@www php-5.6.32]# cd /usr/local/src

[root@www src]# ls

apr-1.6.3               httpd-2.4.33                                  php-5.6.32          phpredis-develop

apr-1.6.3.tar.gz        httpd-2.4.33.tar.gz                           php-5.6.32.tar.bz2  phpredis-develop.zip

apr-util-1.6.1          mariadb-10.2.6-linux-glibc_214-x86_64.tar.gz  php-7.1.6

apr-util-1.6.1.tar.bz2  mysql-5.6.36-linux-glibc2.5-x86_64.tar.gz     php-7.1.6.tar.bz2

[root@www src]#
下载nginx安装包并解压
[root@www src]# wget http://nginx.org/download/nginx-1.8.0.tar.gz

[root@www src]# tar zxf nginx-1.8.0.tar.gz

[root@www src]# cd nginx-1.8.0

[root@www nginx-1.8.0]#
编译:
[root@www nginx-1.8.0]# ./configure --prefix=/usr/local/nginx
然后在make && make install
[root@www nginx-1.8.0]# make && make install

[root@www nginx-1.8.0]# echo $?

0
查看nginx目录下文件
[root@www nginx-1.8.0]# ls /usr/local/nginx/

conf  html  logs  sbin

[root@www nginx-1.8.0]#

conf目录,配置文件目录

html目录,样例文件

logs目录,存放日志的

sbin目录,核心进程目录
-t 检测语法错误:
[root@www nginx-1.8.0]# /usr/local/nginx/sbin/nginx -t

nginx: the configuration file /usr/local/nginx/conf/nginx.conf syntax is ok

nginx: configuration file /usr/local/nginx/conf/nginx.conf test is successful

[root@www nginx-1.8.0]#
创建nginx启动脚本:
[root@www nginx-1.8.0]# vim /etc/init.d/nginx
文件内容拷贝自 https://coding.net/u/aminglinux/p/aminglinux-book/git/blob/master/D15Z/etc_init.d_nginx?public=true
[root@www nginx-1.8.0]# vim /etc/init.d/nginx
[root@www nginx-1.8.0]# cat !$
cat /etc/init.d/nginx
#!/bin/bash
# chkconfig: - 30 21
# description: http service.
# Source Function Library
. /etc/init.d/functions
# Nginx Settings
NGINX_SBIN="/usr/local/nginx/sbin/nginx"
NGINX_CONF="/usr/local/nginx/conf/nginx.conf"
NGINX_PID="/usr/local/nginx/logs/nginx.pid"
RETVAL=0
prog="Nginx"
start()
{
    echo -n $"Starting $prog: "
    mkdir -p /dev/shm/nginx_temp
    daemon $NGINX_SBIN -c $NGINX_CONF
    RETVAL=$?
    echo
    return $RETVAL
}
stop()
{
    echo -n $"Stopping $prog: "
    killproc -p $NGINX_PID $NGINX_SBIN -TERM
    rm -rf /dev/shm/nginx_temp
    RETVAL=$?
    echo
    return $RETVAL
}
reload()
{
    echo -n $"Reloading $prog: "
    killproc -p $NGINX_PID $NGINX_SBIN -HUP
    RETVAL=$?
    echo
    return $RETVAL
}
restart()
{
    stop
    start
}
configtest()
{
    $NGINX_SBIN -c $NGINX_CONF -t
    return 0
}
case "$1" in
  start)
        start
        ;;
  stop)
        stop
        ;;
  reload)
        reload
        ;;
  restart)
        restart
        ;;
  configtest)
        configtest
        ;;
  *)
        echo $"Usage: $0 {start|stop|reload|restart|configtest}"
        RETVAL=1
esac
exit $RETVAL

[root@www nginx-1.8.0]#
更改配置文件权限:
[root@www nginx-1.8.0]# chmod 755 /etc/init.d/nginx

[root@www nginx-1.8.0]# chkconfig --add nginx

[root@www nginx-1.8.0]# chkconfig  nginx on
进入nginx配置文件目录
[root@www nginx-1.8.0]# cd /usr/local/nginx/conf/

[root@www conf]# ls

fastcgi.conf          fastcgi_params.default  mime.types          nginx.conf.default   uwsgi_params

fastcgi.conf.default  koi-utf                 mime.types.default  scgi_params          uwsgi_params.default

fastcgi_params        koi-win                 nginx.conf          scgi_params.default  win-utf

[root@www conf]# mv nginx.conf nginx.conf.bak

[root@www conf]# vim nginx.conf
[root@www conf]# cat !$
cat nginx.conf
user nobody nobody;
worker_processes 2;
error_log /usr/local/nginx/logs/nginx_error.log crit;
pid /usr/local/nginx/logs/nginx.pid;
worker_rlimit_nofile 51200;

events
{
    use epoll;
    worker_connections 6000;
}

http
{
    include mime.types;
    default_type application/octet-stream;
    server_names_hash_bucket_size 3526;
    server_names_hash_max_size 4096;
    log_format combined_realip '$remote_addr $http_x_forwarded_for [$time_local]'
    ' $host "$request_uri" $status'
    ' "$http_referer" "$http_user_agent"';
    sendfile on;
    tcp_nopush on;
    keepalive_timeout 30;
    client_header_timeout 3m;
    client_body_timeout 3m;
    send_timeout 3m;
    connection_pool_size 256;
    client_header_buffer_size 1k;
    large_client_header_buffers 8 4k;
    request_pool_size 4k;
    output_buffers 4 32k;
    postpone_output 1460;
    client_max_body_size 10m;
    client_body_buffer_size 256k;
    client_body_temp_path /usr/local/nginx/client_body_temp;
    proxy_temp_path /usr/local/nginx/proxy_temp;
    fastcgi_temp_path /usr/local/nginx/fastcgi_temp;
    fastcgi_intercept_errors on;
    tcp_nodelay on;
    gzip on;
    gzip_min_length 1k;
    gzip_buffers 4 8k;
    gzip_comp_level 5;
    gzip_http_version 1.1;
    gzip_types text/plain application/x-javascript text/css text/htm
    application/xml;

    server
    {
        listen 80;
        server_name localhost;
        index index.html index.htm index.php;
        root /usr/local/nginx/html;

        location ~ \.php$
        {
            include fastcgi_params;
            fastcgi_pass unix:/tmp/php-fcgi.sock;
            fastcgi_index index.php;
            fastcgi_param SCRIPT_FILENAME /usr/local/nginx/html$fastcgi_script_name;
        }
    }
}

[root@www conf]#
配置文件内容来源:https://coding.net/u/aminglinux/p/aminglinux-book/git/blob/master/D15Z/nginx.conf
检测语法:
[root@www conf]# /usr/local/nginx/sbin/nginx -t

nginx: the configuration file /usr/local/nginx/conf/nginx.conf syntax is ok

nginx: configuration file /usr/local/nginx/conf/nginx.conf test is successful

[root@www conf]#
启动nginx服务
[root@www conf]# /etc/init.d/nginx start

Starting nginx (via systemctl):                            [  确定  ]

[root@www conf]#

[root@www conf]# ps aux | grep nginx

root      2179  0.0  0.1  25016  1572 ?        Ss   23:07   0:00 nginx: master process 	/usr/local/nginx/sbin/nginx -c /usr/local/nginx/conf/nginx.conf

nobody    2294  0.0  0.3  27460  3484 ?        S    23:09   0:00 nginx: worker process

nobody    2295  0.0  0.3  27460  3732 ?        S    23:09   0:00 nginx: worker process

root      2414  0.0  0.2 120796  2092 ?        Ss   23:11   0:00 nginx: master process /usr/sbin/nginx

nginx     2415  0.0  0.3 121180  3124 ?        S    23:11   0:00 nginx: worker process

root      2424  0.0  0.0 112720   980 pts/0    R+   23:11   0:00 grep --color=auto nginx

[root@www conf]#

[root@www conf]# curl localhost
<!DOCTYPE html>
<html>
<head>
<title>Welcome to nginx!</title>
<style>
    body {
        width: 35em;
        margin: 0 auto;
        font-family: Tahoma, Verdana, Arial, sans-serif;
    }
</style>
</head>
<body>
<h1>Welcome to nginx!</h1>
<p>If you see this page, the nginx web server is successfully installed and
working. Further configuration is required.</p>

<p>For online documentation and support please refer to
<a href="http://nginx.org/">nginx.org</a>.<br/>
Commercial support is available at
<a href="http://nginx.com/">nginx.com</a>.</p>

<p><em>Thank you for using nginx.</em></p>
</body>
</html>
[root@www conf]#
测试解析php
[root@www conf]# vim /usr/local/nginx/html/1.php

[root@www conf]# curl localhost/1.php

hello nginx.[root@www conf]#
扩展
Nginx为什么比Httpd高效:原理篇 http://www.toxingwang.com/linux-unix/linux-basic/1712.html
mod_php 和 mod_fastcgi以及php-fpm的比较 http://dwz.cn/1lwMSd
概念了解概念了解:CGI,FastCGI,PHP-CGI与PHP-FPM
http://www.nowamagic.net/librarys/veda/detail/1319/
https://www.awaimai.com/371.html
基于事件驱动的服务器实现高并发详解https://www.zhihu.com/question/64727674


 206
206

 被折叠的 条评论
为什么被折叠?
被折叠的 条评论
为什么被折叠?
 到【灌水乐园】发言


