title_layout.xml
<?xml version="1.0" encoding="utf-8"?>
<LinearLayout xmlns:android="http://schemas.android.com/apk/res/android"
    android:layout_width="match_parent"
    android:layout_height="match_parent"
    android:orientation="vertical"
    android:background="#00ffff">

    <Button
        android:layout_width="match_parent"
        android:layout_height="wrap_content"
        android:text="时间"
        android:id="@+id/button" />

    <Button
        android:layout_width="match_parent"
        android:layout_height="wrap_content"
        android:text="地点"
        android:id="@+id/button2" />

    <Button
        android:layout_width="match_parent"
        android:layout_height="wrap_content"
        android:text="人物"
        android:id="@+id/button3" />
</LinearLayout>
TitleFragment.java
package com.example.administrator.myapplication;

import android.app.Fragment;
import android.os.Bundle;
import android.view.LayoutInflater;
import android.view.View;
import android.view.ViewGroup;

/**
 * Created by Administrator on 2016/3/30.
 */
public class TitleFragment extends Fragment {

    @Override
    public View onCreateView(LayoutInflater inflater, ViewGroup container, Bundle savedInstanceState) {
        View view=inflater.inflate(R.layout.titile_layout,container,false);
        return view;
    }
}
content_layout.xml
<?xml version="1.0" encoding="utf-8"?>
<LinearLayout xmlns:android="http://schemas.android.com/apk/res/android"
    android:layout_width="match_parent"
    android:layout_height="match_parent"
    android:orientation="vertical"
    android:background="#000000">

    <TextView
        android:layout_width="match_parent"
        android:layout_height="match_parent"
        android:text="not content"
android:gravity="center"
        android:id="@+id/textView" />
</LinearLayout>
ContentFragment
package com.example.administrator.myapplication;

import android.app.Fragment;
import android.os.Bundle;
import android.view.LayoutInflater;
import android.view.View;
import android.view.ViewGroup;

/**
 * Created by Administrator on 2016/3/30.
 */
public class ContentFragment extends Fragment{
    @Override
    public View onCreateView(LayoutInflater inflater, ViewGroup container, Bundle savedInstanceState) {
        View view=inflater.inflate(R.layout.content_layout,container,false);
        return view;
    }
}
activity_main.xml
<?xml version="1.0" encoding="utf-8"?>
<LinearLayout xmlns:android="http://schemas.android.com/apk/res/android"
    xmlns:tools="http://schemas.android.com/tools"
    android:layout_width="match_parent"
    android:layout_height="match_parent"
   android:orientation="horizontal"
    tools:context="com.example.administrator.myapplication.MainActivity">
<fragment
    android:layout_width="10dip"
    android:layout_height="match_parent"
    android:name="com.example.administrator.myapplication.TitleFragment"
    android:layout_weight="1"
    android:id="@+id/title_fragment"/>
    <fragment
        android:layout_width="10dip"
        android:layout_height="match_parent"
        android:name="com.example.administrator.myapplication.ContentFragment"
        android:layout_weight="3"
        android:id="@+id/content_fragment"/>


</LinearLayout>
MainActivity.java
package com.example.administrator.myapplication;

import android.os.Bundle;
import android.support.v7.app.ActionBarActivity;
import android.view.Menu;
import android.view.MenuItem;

public class MainActivity extends ActionBarActivity {

    TitleFragment titileFragment;
    ContentFragment contentFragment;
    @Override
    protected void onCreate(Bundle savedInstanceState) {
        super.onCreate(savedInstanceState);
        setContentView(R.layout.activity_main);
        //通过FragmentManager(Fragment管理器)
        titileFragment= (TitleFragment) getFragmentManager().findFragmentById(R.id.title_fragment);
        contentFragment= (ContentFragment) getFragmentManager().findFragmentById(R.id.content_fragment);

    }

}
案例二. 动态 使用fragment 效果和案例一样,用的类也一样
activity_main2.xml
<?xml version="1.0" encoding="utf-8"?>
<LinearLayout xmlns:android="http://schemas.android.com/apk/res/android"
    xmlns:tools="http://schemas.android.com/tools"
    android:layout_width="match_parent"
    android:layout_height="match_parent"
  android:orientation="horizontal"
    tools:context="com.example.administrator.myapplication.MainActivity2">

    <fragment
        android:layout_width="wrap_content"
        android:layout_height="match_parent"
        android:id="@+id/title_fragment"
        android:name="com.example.administrator.myapplication.TitleFragment"
        android:layout_weight="1"/>
  <FrameLayout
      android:layout_width="wrap_content"
      android:layout_height="match_parent"
      android:layout_weight="3"
      android:id="@+id/ff"></FrameLayout>
</LinearLayout>
MainActivity2.java
package com.example.administrator.myapplication;

import android.app.FragmentManager;
import android.app.FragmentTransaction;
import android.os.Bundle;
import android.support.v7.app.ActionBarActivity;

public class MainActivity2 extends ActionBarActivity {
ContentFragment contentFragment;
    @Override
    protected void onCreate(Bundle savedInstanceState) {
        super.onCreate(savedInstanceState);
        setContentView(R.layout.activity_main2);
        addContentLayout();
    }

    /*通过代码添加Fragment*/
    private void addContentLayout()
    {
        FragmentManager fm=getFragmentManager();
        //开启一个事务
        FragmentTransaction ft=fm.beginTransaction();
        contentFragment=new ContentFragment();
        ft.add(R.id.ff,contentFragment);
        //ft.remove()删除
        //ft.replace()替代
        ft.commit();
    }
}
案例三。
 将Fragments加入Activity栈,并传递数据
fragment_pop_back.xml
<FrameLayout xmlns:android="http://schemas.android.com/apk/res/android"
    xmlns:tools="http://schemas.android.com/tools"
    android:layout_width="match_parent"
    android:layout_height="match_parent"
    tools:context="com.example.administrator.myapplication.PopBackFragment">

    <!-- TODO: Update blank fragment layout -->
    <TextView
        android:layout_width="match_parent"
        android:layout_height="match_parent"
        android:text="@string/hello_blank_fragment"
        android:id="@+id/textView_text"
        android:gravity="center"
        android:background="#00ddff"/>

</FrameLayout>
PopBackFragment.java
package com.example.administrator.myapplication;


import android.app.Fragment;
import android.os.Bundle;

import android.view.LayoutInflater;
import android.view.View;
import android.view.ViewGroup;
import android.widget.TextView;


/**
 * A simple {@link Fragment} subclass.
 */
public class PopBackFragment extends Fragment {
// private String title;

    //切换屏幕时 调用无参的构造方法,因此 构造传参 有问题
    public PopBackFragment()
    {

    }
/*    public PopBackFragment(String title) {
 //传参会丢失
        this.title=title;
    }*/
    public static PopBackFragment getInstance(String title)
    {
        PopBackFragment p=new PopBackFragment();
        Bundle b=new Bundle();
        b.putString("title",title);
        //argument参数
        p.setArguments(b);
        return p;
    }


    @Override
    public View onCreateView(LayoutInflater inflater, ViewGroup container,
                             Bundle savedInstanceState) {
        View view=inflater.inflate(R.layout.fragment_pop_back, container, false);
        // Inflate the layout for this fragment
        TextView tv= (TextView) view.findViewById(R.id.textView_text);
        tv.setText(getArguments().getString("title"));

        return view;
    }


}
activity_main3.xml
<?xml version="1.0" encoding="utf-8"?>
<RelativeLayout xmlns:android="http://schemas.android.com/apk/res/android"
    xmlns:tools="http://schemas.android.com/tools"
    android:layout_width="match_parent"
    android:layout_height="match_parent"
    android:paddingBottom="@dimen/activity_vertical_margin"
    android:paddingLeft="@dimen/activity_horizontal_margin"
    android:paddingRight="@dimen/activity_horizontal_margin"
    android:paddingTop="@dimen/activity_vertical_margin"
    tools:context=".PopBackActivity">

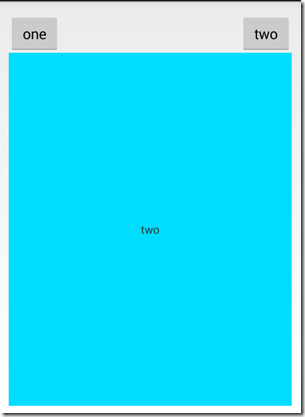
    <Button
        android:layout_width="wrap_content"
        android:layout_height="wrap_content"
        android:text="one"
        android:onClick="oneClick"
        android:id="@+id/button4"
        android:layout_alignParentTop="true"
        android:layout_alignParentLeft="true"
        android:layout_alignParentStart="true" />

    <Button
        android:layout_width="wrap_content"
        android:layout_height="wrap_content"
        android:text="two"
        android:onClick="twoClick"
        android:id="@+id/button5"
        android:layout_alignParentTop="true"
        android:layout_alignParentRight="true"
        android:layout_alignParentEnd="true" />

    <FrameLayout
        android:id="@+id/content"
        android:layout_width="match_parent"
        android:layout_height="match_parent"
        android:layout_below="@+id/button4"
        android:layout_alignParentLeft="true"
        android:layout_alignParentStart="true"></FrameLayout>
</RelativeLayout>
PopBackActivity.java
package com.example.administrator.myapplication;

import android.app.FragmentManager;
import android.app.FragmentTransaction;
import android.support.v7.app.ActionBarActivity;
import android.os.Bundle;
import android.view.KeyEvent;
import android.view.View;

public class PopBackActivity extends ActionBarActivity {

    @Override
    protected void onCreate(Bundle savedInstanceState) {
        super.onCreate(savedInstanceState);
        setContentView(R.layout.activity_main3);
    }
    public void oneClick(View view)
    {
    //PopBackFragment p1=new PopBackFragment("one");
        PopBackFragment p1=PopBackFragment.getInstance("one");
        FragmentManager fm=getFragmentManager();
        FragmentTransaction ft=fm.beginTransaction();
        ft.replace(R.id.content,p1);
        //把当前Fragment添加到Activity栈上
        ft.addToBackStack(null);
        ft.commit();

    }
    public void twoClick(View view)
    {
        PopBackFragment p2=PopBackFragment.getInstance("two");
        FragmentManager fm=getFragmentManager();
        FragmentTransaction ft=fm.beginTransaction();
        ft.replace(R.id.content,p2);
        //把当前Fragment添加到Activity栈上
        ft.addToBackStack(null);
        ft.commit();
    }

    //把Fragment加入到栈中
    @Override
    public boolean onKeyDown(int keyCode, KeyEvent event) {
        if (keyCode==KeyEvent.KEYCODE_BACK)
        {
            if(getFragmentManager().getBackStackEntryCount()==0)
            {
                finish();
            }
            else {
                //出栈 不进行直接退出
                getFragmentManager().popBackStack();
            }
        }
        return true;
    }
}
案例四。
fragment_menu.xml
<LinearLayout xmlns:android="http://schemas.android.com/apk/res/android"
    xmlns:tools="http://schemas.android.com/tools"
    android:layout_width="match_parent"
    android:layout_height="match_parent"
    android:orientation="vertical"
    tools:context="com.example.administrator.myapplication.MenuFragment">

    <!-- TODO: Update blank fragment layout -->

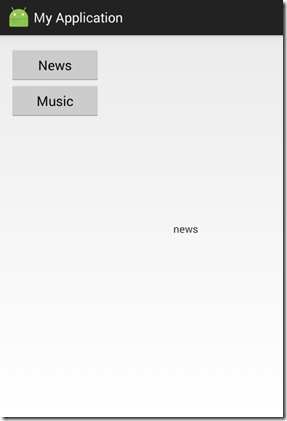
    <Button
        android:layout_width="match_parent"
        android:layout_height="wrap_content"
        android:text="News"
        android:id="@+id/button_news" />

    <Button
        android:layout_width="match_parent"
        android:layout_height="wrap_content"
        android:text="Music"
        android:id="@+id/button_music" />
</LinearLayout>
MenuFragment.java
package com.example.administrator.myapplication;


import android.app.Activity;
import android.app.Fragment;
import android.os.Bundle;
import android.view.LayoutInflater;
import android.view.View;
import android.view.ViewGroup;


/**
 * A simple {@link Fragment} subclass.
 */
public class MenuFragment extends Fragment implements View.OnClickListener {

    private  MyMenuListener myMenuListener;

    public MenuFragment() {
        // Required empty public constructor
    }

    @Override
    public void onAttach(Activity activity) {
        super.onAttach(activity);
        //被实例化
        myMenuListener=(MyMenuListener)activity;
    }

    @Override
    public View onCreateView(LayoutInflater inflater, ViewGroup container,
                             Bundle savedInstanceState) {
        // Inflate the layout for this fragment
  View view=inflater.inflate(R.layout.fragment_menu, container, false);
        view.findViewById(R.id.button_news).setOnClickListener(this);
        view.findViewById(R.id.button_music).setOnClickListener(this);
        return view;
    }

    @Override
    public void onClick(View v) {
        switch (v.getId())
        {
            case R.id.button_news:
                myMenuListener.changeValue("news");
                break;
            case R.id.button_music:
                myMenuListener.changeValue("music");
                break;

        }
    }


    //定义一个回调接口
    public static interface MyMenuListener
    {
        public void changeValue(String value);
    }

}
fragment_main.xml
<LinearLayout xmlns:android="http://schemas.android.com/apk/res/android"
    xmlns:tools="http://schemas.android.com/tools"
    android:layout_width="match_parent"
    android:layout_height="match_parent"
    android:orientation="vertical"
    tools:context="com.example.administrator.myapplication.MainFragment">

    <!-- TODO: Update blank fragment layout -->
    <TextView
        android:layout_width="match_parent"
        android:layout_height="match_parent"
        android:text="@string/hello_blank_fragment"
        android:id="@+id/value"
        android:gravity="center"/>

</LinearLayout>
MainFragment.java
package com.example.administrator.myapplication;


import android.app.Fragment;
import android.os.Bundle;


import android.view.LayoutInflater;
import android.view.View;
import android.view.ViewGroup;
import android.widget.TextView;


/**
 * A simple {@link Fragment} subclass.
 */

public class MainFragment extends Fragment {

    private TextView textView_value;

    public MainFragment() {
        // Required empty public constructor
    }


    @Override
    public View onCreateView(LayoutInflater inflater, ViewGroup container,
                             Bundle savedInstanceState) {
        // Inflate the layout for this fragment
        View view=inflater.inflate(R.layout.fragment_main, container, false);
textView_value= (TextView) view.findViewById(R.id.value);
        return view;
    }


    public void changeTextViewValue(String value)
    {
        textView_value.setText(value);
    }

}
activity_main_activity3.xml
<?xml version="1.0" encoding="utf-8"?>
<LinearLayout xmlns:android="http://schemas.android.com/apk/res/android"
    xmlns:tools="http://schemas.android.com/tools"
    android:layout_width="match_parent"
    android:layout_height="match_parent"
    android:paddingBottom="@dimen/activity_vertical_margin"
    android:paddingLeft="@dimen/activity_horizontal_margin"
    android:paddingRight="@dimen/activity_horizontal_margin"
    android:paddingTop="@dimen/activity_vertical_margin"
    tools:context="com.example.administrator.myapplication.MainActivity3">

    <fragment
        android:layout_width="wrap_content"
        android:layout_height="match_parent"
        android:layout_weight="1"
        android:id="@+id/menuFragment"
        android:name="com.example.administrator.myapplication.MenuFragment"></fragment>

    <fragment
        android:layout_width="wrap_content"
        android:layout_height="match_parent"
        android:layout_weight="2"
        android:id="@+id/mainFragment"
        android:name="com.example.administrator.myapplication.MainFragment"></fragment>

</LinearLayout>
MainActivity3.java
package com.example.administrator.myapplication;

import android.os.Bundle;
import android.support.v7.app.ActionBarActivity;

public class MainActivity3 extends ActionBarActivity implements MenuFragment.MyMenuListener {

    private MenuFragment menuFragment;
    private MainFragment mainFragment;
    @Override
    protected void onCreate(Bundle savedInstanceState) {
        super.onCreate(savedInstanceState);
        setContentView(R.layout.activity_main_activity3);
        menuFragment= (MenuFragment) getFragmentManager().findFragmentById(R.id.menuFragment);
        mainFragment= (MainFragment) getFragmentManager().findFragmentById(R.id.mainFragment);
    }

    @Override
    public void changeValue(String value) {
       mainFragment.changeTextViewValue(value);
    }
}
案例五。
preferences.xml
<?xml version="1.0" encoding="utf-8"?>
<PreferenceScreen xmlns:android="http://schemas.android.com/apk/res/android">
    <PreferenceCategory android:title="是否打开声音">
        <CheckBoxPreference
            android:key="checkbox_preference"
            android:summary="设置打开声音后可以自动开启音乐"
            android:title="打开声音" />
    </PreferenceCategory>

    <PreferenceCategory android:title="城市">
        <EditTextPreference
            android:dialogTitle="昵称"
            android:key="edittext_preference"
            android:summary="请输入你的昵称"
            android:title="昵称">

        </EditTextPreference>

        <ListPreference
            android:dialogTitle="城市名称"
            android:entries="@array/city"
            android:entryValues="@array/city"
            android:key="List_preference"
            android:summary="请选择一个城市名称"
            android:title="城市名称"></ListPreference>

    </PreferenceCategory>

</PreferenceScreen>
PrefsFragment.java
package com.example.administrator.myapplication;

import android.os.Bundle;
import android.preference.PreferenceFragment;

/**
 * Created by Administrator on 2016/3/30.
 */
public class PrefsFragment extends PreferenceFragment {

    @Override
    public void onCreate(Bundle savedInstanceState) {
        super.onCreate(savedInstanceState);
    addPreferencesFromResource(R.xml.preferences);
    }
}
activity_main4.xml
<?xml version="1.0" encoding="utf-8"?>
<RelativeLayout xmlns:android="http://schemas.android.com/apk/res/android"
    xmlns:tools="http://schemas.android.com/tools"
    android:layout_width="match_parent"
    android:layout_height="match_parent"
    android:paddingBottom="@dimen/activity_vertical_margin"
    android:paddingLeft="@dimen/activity_horizontal_margin"
    android:paddingRight="@dimen/activity_horizontal_margin"
    android:paddingTop="@dimen/activity_vertical_margin"
    tools:context="com.example.administrator.myapplication.MainActivity4">
<fragment
    android:layout_width="match_parent"
    android:layout_height="match_parent"

    android:id="@+id/pres_fragment"
    android:name="com.example.administrator.myapplication.PrefsFragment"></fragment>
</RelativeLayout>
MainActivity4.java
package com.example.administrator.myapplication;

import android.content.SharedPreferences;
import android.os.Bundle;
import android.preference.PreferenceManager;
import android.support.v7.app.ActionBarActivity;

public class MainActivity4 extends ActionBarActivity {

    @Override
    protected void onCreate(Bundle savedInstanceState) {
        super.onCreate(savedInstanceState);
        setContentView(R.layout.activity_main4);
//可用于 登录 注册
       SharedPreferences sp= PreferenceManager.getDefaultSharedPreferences(this);
       String name=sp.getString("edittext_preference","");
        System.out.println(name);
    }

}


![L29Y_%Q[GJ$WSBX]BPYP2MV L29Y_%Q[GJ$WSBX]BPYP2MV](http://static.oschina.net/uploads/img/201603/30205701_m3lX.jpg)
![PL0PA}VOSS@%(`80@BC]S)4 PL0PA}VOSS@%(`80@BC]S)4](http://static.oschina.net/uploads/img/201603/30205704_DFQw.png)


 103
103

 被折叠的 条评论
为什么被折叠?


