


11.6 MariaDB安装
准备工作
因为MariaDB的二进制包镜像源在国外地址,所以预先下载了该包到本地物理机,使用lrzsz工具将该包上传至虚拟机/usr/local/src目录进行安装。用的香港的云服务器下载
上传本地包到虚拟终端:
[root@cham002 ~]# cd /usr/local/src
[root@cham002 src]# ls
mysql-5.6.35-linux-glibc2.5-x86_64.tar.gz
[root@cham002 src]# rz

[root@cham002 src]# ls
  mysql-5.6.35-linux-glibc2.5-x86_64.tar.gz      mariadb-10.2.6-linux-glibc_214-x86_64.tar.gz
[root@cham002 src]# tar -zxvf mariadb-10.2.6-linux-glibc_214-x86_64.tar.gz

[root@cham002 src]# ls
mariadb-10.2.6-linux-glibc_214-x86_64         mysql-5.6.35-linux-glibc2.5-x86_64.tar.gz
mariadb-10.2.6-linux-glibc_214-x86_64.tar.gz


[root@cham002 src]# mv mariadb-10.2.6-linux-glibc_214-x86_64 /usr/local/mariadb


[root@cham002 src]# cd /usr/local/mariadb
[root@cham002 mariadb]# ls
bin                 CREDITS      docs               INSTALL-BINARY  mysql-test    scripts    support-files
COPYING             data         EXCEPTIONS-CLIENT  lib             README.md     share
COPYING.thirdparty  DESTINATION  include            man             README-wsrep  sql-bench
安装MariaDB
初始化
[root@cham002 mariadb]# ./scripts/mysql_install_db --user=mysql --datadir=/data/mariadb
Installing MariaDB/MySQL system tables in '/data/mariadb' ...
OK

To start mysqld at boot time you have to copy
support-files/mysql.server to the right place for your system

PLEASE REMEMBER TO SET A PASSWORD FOR THE MariaDB root USER !
To do so, start the server, then issue the following commands:

'./bin/mysqladmin' -u root password 'new-password'
'./bin/mysqladmin' -u root -h cham002 password 'new-password'

Alternatively you can run:
'./bin/mysql_secure_installation'

which will also give you the option of removing the test
databases and anonymous user created by default.  This is
strongly recommended for production servers.

See the MariaDB Knowledgebase at http://mariadb.com/kb or the
MySQL manual for more instructions.

You can start the MariaDB daemon with:
cd '.' ; ./bin/mysqld_safe --datadir='/data/mariadb'

You can test the MariaDB daemon with mysql-test-run.pl
cd './mysql-test' ; perl mysql-test-run.pl

Please report any problems at http://mariadb.org/jira

The latest information about MariaDB is available at http://mariadb.org/.
You can find additional information about the MySQL part at:
http://dev.mysql.com
Consider joining MariaDB's strong and vibrant community:
https://mariadb.org/get-involved/

[root@cham002 mariadb]# echo $?
0

[root@cham002 mariadb]# ls /data/mariadb
aria_log.00000001  ib_buffer_pool  ib_logfile0  mysql               test
aria_log_control   ibdata1         ib_logfile1  performance_schema
[root@cham002 mariadb]# ls /data/mysql
auto.cnf  cham002.err  ibdata1  ib_logfile0  ib_logfile1  mysql  performance_schema  test
[root@cham002 mariadb]# ls /data
mariadb  mysql
配置MariaDB
[root@cham002 mariadb]# cp support-files/my-small.cnf /usr/local/mariadb/my.cnf
[root@cham002 mariadb]# cp support-files/mysql.server /etc/init.d/mariadb
my.cnf 暂时基本不用改。
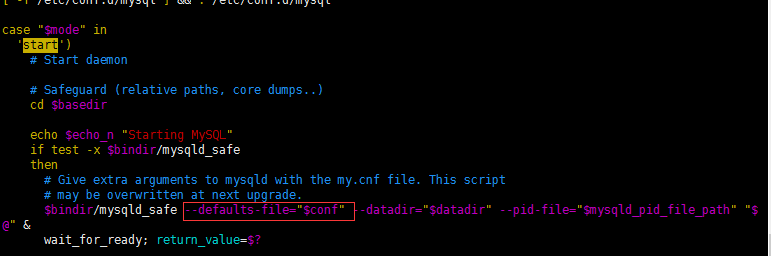
配置启动脚本:
[root@cham002 mariadb]# vim /etc/init.d/mariadb


basedir=/usr/local/mariadb
datadir=/data/mariadb
conf=$basedir/my.cnf
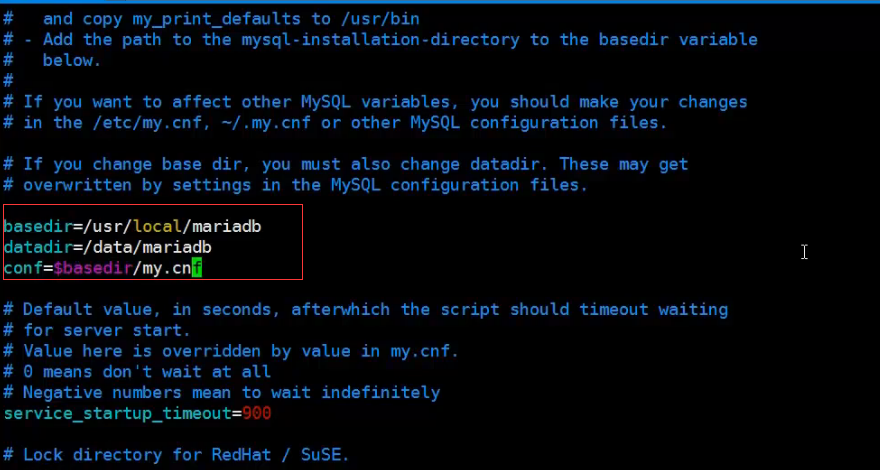
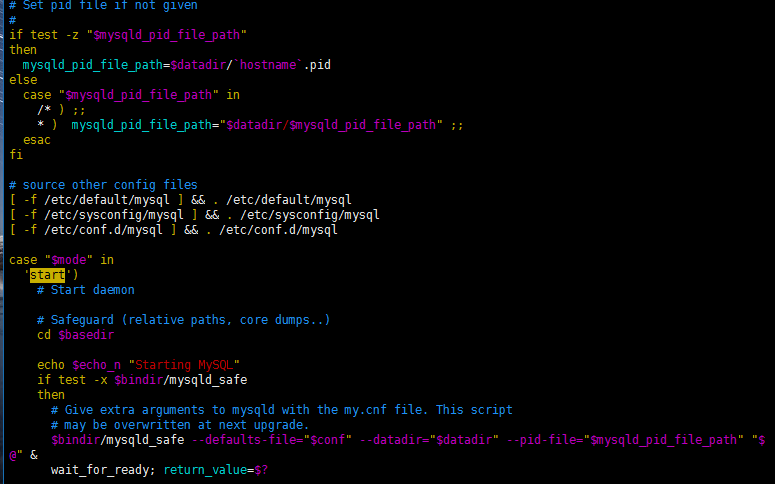
在启动脚本添加该选项
启动mariadb服务
检测mysql服务是否在运行:
[root@cham002 mariadb]# ps aux |grep mysql
root     16447  0.0  0.0 112664   968 pts/5    S+   22:47   0:00 grep --color=auto mysql
因mysql和Mariadb监听同一端口,为避免冲突,所以需要先关闭mysql服务:
[root@cham002 mariadb]# /etc/init.d/mariadb start
Reloading systemd:                                         [  确定  ]
Starting mariadb (via systemctl):                          [  确定  ]
[root@cham002 mariadb]# ps aux |grep mariadb
root     16487  0.0  0.1 115380  1732 ?        S    22:48   0:00 /bin/sh /usr/local/mariadb/bin/mysqld_safe --defaults-file=/usr/local/mariadb/my.cnf --datadir=/data/mysql --pid-file=/data/mysql/cham002.pid
mysql    16603  3.8  5.7 1583872 58088 ?       Sl   22:48   0:01 /usr/local/mariadb/bin/mysqld --defaults-file=/usr/local/mariadb/my.cnf --basedir=/usr/local/mariadb --datadir=/data/mysql --plugin-dir=/usr/local/mariadb/lib/plugin --user=mysql --log-error=/data/mysql/cham002.err --pid-file=/data/mysql/cham002.pid --socket=/tmp/mysql.sock --port=3306
root     16645  0.0  0.0 112664   972 pts/5    S+   22:49   0:00 grep --color=auto mariadb

[root@cham002 mariadb]# netstat -ltnp
Active Internet connections (only servers)
Proto Recv-Q Send-Q Local Address           Foreign Address         State       PID/Program name
tcp        0      0 0.0.0.0:22              0.0.0.0:*               LISTEN      1703/sshd
tcp        0      0 127.0.0.1:25            0.0.0.0:*               LISTEN      2419/master
tcp        0      0 192.168.230.135:8730    0.0.0.0:*               LISTEN      3185/rsync
tcp6       0      0 :::3306                 :::*                    LISTEN      16603/mysqld
tcp6       0      0 :::22                   :::*                    LISTEN      1703/sshd
tcp6       0      0 ::1:25                  :::*                    LISTEN      2419/master
注: 如果系统中只安装mysql和mariadb其中一种服务,可以直接把启动脚本放在/etc/文件中设置开机启动。
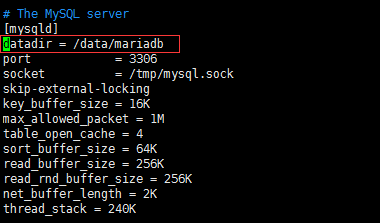
/usr/local/mariadb/my.cnf 如果配置文件中没有配置datadir
[root@cham002 mariadb]# ps aux |grep mysql
root     16487  0.0  0.1 115380  1732 ?        S    22:48   0:00 /bin/sh /usr/local/mariadb/bin/mysqld_safe --defaults-file=/usr/local/mariadb/my.cnf --datadir=/data/mysql --pid-file=/data/mysql/cham002.pid
mysql    16603  0.3  6.4 1583872 64652 ?       Sl   22:48   0:01 /usr/local/mariadb/bin/mysqld --defaults-file=/usr/local/mariadb/my.cnf --basedir=/usr/local/mariadb --datadir=/data/mysql --plugin-dir=/usr/local/mariadb/lib/plugin --user=mysql --log-error=/data/mysql/cham002.err --pid-file=/data/mysql/cham002.pid --socket=/tmp/mysql.sock --port=3306
root     16656  0.0  0.0 112664   972 pts/5    S+   22:55   0:00 grep --color=auto mysql
[root@cham002 mariadb]#
[root@cham002 mariadb]# vim /usr/local/mariadb/my.cnf
[root@cham002 mariadb]# /etc/init.d/mariadb start
Starting mariadb (via systemctl):                          [  确定  ]
[root@cham002 mariadb]# /etc/init.d/mariadb restart
Restarting mariadb (via systemctl):                        [  确定  ]
[root@cham002 mariadb]# ps aux |grep mysql
root     16487  0.0  0.1 115380  1732 ?        S    22:48   0:00 /bin/sh /usr/local/mariadb/bin/mysqld_safe --defaults-file=/usr/local/mariadb/my.cnf --datadir=/data/mysql --pid-file=/data/mysql/cham002.pid
mysql    16603  0.2  6.4 1583872 64652 ?       Sl   22:48   0:01 /usr/local/mariadb/bin/mysqld --defaults-file=/usr/local/mariadb/my.cnf --basedir=/usr/local/mariadb --datadir=/data/mysql --plugin-dir=/usr/local/mariadb/lib/plugin --user=mysql --log-error=/data/mysql/cham002.err --pid-file=/data/mysql/cham002.pid --socket=/tmp/mysql.sock --port=3306
root     16871  0.0  0.0 112664   968 pts/5    S+   23:00   0:00 grep --color=auto mysql
[root@cham002 mariadb]# /etc/init.d/mariadb stop
Stopping mariadb (via systemctl):                          [  确定  ]
[root@cham002 mariadb]# !ps
ps aux |grep mysql
root     16487  0.0  0.1 115380  1732 ?        S    22:48   0:00 /bin/sh /usr/local/mariadb/bin/mysqld_safe --defaults-file=/usr/local/mariadb/my.cnf --datadir=/data/mysql --pid-file=/data/mysql/cham002.pid
mysql    16603  0.2  6.4 1583872 64652 ?       Sl   22:48   0:01 /usr/local/mariadb/bin/mysqld --defaults-file=/usr/local/mariadb/my.cnf --basedir=/usr/local/mariadb --datadir=/data/mysql --plugin-dir=/usr/local/mariadb/lib/plugin --user=mysql --log-error=/data/mysql/cham002.err --pid-file=/data/mysql/cham002.pid --socket=/tmp/mysql.sock --port=3306
root     16914  0.0  0.0 112664   972 pts/5    S+   23:03   0:00 grep --color=auto mysql
[root@cham002 mariadb]# killall mysqld
[root@cham002 mariadb]# ps aux |grep mysql
root     16923  0.0  0.0 112664   972 pts/5    S+   23:04   0:00 grep --color=auto mysql
[root@cham002 mariadb]# /etc/init.d/mariadb start
Starting mariadb (via systemctl):                          [  确定  ]
[root@cham002 mariadb]# !ps
ps aux |grep mysql
root     16950  0.0  0.1 115380  1736 ?        S    23:04   0:00 /bin/sh /usr/local/mariadb/bin/mysqld_safe --defaults-file=/usr/local/mariadb/my.cnf --datadir=/data/mariadb --pid-file=/data/mariadb/cham002.pid
mysql    17069  2.7  5.7 1583772 57892 ?       Sl   23:04   0:00 /usr/local/mariadb/bin/mysqld --defaults-file=/usr/local/mariadb/my.cnf --basedir=/usr/local/mariadb --datadir=/data/mariadb --plugin-dir=/usr/local/mariadb/lib/plugin --user=mysql --log-error=/data/mariadb/cham002.err --pid-file=/data/mariadb/cham002.pid --socket=/tmp/mysql.sock --port=3306
root     17106  0.0  0.0 112664   972 pts/5    S+   23:04   0:00 grep --color=auto mysql
[root@cham002 mariadb]#
11.7-11.9 Apache安装
>Apache是一个基金会的名字,httpd才是我们要安装的软件包,早期它的名字就叫apache。httpd使用一个通用函数库Apr和apr-util,它让httpd可以不关心底层的操作系统平台,可以很方便地移植(从linux移植到windows)。
Apache官网 www.apache.org 。
httpd2.2和httpd2.4所所使用的Apr库不同,而且centos7系统自带的Apr与之不匹配,所以需要使用yum安装Apr库文件。
下载所需要的包
wget下载所需要的包,并解压。

[root@cham002 src]# tar zxvf httpd-2.4.29.tar.gz

[root@cham002 src]# tar zxvf apr-1.6.3.tar.gz

[root@cham002 src]# tar -xjvf apr-util-1.6.1.tar.bz2

[root@cham002 src]# ls
apr-1.6.3         apr-util-1.6.1          httpd-2.4.29         mariadb-10.2.6-linux-glibc_214-x86_64.tar.gz
apr-1.6.3.tar.gz  apr-util-1.6.1.tar.bz2  httpd-2.4.29.tar.gz  mysql-5.6.35-linux-glibc2.5-x86_64.tar.gz
安装Apr包
[root@cham002 src]# cd apr-1.6.3/
[root@cham002 apr-1.6.3]# ls
apr-config.in  apr.spec          CHANGES         dso         libapr.dep  Makefile.in   NOTICE         README.cmake  threadproc
apr.dep        atomic            CMakeLists.txt  emacs-mode  libapr.dsp  Makefile.win  NWGNUmakefile  shmem         time
apr.dsp        build             config.layout   encoding    libapr.mak  memory        passwd         strings       tools
apr.dsw        buildconf         configure       file_io     libapr.rc   misc          poll           support       user
apr.mak        build.conf        configure.in    helpers     LICENSE     mmap          random         tables
apr.pc.in      build-outputs.mk  docs            include     locks       network_io    README         test

[root@cham002 apr-1.6.3]# ./configure --prefix=/usr/local/apr
checking build system type... x86_64-pc-linux-gnu
checking host system type... x86_64-pc-linux-gnu
checking target system type... x86_64-pc-linux-gnu
Configuring APR library
Platform: x86_64-pc-linux-gnu
checking for working mkdir -p... yes
APR Version: 1.6.3
checking for chosen layout... apr
checking for gcc... no
checking for cc... no
checking for cl.exe... no
configure: error: in `/usr/local/src/apr-1.6.3':
configure: error: no acceptable C compiler found in $PATH
See `config.log' for more details
#即上面命令错误,查看其安装过程发现“checking for gcc... no”——表示“gcc”编译器不存在,所以需要先安装gcc编译器:说明:缺少C语言相关的编译器

[root@cham002 apr-1.6.3]# yum install -y gcc
已加载插件:fastestmirror
已安装:
  gcc.x86_64 0:4.8.5-16.el7_4.1

作为依赖被安装:
  cpp.x86_64 0:4.8.5-16.el7_4.1                  glibc-devel.x86_64 0:2.17-196.el7_4.2    glibc-headers.x86_64 0:2.17-196.el7_4.2
  kernel-headers.x86_64 0:3.10.0-693.11.1.el7    libmpc.x86_64 0:1.0.1-3.el7              mpfr.x86_64 0:3.1.1-4.el7

作为依赖被升级:
  glibc.x86_64 0:2.17-196.el7_4.2           glibc-common.x86_64 0:2.17-196.el7_4.2         libgcc.x86_64 0:4.8.5-16.el7_4.1
  libgomp.x86_64 0:4.8.5-16.el7_4.1

完毕!

#再次运行~~!
[root@cham002 apr-1.6.3]# ./configure --prefix=/usr/local/apr


rm: cannot remove 'libtoolT': No such file or directory
config.status: executing default commands
出现这个提示不用管它~没有关系。
[root@cham002 apr-1.6.3]# echo $?
0
# 配置成功!


编译和安装:
[root@cham002 apr-1.6.3]# make && make install

[root@cham002 apr-1.6.3]# ls /usr/local/apr/
bin  build-1  include  lib


安装Apr-util包
[root@cham002 apr-1.6.3]# cd ../apr-util-1.6.1/
[root@cham002 apr-util-1.6.1]# ./configure --prefix=/usr/local/apr-util --with-apr=/usr/local/apr

[root@cham002 apr-util-1.6.1]# echo $?
0
编译和安装:
[root@cham002 apr-util-1.6.1]# make && make install

xml/apr_xml.c:35:19: 致命错误:expat.h:没有那个文件或目录
 #include <expat.h>
                   ^
编译中断。
make[1]: *** [xml/apr_xml.lo] 错误 1
make[1]: 离开目录“/usr/local/src/apr-util-1.6.1”
make: *** [all-recursive] 错误 1

注意: APR 1.6.1版本有变更,进行了加密设置,进行编译时需要使用如下命令(否则在安装Apache是无法调用该库文件):
[root@cham002 apr-util-1.6.1]# yum -y install expat-devel
已加载插件:fastestmirror
Loading mirror speeds from cached hostfile

[root@cham002 apr-util-1.6.1]# make && make install
再次执行make,完成
[root@cham002 apr-util-1.6.1]# echo $?
0
[root@cham002 apr-util-1.6.1]# ls /usr/local/apr-util/这也生成3个文件
bin  include  lib


安装httpd
[root@cham002 src]# cd httpd-2.4.29/
[root@cham002 httpd-2.4.29]# ./configure --prefix=/usr/local/apache2.4 --with-apr=/usr/local/apr --with-apr-util=/usr/local/apr-util --enable-so --enable-mods-shared=most
checking for chosen layout... Apache
checking for working mkdir -p... yes
checking for grep that handles long lines and -e... /usr/bin/grep
checking for egrep... /usr/bin/grep -E
checking build system type... x86_64-pc-linux-gnu
checking host system type... x86_64-pc-linux-gnu
checking target system type... x86_64-pc-linux-gnu
configure:
configure: Configuring Apache Portable Runtime library...
configure:
checking for APR... yes
  setting CC to "gcc"
  setting CPP to "gcc -E"
  setting CFLAGS to " -g -O2 -pthread"
  setting CPPFLAGS to " -DLINUX -D_REENTRANT -D_GNU_SOURCE"
  setting LDFLAGS to " "
configure:
configure: Configuring Apache Portable Runtime Utility library...
configure:
checking for APR-util... yes
checking for gcc... gcc
checking whether the C compiler works... yes
checking for C compiler default output file name... a.out
checking for suffix of executables...
checking whether we are cross compiling... no
checking for suffix of object files... o
checking whether we are using the GNU C compiler... yes
checking whether gcc accepts -g... yes
checking for gcc option to accept ISO C89... none needed
checking how to run the C preprocessor... gcc -E
checking for gcc option to accept ISO C99... -std=gnu99
checking for pcre-config... false
configure: error: pcre-config for libpcre not found. PCRE is required and available from http://pcre.org/
配置:错误:没有找到libpcre的pcreconfig。需要从http://pcre.org/获得PCRE。
PCRE是正则表达式的一个驱动库,必须要依赖这个PCRE 说明:需要安装库文件pcre
[root@cham002 httpd-2.4.29]# echo $?
1
解决办法:
##查看相关的包
[root@cham002 httpd-2.4.29]# yum list |grep pcre
pcre.x86_64                             8.32-15.el7_2.1                @anaconda
ghc-pcre-light.x86_64                   0.4-13.el7                     epel
ghc-pcre-light-devel.x86_64             0.4-13.el7                     epel
mingw32-pcre.noarch                     8.38-1.el7                     epel
mingw32-pcre-static.noarch              8.38-1.el7                     epel
mingw64-pcre.noarch                     8.38-1.el7                     epel
mingw64-pcre-static.noarch              8.38-1.el7                     epel
pcre.i686                               8.32-17.el7                    base
pcre.x86_64                             8.32-17.el7                    base
pcre-devel.i686                         8.32-17.el7                    base
pcre-devel.x86_64                       8.32-17.el7                    base
pcre-static.i686                        8.32-17.el7                    base
pcre-static.x86_64                      8.32-17.el7                    base
pcre-tools.x86_64                       8.32-17.el7                    base
pcre2.i686                              10.23-2.el7                    base
pcre2.x86_64                            10.23-2.el7                    base
pcre2-devel.i686                        10.23-2.el7                    base
pcre2-devel.x86_64                      10.23-2.el7                    base
pcre2-static.i686                       10.23-2.el7                    base
pcre2-static.x86_64                     10.23-2.el7                    base
pcre2-tools.x86_64                      10.23-2.el7                    base
pcre2-utf16.i686                        10.23-2.el7                    base
pcre2-utf16.x86_64                      10.23-2.el7                    base
pcre2-utf32.i686                        10.23-2.el7                    base
pcre2-utf32.x86_64                      10.23-2.el7                    base
[root@cham002 httpd-2.4.29]# yum -install -y pcre2-devel
已加载插件:fastestmirror
[root@cham002 httpd-2.4.29]# ./configure --prefix=/usr/local/apache2.4 --with-apr=/usr/local/apr --with-apr-util=/usr/local/apr-util --enable-so --enable-mods-shared=most
还是不行,估计装的包不对。
[root@cham002 httpd-2.4.29]# yum install -y pcre-devel
已加载插件:fastestmirror
[root@cham002 httpd-2.4.29]# ./configure --prefix=/usr/local/apache2.4 --with-apr=/usr/local/apr --with-apr-util=/usr/local/apr-util --enable-so --enable-mods-shared=most

[root@cham002 httpd-2.4.29]# echo $?
0
编译和安装
[root@cham002 httpd-2.4.29]# make
此过程内容较多不复制代码 时间较长!

出现错误!!!!
collect2: error: ld returned 1 exit status
make[2]: *** [htpasswd] 错误 1
make[2]: 离开目录“/usr/local/src/httpd-2.4.29/support”
make[1]: *** [all-recursive] 错误 1
make[1]: 离开目录“/usr/local/src/httpd-2.4.29/support”
make: *** [all-recursive] 错误 1
[root@cham002 httpd-2.4.29]# echo $?
2

解决办法:删除Apr-util 重新安装Apr-util包
[root@cham002 httpd-2.4.29]# rm -rvf apr-util-1.6.1

[root@cham002 httpd-2.4.29]# echo $?
0
没报错
[root@cham002 httpd-2.4.29]#make install
此过程内容较多不复制代码 时间较长!
[root@cham002 httpd-2.4.29]# echo $?
0
没报错


启动服务

切换至Apache2.4目录:
[root@cham002 httpd-2.4.29]# cd /usr/local/apache2.4/
[root@cham002 apache2.4]# ls
bin  build  cgi-bin  conf  error  htdocs  icons  include  logs  man  manual  modules

[root@cham002 apache2.4]# /usr/local/apache2.4/bin/apachectl start
AH00558: httpd: Could not reliably determine the server's fully qualified domain name, using fe80::6f15:52d3:ebeb:e193. Set the 'ServerName' directive globally to suppress this message
[root@cham002 apache2.4]#
[root@cham002 apache2.4]# ps aux |grep httpd
root     56769  0.0  0.2  95536  2524 ?        Ss   02:20   0:00 /usr/local/apache2.4/bin/httpd -k start
daemon   56770  0.0  0.4 382364  4428 ?        Sl   02:20   0:00 /usr/local/apache2.4/bin/httpd -k start
daemon   56771  0.0  0.4 382364  4428 ?        Sl   02:20   0:00 /usr/local/apache2.4/bin/httpd -k start
daemon   56773  0.0  0.4 382364  4428 ?        Sl   02:20   0:00 /usr/local/apache2.4/bin/httpd -k start
root     56855  0.0  0.0 112680   976 pts/0    S+   02:21   0:00 grep --color=auto httpd
[root@cham002 apache2.4]# netstat -lntp
Active Internet connections (only servers)
Proto Recv-Q Send-Q Local Address           Foreign Address         State       PID/Program name
tcp        0      0 0.0.0.0:22              0.0.0.0:*               LISTEN      1703/sshd
tcp        0      0 127.0.0.1:25            0.0.0.0:*               LISTEN      2419/master
tcp        0      0 192.168.230.135:8730    0.0.0.0:*               LISTEN      3185/rsync
tcp6       0      0 :::3306                 :::*                    LISTEN      17069/mysqld
tcp6       0      0 :::80                   :::*                    LISTEN      56769/httpd
tcp6       0      0 :::22                   :::*                    LISTEN      1703/sshd
tcp6       0      0 ::1:25                  :::*                    LISTEN      2419/master


httpd服务默认监听80端口    mysqld服务默认监听3306端口


 1500
1500

 被折叠的 条评论
为什么被折叠?
被折叠的 条评论
为什么被折叠?
 到【灌水乐园】发言


