


当DCOM/COM+在本机调用时,往往问题比较简单。如果需要远程调用,往往会发生很多问题,比如80070005(Acess is denied),80040155( Interface not registered)等等问题,因为涉及到跨机器,所以会涉及到权限,注册表配置等等的问题。同时,不同类型的客户端(指C++类型等编译型客户,或者是vbscript等解释型客户)远程调用DCOM 时,客户端所要求的配置不尽相同。本文介绍的正对编译型客户远程调用DCOM的示例。
首先,在客户端调用远程调用的时候,需要在客户端进行的配置有如下几种选择:
选择1. 通过nmake -f <dcomservice>.mk生成相应的proxy dll,然后将该proxy dll(一般为<dcomservice>ps.dll)部署在客户段,并通过regsvr32 <dcomservice>ps.dll进行注册,即可实现在客户端进行远程调用
选择2. 将<dcomservice>.tlb文件发布到客户端,然后运行regtlib (regtlibv12) <dcomservice>.tlb进行注册,也可实现在客户端的远程调用。
下面给出客户端调用代码(VC6.0):
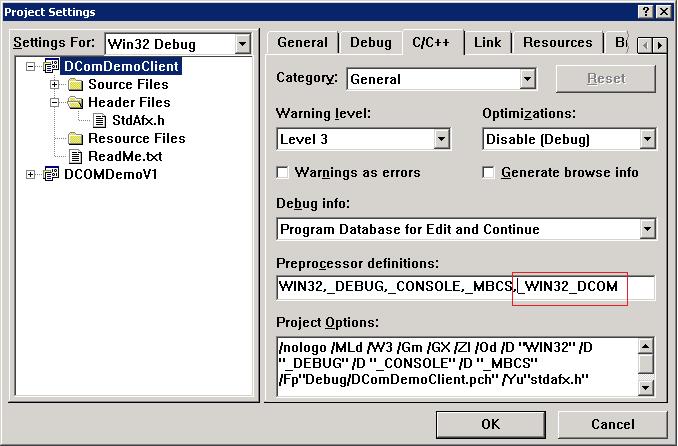
注意:如果调用CoCreateInstanceEx API,必须开启一个_WIN32_DCOM Switch.我们可以在stdafx.h里面加入
#define _WIN32_DCOM
或者在preprocess里面加入该值,如下所示:
//
DComServiceClient.cpp : Defines the entry point for the console application.
//
#include " stdafx.h "
#include " ..\DComDemoV1.h "
#include " ..\DComDemoV1_i.c "
#include < atlbase.h >
#include < comdef.h >
#include < comutil.h >
int main( int argc, char * argv[])
{
/* CreateInstance Locally via SmartPointer;
CComPtr<ISimpleClass> spSimpleClass;
CoInitialize(NULL);
HRESULT hr;
hr=spSimpleClass.CoCreateInstance(__uuidof(SimpleClass));
if(FAILED(hr)) {printf("Error code:%x",hr);return hr;}
BSTR result;
hr=spSimpleClass->HelloWorld(&result);
if(FAILED(hr)) {printf("Error code:%x",hr);return hr;}
char* p=::_com_util::ConvertBSTRToString(result);
printf("%s\n",p);
::SysFreeString(result);
CoUninitialize();
return 0;
*/
// ====================================================
/* CreateInstance locally via primitive pointer;
ISimpleClass* pSimpleClass;
CoInitialize(NULL);
HRESULT hr;
hr=CoCreateInstance(CLSID_SimpleClass,0,CLSCTX_LOCAL_SERVER,IID_ISimpleClass,(void**)&pSimpleClass);
if(FAILED(hr)) return hr;
BSTR result;
hr=pSimpleClass->HelloWorld(&result);
char* p=::_com_util::ConvertBSTRToString(result);
printf("%s\n",p);
pSimpleClass->Release();
CoUninitialize();
return 0;
*/
// call remotely
HRESULT hr;
ISimpleClass * pI = NULL;
COSERVERINFO sin, * sinptr;
MULTI_QI mqi;
mqi.pIID =& IID_ISimpleClass;
mqi.hr = 0 ;
mqi.pItf = 0 ;
COAUTHINFO authInfo;
authInfo.dwAuthnSvc = RPC_C_AUTHN_WINNT; // RPC_C_AUTHN_NONE;
authInfo.dwAuthzSvc = RPC_C_AUTHZ_NONE;
authInfo.pwszServerPrincName = NULL;
authInfo.dwAuthnLevel = RPC_C_AUTHN_LEVEL_PKT ; // RPC_C_AUTHN_LEVEL_NONE;
authInfo.dwImpersonationLevel = RPC_C_IMP_LEVEL_IMPERSONATE; // RPC_C_IMP_LEVEL_ANONYMOUS;
authInfo.pAuthIdentityData = NULL;
authInfo.dwCapabilities = NULL;
sin.dwReserved1 = 0 ;
sin.dwReserved2 = 0 ;
sin.pwszName = L " azalea-desk " ; // define the remote server name here
sin.pAuthInfo =& authInfo;
sinptr =& sin;
hr = CoInitialize( 0 );
if (SUCCEEDED(hr))
{
hr = CoCreateInstanceEx(CLSID_SimpleClass,
NULL,
CLSCTX_REMOTE_SERVER,
sinptr,
1 ,
& mqi
);
if (SUCCEEDED(hr))
{
pI = (ISimpleClass * )mqi.pItf;
printf( " Dcom server connect\n " );
BSTR bsReturnValue;
pI -> HelloWorld( & bsReturnValue);
pI -> Release();
char * pValue = _com_util::ConvertBSTRToString(bsReturnValue);
printf( " %s\n " ,pValue);
delete pValue;
}
else
{
printf( " CreateInstance Error!Error Code:%x\n " ,hr);
}
}
else
{
printf( " CoInitialize Error!Error Code:%x\n " ,hr);
}
CoUninitialize();
return 0 ;
}
该DCOM Service只定义了一个HelloWorld()返回字符串的method.客户端调用成功后的screenshot如下:

点击此处下载源代码


 760
760


 被折叠的 条评论
为什么被折叠?
被折叠的 条评论
为什么被折叠?
 到【灌水乐园】发言


