


Python三种图像处理库,PIL、skimage、OpenCV中三次插值对比
PIL、skimage、OpenCV三种图片处理库在图片的缩放上都有resize方法。在resize方法中我们又可以调用不同的插值方法。
对比前的准备
首先导入必要的python库,将测试文件放入测试目录。我的测试图片comic.png放在与工程同目录的test文件夹里。`
import cv2 as cv
import PIL.Image as pil_image
import numpy as np
import skimage
from skimage import io,transform
from pylab import *

采用PSNR来评价三种库插值方法
PSNR计算公式,单位dB。PSNR越高,缩放效果越好(图片保真度更好)。
def psnr(img1, img2):
"""
compute the psnr
:param img1: img1
:param img2: img2
:return:
"""
diff = img1 - img2
diff = diff.flatten('C')
rmse = math.sqrt(np.mean(diff ** 2.))
psnr = 20 * math.log10(1.0 / rmse)
return psnr
OpenCV插值(cubic)
img = cv.imread("test/comic.png")
img = cv.cvtColor(img,cv.COLOR_BGR2RGB)
img = cv.resize(img,(249,360))
cvimg1 = cv.resize(img, None, fx=1/3, fy=1/3, interpolation=cv.INTER_CUBIC)
cvimg2 = cv.resize(cvimg1, None, fx=3, fy=3, interpolation=cv.INTER_CUBIC)
cvPicture = figure()
ax1 = cvPicture.add_subplot(131)
title('img')
ax2 = cvPicture.add_subplot(132)
title('cvimg1')
ax3 = cvPicture.add_subplot(133)
title('cvimg2')
ax1.imshow(img)
ax2.imshow(cvimg1)
ax3.imshow(cvimg2)
cvpsnr = psnr(img/255, cvimg2/255)
print("psnr: %.5fdB"%cvpsnr)
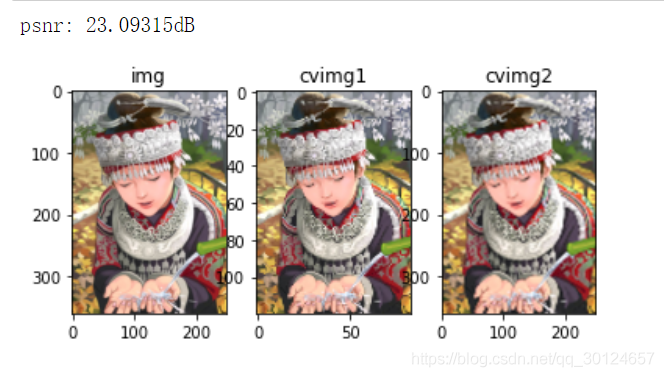
首先将图片缩小为原图的1
3
\frac{1}{3}31,即cvimg1。然后再将cvimg1放大到3倍,即cvimg2。新放大的cvimg2与原图做对比。从PSNR可以看出用openCV进行插值,效果还是很不错的。后面的两种对比方式同理。
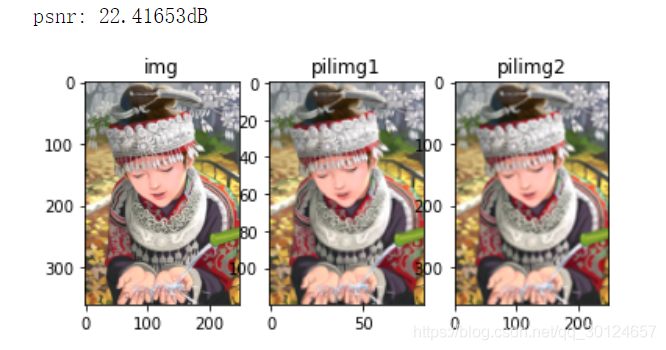
PIL插值(bicubic)
img = pil_image.open("test/comic.png").convert('RGB')
img = img.resize((249,360),resample=pil_image.BICUBIC)
pilimg1 = img.resize((img.width // 3, img.height // 3), resample=pil_image.BICUBIC)
pilimg2 = pilimg1.resize((pilimg1.width * 3, pilimg1.height * 3), resample=pil_image.BICUBIC)
# 不转numpy的话这里img是PIL.Image.Image类型,没法计算psnr
img = np.array(img)
pilimg2 = np.array(pilimg2)
pilPicture = figure()
ax1 = pilPicture.add_subplot(131)
title('img')
ax2 = pilPicture.add_subplot(132)
title('pilimg1')
ax3 = pilPicture.add_subplot(133)
title('pilimg2')
ax1.imshow(img)
ax2.imshow(pilimg1)
ax3.imshow(pilimg2)
pilpsnr = psnr(img/255, pilimg2/255)
print("psnr: %.5fdB"%pilpsnr)
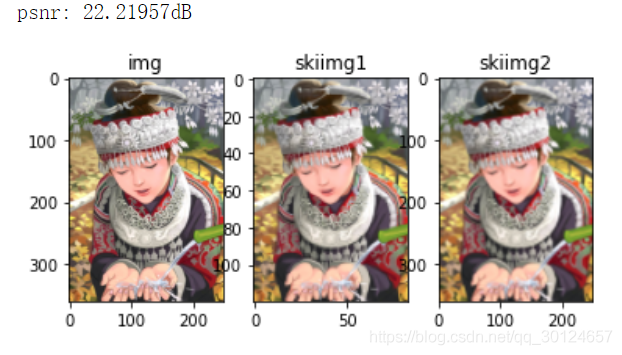
Skimage插值(bicubic)
img= io.imread("test/comic.png")
'''
resize函数接口
resize(image, output_shape, order=1, mode='constant', cval=0, clip=True, preserve_range=False)
order : int, optional
The order of interpolation. The order has to be in the range 0-5:
- 0: Nearest-neighbor
- 1: Bi-linear (default)
- 2: Bi-quadratic
- 3: Bi-cubic
- 4: Bi-quartic
- 5: Bi-quintic
'''
img = transform.resize(img,(360, 249),order=3)
skiimg1 = transform.resize(img,(img.shape[0]//3, img.shape[1]//3),order=3)
skiimg2 = transform.resize(skiimg1,(skiimg1.shape[0]*3, skiimg1.shape[1]*3),order=3)
skiPicture = figure()
ax1 = skiPicture.add_subplot(131)
title('img')
ax2 = skiPicture.add_subplot(132)
title('skiimg1')
ax3 = skiPicture.add_subplot(133)
title('skiimg2')
ax1.imshow(img)
ax2.imshow(skiimg1)
ax3.imshow(skiimg2)
skipsnr = psnr(img, skiimg2)
print("psnr: %.5fdB"%skipsnr)
总结
通过对以上3种库放大进行对比,可以说明同样用三次插值的方法对图像进行缩放三种库的缩放后的效果是不一样的,且相较而言用OpenCV缩放的效果是最好的。
还有是观察到三种库对图片插值方法的描述:cv.INTER_CUBIC;pil_image.BICUBIC;Bi-cubic。查了下OpenCV对Cubic的解释是三次样条插值,在它的描述里并没有用Bi-这个前缀,但OpenCV的方法也是在4邻域内做三次插值,所以这三种方法在计算上应该是一样的。其差异的原因看网上老哥解释很可能是在于他们读图片的方式不同导致。
还有要补充的是OpenCV与Skimage读取图片后,图片的格式是numpy类型数据,PIL则是它自己封装的数据格式PIL.Image.Image。Skimage在使用transform方法后,图片会自动转为0~1之间的浮点数据类型,故不需要再除255。
原文链接:https://blog.csdn.net/qq_30124657/article/details/109226776


 652
652


 被折叠的 条评论
为什么被折叠?
被折叠的 条评论
为什么被折叠?
 到【灌水乐园】发言


