


Platform:Android-7.1.1_r22
参考:http://blog.csdn.net/gaugamela/article/details/52350434
Data建立过程的几个阶段
1 Android向modem发起建立Data的命令
2 modem返回数据连接建立成功后的处理3 FW通知其他App连接状态改变
4 创建native层的物理连接并配置链路信息
5 判断已建立的网络哪些需要保留,哪些需要断开
1 Android向modem发起建立Data的命令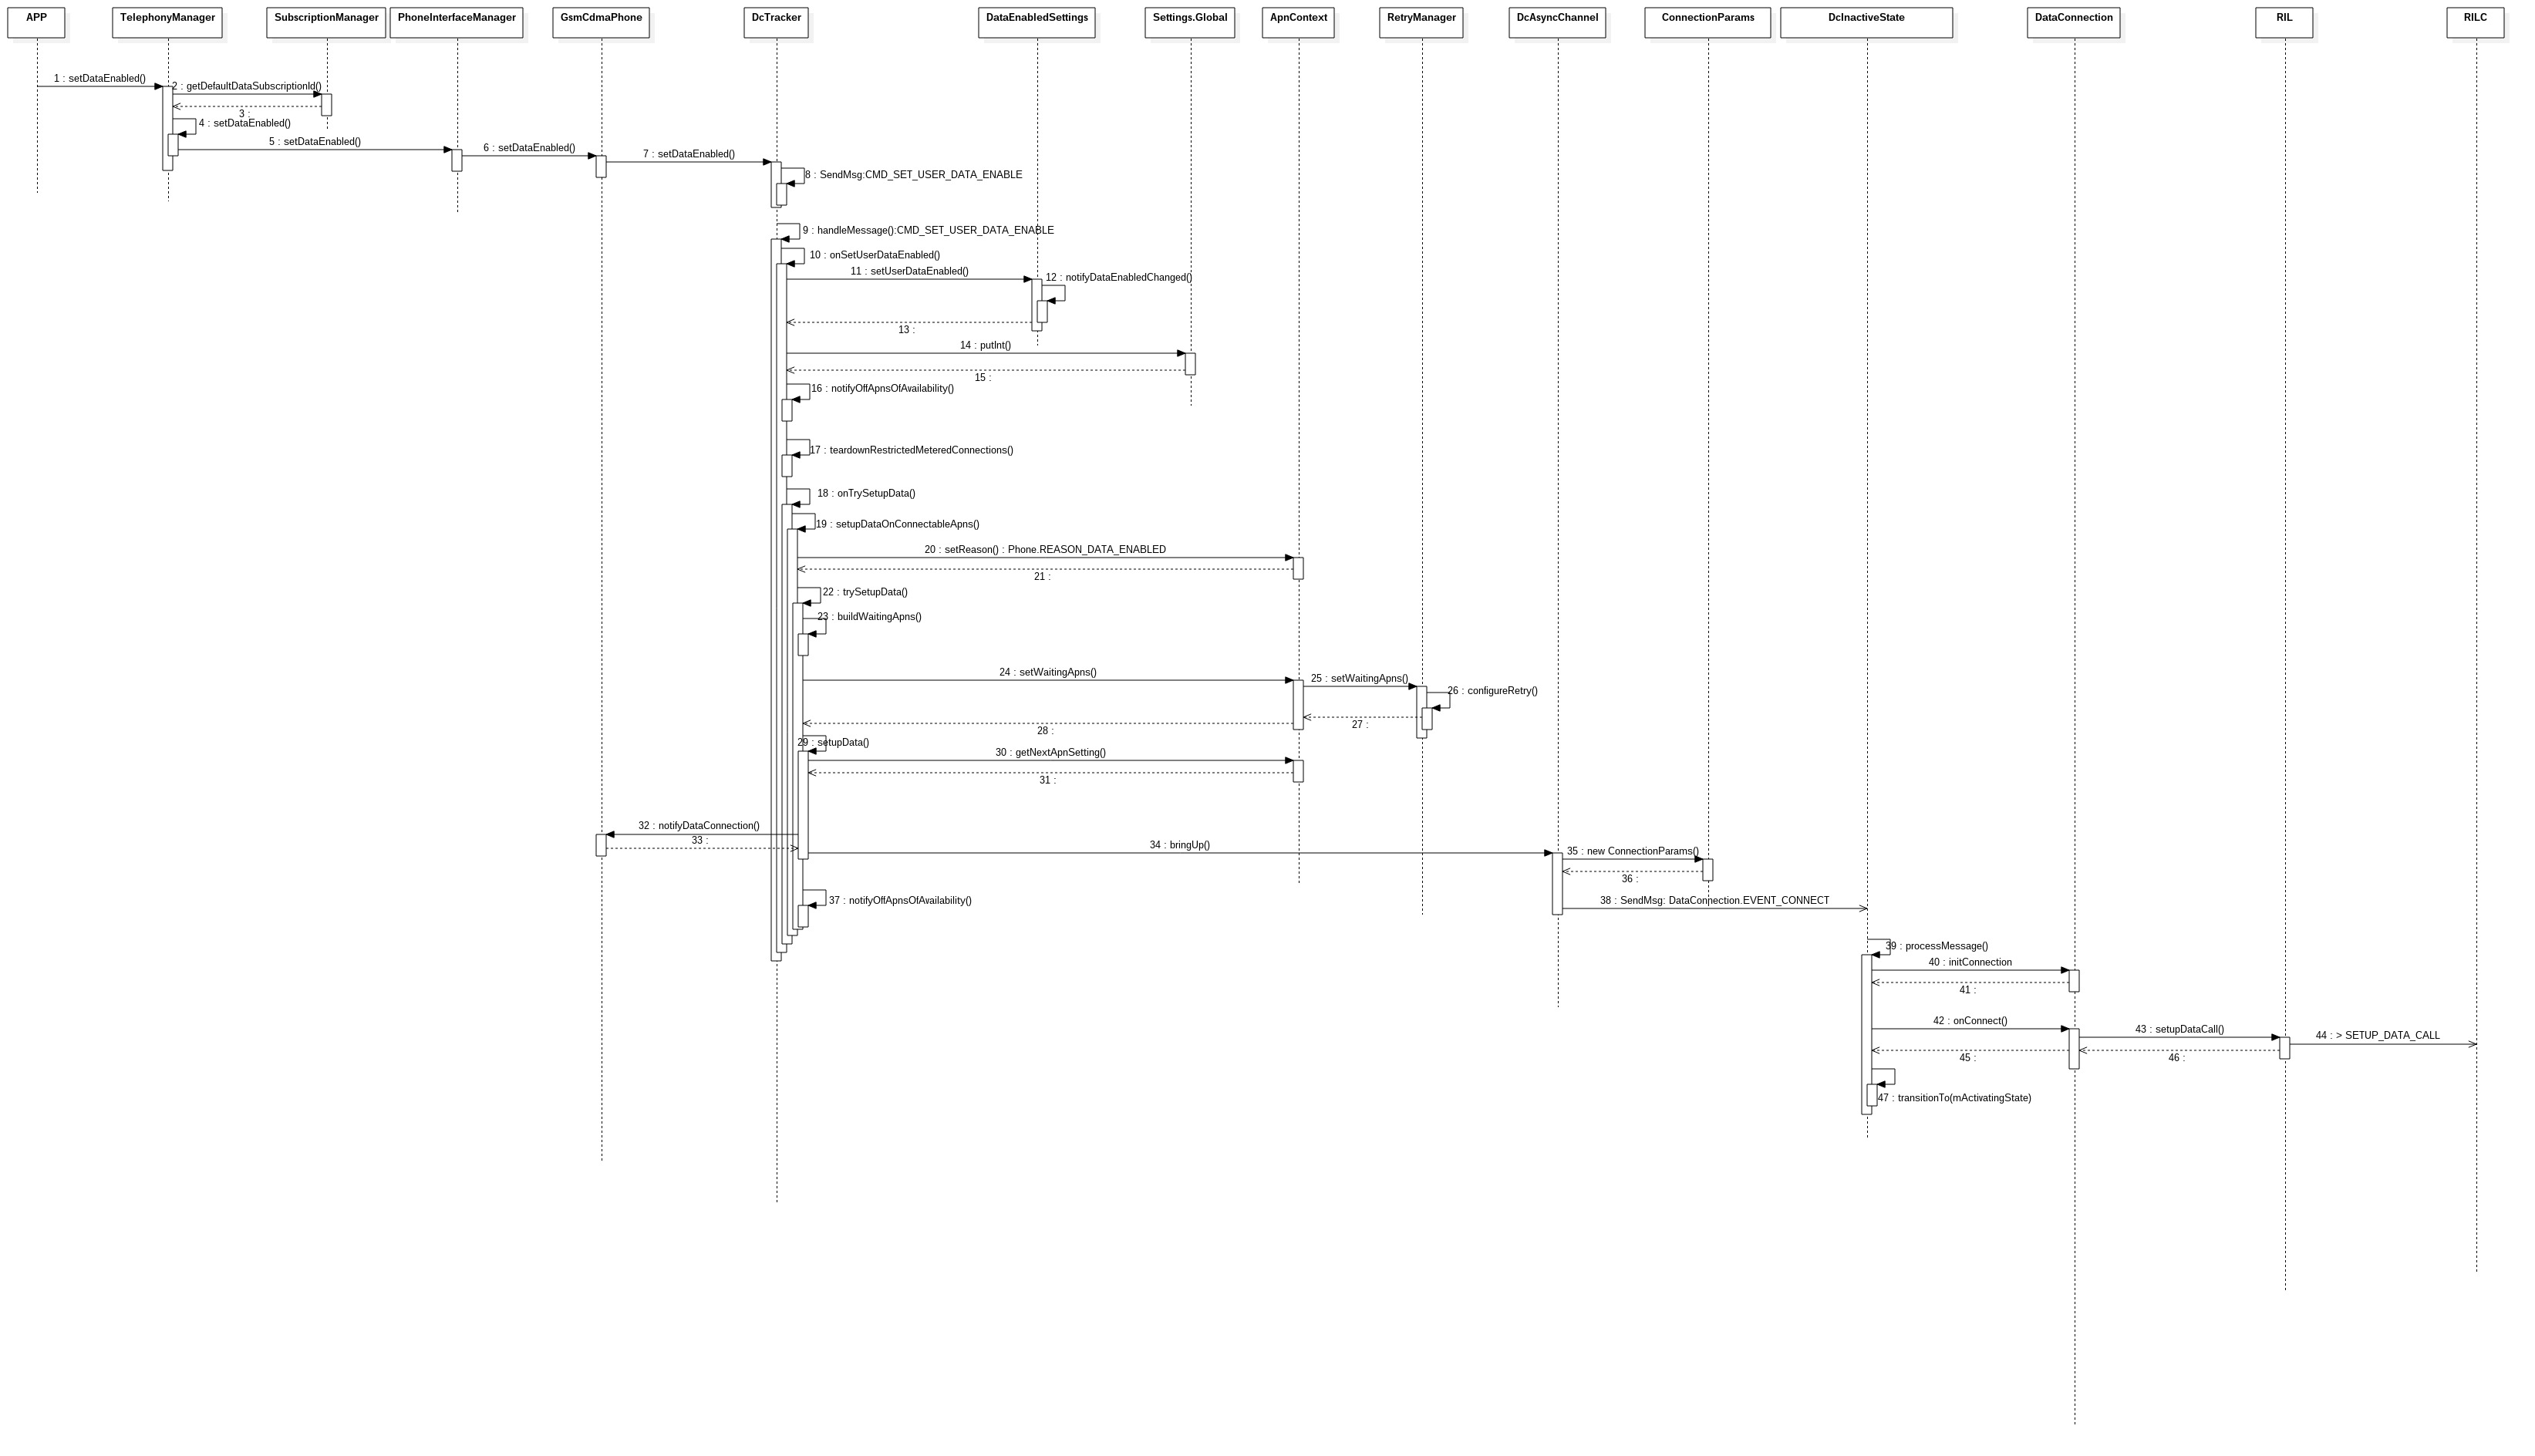
App直接调用TelephonyManager.setDataEnabled()来设置数据连接的开/关。
public void setDataEnabled(int subId, boolean enable) {
......
// subId为默认数据卡的subId
// 通过binder方式调用PhoneInterfaceManager的接口
ITelephony telephony = getITelephony();
if (telephony != null)
telephony.setDataEnabled(subId, enable);
......
}
在PhoneInterfaceManager中,会通过传入的subId获取到对应的Phone对象,进而调用Phone对象的setDataEnabled()方法。
public void setDataEnabled(int subId, boolean enable) {
......
int phoneId = mSubscriptionController.getPhoneId(subId);
......
Phone phone = PhoneFactory.getPhone(phoneId);
......
phone.setDataEnabled(enable);
......
}
在GsmCdmaPhone中没有做任何处理,直接到DcTracker。
public void setDataEnabled(boolean enable) {
mDcTracker.setDataEnabled(enable);
}
DcTracker中会用一个Message消息来通知自己的Handler来处理。
public void setDataEnabled(boolean enable) {
Message msg = obtainMessage(DctConstants.CMD_SET_USER_DATA_ENABLE);
msg.arg1 = enable ? 1 : 0;
if (DBG) log("setDataEnabled: sendMessage: enable=" + enable);
sendMessage(msg);
}
Handler处理上述消息时会调用:
private void onSetUserDataEnabled(boolean enabled) {
synchronized (mDataEnabledSettings) {
// 数据开关状态发生改变时才继续
if (mDataEnabledSettings.isUserDataEnabled() != enabled) {
mDataEnabledSettings.setUserDataEnabled(enabled); // 这个会通知ImsPhoneCallTracker处理一些和VT相关的东西
// 保存Data开关状态
if (TelephonyManager.getDefault().getSimCount() == 1) {
Settings.Global.putInt(mResolver, Settings.Global.MOBILE_DATA, enabled ? 1 : 0);
} else {
int phoneSubId = mPhone.getSubId();
Settings.Global.putInt(mResolver, Settings.Global.MOBILE_DATA + phoneSubId,
enabled ? 1 : 0);
}
// 针对漫游的处理
if (getDataOnRoamingEnabled() == false &&
mPhone.getServiceState().getDataRoaming() == true) {
if (enabled) {
notifyOffApnsOfAvailability(Phone.REASON_ROAMING_ON);
} else {
notifyOffApnsOfAvailability(Phone.REASON_DATA_DISABLED);
}
}
if (enabled) {
// 先关闭那些受限的且是Metered的网络,让我们能够真正的建立上连接
teardownRestrictedMeteredConnections();
onTrySetupData(Phone.REASON_DATA_ENABLED);
} else {
onCleanUpAllConnections(Phone.REASON_DATA_SPECIFIC_DISABLED);
}
}
}
}
接下来的onTrySetupData()和setupDataOnConnectableApns()都比较简单。
private boolean onTrySetupData(String reason) {
setupDataOnConnectableApns(reason);
}
private void setupDataOnConnectableApns(String reason) {
setupDataOnConnectableApns(reason, RetryFailures.ALWAYS); // ALWAYS表示建立数据连接失败后总是会retry
}
setupDataOnConnectableApns()中会用可建立连接的apn来建立连接。
private void setupDataOnConnectableApns(String reason, RetryFailures retryFailures) {
......
// mPrioritySortedApnContexts在DcTracker的构造函数中进行初始化,
// 初始值是从frameworks/base/core/res/res/values/config.xml中
// 的networkAttributes读取的,一般情况下厂商会overlay
for (ApnContext apnContext : mPrioritySortedApnContexts) {
......
if (apnContext.getState() == DctConstants.State.FAILED
|| apnContext.getState() == DctConstants.State.SCANNING) {
// 对之前建立data失败的处理,初次建立连接不会走这里面
......
}
if (apnContext.isConnectable()) { // 如果apn是可连接的,才继续后面的流程
log("isConnectable() call trySetupData");
apnContext.setReason(reason);
trySetupData(apnContext, waitingApns);
}
}
}
我们先来看看APN是否可建立连接是通过什么来判断的。
public boolean isConnectable() {
return isReady() && ((mState == DctConstants.State.IDLE)
|| (mState == DctConstants.State.SCANNING)
|| (mState == DctConstants.State.RETRYING)
|| (mState == DctConstants.State.FAILED));
}
public boolean isReady() {
// mDependencyMet一直为true,所以是否ready由mDataEnabled决定
return mDataEnabled.get() && mDependencyMet.get();
}
这里有个关键的属性ApnContext.mDataEnabled,它决定了APN是否ready,在setEnabled()中会对其赋值。
public void setEnabled(boolean enabled) {
mDataEnabled.set(enabled);
}
SIM卡加载后,会调用如下流程,最终会调用setEnabled()把mDataEnabled设为true;
SubscriptionController.notifySubscriptionInfoChanged()
TelephonyRegistry.notifySubscriptionInfoChanged()
PhoneSwitcher.IOnSubscriptionsChangedListener.onSubscriptionsChanged()
-> EVENT_SUBSCRIPTION_CHANGED
-> onEvaluate()
-> activate()
-> TelephonyNetworkFactory.InternalHandler.handleMessage() EVENT_ACTIVE_PHONE_SWITCH
-> onActivePhoneSwitch()
-> applyRequests()
-> DcTracker.requestNetwork()
-> ApnContext.requestNetwork()
-> DcTracker.setEnabled() EVENT_ENABLE_NEW_APN
-> onEnableApn()
-> applyNewState()
-> ApnContext.setEnabled()
我们回过头继续来看data的建立流程。
trySetupData()中主要是根据APN、数据连接开关等条件来判断是否继续拨号流程。
此外,还会创建WaitingApns,并配置RetryManager。
private boolean trySetupData(ApnContext apnContext, ArrayList<ApnSetting> waitingApns) {
......
if (apnContext.isConnectable() && (isEmergencyApn ||
(isDataAllowed && isDataAllowedForApn(apnContext) &&
mDataEnabledSettings.isDataEnabled(checkUserDataEnabled) && !isEmergency()))) { // 可以建立连接
......
if (apnContext.getState() == DctConstants.State.IDLE) {
// buildWaitingApns()先找preferedApn,没有的话在从mAllApnSettings中找,
// mAllApnSettings的内容是从telephony.db->carriers中读
// 取的。telephony.db->carriers则是用apns.xml和apns-conf.xml中
// 的内容进行初始化,见TelephonyProvider.DatabaseHelper.initDatabase()。
if (waitingApns == null) {
waitingApns = buildWaitingApns(apnContext.getApnType(), radioTech);
}
if (waitingApns.isEmpty()) {
// 没有可用来建立连接的apn
......
return false;
} else {
// 配置RetryManager
apnContext.setWaitingApns(waitingApns);
......
}
}
boolean retValue = setupData(apnContext, radioTech); // 流程继续
notifyOffApnsOfAvailability(apnContext.getReason());
......
} else { // 不可以建立连接
......
return false;
}
}
再继续看setupData()。
private boolean setupData(ApnContext apnContext, int radioTech) {
......
apnSetting = apnContext.getNextApnSetting(); // 从RetryManager中获取ApnSetting,其实就是从WaitingApns中获取
......
// 根据APN类型获取profileId,后面要传给modem
int profileId = apnSetting.profileId;
if (profileId == 0) {
profileId = getApnProfileID(apnContext.getApnType());
}
if (apnContext.getApnType() != PhoneConstants.APN_TYPE_DUN ||
teardownForDun() == false) {
// 先在已经连接或正在连接的ApnContext中查找看有没有兼容的DcAsyncChannel
// 例如,如果某个apn的type为“default|supl|mms”,当default已经建立后,
// 若再想建立supl的连接,就会直接使用之前建立default的dcac,且会在
// DataConnection.DcActiveState.processMessage()->EVENT_CONNECT中直接返回,
// 而不会再发起SETUP_DATA_CALL
dcac = checkForCompatibleConnectedApnContext(apnContext);
if (dcac != null) {
// Get the dcacApnSetting for the connection we want to share.
ApnSetting dcacApnSetting = dcac.getApnSettingSync();
if (dcacApnSetting != null) {
// Setting is good, so use it.
apnSetting = dcacApnSetting;
}
}
}
// 获取DcAsyncChannel
if (dcac == null) {
if (isOnlySingleDcAllowed(radioTech)) {
// 仅支持单PDN时,若有高优先级的链接,则返回
if (isHigherPriorityApnContextActive(apnContext)) {
......
return false;
}
// 清除低优先级的连接
if (cleanUpAllConnections(true, Phone.REASON_SINGLE_PDN_ARBITRATION)) {
......
return false;
}
}
// 查找看有没有可复用的DcAsyncChannel,若无,则新建
dcac = findFreeDataConnection();
if (dcac == null) {
dcac = createDataConnection();
}
......
}
......
// 更新ApnContext状态
apnContext.setDataConnectionAc(dcac);
apnContext.setApnSetting(apnSetting);
apnContext.setState(DctConstants.State.CONNECTING);
mPhone.notifyDataConnection(apnContext.getReason(), apnContext.getApnType());
Message msg = obtainMessage();
msg.what = DctConstants.EVENT_DATA_SETUP_COMPLETE;
msg.obj = new Pair<ApnContext, Integer>(apnContext, generation);
// 调用DcAsyncChannel
dcac.bringUp(apnContext, profileId, radioTech, msg, generation);
if (DBG) log("setupData: initing!");
return true;
}
自此,建立数据连接的各种条件均已满足,接下来就要准备发送命令通知modem建立连接了。
public void bringUp(ApnContext apnContext, int profileId, int rilRadioTechnology,
Message onCompletedMsg, int connectionGeneration) {
......
// 通过Message通知DataConnection
sendMessage(DataConnection.EVENT_CONNECT,
new ConnectionParams(apnContext, profileId, rilRadioTechnology, onCompletedMsg,
connectionGeneration));
}
DataConnection是一个状态机,当前处于DcInactiveState状态,所以会有DcInactiveState的handleMessage()来处理上述消息。
DcInactiveState.processMessage(Message msg) {
......
case EVENT_CONNECT:
if (DBG) log("DcInactiveState: mag.what=EVENT_CONNECT");
ConnectionParams cp = (ConnectionParams) msg.obj;
if (initConnection(cp)) { // 初始化连接
onConnect(mConnectionParams); // 发起数据连接,会调用RIL.setupDataCall()
transitionTo(mActivatingState); // 切换到activating状态
} else {
......
}
onConnect()就不再多说了,会直接调用RIL.java向modem发起建立数据连接的命令。
private void onConnect(ConnectionParams cp) {
......
mPhone.mCi.setupDataCall(
cp.mRilRat,
cp.mProfileId,
mApnSetting.apn, mApnSetting.user, mApnSetting.password,
authType,
protocol, msg);
}
至此,FW层发送命令的流程就算是结束了。
FW发给RIL的参数
radioTech:3, 当前servicestate的data的radioTech
profile:0, 根据apn type获取
apn:epc.tmobile.com
usr/passwd:none
authType:3, 0 (None), 1 (PAP), 2 (CHAP), 3 (PAP or CHAP). PAP安全性低,CHAP安全性高
protocol:IP, IPV4
04-20 07:28:28.780 2517 2567 D RILJ : [3787]> SETUP_DATA_CALL 3 0 epc.tmobile.com none none 3 IP [SUB0]
Data建立成功后RIL返回的参数
status=0:0表示成功,其它值为错误类型
retry=-1:重试次数
04-20 07:28:28.780 2517 2557 D RILJ : [3787]< SETUP_DATA_CALL DataCallResponse: {version=11 status=0 retry=-1 cid=1 active=1 type=IP ifname=eth0 mtu=1500 addresses=[10.0.2.15] dnses=[10.0.2.3] gateways=[10.0.2.2] pcscf=[]} [SUB0]
2 modem返回数据连接建立成功后的处理
RIL收到modem返回的SETUP_DATA_CALL消息后,就会发送EVENT_SETUP_DATA_CONNECTION_DONE给DcActivatingState处理。
public boolean processMessage(Message msg) {
......
case EVENT_SETUP_DATA_CONNECTION_DONE:
......
// 对modem返回的结果进行处理
DataCallResponse.SetupResult result = onSetupConnectionCompleted(ar);
......
switch (result) {
case SUCCESS:
mDcFailCause = DcFailCause.NONE;
transitionTo(mActiveState); // data建立成功,切换到Active状态
break;
......
}
private DataCallResponse.SetupResult onSetupConnectionCompleted(AsyncResult ar) {
// 这里面主要就是根据modem返回的结果判断连接是否建立成功,如失败,则获取错误原因;
// 如成功,则更新相关对象的值。
......
if (cp.mTag != mTag) {
......
result = DataCallResponse.SetupResult.ERR_Stale;
} else if (ar.exception != null) { // 异常处理
......
} else if (response.status != 0) { // 未建立成功
result = DataCallResponse.SetupResult.ERR_RilError;
result.mFailCause = DcFailCause.fromInt(response.status);
} else { // 建立成功
mCid = response.cid; // 更新connection id
mPcscfAddr = response.pcscf; // 更新PCSCF地址
result = updateLinkProperty(response).setupResult; // 更新LinkProperty
}
return result;
}
public UpdateLinkPropertyResult updateLinkProperty(DataCallResponse newState) {
// 先更新LinkProperties对象,再调sendLinkProperties()将这些值设置到底层
......
// set link properties based on data call response
result.setupResult = setLinkProperties(newState, result.newLp);
......
// copy HTTP proxy as it is not part DataCallResponse.
result.newLp.setHttpProxy(mLinkProperties.getHttpProxy());
checkSetMtu(mApnSetting, result.newLp);
mLinkProperties = result.newLp;
updateTcpBufferSizes(mRilRat);
......
if (result.newLp.equals(result.oldLp) == false &&
mNetworkAgent != null) {
// 会在ConnectivityService.NetworkStateTrackerHandler.maybeHandleNetworkAgentMessage()
// 处理消息EVENT_NETWORK_PROPERTIES_CHANGED,暂略...
mNetworkAgent.sendLinkProperties(mLinkProperties);
}
return result;
}
Data建立成功后,DataConnection就会切换到DcActiveState状态。
public void enter() {
// verify and get updated information in case these things
// are obsolete
{
......
// 更新Data的RAT
mNetworkInfo.setSubtype(networkType, TelephonyManager.getNetworkTypeName(networkType));
......
mNetworkInfo.setRoaming(roaming); // 更新漫游状态
}
boolean createNetworkAgent = true;
// If a disconnect is already pending, avoid notifying all of connected
if (hasMessages(EVENT_DISCONNECT) ||
hasMessages(EVENT_DISCONNECT_ALL) ||
hasDeferredMessages(EVENT_DISCONNECT) ||
hasDeferredMessages(EVENT_DISCONNECT_ALL)) {
// 还有断开连接的消息未处理,则不创建NetworkAgent
log("DcActiveState: skipping notifyAllOfConnected()");
createNetworkAgent = false;
} else {
// 通知DcTracker连接建立成功,Msg:EVENT_DATA_SETUP_COMPLETE
// If we were retrying there maybe more than one, otherwise they'll only be one.
notifyAllOfConnected(Phone.REASON_CONNECTED);
}
// 监听语音通话开始/结束,
// 若当前制式不允许语音和数据同时连接,那么语音通话时会将数据挂起
mPhone.getCallTracker().registerForVoiceCallStarted(getHandler(),
DataConnection.EVENT_DATA_CONNECTION_VOICE_CALL_STARTED, null);
mPhone.getCallTracker().registerForVoiceCallEnded(getHandler(),
DataConnection.EVENT_DATA_CONNECTION_VOICE_CALL_ENDED, null);
// DataConnection加入到DcController
mDcController.addActiveDcByCid(DataConnection.this);
// 更新NetworkInfo
mNetworkInfo.setDetailedState(NetworkInfo.DetailedState.CONNECTED,
mNetworkInfo.getReason(), null);
mNetworkInfo.setExtraInfo(mApnSetting.apn);
// 更新TcpBuffer,前面已经更新过一次了!!!
updateTcpBufferSizes(mRilRat);
......
if (createNetworkAgent) {
setNetworkRestriction(); // 不懂,暂略
// 创建DcNetworkAgent
mNetworkAgent = new DcNetworkAgent(getHandler().getLooper(), mPhone.getContext(),
"DcNetworkAgent", mNetworkInfo, makeNetworkCapabilities(), mLinkProperties,
50, misc);
}
}
接下来DcTracker将处理DataConnection发过来的EVENT_DATA_SETUP_COMPLETE消息。
private void onDataSetupComplete(AsyncResult ar) {
......
if (ar.exception == null) { // 无异常
......
if (dcac == null) {
// 正常情况不会走这里
......
} else {
......
if (apn != null && apn.proxy != null && apn.proxy.length() != 0) {
// 某些APN设置了proxy的,则需要更新到LinkProperties中
......
dcac.setLinkPropertiesHttpProxySync(proxy);
......
}
// everything is setup
if(TextUtils.equals(apnContext.getApnType(),PhoneConstants.APN_TYPE_DEFAULT)) {
......
// 设置preferred apn
if (mCanSetPreferApn && mPreferredApn == null) {
if (DBG) log("onDataSetupComplete: PREFERRED APN is null");
mPreferredApn = apn;
if (mPreferredApn != null) {
setPreferredApn(mPreferredApn.id);
......
// A connection is setup
apnContext.setState(DctConstants.State.CONNECTED); // 更新ApnContext的状态
......
if ((!isProvApn) || mIsProvisioning) {
......
// Complete the connection normally notifying the world we're connected.
// We do this if this isn't a special provisioning apn or if we've been
// told its time to provision.
completeConnection(apnContext);
} else {
// This is a provisioning APN,不懂,暂略
}
......
}
} else {
// 异常处理
}
......
}
经过上面的处理后,数据连接现在已经可以使用了,接下来将通知相关模块数据连接可用,并启动监控任务对数据流量及连接状态进行监控。
private void completeConnection(ApnContext apnContext) {
......
mPhone.notifyDataConnection(apnContext.getReason(), apnContext.getApnType()); // 通知数据建立完成
startNetStatPoll(); // 启动监控上下行数据的任务,通知栏的数据上下箭头图标就是根据这个来显示的
startDataStallAlarm(DATA_STALL_NOT_SUSPECTED); // 启动监控数据连接状态的任务,检测到连接异常会重建连接
}
通知数据建立完成。
public void notifyDataConnection(String reason, String apnType) {
// mNotifier在PhoneFactory.makeDefaultPhone()中创建,并在创建Phone对象时传入
mNotifier.notifyDataConnection(this, reason, apnType, getDataConnectionState(apnType));
}
DefaultPhoneNotifier.java
public void notifyDataConnection(Phone sender, String reason, String apnType,
PhoneConstants.DataState state) {
doNotifyDataConnection(sender, reason, apnType, state);
}
private void doNotifyDataConnection(Phone sender, String reason, String apnType,
PhoneConstants.DataState state) {
// 先获取相关参数
......
try {
if (mRegistry != null) {
// 通过Binder调用TelephonyRegistry
mRegistry.notifyDataConnectionForSubscriber(subId,
convertDataState(state),
sender.isDataConnectivityPossible(apnType), reason,
sender.getActiveApnHost(apnType),
apnType,
linkProperties,
networkCapabilities,
((telephony!=null) ? telephony.getDataNetworkType(subId) :
TelephonyManager.NETWORK_TYPE_UNKNOWN),
roaming);
}
} catch (RemoteException ex) {
// system process is dead
}
}
notifyDataConnectionForSubscriber()中会记录下当前连接的一些属性,并通过回调函数及广播通知连接改变。
public void notifyDataConnectionForSubscriber(int subId, int state,
boolean isDataConnectivityPossible, String reason, String apn, String apnType,
LinkProperties linkProperties, NetworkCapabilities networkCapabilities,
int networkType, boolean roaming) {
......
synchronized (mRecords) {
int phoneId = SubscriptionManager.getPhoneId(subId);
if (validatePhoneId(phoneId)) {
// 判断状态是否改变,并更新记录
......
if (modified) {
......
for (Record r : mRecords) {
// 找出所有监听LISTEN_DATA_CONNECTION_STATE事件的观察者,并调用其回调函数
if (r.matchPhoneStateListenerEvent(
PhoneStateListener.LISTEN_DATA_CONNECTION_STATE) &&
idMatch(r.subId, subId, phoneId)) {
try {
......
r.callback.onDataConnectionStateChanged(mDataConnectionState[phoneId],
mDataConnectionNetworkType[phoneId]);
} catch (RemoteException ex) {
// 出现异常,将此观察者加入移除列表
mRemoveList.add(r.binder);
}
}
}
handleRemoveListLocked(); // 移除异常观察者
}
mPreciseDataConnectionState = new PreciseDataConnectionState(state, networkType,
apnType, apn, reason, linkProperties, "");
for (Record r : mRecords) {
// 找出所有监听LISTEN_PRECISE_DATA_CONNECTION_STATE事件的观察者,并调用其回调函数
// 监听此类事件会获得更多信息,且无论连接是否改变都会进行回调通知。
if (r.matchPhoneStateListenerEvent(
PhoneStateListener.LISTEN_PRECISE_DATA_CONNECTION_STATE)) {
try {
r.callback.onPreciseDataConnectionStateChanged(mPreciseDataConnectionState);
} catch (RemoteException ex) {
mRemoveList.add(r.binder);
}
}
}
}
handleRemoveListLocked();
}
// 发送广播通知
broadcastDataConnectionStateChanged(state, isDataConnectivityPossible, reason, apn,
apnType, linkProperties, networkCapabilities, roaming, subId);
broadcastPreciseDataConnectionStateChanged(state, networkType, apnType, apn, reason,
linkProperties, "");
}
广播通知比较简单,接收者直接监听相应广播即可;下面我们来看看回调方式是怎么实现的。
TelephonyRegistry中通过回调函数通知Data状态的监听者,
App可通过调用TelephonyManager中的listen()进行监听,而TelephonyManager则通过binder方式调用TelephonyRegistry的接口。
public void listen(PhoneStateListener listener, int events) {
......
// 先判断ITelephony是否为空,若不为空,则在注册后会马上进行一次回调
Boolean notifyNow = (getITelephony() != null);
// 调用TelephonyRegistry进行注册,其中listener.callback为回调类,events为监听的事件
sRegistry.listenForSubscriber(listener.mSubId, getOpPackageName(),
listener.callback, events, notifyNow);
......
}
下面是TelephonyRegistry中的流程。
public void listenForSubscriber(int subId, String pkgForDebug, IPhoneStateListener callback,
int events, boolean notifyNow) {
listen(pkgForDebug, callback, events, notifyNow, subId);
}
private void listen(String callingPackage, IPhoneStateListener callback, int events,
boolean notifyNow, int subId) {
......
synchronized (mRecords) {
// register
Record r;
// 先遍历所有已注册过的回调类,若发现当前回调类已注册,则会更新相关参数
find_and_add: {
IBinder b = callback.asBinder();
final int N = mRecords.size();
for (int i = 0; i < N; i++) {
r = mRecords.get(i);
if (b == r.binder) {
break find_and_add;
}
}
// 之前未注册,则加入mRecords中
r = new Record();
r.binder = b;
mRecords.add(r);
if (DBG) log("listen: add new record");
}
// 设置相关参数
r.callback = callback;
r.callingPackage = callingPackage;
r.callerUserId = callerUserId;
boolean isPhoneStateEvent = (events & (CHECK_PHONE_STATE_PERMISSION_MASK
| ENFORCE_PHONE_STATE_PERMISSION_MASK)) != 0;
r.canReadPhoneState = isPhoneStateEvent && canReadPhoneState(callingPackage);
// Legacy applications pass SubscriptionManager.DEFAULT_SUB_ID,
// force all illegal subId to SubscriptionManager.DEFAULT_SUB_ID
if (!SubscriptionManager.isValidSubscriptionId(subId)) {
r.subId = SubscriptionManager.DEFAULT_SUBSCRIPTION_ID;
} else {//APP specify subID
r.subId = subId;
}
r.phoneId = SubscriptionManager.getPhoneId(r.subId);
int phoneId = r.phoneId;
r.events = events;
......
if (notifyNow && validatePhoneId(phoneId)) {
// 如果传入的notifyNow为true,并且phoneId有效,则会马上进行一次回调
......
if ((events & PhoneStateListener.LISTEN_DATA_CONNECTION_STATE) != 0) {
try {
r.callback.onDataConnectionStateChanged(mDataConnectionState[phoneId],
mDataConnectionNetworkType[phoneId]);
......
}
......
if ((events & PhoneStateListener.LISTEN_PRECISE_DATA_CONNECTION_STATE) != 0) {
try {
r.callback.onPreciseDataConnectionStateChanged(
mPreciseDataConnectionState);
......
}
......
}
4 创建native层的物理连接并配置链路信息
private class DcNetworkAgent extends NetworkAgent {
public DcNetworkAgent(Looper l, Context c, String TAG, NetworkInfo ni,
NetworkCapabilities nc, LinkProperties lp, int score, NetworkMisc misc) {
super(l, c, TAG, ni, nc, lp, score, misc);
}
NetworkAgent.java
public NetworkAgent(Looper looper, Context context, String logTag, NetworkInfo ni,
NetworkCapabilities nc, LinkProperties lp, int score, NetworkMisc misc) {
......
// 在ConnectivityService中注册NetworkAgent
netId = cm.registerNetworkAgent(new Messenger(this), new NetworkInfo(ni),
new LinkProperties(lp), new NetworkCapabilities(nc), score, misc);
}
ConnectivityManager.java
public int registerNetworkAgent(Messenger messenger, NetworkInfo ni, LinkProperties lp,
NetworkCapabilities nc, int score, NetworkMisc misc) {
try {
return mService.registerNetworkAgent(messenger, ni, lp, nc, score, misc);
......
}
ConnectivityService.java
public int registerNetworkAgent(Messenger messenger, NetworkInfo networkInfo,
LinkProperties linkProperties, NetworkCapabilities networkCapabilities,
int currentScore, NetworkMisc networkMisc) {
enforceConnectivityInternalPermission();
// TODO: Instead of passing mDefaultRequest, provide an API to determine whether a Network
// satisfies mDefaultRequest.
final NetworkAgentInfo nai = new NetworkAgentInfo(messenger, new AsyncChannel(),
new Network(reserveNetId()), new NetworkInfo(networkInfo), new LinkProperties(
linkProperties), new NetworkCapabilities(networkCapabilities), currentScore,
mContext, mTrackerHandler, new NetworkMisc(networkMisc), mDefaultRequest, this);
synchronized (this) {
nai.networkMonitor.systemReady = mSystemReady;
}
addValidationLogs(nai.networkMonitor.getValidationLogs(), nai.network,
networkInfo.getExtraInfo());
if (DBG) log("registerNetworkAgent " + nai);
mHandler.sendMessage(mHandler.obtainMessage(EVENT_REGISTER_NETWORK_AGENT, nai));
return nai.network.netId;
}
case EVENT_REGISTER_NETWORK_AGENT: {
handleRegisterNetworkAgent((NetworkAgentInfo)msg.obj);
private void handleRegisterNetworkAgent(NetworkAgentInfo na) {
if (VDBG) log("Got NetworkAgent Messenger");
mNetworkAgentInfos.put(na.messenger, na);
synchronized (mNetworkForNetId) {
mNetworkForNetId.put(na.network.netId, na);
}
na.asyncChannel.connect(mContext, mTrackerHandler, na.messenger);
NetworkInfo networkInfo = na.networkInfo;
na.networkInfo = null;
updateNetworkInfo(na, networkInfo);
}
private void updateNetworkInfo(NetworkAgentInfo networkAgent, NetworkInfo newInfo) {
NetworkInfo.State state = newInfo.getState();
NetworkInfo oldInfo = null;
final int oldScore = networkAgent.getCurrentScore();
synchronized (networkAgent) {
oldInfo = networkAgent.networkInfo;
networkAgent.networkInfo = newInfo;
}
notifyLockdownVpn(networkAgent);
if (oldInfo != null && oldInfo.getState() == state) { // 新建连接不会走这里面
if (oldInfo.isRoaming() != newInfo.isRoaming()) { // 漫游状态变化,更新iface
if (VDBG) log("roaming status changed, notifying NetworkStatsService");
notifyIfacesChangedForNetworkStats();
} else if (VDBG) log("ignoring duplicate network state non-change");
// In either case, no further work should be needed.
return;
}
......
if (!networkAgent.created
&& (state == NetworkInfo.State.CONNECTED
|| (state == NetworkInfo.State.CONNECTING && networkAgent.isVPN()))) { // 新建连接会走这里面
// A network that has just connected has zero requests and is thus a foreground network.
networkAgent.networkCapabilities.addCapability(NET_CAPABILITY_FOREGROUND);
try {
// This should never fail. Specifying an already in use NetID will cause failure.
if (networkAgent.isVPN()) {
......
} else { // 通过Netd建立一个物理连接
mNetd.createPhysicalNetwork(networkAgent.network.netId,
getNetworkPermission(networkAgent.networkCapabilities));
}
......
networkAgent.created = true;
}
if (!networkAgent.everConnected && state == NetworkInfo.State.CONNECTED) {
networkAgent.everConnected = true;
updateLinkProperties(networkAgent, null); // 更新LinkProperties
notifyIfacesChangedForNetworkStats(); // 更新iface
networkAgent.networkMonitor.sendMessage(NetworkMonitor.CMD_NETWORK_CONNECTED); // 没看懂
scheduleUnvalidatedPrompt(networkAgent); // 用户选择连接到unvalidated网络时弹出确认框,还是没懂啊!!!
......
// Whether a particular NetworkRequest listen should cause signal strength thresholds to
// be communicated to a particular NetworkAgent depends only on the network's immutable,
// capabilities, so it only needs to be done once on initial connect, not every time the
// network's capabilities change. Note that we do this before rematching the network,
// so we could decide to tear it down immediately afterwards. That's fine though - on
// disconnection NetworkAgents should stop any signal strength monitoring they have been
// doing.
updateSignalStrengthThresholds(networkAgent, "CONNECT", null); // 不懂,感觉没做啥啊!
// Consider network even though it is not yet validated.
final long now = SystemClock.elapsedRealtime();
rematchNetworkAndRequests(networkAgent, ReapUnvalidatedNetworks.REAP, now);
// This has to happen after matching the requests, because callbacks are just requests.
notifyNetworkCallbacks(networkAgent, ConnectivityManager.CALLBACK_PRECHECK); // 发到哪儿去了??
} else if (state == NetworkInfo.State.DISCONNECTED) {
......
} else if ((oldInfo != null && oldInfo.getState() == NetworkInfo.State.SUSPENDED) ||
state == NetworkInfo.State.SUSPENDED) {
......
}
}
5 判断已建立的网络哪些需要保留,哪些需要断开
// Handles a network appearing or improving its score.
//
// - Evaluates all current NetworkRequests that can be // 重新选择当前网络
// satisfied by newNetwork, and reassigns to newNetwork
// any such requests for which newNetwork is the best.
//
// - Lingers any validated Networks that as a result are no longer // 挂起不需要的网络
// needed. A network is needed if it is the best network for
// one or more NetworkRequests, or if it is a VPN.
//
// - Tears down newNetwork if it just became validated
// but turns out to be unneeded.
//
// - If reapUnvalidatedNetworks==REAP, tears down unvalidated
// networks that have no chance (i.e. even if validated)
// of becoming the highest scoring network.
//
// NOTE: This function only adds NetworkRequests that "newNetwork" could satisfy,
// it does not remove NetworkRequests that other Networks could better satisfy.
// If you need to handle decreases in score, use {@link rematchAllNetworksAndRequests}.
// This function should be used when possible instead of {@code rematchAllNetworksAndRequests}
// as it performs better by a factor of the number of Networks.
//
// @param newNetwork is the network to be matched against NetworkRequests.
// @param reapUnvalidatedNetworks indicates if an additional pass over all networks should be
// performed to tear down unvalidated networks that have no chance (i.e. even if
// validated) of becoming the highest scoring network.
private void rematchNetworkAndRequests(NetworkAgentInfo newNetwork,
ReapUnvalidatedNetworks reapUnvalidatedNetworks, long now) {
if (!newNetwork.everConnected) return;
boolean keep = newNetwork.isVPN();
boolean isNewDefault = false;
NetworkAgentInfo oldDefaultNetwork = null;
final boolean wasBackgroundNetwork = newNetwork.isBackgroundNetwork();
final int score = newNetwork.getCurrentScore();
if (VDBG) log("rematching " + newNetwork.name());
// Find and migrate to this Network any NetworkRequests for
// which this network is now the best.
ArrayList<NetworkAgentInfo> affectedNetworks = new ArrayList<NetworkAgentInfo>();
ArrayList<NetworkRequestInfo> addedRequests = new ArrayList<NetworkRequestInfo>();
NetworkCapabilities nc = newNetwork.networkCapabilities;
if (VDBG) log(" network has: " + nc);
for (NetworkRequestInfo nri : mNetworkRequests.values()) {
// Process requests in the first pass and listens in the second pass. This allows us to
// change a network's capabilities depending on which requests it has. This is only
// correct if the change in capabilities doesn't affect whether the network satisfies
// requests or not, and doesn't affect the network's score.
if (nri.request.isListen()) continue;
final NetworkAgentInfo currentNetwork = mNetworkForRequestId.get(nri.request.requestId);
final boolean satisfies = newNetwork.satisfies(nri.request); // 从mNetworkRequests中找出符合要求的NetworkRequestInfo
if (newNetwork == currentNetwork && satisfies) {
if (VDBG) {
log("Network " + newNetwork.name() + " was already satisfying" +
" request " + nri.request.requestId + ". No change.");
}
keep = true;
continue;
}
// check if it satisfies the NetworkCapabilities
if (VDBG) log(" checking if request is satisfied: " + nri.request);
if (satisfies) {
// next check if it's better than any current network we're using for
// this request
if (VDBG) {
log("currentScore = " +
(currentNetwork != null ? currentNetwork.getCurrentScore() : 0) +
", newScore = " + score);
}
if (currentNetwork == null || currentNetwork.getCurrentScore() < score) {
// 新建连接比当前连接优先级高,如mobile->WiFi
......
}
} else if (newNetwork.isSatisfyingRequest(nri.request.requestId)) {
......
}
}
......
// 这段以后再看
// Second pass: process all listens.
if (wasBackgroundNetwork != newNetwork.isBackgroundNetwork()) {
// If the network went from background to foreground or vice versa, we need to update
// its foreground state. It is safe to do this after rematching the requests because
// NET_CAPABILITY_FOREGROUND does not affect requests, as is not a requestable
// capability and does not affect the network's score (see the Slog.wtf call above).
updateCapabilities(score, newNetwork, newNetwork.networkCapabilities);
} else {
processListenRequests(newNetwork, false);
}
// do this after the default net is switched, but
// before LegacyTypeTracker sends legacy broadcasts
for (NetworkRequestInfo nri : addedRequests) notifyNetworkCallback(newNetwork, nri);
// Linger any networks that are no longer needed. This should be done after sending the
// available callback for newNetwork.
for (NetworkAgentInfo nai : affectedNetworks) {
updateLingerState(nai, now);
}
// Possibly unlinger newNetwork. Unlingering a network does not send any callbacks so it
// does not need to be done in any particular order.
updateLingerState(newNetwork, now);
......
}
转载于:https://my.oschina.net/igiantpanda/blog/2222651


 1万+
1万+


 被折叠的 条评论
为什么被折叠?
被折叠的 条评论
为什么被折叠?
 到【灌水乐园】发言


