


FAST DFS 搭建
注意:本文档使用CentOS 6.8 为例进行编写。CentOS安装的为桌面版
1. 下载源码
使用git到如下地址 https://github.com/happyfish100
下载源码。
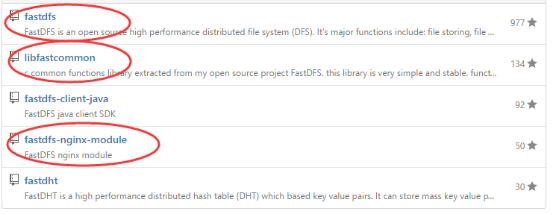
如上图所示,红色圈起来的3部分为必须模块。
Fastdfs 为核心代码
Libfastcommon 为公共模块、
Fastdfs-nginx-module 为nginx模块。
其中,每个模块下,都附带 INSTALL 的说明文件。如下图:

按照INSTALL说明文件中的内容,即可完成对各个模块的编译,安装。
本文以下内容即参照 INSTALL 中的文件内容编写。
使用git下载以上源码。
Git工具的安装:
yum install -y git
Git安装完成后,使用git clone命令,分别下载git 库到本地。
搭建fastdfs服务,需要使用nginx,nginx需要单独下载,
http://nginx.org/download/nginx-1.10.1.tar.gz
下载完成nginx后,进行解压。
下载完成后,如下图所示:

2. 编译安装
2.1 编译安装libfastcommon
Libfastcommon为首先需要编译安装的内容。
cd /root/fastdfs_src/libfastcommon
使用如下命令编译:
./make.sh
使用如下命令安装:
./make.sh install
2.2 编译安装fastdfs
cd /root/fastdfs_src/fastdfs
使用如下命令编译:
./make.sh
使用如下命令安装:
./make.sh install
更改配置文件:
cd /etc/fdfs
cp ./tracker.conf.sample ./tracker.conf
cp ./storage.conf.sample ./storage.conf
cp ./client.conf.sample ./client.conf
更改tracker.conf文件
更改以下配置即可:
# the base path to store data and log files
base_path=/data/fastdfs
(我们使用/data/fastdfs来作为fastdfs的存储目录)
# HTTP port on this tracker server
http.server_port=80
# the tracker server port
port=22122
更改storage.conf文件
更改以下配置即可:
# the storage server port
port=23000
# the name of the group this storage server belongs to
#
# comment or remove this item for fetching from tracker server,
# in this case, use_storage_id must set to true in tracker.conf,
# and storage_ids.conf must be configed correctly.
group_name=group1
# the base path to store data and log files
base_path=/data/fastdfs
# store_path#, based 0, if store_path0 not exists, it's value is base_path
# the paths must be exist
store_path0=/data/fastdfs
# tracker_server can ocur more than once, and tracker_server format is
# "host:port", host can be hostname or ip address
tracker_server=10.1.1.116:22122
(10.1.1.116是本机IP,22122是tracker.conf中配置的tracker服务的端口号)
# the port of the web server on this storage server
http.server_port=80
更改client.conf 配置文件(该文件可不修改,修改是为了方便本地做测试)
# the base path to store log files
base_path=/data/fastdfs
# tracker_server can ocur more than once, and tracker_server format is
# "host:port", host can be hostname or ip address
tracker_server=localhost:22122
#HTTP settings
http.tracker_server_port=80
2.3 启动 tracker 和storage
使用如下命令启动:
/usr/bin/fdfs_trackerd /etc/fdfs/tracker.conf restart
/usr/bin/fdfs_storaged /etc/fdfs/storage.conf restart
服务启动的log可在/data/fastdfs/log 目录下查看,若查看日志中启动没有问题,则可以使用如下命令进行测试。
/usr/bin/fdfs_test /etc/fdfs/client.conf upload /usr/include/stdlib.h
文件能正常上传即可,输出中,会发现有http路径,这个需要等nginx编译安装完成之后才可使用。
2.4 编译安装nginx
编译nginx需要先安装pcre和zlib模块。
使用如下命令进行安装:
yum install -y pcre-devel.x86_64
yum install -y zlib-devel.x86_64
进入到nginx目录,
cd /root/fastdfs_src/nginx-1.10.1
然后依次执行如下命令:
./configure --prefix=/usr/local/nginx --add-module=/root/fastdfs_src/fastdfs-nginx-module/src
执行完成之后,没有error字样的情况下,可依次执行如下命令进行编译和安装:
make
make install
安装完成之后,需要拷贝配置文件,执行如下命令:
cp /root/fastdfs_src/fastdfs-nginx-module/src/mod_fastdfs.conf /etc/fdfs/mod_fastdfs.conf
cp /root/fastdfs_src/fastdfs/conf/http.conf /etc/fdfs/httpd.conf
cp /root/fastdfs_src/fastdfs/conf/mime.types /etc/fdfs/mime.types
下一步修改配置文件:
cd /etc/fdfs
修改mod_fastdfs.conf
# the base path to store log files
base_path=/data/fastdfs
# "host:port", host can be hostname or ip address
# valid only when load_fdfs_parameters_from_tracker is true
tracker_server=10.1.1.116:22122
# the port of the local storage server
# the default value is 23000
storage_server_port=23000
# the group name of the local storage server
group_name=group1
# if the url / uri including the group name
# set to false when uri like /M00/00/00/xxx
# set to true when uri like ${group_name}/M00/00/00/xxx, such as group1/M00/xxx
# default value is false
url_have_group_name = true
# store_path#, based 0, if store_path0 not exists, it's value is base_path
# the paths must be exist
# must same as storage.conf
store_path0=/data/fastdfs
进入nginx的安装目录,修改nginx的配置:
修改nginx.conf 文件:
server {
listen 80;
server_name localhost;
location / {
root /data/fastdfs/data;
ngx_fastdfs_module;
}
}
修改nginx的如上配置即可。
2.5 启动nginx
启动nginx
/usr/local/nginx/sbin/nginx
重启nginx
/usr/local/nginx/sbin/nginx -s stop
停止nginx
/usr/local/nginx/sbin/nginx -s reload
启动nginx后,即可使用上传时返回的http路径来访问上传的文件。


 310
310

 被折叠的 条评论
为什么被折叠?
被折叠的 条评论
为什么被折叠?
 到【灌水乐园】发言


