


Table of Contents

Overview
While Apache Shiro’s core design goals allow it to be used to secure any JVM-based application, such as command line applications, server daemons, web apps, etc, this guide will focus on the most common use case: securing a web application running in a Servletcontainer, such as Tomcat or Jetty.
Prerequisites
The following tools are expected to be installed on your local development machine in order to follow along with this tutorial.
Git (tested w/ 1.7)
Java SDK 7
Maven 3
Your favorite IDE, like IntelliJ IDEA or Eclipse, or even a simple text editor to view files and make changes.
Tutorial Format
This is a step-by-step tutorial. The tutorial, and all of its steps, exist as a Git repository. When you clone the git repository, the master branch is your starting point. Each step in the tutorial is a separate branch. You can follow along simply by checking out the git branch that reflects the tutorial step you are reviewing.
The Application
The web application we will build is a super webapp that can be used as a starting point for your own application. It will demonstrate user login, logout, user-specific welcome messages, access control to certain parts of the web application, and integration with a plugglable security data store.
We will start by setting up the project, including the build tool and declaring dependencies, as well as configuring the servlet web.xml file to launch the web application and the Shiro environment.
Once we complete setup, we will then layer in individual pieces of functionality, including integration with a security data store, then enabling user login, logout, and access control.
Project Setup
Instead of having to manually set up a directory structure and initial set of basic files, we’ve done this for you in a git repository.
1. Fork the tutorial project
On GitHub, visit the tutorial project and click the Fork button on the upper right.
2. Clone your tutorial repository
Now that you have forked the repository to your own GitHub account, clone it on your local machine:
$ git clone git@github.com:$YOUR_GITHUB_USERNAME/apache-shiro-tutorial-webapp.git(where $YOUR_GITHUB_USERNAME is your own GitHub username of course)
You can now cd into the cloned directory and see the project structure:
$ cd apache-shiro-tutorial-webapp3. Review project structure
After cloning the repo, your current master branch will have the following structure:

Here is what each means:
pom.xml: the Maven project/build file. It has Jetty configured so you can test your web app right away by runningmvn jetty:run.
README.md: a simple project readme file
LICENSE: the project’s Apache 2.0 license
.travis.yml: A Travis CI config file in case you want to run continuous integration on your project to ensure it always builds.
.gitignore: A git ignore file, containing suffixes and directories that shouldn’t be checked in to version control.
src/main/resources/logback.xml: A simple Logback config file. For this tutorial, we’ve chosen SLF4J as our logging API and Logback as the logging implementation. This could have easily been Log4J or JUL.
src/main/webapp/WEB-INF/web.xml: Our initialweb.xmlfile that we’ll configure soon to enable Shiro.
src/main/webapp/include.jsp: A page that contains common imports and declarations, included in other JSP pages. This allows us to manage imports and declarations in one place.
src/main/webapp/home.jsp: our webapp’s simple default home page. Includesinclude.jsp(as will others, as we will soon see).
src/main/webapp/index.jsp: the default site index page - this merely forwards the request on to ourhome.jsphomepage.
4. Run the webapp
Now that you’ve cloned the project, you can run the web application by executing the following on the command line:
$ mvn jetty:runNext, open your web browser to localhost:8080, and you’ll see the home page with a Hello, World! greeting.
Hit ctl-C (or cmd-C on a mac) to shut down the web app.
Step 1: Enable Shiro
Our initial repository master branch is just a simple generic web application that could be used as a template for any application. Let’s add the bare minimum to enable Shiro in the web app next.
Perform the following git checkout command to load the step1 branch:
$ git checkout step1Checking out this branch, you will find two changes:
A new
src/main/webapp/WEB-INF/shiro.inifile was added, andsrc/main/webapp/WEB-INF/web.xmlwas modified.
1a: Add a shiro.ini file
Shiro can be configured in many different ways in a web application, depending on the web and/or MVC framework you use. For example, you can configure Shiro via Spring, Guice, Tapestry, and many many more.
To keep things simple for now, we’ll start a Shiro environment by using Shiro’s default (and very simple) INI-based configuration.
If you checked out the step1 branch, you’ll see the contents of this new src/main/webapp/WEB-INF/shiro.ini file (header comments removed for brevity):
[main]

# Let's use some in-memory caching to reduce the number of runtime lookups against Stormpath.
# A real application might want to use a more robust caching solution (e.g. ehcache or a
# distributed cache).  When using such caches, be aware of your cache TTL settings: too high
# a TTL and the cache won't reflect any potential changes in Stormpath fast enough.  Too low
# and the cache could evict too often, reducing performance.
cacheManager = org.apache.shiro.cache.MemoryConstrainedCacheManager
securityManager.cacheManager = $cacheManager
This .ini contains simply a [main] section with some minimal configuration:
It defines a new
cacheManagerinstance. Caching is an important part of Shiro’s architecture - it reduces constant round-trip communications to various data stores. This example uses aMemoryConstrainedCacheManagerwhich is only really good for single JVM applications. If your application is deployed across multiple hosts (e.g. a clustered webserver farm), you will want to use a clustered CacheManager implementation instead.
It configures the new
cacheManagerinstance on the ShirosecurityManager. A ShiroSecurityManagerinstance always exists, so it did not need to be defined explicitly.
1b: Enable Shiro in web.xml
While we have a shiro.ini configuration, we need to actually load it and start a new Shiro environment and make that environment avaiable to the web application.
We do all of this by adding a few things to the existing src/main/webapp/WEB-INF/web.xml file:
<listener>
    <listener-class>org.apache.shiro.web.env.EnvironmentLoaderListener</listener-class>
</listener>

<filter>
    <filter-name>ShiroFilter</filter-name>
    <filter-class>org.apache.shiro.web.servlet.ShiroFilter</filter-class>
</filter>

<filter-mapping>
    <filter-name>ShiroFilter</filter-name>
    <url-pattern>/*</url-pattern>
    <dispatcher>REQUEST</dispatcher>
    <dispatcher>FORWARD</dispatcher>
    <dispatcher>INCLUDE</dispatcher>
    <dispatcher>ERROR</dispatcher>
</filter-mapping>
The
<listener>declaration defines aServletContextListenerthat starts up the Shiro environment (including the ShiroSecurityManager) upon web application startup. By default, this listener automatically knows to look for ourWEB-INF/shiro.inifile for Shiro configuration.
The
<filter>declaration defines the masterShiroFilter. This filter is expected to filter all requests into the web application so Shiro can peform necessary identity and access control operations before allowing a request to reach the application.
The
<filter-mapping>declaration ensures that all request types are filed by theShiroFilter. Oftenfilter-mappingdeclarations don’t specify<dispatcher>elements, but Shiro needs them all defined so it can filter all of the different request types that might execute for a web app.
1c: Run the webapp
After checking out the step1 branch, go ahead and run the web app:
$ mvn jetty:runThis time, you will see log output similar to the following, indicating that Shiro is indeed running in your webapp:
16:04:19.807 [main] INFO  o.a.shiro.web.env.EnvironmentLoader - Starting Shiro environment initialization.
16:04:19.904 [main] INFO  o.a.shiro.web.env.EnvironmentLoader - Shiro environment initialized in 95 ms.
Hit ctl-C (or cmd-C on a mac) to shut down the web app.
Step 2: Connect to a User Store
Perform the following git checkout command to load the step2 branch:
$ git checkout step2Now we have Shiro integrated and running within a webapp. But we haven’t actually told Shiro to do anything yet!
Before we can login, or logout, or perform role-based or permission-based access control, or anything else security related, we need users!
We will need to configure Shiro to access a User Store of some type, so it can look up users to perform login attempts, or check roles for security decisions, etc. There are many types of user stores that any application might need to access: maybe you store users in a MySQL database, maybe in MongoDB, maybe your company stores user accounts in LDAP or Active Directory, maybe you store them in a simple file, or some other proprietary data store.
Shiro does this via what it calls a Realm. From Shiro’s documentation:
Realms act as the ‘bridge’ or ‘connector’ between Shiro and your application’s security data. When it comes time to actually interact with security-related data like user accounts to perform authentication (login) and authorization (access control), Shiro looks up many of these things from one or more Realms configured for an application.
In this sense a Realm is essentially a security-specific DAO: it encapsulates connection details for data sources and makes the associated data available to Shiro as needed. When configuring Shiro, you must specify at least one Realm to use for authentication and/or authorization. The SecurityManager may be configured with multiple Realms, but at least one is required.
Shiro provides out-of-the-box Realms to connect to a number of security data sources (aka directories) such as LDAP, relational databases (JDBC), text configuration sources like INI and properties files, and more. You can plug-in your own Realm implementations to represent custom data sources if the default Realms do not meet your needs.
So, we need to configure a Realm so we can access users.
2a: Set up Stormpath
In the spirit of keeping this tutorial as simple as possible, without introducing complexity or scope that distracts us from the purpose of learning Shiro, we’ll use one of the simplest realms we can: a Stormpath realm.
Stormpath is a cloud hosted user management service, totally free for development purposes. This means that after enabling Stormpath, you’ll have the following ready to go:
A user interface for managing Applications, Directories, Accounts and Groups. Shiro does not provide this at all, so this will be convenient and save time while you go through this tutorial.
A secure storage mechanism for user passwords. Your application never needs to worry about password security, password comparisons or storing passwords. While Shiro can do these things, you would have to configure them and be aware of cryptographic concepts. Stormpath automates password security so you (and Shiro) don’t need to worry about it or be on the hook for ‘getting it right’.
Security workflows like account email verification and password reset via email. Shiro has no support for this, as it is often application specific.
Hosted/managed ‘always on’ infrastructure - you don’t have to set anything up or maintain anything.
For the purposes of this tutorial, Stormpath is much simpler than setting up a separate RDBMS server and worrying about SQL or password encryption issues. So we’ll use that for now.
Of course, Stormpath is only one of many back-end data stores that Shiro can communicate with. We’ll cover more complicated data stores and application-specific configuration of them later.
Sign up for Stormpath
Fill out and submit the Stormpath registration form. This will send a confirmation email.
Click the link in the confirmation email.
Get a Stormpath API Key
A Stormpath API Key is required for the Stormpath Realm to communicate with Stormpath. To get a Stormpath API Key:
Log in to the Stormpath Admin Console using the email address and password you used to register with Stormpath.
In the top-right corner of the resulting page, visit Settings > My Account.
On the Account Details page, under Security Credentials, click Create API Key.
This will generate your API Key and download it to your computer as an
apiKey.propertiesfile. If you open the file in a text editor, you will see something similar to the following:apiKey.id = 144JVZINOF5EBNCMG9EXAMPLE apiKey.secret = lWxOiKqKPNwJmSldbiSkEbkNjgh2uRSNAb+AEXAMPLESave this file in a secure location, such as your home directory in a hidden
.stormpathdirectory. For example:$HOME/.stormpath/apiKey.propertiesAlso change the file permissions to ensure only you can read this file. For example, on *nix operating systems:
$ chmod go-rwx $HOME/.stormpath/apiKey.properties
Register the web application with Stormpath
We have to register our web application with Stormpath to allow the app to use Stormpath for user management and authentication. You register the web app with Stormpath simply by making a REST request, POSTing a new Application resource to the Stormpath applicationsURL:

where:
$YOUR_API_KEY_ID is the apiKey.id value in apiKey.properties and
YOUR_API_KEY_SECRET is the apiKey.secret value in apiKey.properties
This will create your application. Here’s an example response:
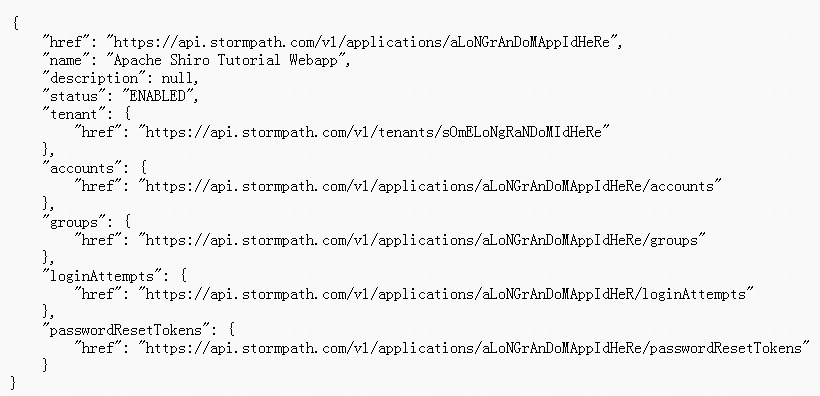
Make note of the top-level href, e.g. https://api.stormpath.com/v1/applications/$YOUR_APPLICATION_ID - we will use this href in theshiro.ini configuration next.
Create an application test user account
Now that we have an application, we’ll want to create a sample/test user for that application:

Again, don’t forget to change $YOUR_APPLICATION_ID in the URL above to match your application’s ID!
2b: Configure the Realm in shiro.ini
Once you choose at least one user store to connect to for Shiro’s needs, we’ll need to configure a Realm that represents that data store and then tell the Shiro SecurityManager about it.
If you’ve checked out the step2 branch, you’ll notice the shiro.ini file’s [main] section now has the following additions:
# Configure a Realm to connect to a user datastore.  In this simple tutorial, we'll just point to Stormpath since it
# takes 5 minutes to set up:
stormpathClient = com.stormpath.shiro.client.ClientFactory
stormpathClient.cacheManager = $cacheManager
stormpathClient.apiKeyFileLocation = $HOME/.stormpath/apiKey.properties
stormpathRealm = com.stormpath.shiro.realm.ApplicationRealm
stormpathRealm.client = $stormpathClient

# Find this URL in your Stormpath console for an application you create:
# Applications -> (choose application name) --> Details --> REST URL
stormpathRealm.applicationRestUrl = https://api.stormpath.com/v1/applications/$STORMPATH_APPLICATION_ID
stormpathRealm.groupRoleResolver.modeNames = name
securityManager.realm = $stormpathRealm
Make the following changes:
Change the
$HOMEplaceholder to be your actual home directory path, e.g./home/jsmithso the finalstormpathClient.apiKeyFileLocationvalue is something like/home/jsmith/.stormpath/apiKey.properties. This path must match the location of theapiKey.propertiesfile you downloaded from Stormpath in Step 2a.Change the
$STORMPATH_APPLICATION_IDplaceholder to be the actual ID value in thehrefreturned from Stormpath at the end of Step 2a. The finalstormpathRealm.applicationRestUrlvalue should look something likehttps://api.stormpath.com/v1/applications/6hsPwoRZ0hCk6ToytVxi4D(with a different application ID of course).
2c: Commit your changes
Your replaced $HOME and STORMPATH_APPLICATION_ID values are specific to your application. Go ahead and commit those changes to your branch:
$ git add . && git commit -m "updated app-specific placeholders" .2d: Run the webapp
After making the changes as specified in Step 2b and 2c, go ahead and run the web app:
$ mvn jetty:runThis time, you will see log output similar to the following, indicating that Shiro and the new Realm are configured properly in your webapp:
16:08:25.466 [main] INFO  o.a.shiro.web.env.EnvironmentLoader - Starting Shiro environment initialization.
16:08:26.201 [main] INFO  o.a.s.c.IniSecurityManagerFactory - Realms have been explicitly set on the SecurityManager instance - auto-setting of realms will not occur.
16:08:26.201 [main] INFO  o.a.shiro.web.env.EnvironmentLoader - Shiro environment initialized in 731 ms.
Hit ctl-C (or cmd-C on a mac) to shut down the web app.


 209
209

 被折叠的 条评论
为什么被折叠?
被折叠的 条评论
为什么被折叠?
 到【灌水乐园】发言


