


该部分主要是ueditor的使用,去掉ueditor的jsp依赖,自定义图片上传路径,完全解除对百度ueditor.jar的使用,下载utf8-jsp版本的话就会看到jsp目录下会有个ueditor.jar,这个jar在maven仓库是没有的。喜欢看源码的筒子请下载ueditor源码,里面有jsp版本的jar包的源代码。
构建工程
下载utf8-jsp版本,目录结构如下所示:
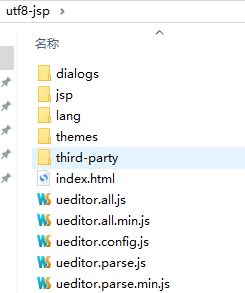
我这里是用的是springboot的工程,其他的也一样,将下载的utf8-jsp复制到static目录下,我这里已经将其该名成了ueditor,改名随意,可以不改。
①jsp目录下的config.json复制到resource目录,ueditor每次实例化都会读取config.json,我们自己来提供这个读取接口。
②删除jsp目录,脱离jsp以及相关的jar包,读取配置文件接口自己写,上传用自己的接口。
③由于项目的html文件不可能一并写在ueditor目录下,所以我已将自带的index.html移动到了static目录下,这个就相当于自己写的html了,别忘了改index.html里面引入的js资源的路径。
确定配置文件获取路径
第一步:打开ueditor.config.js文件。
// window.UEDITOR_HOME_URL = "";
    var URL = window.UEDITOR_HOME_URL || getUEBasePath();

    /**
     * 配置项主体。注意,此处所有涉及到路径的配置别遗漏URL变量。
     */
    window.UEDITOR_CONFIG = {

        //为编辑器实例添加一个路径,这个不能被注释
        UEDITOR_HOME_URL: URL

        // 服务器统一请求接口路径
        , serverUrl: URL + "servlet"
Window.UEDITOR_HOME_URL可以不用管他。
来看服务器统一请求接口路径,这个路径就是获取配置文件,上传等接口的路径,由于上传路径等哈会通过其他方式配置成使用我们自己的上传路径,所以这里这个路径就只是获取配置文件用了。
我这里配置得是URL+”servlet”,具体咋配自己喜欢,但是"URL+"是必须的。
第二步:写好启动类,启动工程,访问index.html页面,打开F12调试,刷新页面,你将看到下图的内容,提示“请求后台配置项http错误,上传功能将不能正常使用”。
重要:这个路径就是ueditor获取配置文件的路径,所以这里我们写配置文件的获取的接口就按这个来写就行了,由于只是获取配置文件的接口,所以后边的参数action就不重要了,这个action主要是用来是获取配置文件还是上传用的。这里由于我们上传用的自己的,已经没用百度自己的jar了,所以这个就没用了。
![]()
第三步:写获取配置文件的Controller,写入到流中(参照ueditor自己的controller.jsp)。
@RestController
@RequestMapping("/ueditor")
public class UeditorController {

    @RequestMapping("/servlet")
    public void servlet(HttpServletRequest request, HttpServletResponse response) {
        try {
            PrintWriter out = response.getWriter();
            request.setCharacterEncoding("utf-8");
            response.setHeader("Content-Type", "text/html");

            String action = request.getParameter("action");
            String result = "";
            if (action.equals("config")) {
                MyConfigManager configManager= MyConfigManager.getInstance();
                result=configManager.getAllConfig().toString();
            }
            out.write(result);
        } catch (IOException e) {
            e.printStackTrace();
        }
    }

}
MyConfigManager.java
public final class MyConfigManager {
    private final Logger logger = LoggerFactory.getLogger(MyConfigManager.class);

    private JSONObject jsonConfig = null;
    private static MyConfigManager manager;

    private MyConfigManager() throws IOException {
        this.initEnv();
    }

    public static MyConfigManager getInstance() {
        if (manager != null) {
            //ueditor每次实例化都会获取配置文件,单列模式,防止一直new对象
            return manager;
        }
        try {
            manager = new MyConfigManager();
            return manager;
        } catch (Exception var4) {
            return null;
        }
    }

    public boolean valid() {
        return this.jsonConfig != null;
    }

    public JSONObject getAllConfig() {
        if (this.jsonConfig != null)
            return this.jsonConfig;
        else {
            JSONObject state=new JSONObject();
            //将“配置文件初始化失败”转成unicode编码返回
            state.put("state","\\u914d\\u7f6e\\u6587\\u4ef6\\u521d\\u59cb\\u5316\\u5931\\u8d25");
            return state;
        }
    }

    private void initEnv() throws IOException {
        String configContent = this.readFile();
        try {
            JSONObject e = JSONObject.parseObject(configContent);
            this.jsonConfig = e;
        } catch (Exception var4) {
            this.jsonConfig = null;
        }

    }

    private String readFile() throws IOException {
        StringBuilder builder = new StringBuilder();
        logger.info("开始读取文件:");
        Resource resource = new ClassPathResource("config.json");
        try {
            InputStreamReader reader = new InputStreamReader(resource.getInputStream(), "UTF-8");
            BufferedReader bfReader = new BufferedReader(reader);
            String tmpContent = null;

            while ((tmpContent = bfReader.readLine()) != null) {
                builder.append(tmpContent);
            }
            logger.info("文件读取完成:");
            bfReader.close();
        } catch (UnsupportedEncodingException var6) {
            logger.info("文件读取出错:");
            ;
        }
        return this.filter(builder.toString());
    }

    private String filter(String input) {
        return input.replaceAll("/\\*[\\s\\S]*?\\*/", "");
    }
}
这个时候再启动项目,访问index.html页面,就不会报错了,但是上传是不能成功的,因为我们这个接口是专门获取配置文件的,对上传没有任何作用。
之前说了,ueditor.config.js中配置的统一路径就是这个接口,那个action得值就是用来区别到底是上传,还是获取配置文件。
上传配置
第一步:写文件上传接口,
ueditor的图片上传,返回ueditor能识别的参数类型,这个表单名字files是在config.json里面配置过的,默认为upfile,这里演示的仅仅是是否上传成功,所以上传的图片全部默认保存到了指定的路径,ueditor上是不能显示的。
config.json
/* 上传图片配置项 */
    "imageActionName": "uploadimage", /* 执行上传图片的action名称 */
    "imageFieldName": "files", /* 提交的图片表单名称 */
    "imageMaxSize": 2048000, /* 上传大小限制,单位B */
UploadController.java
@RestController
public class UploadController {

    @RequestMapping("/upload")
    public Object upload(@RequestParam(value = "files") MultipartFile files, HttpServletRequest req) {
        String rootPath = req.getServletContext().getRealPath("/");
        System.out.println(rootPath);
        UeditorResponse ur = new UeditorResponse();
        ur.setType(files.getOriginalFilename());
        ur.setOriginal(files.getOriginalFilename());
        try {
            System.out.println(files.getName());
            System.out.println(files.getOriginalFilename());
            String path = "D:/" + files.getOriginalFilename();
            files.transferTo(new File(path));
            ur.setUrl(path);
            ur.setState("SUCCESS");
        } catch (IOException e) {
            e.printStackTrace();
            ur.setState("图片上传失败");
            return ur;
        }
        return ur;
    }

    @RequestMapping("/uploadbase64")
    public Object uploadbase64(String files) {
        System.out.println(files);
        UeditorResponse ur = new UeditorResponse();
        savebase64(files, "D:/xxx.png");
        ur.setState("SUCCESS");
        ur.setUrl("url");
        ur.setOriginal("xxx.png");
        return ur;
    }

    //保存base64为图片
    public Object savebase64(String file, String path) {
        file = file.substring(file.indexOf(",") + 1);
        System.out.println(file);
        try {
            BASE64Decoder decoder = new BASE64Decoder();
            byte[] bytes = decoder.decodeBuffer(file);
            for (int i = 0; i < bytes.length; ++i) {
                if (bytes[i] < 0) {// 调整异常数据
                    bytes[i] += 256;
                }
            }
            InputStream in = new ByteArrayInputStream(bytes);
            FileOutputStream fos = new FileOutputStream(new File(path));
            byte[] b = new byte[4096];
            Integer len = -1;
            while ((len = in.read(b)) != -1) {
                fos.write(b, 0, len);
            }
            fos.flush();
            in.close();
            fos.close();
        } catch (Exception e) {
            e.printStackTrace();
        }
        return null;
    }
}
Ueditor能够识别的返回值实体,UeditorResponse.java
public class UeditorResponse {
    //图片上传成功后返回获取图片的路径,
    //可以是一个二进制流的接口,也可以是图片地址得接口,总之这个路径必须是写在img标签内能够显示的
    private String url;
    //上传状态信息,如果为"SUCCESS"(必须是大写),则表示上传成功,不为SUCCESS时页面提示信息就是state得值
    private String state;
    private String type;
    private String original;
url:图片上传成功后返回获取图片的路径,可以是一个二进制流的接口,也可以是图片地址得接口,总之这个路径必须是写在img标签内能够显示的。
state:上传状态信息,如果为"SUCCESS"(必须是大写),则表示上传成功,不为SUCCESS时页面提示信息就是state得值
第二步:添加实例化ueditor指定上传路径的代码
打开index.html,找到ueditor实例化的部分。
在var ue=UE.getEditor(‘editor’);之后添加下面一段代码,覆盖UEditor中获取路径的方法,用来指定上传路径(也就是我们自己写的上传路径)。
uploadimage,截图和图片上传(config.json里面有注释)
uploadfile,附件上传
涂鸦用的是base64的编码,这种multipartfile的方式就不顶用了,可以重新再写一个base64的,用来上传涂鸦,如上述uploadbase64接口。
//实例化编辑器
var ue = UE.getEditor('editor');

UUE.Editor.prototype._bkGetActionUrl=UE.Editor.prototype.getActionUrl;
UE.Editor.prototype.getActionUrl=function(action){
    if (action == 'uploadimage'||action == 'uploadfile'){
        return 'upload';    /* 这里填上你自己的上传图片的url */
    }else if(action == 'uploadscrawl'){
        return 'uploadbase64';
    }else{
        return this._bkGetActionUrl.call(this, action);
    }
};
所有工作做完,再次访问index.html,测试一次图片上传,你可以发现,原来真的可以用了。
但是:再次提醒一次,这里演示的仅仅是是否上传成功,所以上传的图片全部默认保存到了指定的路径,ueditor上是不能显示的(自己看上传接口的代码)。
Demo地址:https://github.com/wtkid/workspace_G/tree/master/ideaprojects/spirngboot-ueditor
百度jar源码:https://github.com/wtkid/workspace_G/tree/master/ideaprojects/ueditorjar
图片上传图片太大出现滚动条
这个是ueditor自己本身就存在的,跟我们自己这种是否依赖jsp无关。
我们现在要设置图片上传后显示的时候最大宽度不超过屏幕。
第一步:取消style过滤,添加style到过滤白名单。
打开ueditor.config.js,找到图示位置,也就是img开头的那行,添加一个’style’.
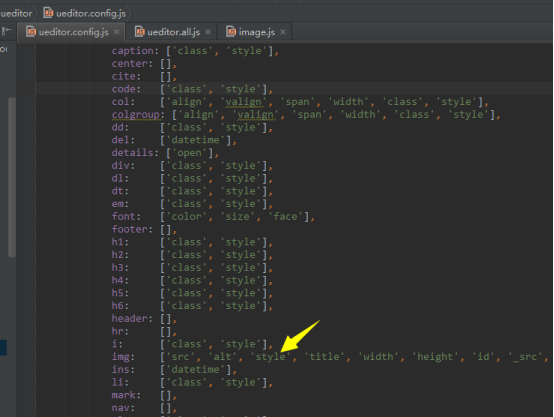
header: [],
hr:     [],
i:      ['class', 'style'],
img:    ['src', 'alt', 'style', 'title', 'width', 'height', 'id', '_src', 'loadingclass', 'class', 'data-latex'],
ins:    ['datetime'],
li:     ['class', 'style'],
第二步:单张图片上传添加style代码
打开ueditor.all.js,找到图示大概24531行的位置,添加以下代码
loader.setAttribute('style', 'max-width:100%');
function callback(){
    try{
        var link, json, loader,
            body = (iframe.contentDocument || iframe.contentWindow.document).body,
            result = body.innerText || body.textContent || '';
        json = (new Function("return " + result))();
        link = me.options.imageUrlPrefix + json.url;
        if(json.state == 'SUCCESS' && json.url) {
            loader = me.document.getElementById(loadingId);
            loader.setAttribute('src', link);
            loader.setAttribute('_src', link);
            loader.setAttribute('style', 'max-width:100%');
            loader.setAttribute('title', json.title || '');
            loader.setAttribute('alt', json.original || '');
            loader.removeAttribute('id');
            domUtils.removeClasses(loader, 'loadingclass');
第三步:剪切板的图片粘贴或直接拖动图片进来时添加style
打开如图所示23771行部分,添加同样代码
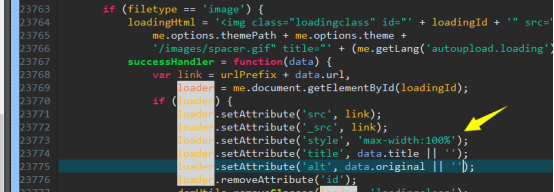
if (filetype == 'image') {
    loadingHtml = '<img class="loadingclass" id="' + loadingId + '" src="' +
        me.options.themePath + me.options.theme +
        '/images/spacer.gif" title="' + (me.getLang('autoupload.loading') || '') + '" >';
    successHandler = function(data) {
        var link = urlPrefix + data.url,
            loader = me.document.getElementById(loadingId);
        if (loader) {
            loader.setAttribute('src', link);
            loader.setAttribute('_src', link);
            loader.setAttribute('style', 'max-width:100%');
            loader.setAttribute('title', data.title || '');
            loader.setAttribute('alt', data.original || '');
            loader.removeAttribute('id');
            domUtils.removeClasses(loader, 'loadingclass');
        }
    };
第四步:多个图片同时上传时添加style
这个要改两个地方。
打开大概11170行的地方。
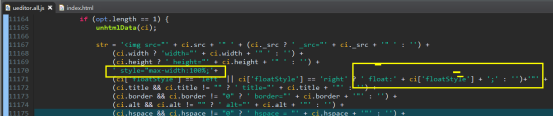
str = '<img src="' + ci.src + '" ' + (ci._src ? ' _src="' + ci._src + '" ' : '') +
    (ci.width ? 'width="' + ci.width + '" ' : '') +
    (ci.height ? ' height="' + ci.height + '" ' : '') +
        ' style="max-width:100%";'+
    (ci['floatStyle'] == 'left' || ci['floatStyle'] == 'right' ? ' float:' + ci['floatStyle'] + ';"' : '') +'"'+
    (ci.title && ci.title != "" ? ' title="' + ci.title + '"' : '') +
再打开大概11188行的位置,也就是上面那个if的else里面的代码。
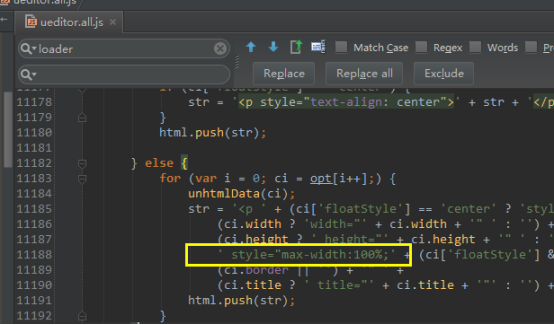
for (var i = 0; ci = opt[i++];) {
    unhtmlData(ci);
    str = '<p ' + (ci['floatStyle'] == 'center' ? 'style="text-align: center" ' : '') + '><img src="' + ci.src + '" ' +
        (ci.width ? 'width="' + ci.width + '" ' : '') + (ci._src ? ' _src="' + ci._src + '" ' : '') +
        (ci.height ? ' height="' + ci.height + '" ' : '') +
        ' style="max-width:100%' + (ci['floatStyle'] && ci['floatStyle'] != 'center' ? 'float:' + ci['floatStyle'] + ';' : '') +
        (ci.border || '') + '" ' +
        (ci.title ? ' title="' + ci.title + '"' : '') + ' /></p>';
    html.push(str);
}
好了,这样就完美了,这个图片太大的问题,有需求的时候就用的住了。
视频上传
H5的vedio标签是可以播放视频流的
以下是某次ueditor上传视频后的内容。其中视频的src接口是输出的视频流。如下所示:
<p>ogg格式视频</p>
<p><video class="edui-upload-video  vjs-default-skin video-js" controls="" preload="none" width="420" height="280" src="/CH_PC/sys/oss/getfile/287d629c5e7240b3b036af0e41d7d4a6" data-setup="{}"></video></p>
<p>MP4格式视频</p>
<p><video class="edui-upload-video  vjs-default-skin video-js" controls="" preload="none" width="420" height="280" src="/CH_PC/sys/oss/getfile/0e8f15272d5b4ddfba0becf549e0874c" data-setup="{}"></video></p>
由于H5的vedio标签可以播放视频流,因此,我们只需要能将视频上传成功就OK了,像上传图片那样处理。config.json中上传视频时的表单名称记得改成和接口中一样。
![]()
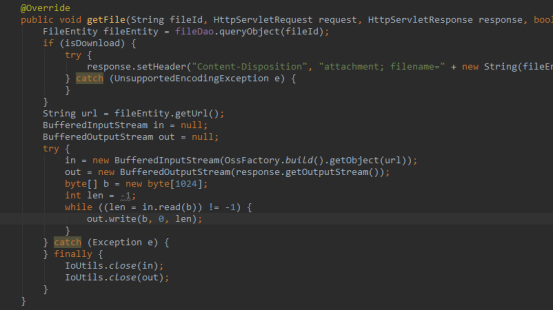
public void getFile(String fileId, HttpServletRequest request, HttpServletResponse response, boolean isDownload) {
		FileEntity fileEntity = fileDao.queryObject(fileId);
		if (isDownload) {
			try {
				response.setHeader("Content-Disposition", "attachment; filename=" + new String(fileEntity.getFilename().getBytes("UTF-8"), "ISO8859-1"));
			} catch (UnsupportedEncodingException e) {
			}
		}
		String url = fileEntity.getUrl();
		BufferedInputStream in = null;
		BufferedOutputStream out = null;
		try {
			in = new BufferedInputStream(OssFactory.build().getObject(url));
			out = new BufferedOutputStream(response.getOutputStream());
			byte[] b = new byte[1024];
			int len = -1;
			while ((len = in.read(b)) != -1) {
				out.write(b, 0, len);
			}
		} catch (Exception e) {
		} finally {
			IoUtils.close(in);
			IoUtils.close(out);
		}
    }
Over~~


 8847
8847


 被折叠的 条评论
为什么被折叠?
被折叠的 条评论
为什么被折叠?
 到【灌水乐园】发言


