


什么是模块?
在计算机程序的开发过程中,随着程序代码越写越多,在一个文件里代码就会越来越长,越来越不容易维护。为了编写可维护的代码,我们把很多函数分组,分别放到不同的文件里,分组的规则就是把实现了某个功能的代码集合,放置到一个模块中,这样,每个文件包含的代码就相对较少,很多编程语言都采用这种组织代码的方式。在Python中,一个.py文件就称之为一个模块(Module)。模块也被叫做库。
模块的作用?
1、模块内有许多函数方法,利用这些方法可以更简单的完成许多工作。
2、模块可以在文件中永久保存代码。在python交互式解释器中操作输入的代码,在退出python时是不会被保存的,而模块文件中的代码是永久存在的。
3、从实用性方面来说,模块可以跨系统平台使用,只需要Copy代码就可以。比如说,有一个全局对像,会被许多文件使用,这时为了方便把它写入一个模块中,再被调用是最好的方法。
模块的分类
内置模块 :Python官方提供的一些模块功能,比如:random,json,string,base64,pickle,sys,os等
自定义模块:根据自己需求编写的一些.py文件或一类模块以及包。
第三方模块:非Python本身自带的一些模块甚至框架。比如:request,Image,Flask,Django,Scrapy等。
怎么使用?
1.导入
模块的导入使用import语句来完成。 import module1[, module2[,... moduleN] 如果导入的模块和主程序在同个目录下,直接import就行了。
如果导入的模块是在主程序所在目录的子目录下,可以在子目录中增加一个空白的__init__.py文件,该文件使得python解释器将子目录整个也当成一个模块,然后直接通过“import 子目录.模块”导入即可。
如果导入的模块是在主程序所在目录的父目录下,则要通过修改path来解决,有两种方法:
(1)通过”import sys,sys.path.append('父目录的路径')“来改变,这种方法属于一次性的,只对当前的python解释器进程有效,关掉python重启后就失效了。
(2)直接修改环境变量:在windows中是 “ set 变量=‘路径’ ” 例如:set PYTHONPATH=‘C:\test\...’ 查看是否设置成功用echo %PYTHONPATH%,而且进到python解释器中查看sys.path,会发现已经有了新增加的路径了。这种方式是永久的,一次设置以后一直都有效。
注意:通过修改path是通用的方法,因为python解释器就是通过sys.path去一个地方一个地方的寻找模块,且当前目录优先导入。
扩展补充:
还有一种动态导入模块的方法,以字符串方式导入,可以根据用户输入,或者url等来进行动态创建导入模块的语句,案例如下:
1 inp = input("请输入要访问的url:")
2 m, f = inp.split("/")
3 obj = __import__(m)
4 # 这样导入的m模块,就被实例到对象obj。
5
6
7 # 带入带路径的模块,扩展:__import__的使用
8 # __import__("lib.xxx.xxx.xx"+ m) 默认情况下只导入lib
9 # __import__("lib.xxx.xxx.xx"+ m, fromlist=True) fromlist参数可以使它导入lib.xx.xx.xx,使多层次导入生效。默认为单层
案例代码:
1 def run():
2     inp = input("请输入要访问的url:")
3     if hasattr(commons, inp):
4         func = getattr(commons, inp) # commons是模块,inp是对应函数
5         func()
6     else:print("不存在")
2.命名
由于Python在导入模块的时候,是按照sys.path路径去顺序查找,因此,如果在当前目录下找到的话,就会终止向下查找,因此模块的命名应该避免与第三方模块、内置模块冲突。
3.编写
模块的编写与常规函数的编写无其他区别,需要注意的就是尽量聚合一类功能的代码放入一个模块中,提高了整合度,也方便其他人来调用。同时还可以提高构建项目时,包的有序性和可维护性。
4. 几个重要的内置变量
__doc__ 函数、或者文档的注释
__file__ 获取当前运行的py文件所在的目录
__cached__ __pycache__的路径,知道就行
__name__ 1. 获取函数的名称 2.只有执行当前文件时,当前文件的特殊变量__name__ 就等于“__main__”
__package__ 输出对应函数属于哪个包 . admin.__package__
常见模块的用法
1. sys
包括了一组非常实用的服务,内含很多函数方法和变量,用来处理Python运行时配置以及资源,从而可以与当前程序之外的系统环境交互
1)sys.argv 获取一个命令行参数的list。 第一个元素是python脚本名称,其余的每个元素类似shell中传参的$1, $2, $3....$n
2)sys.path 查找模块所在目录的目录名列表。常用来添加其他目录的包或者模块


import sys, os
# 程序主目录
BASE_DIR = os.path.dirname(os.path.abspath(__file__))
# 添加主目录至环境变量,通常写于文件首部位置
sys.path.append(BASE_DIR)

print(sys.path[0], type(sys.path[0]))

#out:
E:\学习经历\python勃起\SVN目录\S13-Day05\class <class 'str'>
3)sys.exit(n) 退出程序,正常退出时exit(0).
4)sys.platform 返回操作系统平台名称
5)sys.stdin 输入相关
6)sys.stdout 输出相关,实际上,这就是print函数真正做的事情:它在你打印的字符串后面加上一个硬回车,然后调用 sys.stdout.write 函数。
7)sys.stderr 错误相关
2. os
这个模块包含普遍的操作系统功能。如果你希望你的程序能够与平台无关的话,这个模块是尤为重要的。即它允许一个程序在编写后不需要任何改动,也不会发生任何问题,就可以在Linux和Windows下运行。
 1 os.getcwd()                 获取当前工作目录,即当前python脚本工作的目录路径
 2
 3 os.chdir("dirname")         改变当前脚本工作目录;相当于shell下cd
 4 os.makedirs('dir1/dir2')    可生成多层递归目录,相当于linux中的mkdir -p
 5 os.removedirs('dirname1')   若目录为空,则删除,并递归到上一级目录,如若也为空,则删除,依此类推
 6 os.mkdir('dirname')         生成单级目录;相当于shell中mkdir dirname
 7 os.rmdir('dirname')         删除单级空目录,若目录不为空则无法删除,报错;相当于shell中rmdir dirname
 8 os.listdir('dirname')       列出指定目录下的所有文件和子目录,包括隐藏文件,并以列表方式打印
 9 os.remove()                 删除一个文件
10 os.rename("oldname","new")  重命名文件/目录
11 os.stat('path/filename')    获取文件/目录信息
12 os.sep                      操作系统特定的路径分隔符,win下为"\\",Linux下为"/"
13 os.linesep                  当前平台使用的行终止符,win下为"\t\n",Linux下为"\n"
14 os.pathsep                  用于分割文件路径的字符串,windows下为";",Linux下为":"
15 os.name                     字符串指示当前使用平台。win->'nt'; Linux->'posix'
16 os.system("bash command")   运行shell命令,并输出对应结果
17 os.environ                  获取系统环境变量
18 os.path.abspath(path)       返回path规范化的绝对路径
19 os.path.split(path)         将path分割成目录和文件名二元组返回
20 os.path.dirname(path)       返回path的目录。其实就是os.path.split(path)的第一个元素
21 os.path.basename(path)      返回path最后的文件名。如何path以/或\结尾,那么就会返回空值。即os.path.split(path)的第二个元素
22 os.path.exists(path)        如果path存在,返回True;如果path不存在,返回False
23 os.path.isabs(path)         如果path是绝对路径,返回True
24 os.path.isfile(path)        如果path是一个存在的文件,返回True。否则返回False
25 os.path.isdir(path)         如果path是一个存在的目录,则返回True。否则返回False
26 os.path.join(path1[, path2[, ...]])  将多个路径组合后返回,第一个绝对路径之前的参数将被忽略
27 os.path.getatime(path)      返回path所指向的文件或者目录的最后存取时间
28 os.path.getmtime(path)      返回path所指向的文件或者目录的最后修改时间
重点:os.path.join,用于连接多个字符串来组成路径,可以根据不同的操作系统,生成不同表现形式的地址 ,'/','\'
3. random
python中的随机数模块,常用的几个方法如下:
1 random.random()       用于生成一个0到1的随机浮点数: 0 <= n < 1.0
2 random.uniform(a,b)  用于生成一个指定范围内的随机符点数,两个参数其中一个是上限,一个是下限
3 random.randint(a, b)    用于生成一个指定范围内的整数。其中参数a是下限,参数b是上限,生成的随机数n: a <= n <= b
4 random.randrange([start], stop[, step])  从指定范围内,按指定基数递增的集合中 获取一个随机数
5 random.choice   从序列中获取一个随机元素。其函数原型为:random.choice(sequence)。参数sequence表示一个有序类型
6 random.sample(sequence, k)     从指定序列中随机获取指定长度的片断
4. time 和 datetime
 1 import time
 2 import datetime
 3
 4 print(time.time()) #返回当前系统时间戳
 5 print(time.ctime()) #输出Tue Jan 26 18:23:48 2016 ,当前系统时间
 6 print(time.ctime(time.time()-86640)) #将时间戳转为字符串格式
 7 print(time.gmtime(time.time()-86640)) #将时间戳转换成struct_time格式
 8 print(time.localtime(time.time()-86640)) #将时间戳转换成struct_time格式,但返回 的本地时间
 9 print(time.mktime(time.localtime())) #与time.localtime()功能相反,将struct_time格式转回成时间戳格式
10 #time.sleep(4) #sleep
11 print(time.strftime("%Y-%m-%d %H:%M:%S",time.gmtime()) ) #将struct_time格式转成指定的字符串格式
12 print(time.strptime("2016-01-28","%Y-%m-%d") ) #将字符串格式转换成struct_time格式
13
14 #datetime module
15
16 print(datetime.date.today()) #输出格式 2016-01-26
17 print(datetime.date.fromtimestamp(time.time()-864400) ) #2016-01-16 将时间戳转成日期格式
18 current_time = datetime.datetime.now() #
19 print(current_time) #输出2016-01-26 19:04:30.335935
20 print(current_time.timetuple()) #返回struct_time格式
21
22 #datetime.replace([year[, month[, day[, hour[, minute[, second[, microsecond[, tzinfo]]]]]]]])
23 print(current_time.replace(2014,9,12)) #输出2014-09-12 19:06:24.074900,返回当前时间,但指定的值将被替换
24
25 str_to_date = datetime.datetime.strptime("21/11/06 16:30", "%d/%m/%y %H:%M") #将字符串转换成日期格式
26 new_date = datetime.datetime.now() + datetime.timedelta(days=10) #比现在加10天
27 new_date = datetime.datetime.now() + datetime.timedelta(days=-10) #比现在减10天
28 new_date = datetime.datetime.now() + datetime.timedelta(hours=-10) #比现在减10小时
29 new_date = datetime.datetime.now() + datetime.timedelta(seconds=120) #比现在+120s
30 print(new_date)
5. 序列化模块json
json,用于字符串 和 python数据类型间进行转换.更加适合跨语言(一般都是字符串)
json.loads 将字符串转换为python的数据类型
json.dumps 将python的基本数据类型转换为字符串
 1 import json
 2 dic = '{"k1":1, "k2":2}'
 3 print(json.loads(dic), type(json.loads(dic)))
 4
 5 out: {'k1': 1, 'k2': 2} <class 'dict'>
 6
 7
 8
 9 dic = {'k1':1}
10 s = json.dumps(dic)
11 print(s, type(s))
12
13 out: {"k1": 1} <class 'str'>
json.load 从文件读取json数据格式的字符串,进而转换成python中的数据格式
json.dump 将json数据,写入文件
 1 import json, os
 2 li = [11, 22, 33]
 3 json.dump(li, open('write.txt', 'w'))
 4 os.system("type write.txt")
 5
 6 out: [11, 22, 33]
 7
 8
 9 LI = json.load(open('write.txt', 'r'))
10 print(LI, type(LI))
11
12 out: [11, 22, 33] <class 'list'>
pickle,用于python特有的类型和 python的数据类型间进行转换,对python复杂类型做操作,是一种持久化存储的方式。缺点:python版本之间的不同,可能会导致无法反序列化其他版本的序列化结果或文件。
pickle.loads 将bytes数据类型转换为对应的python数据类型
pickles.dumps 将python数据类型转换为bytes对象
 1 import pickle
 2 li = [11,22,33]
 3 r = pickle.dumps(li)
 4 print(r, type(r))
 5
 6 out: b'\x80\x03]q\x00(K\x0bK\x16K!e.' <class 'bytes'>
 7
 8
 9 s = pickle.loads(r)
10 print(s, type(s))
11
12 out: [11, 22, 33] <class 'list'>
pickle.load 从pickle数据格式的文件中读取数据,并转化为python数据格式。
pickles.dump 将python数据格式,存储入文件中,返回None
 1 import pickle
 2 li = [11,22,33]
 3 r = pickle.dump(li,open("write.txt",'wb'))
 4 print(r, type(r))
 5
 6 out: None <class 'NoneType'>
 7
 8 s = pickle.load(open("write.txt",'rb'), encoding='utf-8')
 9 print(s, type(s))
10
11 out: [11, 22, 33] <class 'list'>
6. logging 用于便捷记录日志且线程安全的模块
日志模块基本上是所有程序中最常用的功能, 而logging模块属于python内置的一个模块(注意,是内置哦,可以跨平台使用,可以跨平台使用,可以跨平台使用,重要的事情说三遍)。如果简单的打印日志信息到文件,使用非常简单,分为以下俩步:
1)定义文件 2)输出信息 (如果只是输出至屏幕,第一步“1”)可以省去)
 1 import logging, os
 2
 3 logging.basicConfig(filename='example.log',level=logging.INFO)
 4 logging.debug('This message should go to the log file')
 5 logging.info('So should this')
 6 logging.warning('And this, too')
 7 os.system("type example.log")
 8
 9 out:
10 INFO:root:So should this
11 WARNING:root:And this, too
上边示例代码中,其实日志等级level不是必须配置的,默认level=warning。输出不同级别的日志,只有日志等级大于或等于设置的日志级别的日志才会被输出。全部的日志级别如下:
| Level | When it’s used |
|---|---|
DEBUG | Detailed information, typically of interest only when diagnosing problems. |
INFO | Confirmation that things are working as expected. |
WARNING | An indication that something unexpected happened, or indicative of some problem in the near future (e.g. ‘disk space low’). The software is still working as expected. |
ERROR | Due to a more serious problem, the software has not been able to perform some function. |
CRITICAL | A serious error, indicating that the program itself may be unable to continue running. |
logging.basicConfig的其他配置参数:
    filename  Specifies that a FileHandler be created, using the specified
              filename, rather than a StreamHandler.#定义输出文件名
    filemode  Specifies the mode to open the file, if filename is specified
              (if filemode is unspecified, it defaults to 'a').#定义输出日志文件的打开方式,默认为append追加模式。
    format    Use the specified format string for the handler.#定义日志格式
    datefmt   Use the specified date/time format.#定义时间格式,即%(asctime)的格式
    style     If a format string is specified, use this to specify the
              type of format string (possible values '%', '{', '$', for
              %-formatting, :meth:`str.format` and :class:`string.Template`
              - defaults to '%').
    level     Set the root logger level to the specified level.#定义日志输出级别
    stream    Use the specified stream to initialize the StreamHandler. Note
              that this argument is incompatible with 'filename' - if both
              are present, 'stream' is ignored.#与finename配置项冲突,共存时此项配置忽略
    handlers  If specified, this should be an iterable of already created
              handlers, which will be added to the root handler. Any handler
              in the list which does not have a formatter assigned will be
              assigned the formatter created in this function.
其中format是最常用的一个参数,用来定义日志格式,比如:format='%(asctime)s - %(name)s - %(levelname)s -%(module)s: %(message)s'
%()s中,分别代表什么呢?看下表:(着重关注:levelname,filename, module, lineno, funcName, asctime, message)
   %(name)s            Name of the logger (logging channel)
    %(levelno)s         Numeric logging level for the message (DEBUG, INFO,
                        WARNING, ERROR, CRITICAL)
    %(levelname)s       Text logging level for the message ("DEBUG", "INFO",
                        "WARNING", "ERROR", "CRITICAL")
    %(pathname)s        Full pathname of the source file where the logging
                        call was issued (if available)
    %(filename)s        Filename portion of pathname
    %(module)s          Module (name portion of filename)
    %(lineno)d          Source line number where the logging call was issued
                        (if available)
    %(funcName)s        Function name
    %(created)f         Time when the LogRecord was created (time.time()
                        return value)
    %(asctime)s         Textual time when the LogRecord was created
    %(msecs)d           Millisecond portion of the creation time
    %(relativeCreated)d Time in milliseconds when the LogRecord was created,
                        relative to the time the logging module was loaded
                        (typically at application startup time)
    %(thread)d          Thread ID (if available)
    %(threadName)s      Thread name (if available)
    %(process)d         Process ID (if available)
    %(message)s         The result of record.getMessage(), computed just as
                        the record is emitted
案例1:将日志打印到屏幕
import logging

logging.debug('This is debug message')
logging.info('This is info message')
logging.warning('This is warning message')
logging.critical('This is critical message')
logging.error('This is error message')

out:
WARNING:root:This is warning message
CRITICAL:root:This is critical message
ERROR:root:This is error message
#上边示例中,发现只有warning级别以上的打印到屏幕,是因为默认记录level为warning的原因,上边已经说到过。
案例2:将日志同时输出到屏幕和日志
import logging

#define logfile/logformat/loglevel for file log
logging.basicConfig(level=logging.DEBUG,
                format='%(asctime)s %(filename)s[line:%(lineno)d] %(levelname)s %(message)s',
                datefmt='%a, %d %b %Y %H:%M:%S',
                filename='example.log',
                filemode='w')

#create logger obj
logger = logging.getLogger('CURRENT-USER')
logger.setLevel(logging.DEBUG)

#create console handler and set level to INFO
ch = logging.StreamHandler()
ch.setLevel(logging.INFO)

# define log format for console log
formatter = logging.Formatter('%(asctime)s - %(name)s - %(levelname)s - %(message)s')
ch.setFormatter(formatter)

# add console handle to logger obj
logger.addHandler(ch)

logger.debug('This is debug message')
logger.info('This is info message')
logger.warning('This is warning message')
logger.critical('This is critical message')
logger.error('This is error message')
最终终端展示:
2016-06-08 16:26:50,007 - CURRENT-USER - INFO - This is info message
2016-06-08 16:26:50,007 - CURRENT-USER - WARNING - This is warning message
2016-06-08 16:26:50,007 - CURRENT-USER - CRITICAL - This is critical message
2016-06-08 16:26:50,010 - CURRENT-USER - ERROR - This is error message
最终文件内容:
Wed, 08 Jun 2016 16:30:35 practice3.py[line:183] DEBUG This is debug message
Wed, 08 Jun 2016 16:30:35 practice3.py[line:184] INFO This is info message
Wed, 08 Jun 2016 16:30:35 practice3.py[line:185] WARNING This is warning message
Wed, 08 Jun 2016 16:30:35 practice3.py[line:186] CRITICAL This is critical message
Wed, 08 Jun 2016 16:30:35 practice3.py[line:187] ERROR This is error message
案例3:设置log rotate(TimedRotatingFileHandler和RotatingFileHandler)
无论是TimedRotatingFileHandler还是RotatingFileHandler,都是继承自logging.FileHandler。
#定义一个RotatingFileHandler,最多备份5个日志文件,每个日志文件最大238byte
Rthandler = RotatingFileHandler('example.log', maxBytes=238,backupCount=5)
Rthandler.setLevel(logging.INFO)
formatter = logging.Formatter('%(asctime)s %(filename)s[line:%(lineno)d] %(levelname)s %(message)s')
Rthandler.setFormatter(formatter)
logging.getLogger('').addHandler(Rthandler)

logging.debug('This is debug message')
logging.info('This is info message')
logging.warning('This is warning message')
logging.critical('This is critical message')
logging.error('This is error message')
更多的用法,参照http://www.cnblogs.com/dkblog/archive/2011/08/26/2155018.html
PS. 还有一个日志的第三方模块,syslog感觉没有logging好用,关键不支持跨平台操作(windows就不可以)。所以这里不作过多说明。
7. 加密模块hashlib
由于只是简单使用hashlib.md5() , hashlib.sha1() , hashlib.sha256() , hashlib.sha384() , hashlib.sha512() 的话,可以通过撞库的方式进行反解,因此有必要对加密算法中添加自定义key再来做加密,即加盐。以sha512加盐加密为例,其余的使用方法一样。
1 import hashlib
2
3 hash = hashlib.sha512('nihao'.encode('utf-8'))
4 hash.update('123'.encode("utf-8"))
5 print(hash.hexdigest())
6
7 out: 480ad41a6a159cba1811ccac4561845816e9a488cc992b0979a73065560e6a30f34a1f1a051c7044ae7d636df0327cc4f3bb7f54e129e4d76688f389394c257c
Ps: 需要额外注意,python在所有平台上都可以使用的加密算法如下:
>>> hashlib.algorithms_guaranteed
{'sha224', 'sha512', 'sha256', 'sha384', 'sha1', 'md5'}
8. 签名算法hmac
hmac主要应用在身份验证中,它的使用方法是这样的:
1. 客户端发出登录请求(假设是浏览器的GET请求)
2. 服务器返回一个随机值,并在会话中记录这个随机值
3. 客户端将该随机值作为密钥,用户密码进行hmac运算,然后提交给服务器
4. 服务器读取用户数据库中的用户密码和步骤2中发送的随机值做与客户端一样的hmac运算,然后与用户发送的结果比较,如果结果一致则验证用户合法
在这个过程中,可能遭到安全攻击的是服务器发送的随机值和用户发送的hmac结果,而对于截获了这两个值的黑客而言这两个值是没有意义的,绝无获取用户密码的可能性,随机值的引入使hmac只在当前会话中有效,大大增强了安全性和实用性
1 import hmac
2 myhmac = hmac.new(b'suijizhi')
3 myhmac.update(b'mypassword')
4 print(myhmac.hexdigest())
5
6 out: 7b6a9485f5b1f513d6d55b24642db70c
扩展阅读:哈希长度扩展攻击解析
科普哈希长度扩展攻击(Hash Length Extension Attacks)_百度安全论坛
9. re模块
1)re.match(pattern, string, flags=0) 从起始位置开始根据模型去字符串中匹配指定内容,匹配单个.起始位置不匹配,则返回None
- 第一个参数是正则表达式,如果匹配成功,则返回一个Match,否则返回一个None;
- 第二个参数表示要匹配的字符串;
- 第三个参数是标识位,用于控制正则表达式的匹配方式,如:是否区分大小写,多行匹配等等。
# 标志位如下
I = IGNORECASE = sre_compile.SRE_FLAG_IGNORECASE # ignore case
L = LOCALE = sre_compile.SRE_FLAG_LOCALE # assume current 8-bit locale
U = UNICODE = sre_compile.SRE_FLAG_UNICODE # assume unicode locale
M = MULTILINE = sre_compile.SRE_FLAG_MULTILINE # make anchors look for newline
S = DOTALL = sre_compile.SRE_FLAG_DOTALL # make dot match newline
X = VERBOSE = sre_compile.SRE_FLAG_VERBOSE # ignore whitespace and comments
案例:
import re
# 匹配第一个单词
text = "JGood is a handsome boy, he is cool, clever, and so on..."
m = re.match(r"(\w+)\s", text)
print(m)
print(m.group())
print(m.group(0))
print(m.group(1))

out:
<_sre.SRE_Match object; span=(0, 6), match='JGood '>
JGood_   # _表示空格
JGood_
JGood
从上面结果可以看出, m.group() = m.group(0) = m.group(1) + '\s'
2) re.search(pattern, string, flags=0) 在字符串内查找模式匹配,匹配单个,只到找到第一个匹配然后返回,如果字符串没有匹配,则返回None。
text = "JGood is a handsome boy, he is cool, clever, and so on..."
m = re.search(r"\w{8}\s", text)
print(m)
print(m.group())
print(m.group(0))

out:
<_sre.SRE_Match object; span=(11, 20), match='handsome '>
handsome_    # _表示空格
handsome_
3)从上边的print(m) 可以看到,匹配结果返回一个 SRE_Match object,下面讲讲这个Object 的几个常用方法:
group([group1,…])
返回匹配到的一个或者多个子组。如果是一个参数,那么结果就是一个字符串,如果是多个参数,那么结果就是一个参数一个item的元组。group1的默认等于0(即返回所有的匹配值).如果groupN参数为0,相对应的返回值就是全部匹配的字符串,如果group1的值是[1…99]范围之内的,那么 将匹配对应括号组的字符串。如果组号是负的或者比pattern中定义的组号大,那么将抛出IndexError异常。如果pattern没有匹配到,但是group匹配到了,那么group的值也为None。如果一个pattern可以匹配多个,那么组对应的是样式匹配的最后一个。另外,子组是根据括号从左向右来进行区分的。
groups([default])
返回一个包含所有子组的元组。Default是用来设置没有匹配到组的默认值的。Default默认是"None”。
groupdict([default])
返回匹配到的所有命名子组的字典。Key是name值,value是匹配到的值。参数default是没有匹配到的子组的默认值。这里与groups()方法的参数是一样的。默认值为None
4)findall(pattern, string, flags=0) 获取字符串中所有匹配的字符串
1 text = "JGood is a handsome boy, he is cool, clever, and so on..."
2 obj = re.findall('\wo{2}\w', text)
3 print(obj)
4
5 out: ['Good', 'cool']
5) re.sub(pattern, repl, string, count=0, flags=0) re.sub用于替换字符串中的匹配项。
1 text = "JGood is a handsome boy, he is cool, clever, and so on..."
2 obj = re.sub(r'\s+', '-', text)  # 将空格替换成“-”
3 print(obj)
4
5 out:
6 JGood-is-a-handsome-boy,-he-is-cool,-clever,-and-so-on...
6)re.split(pattern, string, maxsplit=0, flags=0) 根据指定匹配进行分组
1 text = "JGood is a handsome boy, he is cool, clever, and so on..."
2 obj = re.split(r'\s+', text) #以空格为分隔符进行切分
3 print(obj)
4
5 out:
6 ['JGood', 'is', 'a', 'handsome', 'boy,', 'he', 'is', 'cool,', 'clever,', 'and', 'so', 'on...']
7) re.compile(pattern, flags=0) 可以把正则表达式编译成一个正则表达式对象。可以把那些经常使用的正则表达式编译成正则表达式对象,这样可以提高一定的效率
 1 import re
 2
 3 text = "JGood is a handsome boy, he is cool, clever, and so on..."
 4 regex = re.compile(r'\w*oo\w*')
 5 print(regex.findall(text)) #查找所有包含'oo'的单词
 6 print(regex.sub(lambda m: '[' + m.group(0) + ']', text)) #将字符串中含有'oo'的单词用[]括起来。
 7
 8 out:
 9 ['JGood', 'cool']
10 [JGood] is a handsome boy, he is [cool], clever, and so on...
10. configparser 处理特定格式的文件,其本质上是利用open来操作文件
1)声明1:文件格式如下:
[section1] # 节点1
k1 = v1    # 值1
k2:v2       # 值2

[section2] # 节点2
k1 = v1    # 值1
声明2:configparser取出的值,默认都为str类型,因此存储的时候也要传入str类型的参数。如果希望取出的值为其他类型,可以通过如下方式进行转换
config.getint(setion_name, key_name) , config.getfloat(setion_name, key_name), config.getboolean(setion_name, key_name)
2)获取所有的节点section : config.sections() 返回值是一个list
3)获取指定节点下键值对 : config.items(section_name)
4)获取指定节点下所有的key : config.options(section_name)
5)获取指定节点下指定的key : config.get(section_name, key_name)
6)检查、删除、增加节点 :
config.has_section(section_name)
config.remove_section(section_name)
config.add_section(section_name)
7)检查、删除、设置指定section中的键值 :
config.has_option(section_name, key_name)
config.remove_option(section_name, key_name)
config.set(section_name, key_name, value)
11. XML处理模块:xml
用途:1. 页面上做展示 2.配置文件
存储方式:1.文件
2.内部数据XML格式
1)解析XML
解析XML有两种方式,第一种是直接解析,就是直接将xml文件,加载到内存,解析为xml对象。
第二种是间接解析,就是将xml通过open函数读入内存,然后将读出的str类型数据,解析为xml对象。
测试数据如下:
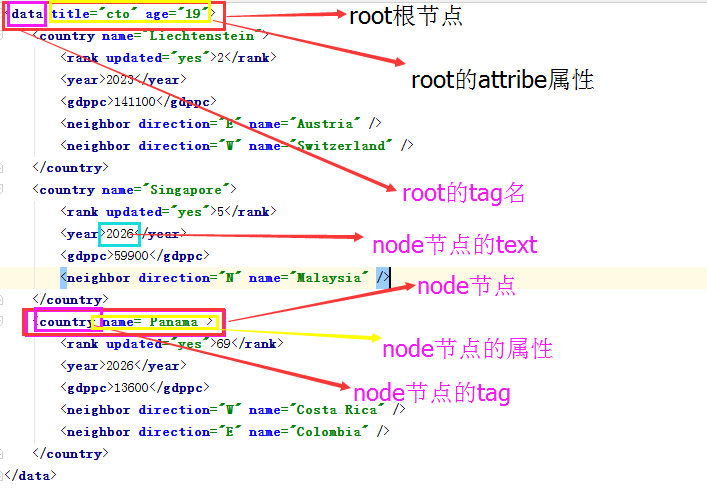
# filename : example.xml
<data>
    <country name="Liechtenstein">
        <rank updated="yes">2</rank>
        <year>2023</year>
        <gdppc>141100</gdppc>
        <neighbor direction="E" name="Austria" />
        <neighbor direction="W" name="Switzerland" />
    </country>
    <country name="Singapore">
        <rank updated="yes">5</rank>
        <year>2026</year>
        <gdppc>59900</gdppc>
        <neighbor direction="N" name="Malaysia" />
    </country>
    <country name="Panama">
        <rank updated="yes">69</rank>
        <year>2026</year>
        <gdppc>13600</gdppc>
        <neighbor direction="W" name="Costa Rica" />
        <neighbor direction="E" name="Colombia" />
    </country>
</data>
结构分析图:
直接解析
from xml.etree import ElementTree as ET

# 直接解析XML
# ElementTree 类型具有将内存中xml数据写入文件的属性,而Element不具备
tree = ET.parse("example.xml")
root = tree.getroot()
print(root)

out: <Element 'data' at 0x0000000000A56138>
间接解析
from xml.etree import ElementTree as ET

str_xml = open('example.xml', 'r').read()
root = ET.XML(str_xml)
print(root)

out: <Element 'data' at 0x0000000000C37818>
2)遍历XML文档中的所有内容
from xml.etree import ElementTree as ET
tree = ET.parse("example.xml")
root = tree.getroot()

for child in root:
    print(child, child.tag, child.attrib)
    for gradechild in child:
        print(gradechild, gradechild.tag, gradechild.text, gradechild.attrib, )

out: <Element 'country' at 0x0000000000E03AE8> country {'name': 'Liechtenstein'}
<Element 'rank' at 0x0000000000E18318> rank 2 {'updated': 'yes'}
<Element 'year' at 0x0000000000E18368> year 2023 {}
<Element 'gdppc' at 0x0000000000E183B8> gdppc 141100 {}
<Element 'neighbor' at 0x0000000000E18408> neighbor None {'direction': 'E', 'name': 'Austria'}
<Element 'neighbor' at 0x0000000000E18458> neighbor None {'direction': 'W', 'name': 'Switzerland'}
<Element 'country' at 0x0000000000E184A8> country {'name': 'Singapore'}
<Element 'rank' at 0x0000000000E184F8> rank 5 {'updated': 'yes'}
<Element 'year' at 0x0000000000E18548> year 2026 {}
<Element 'gdppc' at 0x0000000000E18598> gdppc 59900 {}
<Element 'neighbor' at 0x0000000000E185E8> neighbor None {'direction': 'N', 'name': 'Malaysia'}
<Element 'country' at 0x0000000000E18638> country {'name': 'Panama'}
<Element 'rank' at 0x0000000000E18688> rank 69 {'updated': 'yes'}
<Element 'year' at 0x0000000000E186D8> year 2026 {}
<Element 'gdppc' at 0x0000000000E18728> gdppc 13600 {}
<Element 'neighbor' at 0x0000000000E18778> neighbor None {'direction': 'W', 'name': 'Costa Rica'}
<Element 'neighbor' at 0x0000000000E187C8> neighbor None {'direction': 'E', 'name': 'Colombia'}
遍历XML某个节点的所有内容
from xml.etree import ElementTree as ET

str_xml = open('example.xml', 'r').read()
root = ET.XML(str_xml)

for node in root.iter('year'): # 去所有子和子孙节点中,找寻year节点
    print(node.tag, node.text)

out:
year 2023
year 2026
year 2026
3)修改节点内容
from xml.etree import ElementTree as ET
# 打开文件,读取XML内容
str_xml = open('example.xml', 'r').read()

# 将字符串解析成xml特殊对象,root代指xml文件的根节点
root = ET.XML(str_xml)

############ 操作 ############

# 顶层标签
print(root.tag)

# 循环所有的year节点
for node in root.iter('year'):
    # 将year节点中的内容自增一
    new_year = int(node.text) + 1
    node.text = str(new_year)

    # 设置属性
    node.set('name', 'alex')
    node.set('age', '18')
    # 删除属性
    del node.attrib['name']


############ 保存文件 ############
tree = ET.ElementTree(root)
tree.write("test3.xml", encoding='utf-8')
删除节点
# 直接解析xml文件
tree = ET.parse("example.xml")

# 获取xml文件的根节点
root = tree.getroot()

############ 操作 ############

# 顶层标签
print(root.tag)

# 遍历data下的所有country节点
for country in root.findall('country'):
    # 获取每一个country节点下rank节点的内容
    rank = int(country.find('rank').text)

    if rank > 50:
        # 删除指定country节点
        root.remove(country)

############ 保存文件 ############
tree.write("test-delnode.xml", encoding='utf-8')
在原xml基础上创建节点
from xml.etree import ElementTree as ET
tree = ET.parse("example.xml")
root = tree.getroot()

# ele = ET.Element()
ele = ET.Element('test', {'k1': 'v1'})
ele.text = "内容"
# 在无text内容的时候,采用自闭合标签,即<test k1='v1' />
# def __init__(self, tag, attrib={}, **extra):
root.append(ele)
tree.write('createxml.xml', encoding='utf-8')
4)创建XML文档
4.1) 方式1:嫁接的方式生成XML文档。即先生成子孙,然后将子孙嫁接到root部位,最后保存,完成整个创建工作
from xml.etree import ElementTree as ET
# 创建根节点
root = ET.Element("family")

# 创建节点大儿子
son1 = ET.Element('son', {'name': 'lisi'})
# 创建节点小儿子
son2 = ET.Element('son', {'name': 'zhangsan'})

# 在大儿子中创建两个孙子
grandson1 = ET.Element('grandson', {'name': 'wangwu'})
grandson2 = ET.Element('grandson', {'name': 'maliu'})

# 把孙子添加到父亲节点中
son1.append(grandson1)
son2.append(grandson2)
# 把父亲添加到爷爷节点中
root.append(son1)
root.append(son2)

# 将爷爷节点转换为Etree类型
tree = ET.ElementTree(root)
# 默认情况下write,会保存为一行,没有缩进
# tree.write("create_new_xml.xml", encoding='utf-8')
tree.write("create_new_xml.xml", encoding='GBK', xml_declaration=True, short_empty_elements=False)
# short_empty_elements = True表示开启自封闭标签,False表示关闭自封闭标签
# xml_declaration = None时,如果为US-ASCII 或者UTF-8则不添加声明,其他编码格式添加声明。如果为True则永远添加声明.False关闭添加声明
创建结果如下:
<?xml version='1.0' encoding='GBK'?>
<family><son name="lisi"><grandson name="wangwu"></grandson></son><son name="zhangsan"><grandson name="maliu"></grandson></son></family>
可以看到,利用原生的XML保存文件时,默认没有缩进。因此需要修改保存方式
def prettify(elem):
    """将节点转换成字符串,并添加缩进。
    """
    rough_string = ET.tostring(elem, 'utf-8')
    reparsed = minidom.parseString(rough_string)
    return reparsed.toprettyxml(indent="\t")

from xml.dom import minidom
from xml.etree import ElementTree as ET
# 创建根节点
root = ET.Element("family")

# 创建节点大儿子
son1 = ET.Element('son', {'name': 'lisi'})
# 创建节点小儿子
son2 = ET.Element('son', {'name': 'zhangsan'})

# 在大儿子中创建两个孙子
grandson1 = ET.Element('grandson', {'name': 'wangwu'})
grandson2 = ET.Element('grandson', {'name': 'maliu'})

# 把孙子添加到父亲节点中
son1.append(grandson1)
son2.append(grandson2)
# 把父亲添加到爷爷节点中
root.append(son1)
root.append(son2)

raw_str = prettify(root)
f = open("create_new_xml.xml",'w',encoding='utf-8')
f.write(raw_str)
f.close()
4.2)方式2:开枝散叶的方式生成XML文档。即子孙由root开始,长出son,再基于son长出grandson,依次生长,最后保存,完成整个创建工作。
from xml.etree import ElementTree as ET

# 创建根节点
root = ET.Element("famliy")


# 创建大儿子
# son1 = ET.Element('son', {'name': '儿1'})
son1 = root.makeelement('son', {'name': '儿1'})
# 创建小儿子
# son2 = ET.Element('son', {"name": '儿2'})
son2 = root.makeelement('son', {"name": '儿2'})

# 在大儿子中创建两个孙子
# grandson1 = ET.Element('grandson', {'name': '儿11'})
grandson1 = son1.makeelement('grandson', {'name': '儿11'})
# grandson2 = ET.Element('grandson', {'name': '儿12'})
grandson2 = son1.makeelement('grandson', {'name': '儿12'})

son1.append(grandson1)
son1.append(grandson2)


# 把儿子添加到根节点中
root.append(son1)
root.append(son1)

tree = ET.ElementTree(root)
tree.write('oooo.xml',encoding='utf-8', short_empty_elements=False)
4.3)方式3:以拼凑的方式生成XML文档。即以某个节点为准,直接插入对应节点的子节点位置。
from xml.etree import ElementTree as ET


# 创建根节点
root = ET.Element("famliy")


# 创建节点大儿子
son1 = ET.SubElement(root, "son", attrib={'name': '儿1'})
# 创建小儿子
son2 = ET.SubElement(root, "son", attrib={"name": "儿2"})

# 在大儿子中创建一个孙子
grandson1 = ET.SubElement(son1, "age", attrib={'name': '儿11'})
grandson1.text = '孙子'


et = ET.ElementTree(root)  #生成文档对象
et.write("test.xml", encoding="utf-8", xml_declaration=True, short_empty_elements=False)
5)命名空间:暂时没用到,用到了再说!
参考链接: http://www.w3school.com.cn/xml/xml_namespaces.asp
12. shutil 模块以及压缩包处理
1)将文件内容拷贝到另一个文件中
1 import shutil
2 shutil.copyfileobj(open('old.txt','r'), open('new.txt', 'w'))
2)拷贝文件
shutil.copyfile('old.txt', 'new.txt')
3)仅拷贝权限。内容、组、用户均不变
shutil.copymode('old.txt', 'new.txt')
4)仅拷贝状态的信息,包括:mode bits, atime, mtime, flags
shutil.copystat('old.txt', 'new.txt')
5)拷贝文件和权限
shutil.copy('old.txt', 'new.txt')
6)拷贝文件和状态信息
shutil.copy2('old.txt', 'new.txt')
7)递归的去拷贝文件夹
shutil.copytree('folder1', 'folder2', ignore=shutil.ignore_patterns('*.pyc', 'tmp*'))
8)递归的去删除文件夹
shutil.rmtree('folder1')
shutil模块对于压缩包的处理很弱,因此选用其他模块来处理压缩包。这里介绍zipfile和tarfile两个模块。
13. zipfile和tarfile
import zipfile

# 压缩。 压缩之后源文件不消失
z = zipfile.ZipFile('test.zip', 'w')
# w表示创建新的,a表示追加
z.write('file_1.log') # file必须存在,否则会报错FileNotFoundError
z.write('file_2.txt')
z.close()

# 解压
z = zipfile.ZipFile('test.zip', 'r')
# 查看压缩包中文件名列表
print(z.namelist())
# 解压单个文件
z.extract('file_1.log')
# 解压全部文件
z.extractall()
z.close()
# 压缩
tar = tarfile.open('test.tar','w')
tar.add('file_1.log', arcname='bbs2.log') # 压缩后可改变压缩名
tar.add('file_2.txt') # 不写arcname的话,文件名保持不变
tar.close()

# 解压
tar = tarfile.open('test.tar','r')
# 获取压缩文件的文件名列表
print(tar.getnames())
# 解压单个文件
tar.extract("file_2.txt")
# 解压全部文件
tar.extractall()  # 可设置解压地址,默认为当前目录
tar.close()
14. subprocess 执行命令
在执行一些Linux系统命令的时候,有多种方式:比如os.system(command) , os.popen(commond).read(), commands.getstatusoutput(command) 等方法。以上执行shell命令的相关的模块和函数的功能均在 subprocess 模块中实现,并提供了更丰富的功能。
subprocess包中定义有数个创建子进程的函数,这些函数分别以不同的方式创建子进程,所以我们可以根据需要来从中选取一个使用。另外subprocess还提供了一些管理标准流(standard stream)和管道(pipe)的工具,从而在进程间使用文本通信。
1)subprocess.call() 执行命令,返回状态码,相当于return exit_code
retcode = subprocess.call(["ls", "-l"], shell=False)
retcode = subprocess.call("ls -l", shell=True)
为什么用shell=True:
shell=False时,该方法的执行是以os.execvp(file, args)来执行的,如果接收一个列表或元组,则列表第一个元素当做命令,之后的当做参数进行执行。如果接收一个字符串,则认为该字符串是一个可执行文件的文件名,会执行该文件,文件不存在报:OSError: [Errno 2] No such file or directory
我们使用了shell=True这个参数。Python将先运行一个shell,再用这个shell来解释这整个字符串。shell命令中有一些是shell的内建命令,这些命令必须通过shell运行,$cd。shell=True允许我们运行这样一些命令。
2)subprocess.check_call() 执行命令,如果执行状态码是0,可以取到返回的状态码,否则报出错误subprocess.CalledProcessError(returncode, cmd, output=None, stderr=None),该对象包含有returncode属性
subprocess.check_call(["ls", "-l"], shell=False)
subprocess.check_call("ls -l", shell=True)
import subprocess
b = subprocess.CalledProcessError
try:
subprocess.check_call('fff', shell=True)
except b:
print b
out:/bin/sh: fff: command not found
Command 'fff' returned non-zero exit status 127
3)subprocess.check_output() 执行命令,如果执行状态码是 0 ,则返回执行结果,且return值存在,如果return code不为0,则举出错误subprocess.CalledProcessError,该对象包含有returncode属性和output属性,output属性为标准输出的输出结果。
retinfo = subprocess.check_output(["ls", "-l"], shell=False)
retinfo = subprocess.check_output("ls -l", shell=True)
上述的三个方法,本质上都是调用了subprocess.Popen()方法。
4)subprocess.Popen(self, args, bufsize=-1, executable=None,stdin=None, stdout=None, stderr=None,preexec_fn=None, lose_fds=_PLATFORM_DEFAULT_CLOSE_FDS,shell=False, cwd=None, env=None, universal_newlines=False,startupinfo=None, creationflags=0,restore_signals=True, start_new_session=False,pass_fds=()) 用户执行复杂的命令
参数:
args:shell命令,可以是字符串或者序列类型(如:list,元组)
bufsize:指定缓冲。0 无缓冲,1 行缓冲,其他 缓冲区大小,负值 系统缓冲
stdin, stdout, stderr:分别表示程序的标准输入、输出、错误句柄
preexec_fn:只在Unix平台下有效,用于指定一个可执行对象(callable object),它将在子进程运行之前被调用
close_sfs:在windows平台下,如果close_fds被设置为True,则新创建的子进程将不会继承父进程的输入、输出、错误管道。
所以不能将close_fds设置为True同时重定向子进程的标准输入、输出与错误(stdin, stdout, stderr)。
shell:同上
cwd:用于设置子进程的当前目录
env:用于指定子进程的环境变量。如果env = None,子进程的环境变量将从父进程中继承。
universal_newlines:不同系统的换行符不同,True -> 同意使用 \n
startupinfo与createionflags只在windows下有效。将被传递给底层的CreateProcess()函数,用于设置子进程的一些属性,如:主窗口的外观,进程的优先级等等
import subprocess
ret1 = subprocess.Popen(["mkdir","t1"])
ret2 = subprocess.Popen("mkdir t2", shell=True)
终端输入的命令分为两种:
- 输入即可得到输出,如:ifconfig
- 输入进行某环境,依赖再输入,如:python
情景1:输入后即刻得到输出
import subprocess

obj = subprocess.Popen("mkdir t3", shell=True, cwd='/home/dev',)
情景2:输入进行某环境,依赖再输入
import subprocess

obj = subprocess.Popen(["python3"],
                        stdin=subprocess.PIPE,
                        stdout=subprocess.PIPE,
                        stderr=subprocess.PIPE,
                        universal_newlines=True)
obj.stdin.write("print(1)\n")
obj.stdin.write("print(2)")
obj.stdin.close()

cmd_out = obj.stdout.read()
obj.stdout.close()
cmd_error = obj.stderr.read()
obj.stderr.close()

print(cmd_out)
print(cmd_error)
import subprocess

obj = subprocess.Popen(["python"], stdin=subprocess.PIPE, stdout=subprocess.PIPE, stderr=subprocess.PIPE, universal_newlines=True)
obj.stdin.write("print(1)\n")
obj.stdin.write("print(2)")

out_error_list = obj.communicate()
print(out_error_list)
# out_error_list = (stdout, stderr)
import subprocess

obj = subprocess.Popen(["python"], stdin=subprocess.PIPE, stdout=subprocess.PIPE, stderr=subprocess.PIPE, universal_newlines=True)
out_error_list = obj.communicate('print("hello")')
print(out_error_list)
# if self.universal_newlines is True, this should be a string; if it is False, "input" should be bytes.
# universal_newlines=True表示以text的方式打开stdout和stderr。


 888
888


 被折叠的 条评论
为什么被折叠?
被折叠的 条评论
为什么被折叠?
 到【灌水乐园】发言


